Coming Soon: Outlook for Android support for Android 10 device password complexity

Coming Soon: Outlook for Android support for Android 10 device password complexity

This article is contributed. See the original author and article here.

At the end of August, Outlook for Android will roll out support for the new device password complexity functionality included within Android 10 and later.

With each operating system version release, Google includes new APIs in which apps can target for supporting new functionality offered in the operating system release. Until apps target those APIs, they are not able to take advantage of that functionality. When Google announced Android 10 and its latest API (API 29), they also announced deprecation of Device Admin. Prior to targeting Android 10, Outlook for Android used Device Admin to manage device password settings defined in an Exchange mobile device mailbox policy; for more information see, Managing Outlook for iOS and Android in Exchange Online.

With Outlook for Android targeting Android 10, when a user launches Outlook on Android 10 and later devices, Outlook queries the device’s (or the work profile’s) screen lock complexity. Android 10’s password complexity levels are defined as:


Password complexity level

Password requirements

None

No password requirements are configured

Low

Password can be a pattern or a PIN with either repeating (4444) or ordered (1234, 4321, 2468) sequences

Medium

Passwords that meet one of the following criteria:

– PIN with no repeating (4444) or ordered (1234, 4321, 2468) sequences with a minimum length of 4 characters 
– Alphabetic passwords with a minimum length of 4 characters
– Alphanumeric passwords with a minimum length of 4 characters

High

Passwords that meet one of the following criteria:

– PIN with no repeating (4444) or ordered (1234, 4321, 2468) sequences with a minimum length of 8 characters
– Alphabetic passwords with a minimum length of 6 characters
– Alphanumeric passwords with a minimum length of 6 characters


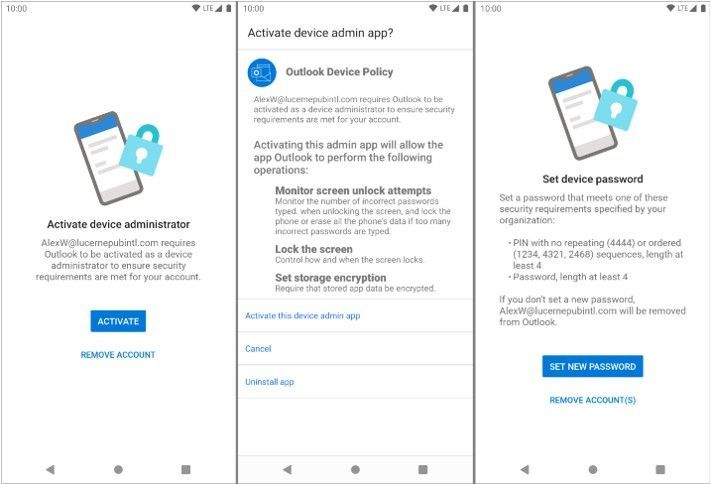
If Android determines that Outlook requires a stronger screen lock, then Outlook directs the user to the system screen lock settings, allowing the user to update the security settings to become compliant:


OLAndroid10PWD.jpg


At no time is Outlook aware of the user’s password; the app is only aware of the password complexity level.

The specific password complexity criteria and conversion logic used for translating Exchange mobile mailbox device policy password settings to Android 10 password complexity levels is below, but is also documented in Mobile device mailbox policies in Exchange Online:


Mobile device mailbox policy setting

Android password complexity level

Password enabled = false

None

Allow simple password = true
Min password length < 4

Low

Allow simple password = true
Min password length < 6

Medium

Allow simple password = false
Alphanumeric password required = true
Min password length < 6

Medium

Allow simple password = true
Min password

High

Allow simple password = false
Alphanumeric password required = true
Min password length >= 6

High


The change associated with Android 10 will go into effect immediately once the version of Outlook for Android that targets Android 10 is updated at the end of August. For devices that are not upgraded to Android 10 (Android 9 and below), Device Admin will continue to be in use for managing the device’s password and there are no changes to Outlook’s use of Device Admin from a user experience perspective. 

What do I need to do to prepare for this change? 

There is nothing you need to prepare for this change. This may be a good time to review your current password policies for mobile devices and mobile apps. Our recommendation is to consult with your Microsoft account team on the right security solution for your organization. Depending on whether your devices are company owned or BYOD, the recommendation will vary. Our recommendation is that administrators do not rely on Exchange mobile device mailbox policies, but instead use a mobile management solution such as Microsoft Intune to set access requirement conditions appropriate for your organization. To learn more visit https://aka.ms/startoutlookmobile

We also recommend that your users upgrade to the latest version of Android that is supported on your users’ phones and tablets. 

Additional resources

Ross Smith IV

Friday Five: Project Cortex, ASP.NET MVC, And More!

Friday Five: Project Cortex, ASP.NET MVC, And More!

This article is contributed. See the original author and article here.

image.png

ASP.NET MVC: CRUD OPERATIONS FOR FULL CALENDAR JQUERY PLUGIN

Asma Khalid is an Entrepreneur, ISV, Product Manager, Full Stack .Net Expert, Community Speaker, Contributor, and Aspiring YouTuber. Asma counts more than 7 years of hands-on experience in Leading, Developing & Managing IT related projects and products as an IT industry professional. Asma is the first woman from Pakistan to receive the MVP award three times, and the first to receive C-sharp corner online developer community MVP award four times. See her blog here.

image.png

Deploy WordPress on Azure Kubernetes Service

Dave Rendón has been a Microsoft Azure MVP for 6 consecutive years. As an IT professional with more than 10 years of experience, he has a strong focus on Microsoft technologies and moreover on Azure since 2010. He supports the business developers and sales teams at Kemp from a technical level. I also support the account managers by developing a firm understanding of their customer’s technical dilemma(s) and providing a sound technical solution. Follow him on Twitter: @DaveRndn

image.png

Building microservices through Event Driven Architecture part 12: Continuous Integration

Gora Leye is a Solutions Architect, Technical Expert and Devoper based in Paris. He works predominantly in Microsoft stacks: Dotnet, Dotnet Core, Azure, Azure Active Directory/Graph, VSTS, Docker, Kubernetes, and software quality. Gora has a mastery of technical tests (unit tests, integration tests, acceptance tests, and user interface tests). Follow him on Twitter @logcorner.

image.png

#Microsoft Windows Admin Center and Azure Backup Management #WAC #Azure

James van den Berg has been working in ICT with Microsoft Technology since 1987. He works for the largest educational institution in the Netherlands as an ICT Specialist, managing datacenters for students. He’s proud to have been a Cloud and Datacenter Management since 2011, and a Microsoft Azure Advisor for the community since February this year. In July 2013, James started his own ICT consultancy firm called HybridCloud4You, which is all about transforming datacenters with Microsoft Hybrid Cloud, Azure, AzureStack, Containers, and Analytics like Microsoft OMS Hybrid IT Management. Follow him on Twitter @JamesvandenBerg and on his blog here.

marjin.jpg

How can you prepare for Project Cortex?

Marijn Somers is an MVP for Office Apps and Services who has been active in various roles to help clients deliver successful collaboration and content management solutions for more than 14 years. These roles include project manager, presales engineer, evangelist, SPOC (Single-Point-Of-Contact), trainer, analyst and administrator. Marjin is the founder and owner of Balestra, an outfit which focuses on Microsoft Office 365 and specializes in governance and user adoption for collaboration and document management. Follow him on Twitter @MarjinSomers

To Do is now integrated with the Microsoft 365 suite of applications

To Do is now integrated with the Microsoft 365 suite of applications

This article is contributed. See the original author and article here.

Digital clutter is an ever-increasing challenge. It’s one of the reasons why modern life feels so busy and chaotic. Microsoft To Do is committed to providing a complete task management solution that keeps people at the center. To Do helps people focus on and keep track of what matters, in work and in life. Our 3 key promises are: 1) collect tasks from different sources, 2) show urgent and important tasks, and 3) help users complete them (coming soon).


To fulfil our first promise, we’re integrating To Do with the Microsoft 365 suite of applications and making it available in key user workflows. Following up on the full Outlook/To Do integration, Tasks in Teams is rolling out this August. With this launch, To Do is now available in Microsoft Teams .

To Do is already integrated with Planner – tasks assigned to you in Planner boards show up in the “Assigned to you” list. To Do is also available in Microsoft Launcher and any task added via Cortana gets added to To Do. By Q121, we will support @mentions in Excel, Word, and PowerPoint, which means that whenever someone @mentions you, the tasks you’re mentioned in will automatically appear in your “Assigned to you” smart list. We’re also working on adding your reading lists from Edge as tasks. More integrations are on the way to make To Do the place for all your tasks.


Tasks in Teams provide consolidated view of your To Do and Planner tasksTasks in Teams provide consolidated view of your To Do and Planner tasks


To Do is much more than a to-do list organizer. It’s an intelligent fabric that collects and connects tasks across the Microsoft 365 suite of applications. For example, the Insights add-in program for Outlook extracts important commitments or follow-ups from your Outlook  messages and, with a click, adds them to To Do. In addition, the My Day smart list has task suggestions collected from across Microsoft 365 to help you prioritize and complete important tasks for your day. Moreover, you can also share lists with coworkers to get more done together. You can easily switch to your personal account and organize your tasks outside of work.


To Do is built on the Microsoft Exchange platform, and it meets all security and privacy standards by design like your Outlook inbox. Organization admins can easily grant or remove access to To Do for their employees. We imagine a future where all your tasks in Microsoft 365 apps are collected automatically in To Do so you can focus on what matters and save time every day.

To Do complies with information governance and eDiscovery features of Office 365To Do complies with information governance and eDiscovery features of Office 365


We’ll post updates just like this on the Tech Community blog to let you know about new features that you can try  in To Do. Check back here for regular posts and check out our Release Notes for more information about updates and fixes. In the meantime, we want to hear from you! Tell us what you think about the Teams integration and let us know what you’re looking forward to next via UserVoice or write to us (todofeedback@microsoft.com).


HDInsight Managed Kafka with Confluent Kafka Schema Registry

HDInsight Managed Kafka with Confluent Kafka Schema Registry

This article is contributed. See the original author and article here.

Kafka Schema Registry provides serializers that plug into Kafka clients that handle message schema storage and retrieval for Kafka messages that are sent in the Avro format. Its used to be a OSS project by Confluent , but is now under the Confluent community license . The Schema Registry additionally serves the below purposes

  • Store and retrieve schemas for producers and consumers
  • Enforce backward/forward /full compatibility on Topics
  • Decrease the size of the payload sent to Kafka

In an HDInsight Managed Kafka cluster the Schema Registry is typically deployed on an Edge node to allow compute separation from Head Nodes.

Below is a representative architecture of how the Schema Registry is deployed on an HDInsight cluster. Note that Schema Registry natively exposes a REST API for operations on it. Producers and consumers can interact with the Schema Registry from within the VNet or using the Kafka REST Proxy.

Pic1.png


Deploy a HDInsight Managed Kafka with Confluent Schema Registry

In this section we would deploy an HDInsight Managed Kafka cluster with an Edge Node inside a Virtual Network and then install the Confluent Schema Registry on the Edge Node.

  • Click on the Deploy to Azure Link to start the deployment process

Deploy to Azure  

 
  • On the Custom deployment template populate the fields as described below. Leave the rest of their fields at their default entries

    • Resource Group : Choose a previously created resource group from the dropdown
    • Location : Automatically populated based on the Resource Group location
    • Cluster Name : Enter a cluster name( or one is created by default)
    • Cluster Login Name: Create a administrator name for the Kafka Cluster( example : admin)
    • Cluster Login Password: Create a administrator login password for the username chosen above
    • SSH User Name: Create an SSH username for the cluster
    • SSH Password: Create an SSH password for the username chosen above
  • Check he box titled “I agree to the terms and conditions stated above” and click on Purchase.

Pic2.png


  • Wait till the deployment completes and you get the Your Deployment is Complete message and then click on Go to resource.

Pic3.png

  • On the Resource group explore the various components created as part of the Deployment . Click on the HDInsight Cluster to open the cluster page.
  • On the HDInsight cluster page click on the SSH+Cluster login blade on the left and get the hostname of the edge node that was deployed.

Pic5.png

  • Using an SSH client of your choice ssh into the edge node using the sshuser and password that you set in the custom ARM script.

  • In the next section we would configure the Confluent Kafka Schema Registry that we installed on the edge node

    Configure the Confluent Schema Registry

    The confluent schema registry is located at /etc/schema-registry/schema-registry.properties and the mechanisms to start and stop service executables are located at the /usr/bin/ folder.

    The Schema Register needs to know the Zookeeper service to be able to interact with HDInsight Kafka cluster. Follow the below steps to get the details of the Zookeeper Quorum.

    • Set up password variable. Replace PASSWORD with the cluster login password, then enter the command
    export password='PASSWORD' 
    
    • Extract the correctly cased cluster name
    export clusterName=$(curl -u admin:$password -sS -G "http://headnodehost:8080/api/v1/clusters" | jq -r '.items[].Clusters.cluster_name')
    
    • Extract the Kafka Zookeeper hosts
    export KAFKAZKHOSTS=$(curl -sS -u admin:$password -G https://$clusterName.azurehdinsight.net/api/v1/clusters/$clusterName/services/ZOOKEEPER/components/ZOOKEEPER_SERVER | jq -r '["(.host_components[].HostRoles.host_name):2181"] | join(",")' | cut -d',' -f1,2);
    
    • Validate the content of the KAFKAZKHOSTS variable
    echo  $KAFKAZKHOSTS
    
    • Zookeeper values appear in the below format . Make a note of these values as they will be used later
    zk1-ag4kaf.q2hwzr1xkxjuvobkaagmjjkhta.gx.internal.cloudapp.net:2181,zk2-ag4kaf.q2hwzr1xkxjuvobkaagmjjkhta.gx.internal.cloudapp.net:2181
    
    • To extract Kafka Broker information into the variable KAFKABROKERS use the below command.
    export KAFKABROKERS=$(curl -sS -u admin:$password -G https://$clusterName.azurehdinsight.net/api/v1/clusters/$clusterName/services/KAFKA/components/KAFKA_BROKER | jq -r '["(.host_components[].HostRoles.host_name):9092"] | join(",")' | cut -d',' -f1,2);
    

    Check to see if the Kafka Broker information is available

    echo $KAFKABROKERS
    
    • Kafka Broker host information appears in the below format
    wn1-kafka.eahjefyeyyeyeyygqj5y1ud.cx.internal.cloudapp.net:9092,wn0-kafka.eaeyhdseyy1netdbyklgqj5y1ud.cx.internal.cloudapp.net:9092
    
    • Open the Schema Registry properties files in edit mode
    sudo vi /etc/schema-registry/schema-registry.properties
    
    • By default the file would contain the below parameters
    listeners=http://0.0.0.0:8081
    kafkastore.connection.url=zk0-ohkl-h:2181,zk1-ohkl-h:2181,zk2-ohkl-h:2181
    kafkastore.topic=_schemas
    debug=false
    
    • Replace the kafastore.connection.url variable with the Zookeeper string that you noted earlier. Also replace the debug variable to true . If set to true true, API requests that fail will include extra debugging information, including stack traces. The properties files now looks like this.
    listeners=http://0.0.0.0:8081
    kafkastore.connection.url=zk1-ag4kaf.q2hwzr1xkxjuvobkaagmjjkhta.gx.internal.cloudapp.net:2181,zk2-ag4kaf.q2hwzr1xkxjuvobkaagmjjkhta.gx.internal.cloudapp.net:2181
    kafkastore.topic=_schemas
    debug=true
    
    • Save and exit the properties file using :wq command

    • Use the below commands to Start the Schema Registry and point it to use the updated Schema Registry properties file

    cd /bin
    
    $ sudo schema-registry-start /etc/schema-registry/schema-registry.properties
    
    • Schema Registry Starts and starts listening for requests.
    ...
    ...
    [2020-03-22 13:24:49,089] INFO Adding listener: http://0.0.0.0:8081 (io.confluent.rest.Application:190)
    [2020-03-22 13:24:49,154] INFO jetty-9.2.24.v20180105 (org.eclipse.jetty.server.Server:327)
    [2020-03-22 13:24:49,753] INFO HV000001: Hibernate Validator 5.1.3.Final (org.hibernate.validator.internal.util.Version:27)
    [2020-03-22 13:24:49,902] INFO Started o.e.j.s.ServletContextHandler@40844aab{/,null,AVAILABLE} (org.eclipse.jetty.server.handler.ContextHandler:744)
    [2020-03-22 13:24:49,914] INFO Started NetworkTrafficServerConnector@33fe57a9{HTTP/1.1}{0.0.0.0:8081} (org.eclipse.jetty.server.NetworkTrafficServerConnector:266)
    [2020-03-22 13:24:49,915] INFO Started @2780ms (org.eclipse.jetty.server.Server:379)
    [2020-03-22 13:24:49,915] INFO Server started, listening for requests... (io.confluent.kafka.schemaregistry.rest.SchemaRegistryMain:45)
    
    • With the Schema Registry running in one SSH session , launch another SSH window and try out some basic commands to ensure that Schema Registry is working as expected.

    • Register a new version of a schema under the subject “Kafka-key” and note the output

    $ curl -X POST -i -H "Content-Type: application/vnd.schemaregistry.v1+json" 
        --data '{"schema": "{"type": "string"}"}'
    
       HTTP/1.1 200 OK
    Date: Sun, 22 Mar 2020 16:33:04 GMT
    Content-Type: application/vnd.schemaregistry.v1+json
    Content-Length: 9
    Server: Jetty(9.2.24.v20180105)
    
    • Register a new version of a schema under the subject “Kafka-value” and note the output
    curl -X POST -i -H "Content-Type: application/vnd.schemaregistry.v1+json" 
        --data '{"schema": "{"type": "string"}"}' 
    
    HTTP/1.1 200 OK
    Date: Sun, 22 Mar 2020 16:34:18 GMT
    Content-Type: application/vnd.schemaregistry.v1+json
    Content-Length: 9
    Server: Jetty(9.2.24.v20180105)
    
    • List all subjects and check the output
    curl -X GET -i -H "Content-Type: application/vnd.schemaregistry.v1+json" 
        http://localhost:8081/subjects
    
    HTTP/1.1 200 OK
    Date: Sun, 22 Mar 2020 16:34:39 GMT
    Content-Type: application/vnd.schemaregistry.v1+json
    Content-Length: 27
    Server: Jetty(9.2.24.v20180105)
    
    ["Kafka-value","Kafka-key"]

    Send and consume Avro data from Kafka using schema registry

    • Create a fresh Kafka Topic agkafkaschemareg
    /usr/hdp/current/kafka-broker/bin/kafka-topics.sh --create --replication-factor 3 --partitions 8 --topic agkafkaschemareg --zookeeper $KAFKAZKHOSTS
    
    • Use the Kafka Avro Console Producer to create a schema , assign the schema to the Topic and start sending data to the topic in Avro format. Ensure that the Kafka Topic in the previous step is successfully created and that $KAFKABROKERS has a value in it.

    • The schema we are sending is a Key: Value Pair

    Key : Int 
    
    Value
    {
      "type": "record",
      "name": "example_schema",
      "namespace": "com.example",
      "fields": [
        {
          "name": "cust_id",
          "type": "int",
          "doc": "Id of the customer account"
        },
        {
          "name": "year",
          "type": "int",
          "doc": "year of expense"
        },
        {
          "name": "expenses",
          "type": {
            "type": "array",
            "items": "float"
          },
          "doc": "Expenses for the year"
        }
      ],
      "doc:": "A basic schema for storing messages"
    } 


    • Use the below command to start the Kafka Avro Console Producer
    /usr/bin/kafka-avro-console-producer     --broker-list $KAFKABROKERS     --topic agkafkaschemareg     --property parse.key=true --property key.schema='{"type" : "int", "name" : "id"}'     --property value.schema='{ "type" : "record", "name" : "example_schema", "namespace" : "com.example", "fields" : [ { "name" : "cust_id", "type" : "int", "doc" : "Id of the customer account" }, { "name" : "year", "type" : "int", "doc" : "year of expense" }, { "name" : "expenses", "type" : {"type": "array", "items": "float"}, "doc" : "Expenses for the year" } ], "doc:" : "A basic schema for storing messages" }'
    
    • When the producer is ready to accept messages start sending the messages in the predefined Avro schema format. Use the Tab key to create spacing between the Key and Value.
    1 TAB {"cust_id":1313131, "year":2012, "expenses":[1313.13, 2424.24]}
    2 TAB {"cust_id":3535353, "year":2011, "expenses":[761.35, 92.18, 14.41]}
    3 TAB {"cust_id":7979797, "year":2011, "expenses":[4489.00]}

Pic7.png


  • Try entering random non schema data into the console producer to see how the producer does now allow any data that does not conform to predefined Avro schema.
1       {"cust_id":1313131, "year":2012, "expenses":[1313.13, 2424.24]}
2       {"cust_id":1313131,"cust_age":34 "year":2012, "expenses":[1313.13, 2424.24,34.212]}
org.apache.kafka.common.errors.SerializationException: Error deserializing json {"cust_id":1313131,"cust_age":34 "year":2012, "expenses":[1313.13, 2424.24,34.212]} to Avro of schema {"type":"record","name":"example_schema","namespace":"com.example","fields":[{"name":"cust_id","type":"int","doc":"Id of the customer account"},{"name":"year","type":"int","doc":"year of expense"},{"name":"expenses","type":{"type":"array","items":"float"},"doc":"Expenses for the year"}],"doc:":"A basic schema for storing messages"}
Caused by: org.codehaus.jackson.JsonParseException: Unexpected character ('"' (code 34)): was expecting comma to separate OBJECT entries
 at [Source: java.io.StringReader@3561c410; line: 1, column: 35]
        at org.codehaus.jackson.JsonParser._constructError(JsonParser.java:1433)
        at org.codehaus.jackson.impl.JsonParserMinimalBase._reportError(JsonParserMinimalBase.java:521)
        at org.codehaus.jackson.impl.JsonParserMinimalBase._reportUnexpectedChar(JsonParserMinimalBase.java:442)
        at org.codehaus.jackson.impl.ReaderBasedParser.nextToken(ReaderBasedParser.java:406)
        at org.apache.avro.io.JsonDecoder.getVaueAsTree(JsonDecoder.java:549)
        at org.apache.avro.io.JsonDecoder.doAction(JsonDecoder.java:474)
        at org.apache.avro.io.parsing.Parser.advance(Parser.java:88)
        at org.apache.avro.io.JsonDecoder.advance(JsonDecoder.java:139)
        at org.apache.avro.io.JsonDecoder.readInt(JsonDecoder.java:166)
        at org.apache.avro.io.ValidatingDecoder.readInt(ValidatingDecoder.java:83)
        at org.apache.avro.generic.GenericDatumReader.readInt(GenericDatumReader.java:511)
        at org.apache.avro.generic.GenericDatumReader.readWithoutConversion(GenericDatumReader.java:182)
        at org.apache.avro.generic.GenericDatumReader.read(GenericDatumReader.java:152)
        at org.apache.avro.generic.GenericDatumReader.readField(GenericDatumReader.java:240)
        at org.apache.avro.generic.GenericDatumReader.readRecord(GenericDatumReader.java:230)
        at org.apache.avro.generic.GenericDatumReader.readWithoutConversion(GenericDatumReader.java:174)
        at org.apache.avro.generic.GenericDatumReader.read(GenericDatumReader.java:152)
        at org.apache.avro.generic.GenericDatumReader.read(GenericDatumReader.java:144)
        at io.confluent.kafka.formatter.AvroMessageReader.jsonToAvro(AvroMessageReader.java:213)
        at io.confluent.kafka.formatter.AvroMessageReader.readMessage(AvroMessageReader.java:200)
        at kafka.tools.ConsoleProducer$.main(ConsoleProducer.scala:59)
        at kafka.tools.ConsoleProducer.main(ConsoleProducer.scala)

  • In a different screen start the Kafka Avro Console Consumer
sudo /usr/bin/kafka-avro-console-consumer --bootstrap-server $KAFKABROKERS --topic agkafkaschemareg --from-beginning
  • You should start seeing the below output
{"cust_id":1313131,"year":2012,"expenses":[1313.13,2424.24]}
{"cust_id":7979797,"year":2011,"expenses":[4489.0]}
{"cust_id":3535353,"year":2011,"expenses":[761.35,92.18,14.41]}


Pic8.png 

Spark Notebook error:  Java.sql.SQLException:User does not have permissions to perform this action

Spark Notebook error: Java.sql.SQLException:User does not have permissions to perform this action

This article is contributed. See the original author and article here.

I was working on this case last week with permission error on the spark notebook, so basically the scenario was: 

1. Loading data from another database to DB container.

2. Loading Data from Datawarehouse using Spark Notebook

When the second step was executed the error bellow was throw:

Error: java.sql.SQLException: com.microsoft.sqlserver.jdbc.SQLServerException:User does not have permissions to perform this action


So the error message is pretty clear: This is a permission error. The solution was also simple as the message.

We created a SQL User on the Db for this process specific. As this process requires only data reader permission that was the one given to the user.

---Run on Master DB
CREATE LOGIN loginmame WITH PASSWORD = Lalala!0001' GO ---Run on SQL DW DB CREATE USER username FOR LOGIN loginname WITH DEFAULT_SCHEMA = dbo GO -- Add user to the database role EXEC sp_addrolemember N'db_datareader', N'username' GO GRANT CONNECT TO username;

After that we changed the notebook process to run using the SQL User/Password that we just created. As it follows.


Spark script using SQL User to be executed on the notebook (spark Scala):

val df = spark.read.

option(Constants.SERVER, "Workspacename.sql.azuresynapse.net").

option(Constants.USER, "user ").

option(Constants.PASSWORD, "password").

sqlanalytics("Databasename.dbo.tablename")

 df.show(1)

Also as figure  1 exemplifies:

spark_notebook.png

That is it!


Liliam Leme

UK Engineer