by Scott Muniz | Jul 29, 2020 | Uncategorized
This article is contributed. See the original author and article here.
Navigating this global pandemic and the aftermath has been one of the toughest challenges in recent times. Organizations are looking to maintain cohesivity and safely return to physical spaces. Microsoft 365 and Microsoft Teams can help.
This article outlines sixteen ideas for staying connected and safely managing your return to shared physical space. Please reach out to your Customer Success Manager or Account Technology Strategist for additional details.
Staying connected whilst working remotely
Maintaining a connected culture without being together physically is challenging. Leveraging Teams native collaboration and Teams Apps can help:
- Let’s start with the basics of remote work – Enabling remote work with Microsoft 365 Series – Microsoft product teams discuss the implementation of Microsoft 365 to help your employees meet and collaborate remotely, as well as engage audiences through virtual events and communications.
- Company Communicator – This app template enables communication teams to create and send chat messages such as work from home announcements, emergency alerts, or any organization-wide broadcast. Is Email really the best vehicle to capture employee’s attention in times of crisis?

- Custom Stickers – Self-expression is core to a healthy team culture. This app template allows your users to use custom stickers and GIFs within Microsoft Teams. This template provides an easy, web-based configuration experience where anyone with configuration access can upload the GIFs/stickers/images they want their end-users to have, allowing your entire team to use any set of stickers you chose.

- Praise – Science agrees: People are happier and more productive when they get recognition for their efforts. Send acclaim to your employees and coworkers with Praise. Deliver in a chat, or for wider recognition, send it in a channel conversation. Revel in the good vibes.

- IceBreaker – Icebreaker is a Microsoft Teams bot that helps your team get closer by pairing two random team members up every week to meet. The bot makes scheduling easy by automatically suggesting free times that work for both members. Strengthen personal connections and build a tightly knit community with this app template.

- Disco – Disco is 3rd Party app that makes it easy to celebrate your company culture and values. Bring your culture online by making your mission and values visible and actionable with Disco: Recognize people in real-time when they live your values and uncover trends and metrics on values usage.

- Virtual Coffee or Happy Hours –Virtual Coffee or Happy Hour in Teams allow for a sense of normalcy. Interaction with other humans – even virtually – is therapeutic and informal office interaction often can spur brilliant ideas.

- Incident Reporter App Template – Incident Reporter is a Microsoft Teams bot that optimizes the management of incidents in your organization. IR can be used to track pandemic related incidents. The bot facilitates automated incident data collection, customized incident reports, relevant stakeholder notifications, and end-to-end incident tracking.

- Remote Support App Template – Remote Support is a Microsoft Teams bot that provides a focused interface between support requesters throughout your organization and the internal support team. End-users can submit, edit, or withdraw requests for support and the support team can respond, manage, and update requests all within the Teams platform.

- Facilities Bot with FAQPlus – FAQPlus is a chat bot that can ingest a wide variety of sources to create QnA pairs. FAQPlus also has escalation if users need more help. Use FAQPlus to create a Facilities Bot based on your existing assets to answer common questions like which offices are open or building sanitation procedures.

- Crisis Communication App – Crisis Communication app provides a user-friendly experience to connect users with information about a crisis. Quickly get updates on internal company news, get answers to frequently asked questions, and get access to important information like links and emergency contacts.

Easing the return to shared physical space
As we move to re-open facilities, we need to adhere to local law and guidelines. Teams Apps can help manage reallocation of corporate resources to meet these critical priorities.

Again, let us start with the fundamentals – Operational Readiness – did you radically reconfigure your network to support remote workers? Some risk exists with network infrastructure as users come back to central locations en masse. Here are some key resources to help:
Now for some apps that will help return to the Office:
- Book-a-room bot – Book-a-room bot lets you quickly find and book a workspace on the go. Users can see available working locations, depending on the selected location/building, and select one from the list to book the space.

- Microsoft Shifts – This schedule management tool helps you create, update, and manage schedules for your team. Key features allow office managers to share available spaces to employees based on floor locations, let departments manage allocated space and publish list of suggested activities while employees are on site.

- Building Access App – The Building Access app can be used by organizations to bring employees back to office facilities safely. The App allows facilities managers to manage facility readiness, define occupancy thresholds per floor or open space, set eligibility criteria for onsite access and allows employees to reserve an office workspace after providing self-attestation on key health questions. Executives and facility managers can use the included Power BI dashboard to gather insights needed for planning purposes.

- Return to Workplace Solution – Reopen responsibly, monitor intelligently, and protect continuously with solutions for a safer work environment:
- Location Readiness dashboard helps determine the readiness of the facilities and efficiently manage their safe reopening.
- Facility Safety Management gives facility managers the tools they need to manage the reopening and readiness of the facilities.
- Workplace Care Management gives health and safety leaders the tools they need to actively manage COVID-19 cases, identify hot spots for safety improvement, and import data from contact tracing systems to determine exposure.
- Employee Return to the Workplace offers your workforce the self-service tool that they need to feel confident about returning and remain productive while onsite. They can use Employee Return to the Workplace to check in to work remotely and self-screen before entering a building.

See this great post from our friends in Healthcare Return to work- office space distancing
Conclusion
Maintaining cohesivity is challenging while everyone is working elsewhere. We need capabilities and tooling to safely allocate space when it is time to return to the Office. Teams Platform has numerous options by way of built in capabilities and apps to help you address both challenges.
by Scott Muniz | Jul 29, 2020 | Uncategorized
This article is contributed. See the original author and article here.
Hi IoT developers! We’ve refreshed the IoT Plug and Play Preview with new features and enhancements. You can get started today preparing your devices and applications for the next generation of IoT solutions enabled by IoT Plug and Play. Specifically, this release enables device developers and OEM’s to begin building devices they can certify for IoT Plug and Play ahead of the general availability launch. Furthermore, solution developers can begin creating IoT Plug and Play aware solutions using the latest SDKs with the updated IoT Plug and Play specifications that will seamlessly integrate with Azure IoT services and solutions from our partners.
The new IoT Plug and Play features dramatically enhances the developer experience for both device developers and solution builders. Device developers can declare their device model to IoT Hub at connection time using the open source SDKs that are production ready. Solution builders can develop solutions that automatically understand the device and start interacting with the devices, all without writing any embedded code.
Existing devices already connecting to and using Azure IoT communication patterns (Device Twins, Direct Methods, Telemetry) can be easily upgraded with minimal code changes. Device developers just need to describe the device capabilities in a model and include this model’s identifier in the connection string. On the solution side, developers can retrieve the model from its identifier and use it to make their applications dynamically recognize devices capabilities and adapt to these, delivering the next generation of IoT solutions.
IoT Plug and Play and Azure Digital Twins are both based on the Digital Twins Definition Language (DTDL) that is open source and is based on open W3C standards such as JSON-LD and RDF, which enables easier adoption across services and tooling.
IoT Plug and Play simplifies IoT solution development
Device interactions with an IoT solution can be described in terms of telemetry, properties, and commands using the Digital Twins Definition Language (DTDL) version 2, the same language used by Azure Digital Twins (more on this later). These communication patterns are implemented in the MQTT protocol that’s broadly used in the industry to connect IoT devices. With IoT Plug and Play we go one step further by modeling device communication patterns with an open language. Our goal is to improve IoT solutions development productivity by enabling Model-driven workflows such as code generation, automatic validation, and dynamic UI.
Developers can use the Azure IoT device SDKs available in C, .NET, Java, Python and Node, or any MQTT library to interact with IoT Hub in a secure and reliable way. All of these have been updated to support IoT Plug and Play.
Let’s dive into what’s new and how to get started!
New Azure IoT Hub features
Azure IoT Hub is a Cloud service that enables secure and scalable device connections, communication, and integration with IoT solutions. Think of it as your device gateway. IoT Hub handles authentication of devices, establishes bidirectional communication, and offers several types of interactions with devices such as telemetry, device twin state synchronization, and direct methods, all built on top of the IoT Hub communication protocol.
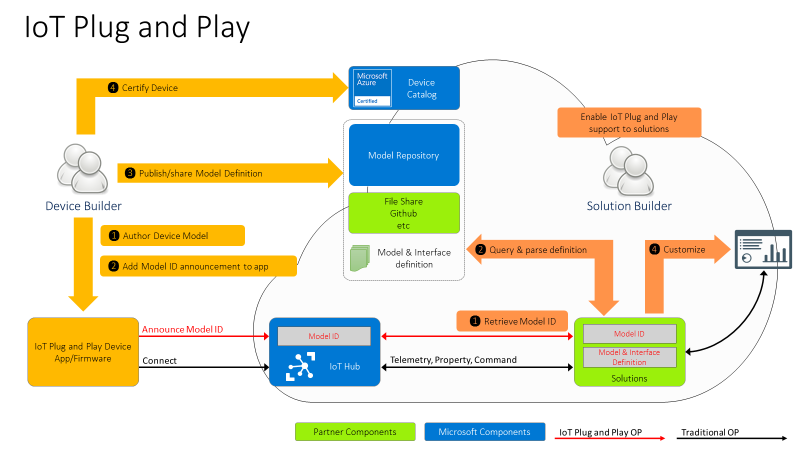
However, these patterns on their own aren’t defining a shared convention between device and cloud application. Device developers and solution developers need to agree on a convention defining what’s in the telemetry payload, what’s the data format, what commands are supported by devices, and what properties they expose. This is exactly what IoT Plug and Play does. Here is how this all comes together.

For the Device developer:
- Using latest enhanced tools and SDKs (more details below on what’s new), the Device developer will author a device model using DTDL.
- To enable Model ID registration, IoT Hub accepts a new parameter in the MQTT Connection packet with the Model ID sent by the device and makes this Model ID available to cloud applications. Once the model is defined, the device developer just needs to add the Model ID announcement in the connection message and ensure the device implementation matches the model. With this Model ID, IoT Hub will be able to identify devices that support IoT Plug and Play and enable to seamlessly integrate them into IoT Plug and Play enabled solutions (see below).
- Device developers can share their devices’ models with solution developers directly or through a public or private repository, with the corresponding Model IDs.
- Device builders can certify their devices for solution builders to get the guarantee that devices are indeed supporting Plug and Play and can seamlessly be integrated into next generation IoT solutions.
For the solution developer:
- Solution builders can retrieve devices’ Model ID from IoT hub.
- With the Model ID, they will acquire and parse the matching IoT Plug and Play model for the device from the model repository or other sharing mechanism agree upon with the device builder.
- With the IoT Plug and Play model, solutions can dynamically adjust their user interface depending on the devices connecting.
IoT Plug and Play Preview is currently available in Japan East, Central US, and North Europe.
Device SDKs are production ready
As of today, all Azure IoT Hub device SDKs are already updated, and support IoT Plug and Play. Here are the steps required to enable IoT Plug and Play on any device:
- Create the model describing the device interactions
- Implement the device model including sharing the Model ID during the connection and using the Azure IoT communication patterns (Device Twins, Direct Methods, Telemetry)
- Validate the device’s implementation of the model using a tool to interact with the device (Azure IoT Explorer, IoT Plug and Play CLI, REST APIs, Service SDKs)
We’ve got some good news for device developers: even though IoT Plug and Play is still in Preview, device builders can use these SDKs to build certification ready devices starting today. This means we won’t make any further breaking changes to the SDKs and all devices created today will work without any modification when IoT Plug and Play becomes generally available (GA).
New features for solution builders
To fulfill the promise of the Digital Twins vision, IoT Plug and Play offers APIs compatible with Azure Digital Twins (ADT), allowing any IoT Plug and Play device to seamlessly integrate into Digital Twins applications.
This new preview REST API can be consumed by the Azure Digital Twins Service SDKs, available for Node and Python. Support for Java and .NET will be added soon. Furthermore, Azure IoT Hub can produce Digital Twins change notifications.
These features enable the alignment of IoT Hub with ADT to accelerate the creation of modern smart environmental solutions.
Developer Experience
To create device models, developers can use the Visual Studio extensions for DTDL, available for VSCode and Visual Studio 2019, with all expected features such as Intellisense and automatic validation. Read more about this extension in this blog post announcement.
Because IoT Plug and Play exposes REST APIs, you can easily extend your own tooling, scripts, and development environments. In fact, the Azure IoT Explorer tool, the Visual Studio and Code extensions, and the Azure CLI IoT extension are all taking full advantage of the IoT Plug and Play REST APIs.
We have samples and docs for all languages available in our new released documentation on docs.microsoft.com/azure/iot-pnp to help you learn IoT Plug and Play concepts.
Hello IoT Plug and Play World !!
How about we walk you through how this all looks?
Let’s create a simple device using the .NET SDK, (other languages are available in the Quickstarts) that reports the current memory available as a telemetry data point, the frequency of this signal will be configurable by a writable property that can be set from the solution side.
First, we create the DTDL interface, applying a model-first approach, and then we implement a device in .NET that produces messages that are compatible with the IoT Plug and Play convention.
We’ll use the DTDL VSCode extension to create the interface using the command palette: DTDL: CreateInterface, and replace the default contents with the telemetry and property elements.
{
  "@context": "dtmi:dtdl:context;2",
  "@id": "dtmi:com:example:mydevice;1",
  "@type": "Interface",
  "displayName": "mydevice",
  "contents": [
    {
      "@type": "Telemetry",
      "name": "workingSet",
      "schema": "double"
    },
    {
      "@type": "Property",
      "name": "refreshInterval",
      "schema": "integer"
      "writable" : true
    }
  ]
}
To create the device code we use .NET and the Microsoft.Azure.Devices.Client/1.27.0 NuGet package.
To initialize the DeviceClient we need the Device Connection String and the Model Id
string modelId = "dtmi:com:example:mydevice;1";
string connectionString = "<deviceConnectionString>";
int    refreshInterval = 5;
var client = DeviceClient.CreateFromConnectionString(connectionString,
                      TransportType.Mqtt,
                      new ClientOptions() { ModelId = modelId });
Console.WriteLine("client connected");
Let’s start by reading the refreshInterval from the desired properties
var twin = await client.GetTwinAsync();
if (twin.Properties.Desired.Contains(nameof(refreshInterval)))
{
  JValue refreshIntervalProperty = twin.Properties.Desired[nameof(refreshInterval)];
  refreshInterval = refreshIntervalProperty.Value<int>();
  Console.WriteLine("Found refreshInterval:" + refreshInterval);
}
And sending the telemetry in a loop.
while (true)
{
  var serializedTelemetry = JsonConvert.SerializeObject(
    new { workingSet = Environment.WorkingSet }
  );
  var message = new Message(Encoding.UTF8.GetBytes(serializedTelemetry));
  message.ContentType = "application/json";
  message.ContentEncoding = "utf-8";
  await client.SendEventAsync(message);
  Console.WriteLine(serializedTelemetry);
  await Task.Delay(refreshInterval * 1000);
}
Finally, we want to subscribe to any desired property update. Note that the device must report back if the desired property was applied. The extra properties are described in the IoT Plug and Play Convention.
await client.SetDesiredPropertyUpdateCallbackAsync(async (desired, ctx) =>
{
  if (desired.Contains(nameof(refreshInterval)))
  {
    JValue refreshIntervalProp = desired[nameof(refreshInterval)];
    refreshInterval = refreshIntervalProp.Value<int>();
    Console.WriteLine("Received refreshInterval:" + refreshInterval);
    TwinCollection reportedProperties = new TwinCollection();
    TwinCollection ackProps = new TwinCollection();
    ackProps["value"] = refreshInterval;
    ackProps["ac"] = 200;
    ackProps["av"] = desired.Version;
    ackProps["ad"] = "desired property received";
    reportedProperties[nameof(refreshInterval)] = ackProps;

    await client.UpdateReportedPropertiesAsync(reportedProperties);
  }
}, null);
Use the service SDK to add IoT Plug and Play support in your solutions
Our service SDKs allow you to easily take advantage of IoT Plug and Play in your IoT solutions. Let us show you how.
IoT Solutions use the Azure SDK to interact with the devices using IoT Hub’s patterns (Telemetry, Device Twins and Direct Methods). The new Azure IoT Hub Digital Twins service SDKs lets you retrieve the Model Id announced by the device.
This time we are going to use the Node.js service SDK from NPM.
const dt = require('azure-iot-digitaltwins-service') // preview
const cs = '<HubConnectionString>'
const dtclient = new dt.DigitalTwinServiceClient(new dt.IoTHubTokenCredentials(cs))
dtclient.getDigitalTwin('mxchip1')
  .then(dtresp => {
    if (dtresp) {
      const twin = dtresp._response.parsedBody
      const modelId = twin.$metadata.$model
      console.log(modelId)
    }
  })
With the Model Id available, your custom solution can make smart decisions about how to interact with the device. If the device implements the model Id we know of, we can safely update the refreshInterval property using the new Digital Twins patch api.
if (modelId === 'dtmi:com:example:mydevice;1') {

  const patch = [{
      op: 'add',
      path: '/refreshInterval',
      value: 3
  }]

  dtclient.updateDigitalTwin(deviceId, patch, dtresp.eTag)
    .then(patchResp => {
      console.log(patchResp)
    })
}
If the .NET device simulator is still running you should see how the device reacts.
Full code and sample model available in this gist
Use Azure IoT Explorer to validate the device implementation
The last step is to validate the device implementation against its Model. For this, we use Azure IoT Explorer which has been updated to support IoT Plug and Play from version 0.11.1.
To connect the Azure IoT Explorer tool to IoT Hub, you need the admin IoT Hub connection string. When you’re connected, go to the devices section and add a new device. When you have the device id registered, you can grab the connection string and replace in the first code snippet we created before for the device.

Azure IoT Explorer can load your models from a local folder. In the main screen – Home, select IoT Plug and Play settings and set the source to a local folder where your DTDL model files are located.
Now, when you run the device code (remember to update the connection string), Azure IoT Explorer will populate the IoT Plug and Play view with a default UI built from the model.
See what happened here in the Azure IoT Explorer? Its UI adapted to the device model without any need for code change or configuration. Isn’t that convenient?

You can now inspect telemetry, properties and interact with the device.
Let’s update the refreshInterval value from the Azure IoT Explorer UI and see the bi-directional communication with the device in action.

IoT Central will use IoT Plug and Play
Integration with IoT Central is a key component of the IoT Plug and Play value proposition. By the time IoT Plug and Play becomes generally available, IoT Central will be updated to fully support the new capabilities and conventions in full alignment with DTDL v2, additionally all certified IoT Plug and Play devices will automatically work with Central. Stay tuned for more updates on this soon.
Next Steps
Don’t miss the latest IoT Show with more live demos connecting Things to Azure using IoT Plug and Play, check it out in
Channel9 and
YouTube
Our team is eager to see how you will take advantage of IoT Plug and Play in your IoT devices and solutions. We are also looking forward to getting your feedback. You can find us in our open source GitHub Repos for the SDKs, or you can simply engage in a conversation right here in the IoT Tech Community commenting below.

by Scott Muniz | Jul 29, 2020 | Uncategorized
This article is contributed. See the original author and article here.
It is that time of the week again: Reconnect! In this edition, we are joined by 15-time MVP title holder Mark Arteaga.
Hailing from Ontario, Canada, Mark prides himself on helping companies build and ship software products. Mark has an extensive background in software development with certifications including Xamarin Certified Developer, Xamarin University Trainer, and .NET Developer & Architect. He continues to use these skills and more in leading his company, RedBit Development.
Serving as company founder and president since 2003, RedBit Development specializes in helping customers like The Globe & Mail and MTV to implement mobile solutions.
The software consulting, design and engineering company focuses on mobile and web-based solutions, as well as emerging experiences such as augmented, virtual and mixed reality, to help their clients reach new audiences. Further, the Microsoft Certified Gold Partner company has been instrumental in supporting Canada’s largest food rescue organization, Second Harvest, in expanding its response to COVID-19.
In just three weeks, RedBit Development rescaled and optimized the FoodRescue.ca platform on Azure, added a feature to enable non-food donations such as hand sanitizer and toilet paper, and launched a mobile app integrated with Dynamics 365 to make it easier for people to donate food. In July, RedBit Development was announced as the inaugural winner of the Community Response award at the 2020 Microsoft Partner of the Year Awards.
Mark has enjoyed an illustrious career working with Microsoft following his first MVP title in 2004. For example, Mark previously received the MVP award six years in a row for his role in the Windows Phone developer community, and at the time held the distinction as the only Windows Phone Developer MVP in Canada. Mark is often speaking to the developer community at various events about mobile-based solutions throughout Canada.
For more on Mark, visit his blog or follow him on Twitter @MarkArteaga

by Scott Muniz | Jul 29, 2020 | Alerts, Microsoft, Technology, Uncategorized
This article is contributed. See the original author and article here.
Many organisations have established their data-lake on Azure to manage their end to end data analytics estate. In some cases, organisations’ customers/partners leverage other cloud providers and we want to meet them wherever they are, after all Azure is an open and versatile platform.
If the partner or customer is already using Azure, there are a myriad of options to move data into their estate. Azure Data Share however stands out as its geared towards these cross-tenant data sharing use-cases. It allows users to create invitations, define T&Cs, define snapshot frequency and type (incremental/full), and revoke shares.
Pulling data into Azure from other clouds is also rather straight-forward using one of Azure Data Factory’s 90+ copy-activity connectors, including AWS, GCP, Salesforce, Oracle and many more.
Some of these connectors support being used as a source (read) and sink (write). Azure native services, Oracle, SAP, and some others can be used as source and sink. However, not all connectors support this, in which case developers can default to the generic connectors such as ODBC, filesystem, and SFTP connectors.
In this blog I want to outline another approach using spark to read and write selected datasets to other clouds such as GCS or S3. However, this methodology applies to really any service that has a spark or Hadoop driver. This gives us bidirectional on-demand access to any cloud storage. As data is read into memory we can join, filter, aggregate data as needed from multiple environments.
Caveat emptor, as data egresses you may be subject to network costs.
Pre-Reqs
- Azure subscription, Azure Databricks (ADB) workspace, and Azure Data Factory
- Google Cloud Platform subscription
Google Cloud
- Create a service account https://console.cloud.google.com/iam-admin/serviceaccounts/ > ad/nt > create key with type json > keep the json doc safe
- Go to https://console.cloud.google.com/storage/ > create bucket (single region, standard storage) > add “Storage Object Admin” permission to service account created in step 1. > upload a test csv file
Azure
- Navigate to your Azure Databricks workspace (or create one via Quickstart Guide)
- Upload your GCS service account json to DBFS storage, you can use the Databricks CLI
databricks fs cp ./myspecialkey.json "dbfs:/data"
- Create a cluster using the 6.5 Databricks runtime (includes Apache Spark 2.4.5, Scala 2.11) with the following Spark Config:
spark.hadoop.fs.gs.auth.service.account.json.keyfile /dbfs/data/myspecialkey.json
spark.hadoop.fs.gs.impl com.google.cloud.hadoop.fs.gcs.GoogleHadoopFileSystem
spark.hadoop.fs.gs.project.id {Your-GCP-Project-ID}
spark.hadoop.fs.gs.auth.service.account.enable true
spark.databricks.pyspark.trustedFilesystems com.google.cloud.hadoop.fs.gcs.GoogleHadoopFileSystem,com.databricks.adl.AdlFileSystem,com.databricks.s3a.S3AFileSystem,shaded.databricks.org.apache.hadoop.fs.azure.NativeAzureFileSystem,shaded.databricks.v20180920_b33d810.org.apache.hadoop.fs.azurebfs.SecureAzureBlobFileSystem
Note: the spark.databricks.pyspark.trustedFilesystems is needed to work around org.apache.spark.api.python.PythonSecurityException exception.
- Once the cluster is created add Google’s GCS connector as a library
- Clusters > {your cluster} > Libraries > Install New > Maven > Coordinates: com.google.cloud.bigdataoss:gcs-connector:1.5.2-hadoop2
- Make note of the version, other versions cause inflection and IOException errors as Databricks uses Hadoop 2.x. Later versions of Databricks runtimes (7.1+) may move to Hadoop 3.
- At this point we can simply use ls, cp, mv, rm to move data across between ADLS storage and GCS. Note: I set up credential pass-through in my cluster which authenticated me to my data-lake using my SSO/Active Directory credentials.
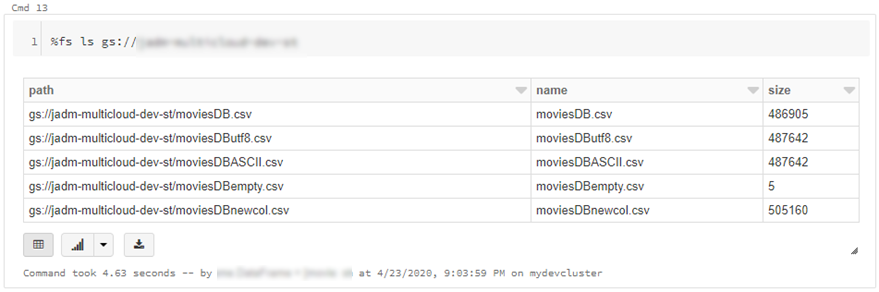
dbutils.fs.cp("abfss://{filesystem}@{yourADLSaccount}.dfs.core.windows.net/movies/","gs://{yourGCSbucket}/",True)

- We can also read individual files/folders into a data-frame.
df = spark.read.csv("gs://{yourGCSbucket}/{somefile} ", header=True)
This will read data directly from your GCS bucket, note this may incur GCP egress costs.

- From here the cloud is the limit, we can define spark tables across multiple environments and query across them as if it were all co-located. Don’t forget however, that spark has to import all the data into memory which may impact performance and egress costs.
%sql
CREATE TABLE adlsstest (movie long, title string, genres string, year long, rating long, RottonTomato string) USING CSV LOCATION "abfss://{filesystem}@{yourADLSaccount}.dfs.core.windows.net/movies/moviesDB.csv";
CREATE TABLE gstest (movie long, title string, genres string, year long, rating long, RottonTomato string) USING CSV LOCATION "gs://{yourGCSbucket}/moviesDB.csv";
CREATE VIEW myview AS
  SELECT *,'adls' AS src FROM adlsstest
  UNION ALL
  SELECT *,'gcs' as src FROM gstest

Automation
From here it is a piece of cake to parameterise and automate movement of data. We can set up an Azure Data Factory pipeline to pass parameters into the Azure Databricks notebooks to do stuff. In this example I copy all files from a specified ADLS directory into a GCS target directory.
- Create a new notebook in Databricks using the code at the end
- Navigate to your Azure Data Factory (or create one via Quickstart Guide)
- Create a pipeline with a Databricks activity (here’s a guide)
- In the Data Factory pipeline create 3 parameters: sourcedir, targetdir, and myfile. Define some default values using the respective ABFSS and GS formats:

- Add the notebook path and map the pipeline parameters to the notebook parameters under Azure Databricks activity > Settings

- Click Debug, you can optionally modify the parameter values > Click Ok > As its running click on details (spectacles icon) and view notebook output

- Head back to your GCP portal, and you will see the files appear in GCS

As we are accessing ADLS from an automated job we cannot use credential passthrough. My colleague Nicholas Hurt wrote a great piece discussing different approaches to authenticating to ADLS from ADB.
I am using a service principal for this demo. Azure documentation outlines how to set this up. Also, I set up a secret scope using the Databricks CLI and stored the service principal key there.
# authenticate using a service principal and OAuth 2.0
spark.conf.set("fs.azure.account.auth.type", "OAuth")
spark.conf.set("fs.azure.account.oauth.provider.type", "org.apache.hadoop.fs.azurebfs.oauth2.ClientCredsTokenProvider")
spark.conf.set("fs.azure.account.oauth2.client.id", "YOUR-APPLICATION-ID")
spark.conf.set("fs.azure.account.oauth2.client.secret", dbutils.secrets.get(scope = "mykeys", key = "mysp"))
spark.conf.set("fs.azure.account.oauth2.client.endpoint", "https://login.microsoftonline.com/YOUR-TENANT-ID/oauth2/token")

# readdf=spark.read.format("csv").option("header", "true").load("abfss://fs1@.dfs.core.windows.net/movies/moviesDB.csv")
dbutils.widgets.text("sourcedir", "","")
sourcedir = dbutils.widgets.get("sourcedir")
print ("Param -'sourcedir':", sourcedir)

dbutils.widgets.text("targetdir", "","")
targetdir = dbutils.widgets.get("targetdir")
print ("Param -'targetdir':", targetdir)

dbutils.widgets.text("myfile", "","")
myfile = dbutils.widgets.get("myfile")
print ("Param -'myfile':", myfile)

##dbutils.fs.cp("abfss://fs1@.dfs.core.windows.net/movies/","gs:///",True)
dbutils.fs.cp(sourcedir,targetdir,True)
##df = spark.read.csv("gs:///moviesDB.csv",header=True)
df = spark.read.csv(myfile,header=True)
Conclusion
Using this approach, we can move data between different storage providers if they provide a compatible jar. In fact, this will work across S3, GCS, BigQuery and many more.
Further we discussed how to automate the process to tie in with broader Azure data orchestration. This approach augments multi-cloud, on-prem data integration capabilities available out of the box with Azure Data Factory.
I should call out that this approach does not support mounts, however that is a minor limitation.

by Scott Muniz | Jul 29, 2020 | Uncategorized
This article is contributed. See the original author and article here.
When it comes to securing the Microsoft 365 Apps using policies, IT Pros often face a challenge: You want to tighten security as much as possible to keep the bad guys out, but at the same time you do not want to impact your user’s productivity. And you would like to be able to evaluate the potential impact of a security config change before fully enforcing it. Sounds familiar? Then this blog post is for you!
This post will show you how to leverage the Security Policy Advisor (SPA) to identify slack in your security configuration, make changes to your policy settings and validate the new config first before enforcing them, reducing the risk to impact user productivity. The data-driven service allows you to make decisions based on facts like actual feature usage or if your users are already under attack by e.g. malicious Office documents being sent to them, rather than just guessing what the impact of a change might be.
Overview
With more people working from home, traditional security layers like working on a trusted network or trusted device are going away. It becomes more important to meet the user where they are and providing a secure setup without affecting their productivity. The Security Policy Advisor (SPA) is a service hosted in your tenant, so you can put it to work within minutes. No need for any on-prem infrastructure.
SPA uses the Office cloud policy service (OCPS) to enforce security policies in the Office applications. Such policies are bound to the AzureAD user identity, independent from the actual device used or how this device is managed (if at all). When a user signs into an Office application using their work credentials, SPA and OCPS will ensure that the policies are applied, at home or at work, on corporate and personal devices.
SPA currently supports several security policies, but in the following article we will focus on one policy which can drastically reduce your exposure to attacks targeting Office: VBA Macro Notification Settings. If you are an Office Desktop Admin, it is likely that you have had to deal with this dilemma: Restrict macro execution to protect your users and enterprise from malware attacks like this one or leave it enabled so you don’t risk impacting users productivity? Sounds familiar? OK, let’s look at an example on how you could tackle this challenge.
Step 1 – Review requirements and create policy configurations
There are only two requirements for using Security Policy Advisor:
- Devices must run at least version 1908 of Microsoft 365 Apps for enterprise.
- Apps must be allowed to send required service data for Office.
Use the Office cloud policy service (OCPS) to create a policy configuration. You are not required to configure any policies in this configuration to receive recommendations. Have a look at our OCPS walkthrough guide for further guidance on using OCPS.
Step 2 – Enable Security Policy Advisor
Next step is to enable SPA. Navigate to config.office.com, sign in with Global Administrator, Security Administrator, or Office Apps Admin permissions and click on Security. Toggle the switch to On.

That’s it. If you have policy configurations created in OCPS, SPA will now start generating recommendations for those. This happens quickly, typically within minutes. You can also create a policy configuration from Security Policy Advisor using the Create a policy configuration button.
Step 3 – Review recommendations and tighten up security
Once Security Policy Advisor has finished analyzing data, it will inform you of new recommendations. You can click through the policies and see a full list of settings to consider:

For each policy you can review more details by clicking on it. It will give you more information on how many users have actually used the feature and for specific settings (macros) also data on any attacks through this vector targeted at users in the group. Here’s an example of how the data might look like for the VBA Macro Notification Settings policy recommendation.

So in this case, you can see that no user has actually opened Excel documents with macros (Total users), but all users have been targeted by malicious macros. So there is a big opportunity to boost security without impacting the user’s productivity. SPA provides you the information you need to justify this change and take it through a change management process.
That’s one of two features which give you confidence when using SPA: You will get historical data based on the actual usage of the Office apps as well as any attacks detected by Office 365 Advanced Threat Protection (ATP). No more guessing if a certain user group is actually using a feature and is at risk by not restricting it. You get actionable data and should act on it.
Perhaps you still have reservation acting on these recommendations and data. This is where the second feature comes in handy: You can set a policy, but allow the user to override it. The above example strongly suggests to disable VBA notifications as users are not using this feature and are under attack. But we might want to flight this new setting to users first and monitor impact.
So in this example you would review the data for each of the VBA Notifications settings (there is one per application), accept the recommendation to disable VBA macros, but set Override to Enabled.

After clicking Apply, the new policy is set and will disable VBA macros for all targeted users. In case a user opens a document with macros embedded, a notification is shown that the VBA macro was disabled. In addition, the user is given an option to override this policy and still enable macros. When they do, this information is captured and surfaced back to you in the admin portal.

This approach combines the power of having insights into historical data, but also safely try out a more restrictive security configuration.
Step 4 – Monitor productivity impact and adjust configuration
After a given time, e.g. two weeks, you can review how often users have actually used the option to override the setting. Log into the SPA UI, select the policy and switch to the Applied policies tab. Clicking on the individual setting will bring up the policy details and you can review how many users have overridden the setting.

In the above example, you could go forward with confidence and disable the override to boost overall app security. You first must roll back the policy, select the policy from the recommendations tab again and re-deploy with user override disabled.
In case users opted to override the setting, you might want to move these users to another Azure AD security group and targeted them with a less strict security configuration using OCPS.
Step 5 – Iterate
A common statement in IT security is “Security is not a one-time activity, it is a process” and this is also true when it comes to securing Office applications. After deploying the VBA notification setting, you should start looking at the other available policies like:
- Block macros in Office files from the internet
- Disable All ActiveX
- Check ActiveX objects
- Blocking legacy file formats
We recommend that you first check if there are any recorded attack attempts for the Block macros in Office files from the internet settings. If yes, you might want to focus on these first to quickly reduce your attack surface. Then work your way through the list over time. This will boost your security stance step-by-step by removing any slack. Revisit the dashboard on a regular base to monitor impact and adjust policies where needed.
By default, we will show recommendations with a low productivity impact first. You can switch the Show all recommendations toggle to get a full view:

It is key to find the right balance between being restrictive and still allowing people to do their job. If security is too restrictive, users often start to work around these limitations and this might be a greater impact to your security posture then having a configuration which is not cranked up to the maximum.
About the Authors
For this blog post the Microsoft 365 Apps Ranger Team at Microsoft partnered with the engineering team behind Security Policy Advisor. Feel free to share your questions in the comment section. For feedback on SPA, please use the feedback functionality in the config.office.com portal, it will get routed directly to the SPA team.
FAQ
Q: SPA is not generating any recommendations, what could be wrong?
A: Double check if required diagnostic data is enabled in your environment and devices can upload the data to the required endpoints.
Q: Required diagnostic data is enabled, still nothing. What else could be the cause be?
A: SPA needs a certain share of users to report data back to generate recommendations per group. Double-check if most users in a targeted group are active Microsoft 365 Apps users and have diagnostic data enabled.

Recent Comments