by Contributed | Jun 27, 2023 | Technology
This article is contributed. See the original author and article here.
Over the past few months, Microsoft Learn has published a series of blogs showcasing the latest trends in the tech industry and the increasing demand for tech skills. This series has highlighted in-depth LinkedIn data showing that preparing talent for an ever-changing job market is more important than ever. Despite recent layoffs at tech companies, the demand for technical skills in the modern workplace has never been greater; LinkedIn data has shown that the need for tech talent is flourishing in non-tech industries such as education, healthcare, finance, and government proving that not just tech companies are looking for people with technology skills.
Helping students become work-ready is top of mind for educators and institutions, as it is essential that students not only build technical skills and expertise, but also then connect with employers looking for these critical skills. Higher education institutions are looking for new ways to prepare their students, especially now that more employers are engaging in skills-based hiring and looking beyond just those people who have formal 4-year degrees. More of these institutions see the value in partnering with Microsoft to help their students learn valuable tech skills and earn industry-recognized certifications, and many are turning to the resources and training found through Microsoft Learn.
Recently, Times Higher Education, a British magazine reporting specifically on news and issues related to higher education, published an article discussing these trends and how, as the market for technical skills continues to evolve and grow, employers need a sustainable stream of talent to realize their ambitions. Many are experiencing a digital skills gap, where they are lacking access to professionals with the right experience and qualifications in current and emerging technologies. The article profiles three universities who have partnered with Microsoft to help students make career connections with employers and unlock opportunities for new talent to gain digital credentials and begin a rewarding career in tech.
Bridging the gap: helping students to be work-ready
The universities highlighted in the article are preparing students for the current tech employment landscape with the support of Microsoft programs including Microsoft Learn for Educators (MSLE), which provides higher education institutions and educators with a suite of comprehensive tools and resources to augment students’ existing degree paths with industry-recognized certifications. More educators are seeing the value of students acquiring these certifications in today’s job market, while MSLE gives them access to ready-made, instructor-led curriculum that can put students on a path to a variety of technical careers, as educators can work with students on certifications in their specialist fields. Students are increasingly more interested in pursuing these credentials because of growing awareness that employers value these industry certifications in addition to college degrees, as this combination gives students an advantage as they begin applying for jobs.
Further, students can also turn to Microsoft as they begin their careers in tech, gaining skills and connecting with employers with the help of Microsoft Learn Career Connected which pairs the tools and resources of Microsoft Learn with the power of LinkedIn. Microsoft Learn Career Connected has shown to be particularly useful for those students who don’t necessarily know their desired career path, as they can get recommended suggestions for learning paths that make sense based on their interests or the courses they are currently taking. Students can interact with a community of other learners and get their perspectives and support, share their experiences, and connect with employers who are looking for specific tech skills. MSLE offers pre-curated short courses in key skills areas and supports educators to further deliver learning that students can use once they enter the world of work.
There are several success stories from universities who have offered their students access to a range of complementary Microsoft credentials through MSLE and Microsoft Learn Career Connected. One of the examples cited in the article includes the real-world implications that the pandemic had on the hard-hit hospitality industry on the Hawaiian Islands. Debasis Bhattacharya, Associate Professor at Maui College at the University of Hawaii, teaches Applied Business and Information Technology and uses MSLE to support his students in gaining digital certifications that will make them stand out to employers. Maui College is already seeing results from using the teaching and learning content and resources available as part of MSLE. As more students gain certifications, the college has seen an uptick in employers approaching students before they graduate. “They are getting more internships that should lead to more full-time roles once they graduate,” Bhattacharya says.
MSLE is also being used with continuing education programs in Canada. The University of Calgary was the first institution in Canada to become an education global training partner with Microsoft. Valuable support has come from MSLE in terms of curriculum planning, according to Vui Kien Liau, Associate Director of Technology Programs for continuing education at Calgary. “Students could just access courses on the internet, but they get value out of the experience of sharing and interacting with instructors,” he says. “The MSLE program helps us to build a curriculum that appeals to all learners.” The university has already trained more than 13,000 students in Microsoft Azure Cloud.
Lastly, although Eastern Washington University (EWU) is in the early stages of using MSLE to support its teaching, many students have already successfully achieved certifications which will afford them an advantage in the labor market according to Alexandros Paparas, Assistant Professor at EWU. “Businesses often come to us looking for potential recruits, so the students all find jobs before they graduate.” While students often build early links with employers and apply directly for roles, Microsoft Learn Career Connected and its dedicated LinkedIn group have also been useful for students in terms of networking, showcasing their credentials, and honing their job applications.
Making career connections: how Microsoft opens doors for new talent
The article goes on to highlight in more detail how Microsoft Learn Career Connected can help students connect with employers looking for technical skillsets. Many find that gaining digital credentials can be the first step towards a rewarding career in tech, and then Microsoft Learn Career Connected can help link students with a range of opportunities with employers.
For example, Avanade, a global professional services company providing IT consulting and services focused on the Microsoft platform, has a long history with Microsoft and is part of Microsoft Learn Career Connected, offering students help with training, employee placement, and assistance finding a job.
Another organization showcased is TechFluent—a non-profit organization supported by volunteers in the technology industry that aims to provide mentorship and training on Microsoft’s Dynamics 365 and the Power Platform—that also connects participants to available jobs within the tech industry.
Preparing the next generation with MSLE, Microsoft Learn Career Connected, and Microsoft Certifications
Now more than ever we are seeing that all jobs truly are tech jobs and that tech skills are in-demand across so many industries. When it comes to employment, we are seeing the value that industry-recognized certifications provide for students beyond formal and traditional degrees. More higher education institutions are turning to Microsoft programs like MSLE to help them prepare students for an evolving job market and to build the technical skills they need to meet growing demand. And it doesn’t stop there—once students have the skills, they can turn to Microsoft Learn Career Connected as they begin their career— connecting with employers and new job opportunities. Programs like Microsoft Learn for Educators and Microsoft Learn Career Connected, as well as training and certifications, are here to help prepare students as they begin their career and can offer continued support throughout their learning journey.
Read more.
by Contributed | Jun 26, 2023 | Technology
This article is contributed. See the original author and article here.
This month we are introducing several capabilities for leaders, corporate communicators, and employees to improve your campaigns, events, and engagement across the platform. Here’s what’s new for Viva Engage this month:
Updates to Leadership Corner* feeds and announcements
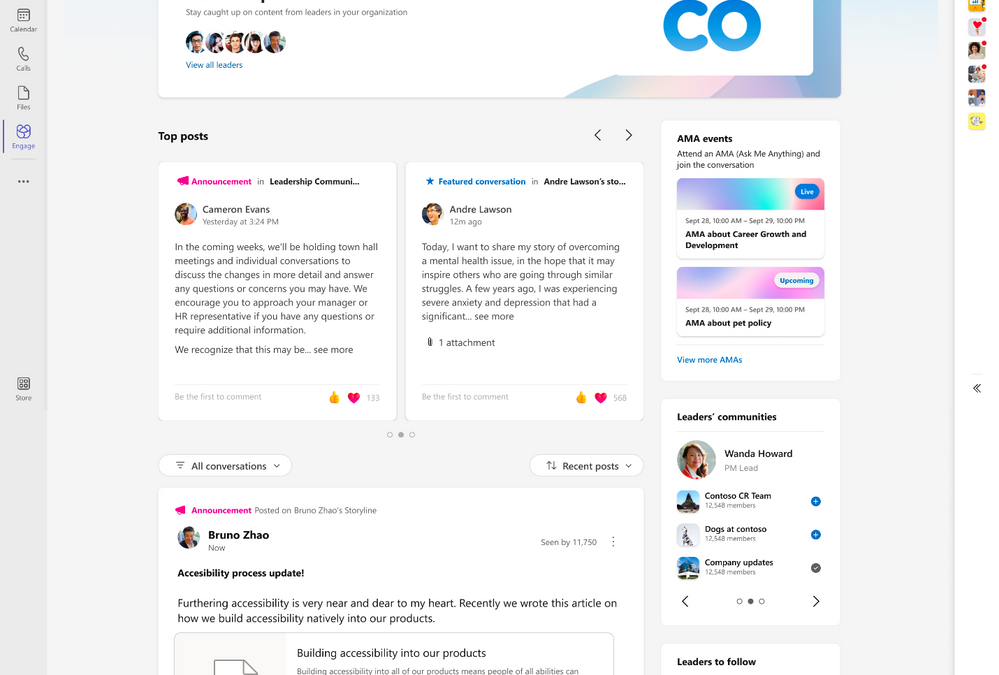
Employees can sort the feed in Leadership Corner chronologically, or filter to see unread conversations or only announcements from their leaders. Additionally, employees can now access a dedicated feed with all featured conversations across the network in a single, consolidated view.
Top posts are also new in Leadership Corner, providing a visual element to highlight featured conversations and announcements from leaders.

Top posts now have a dedicated carousel within Leadership Corner
*Denotes features are available to Microsoft Viva customers only.
New enhancements coming to campaigns* in Viva Engage
The campaign discovery hub in Viva Engage will help employees explore and discover campaigns.
In the campaign hub, employees will find:
- Top campaigns which are trending campaigns that the employee is currently not following
- Sponsored campaigns which are campaigns that are sponsored by leaders
- Browse all campaigns which shows all active and ended campaign

Employees can Follow active campaigns or learn more about a campaign on its landing page. Or employees can access the campaign hub by clicking on Discover more from Top Campaigns on the home feed or Followed Campaigns on any storyline profile. Employees can search for a campaign by using the Viva Engage search bar. Search campaigns results show campaign hashtag, description, followers count, official symbol, color theme and cover image. This search is based on a prefix search to provide more relevant information.
The newly added Executive sponsors enables leaders in an organization to sponsor and support campaigns. Corporate communicators (campaign managers) of an organization can manually add leaders as executive sponsors. Once added, executive sponsors will be notified in Viva Engage and Outlook. Campaigns that have executive sponsors will also show up in Leadership Corner. Learn best practices and get some ideas from Viva Engage Explained blog to get started with campaigns.

Ask Me Anything improvements make hosting easier for large AMAs
Ask Me Anything’s are text based virtual events, often hosted by leaders or subject matter experts on a specific topic. Coming soon, organizers will be renamed to hosts and moderators will be renamed to organizers. When you create an AMAM you can add up to 10 moderators and/or hosts per event. Hosts can create the event and add co-organizers to help edit and manage the event. AMA moderators can help manage incoming questions from employees during the event. Depending on the anticipated size and reach of your AMA, we’d advise at least 2 moderators.

Employees will be able to add AMAs directly to their calendars to remind them of the upcoming events and participate live. The calendar invite will include time and a link directly to the AMA making it simple for employees to find the action and post their own question or upvote previously asked questions. Additionally, we display upcoming and past AMAs that leaders have hosted, employees will be able to see AMAs from their leaders within the Leadership Corner.

After the AMA has concluded, organizers and leaders need insights to measure success or make improvements. Viva Engage will now include an initial set of analytics for AMAs. Organizers can see key details of their AMAs like reach and engagement.
For more details about hosting your own AMA and best practices, view the AMA Playbook.
Viva Engage topic migration update and improvements rolling out
Shifting to Viva Topics leverages a more robust and secure infrastructure for Viva Engage topics. We began this process earlier this year for networks in Native Mode and will continue until all Viva Engage networks have migrated to Viva Topics. The migration also helps make community-sourced knowledge accessible across an organization and supports a consistent topics experience in Microsoft 365. To ensure quality topic experiences, Viva Engage topics applied to less than 10 Viva Engage conversations or topics with no usage in the last 18 months will still be migrated but will not be surfaced in topic picking experiences.
For organizations not using premium Viva Topics experiences, the use of topics in Viva Engage will appear the same before and after topic migration.
For organizations using Viva Topics*, you will gain premium benefits, such as topic cards in Yammer (Viva Engage), Viva Topic pages, and centralized topic management.
To support these changes fixes and enhancements to data exports and the Topics API will be rolling out. Admins can review documentation on API and data export in the following resources:
Export topics created in Viva Engage with PowerShell
Using PowerShell, you can export topics created by an employee in Viva Engage (also known as Lite Topics) to a .csv file. Topics created before enabling integration with Viva Engage are included. For more information, please see Export topics created in Viva Engage with PowerShell.
More controls coming to the new admin center
Last month we released a new Viva Engage admin center on the web, and now we will include more capabilities including data exports and increase audit logs. Learn more about the Admin Center here.

And in case you missed it…
CSV Bulk upload for communities is generally available. See this blog post for more details and add members to your communities today! Share step by step instructions with your community admins.
Stay connected, learn from your leaders, and build communities with the newly rebranded Viva Engage mobile app. Download the app from the app store. With the Viva Engage mobile app, sharing updates and staying connected to your organization and up-to-date on the latest news has never been easier.
Yammer.com is rebranding! Yammer web will be rebranded June 28. We will be hosting a community event July 11 to answer any outstanding questions. Need more resources? Check out the rebranding toolkit for templates and more to communicate the upcoming rebranding changes to your employees.

What’s coming soon?
See what else Viva Engage has planned on the public roadmap and keep an eye on this blog for more news, updates, and best practices relating to Viva Engage and communities in Microsoft 365.
*Some capabilities are only available for Microsoft Viva customers. Learn more here.
by Contributed | Jun 25, 2023 | Technology
This article is contributed. See the original author and article here.
We received some support cases when customers encounter following error “TSQL CRUD has been disallowed via policy for this Azure subscription“ while trying to create or modify of Azure SQL resources through T-SQL.
Cause
This error occurred when Azure Administrator block the T-SQL CRUD operations of Azure SQL resources through T-SQL. This is enforced at the subscription level to block T-SQL commands from affecting SQL resources in any Azure SQL database.
How to enable block T-SQL CRUD
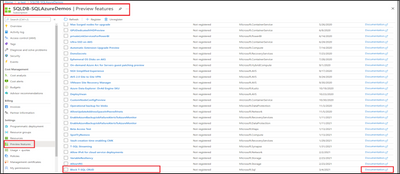
To use this feature “block T-SQL CRUD” operation an Azure user with owner or contributor role is needed, by following the below steps:
- Go to your subscription on Azure portal.
- Select the Preview Features tab.
- Select Block T-SQL CRUD.
- After you select Block T-SQL CRUD, a new window will open, select Register, to register this block with Microsoft.Sql resource provider.

After you register the block of T-SQL CRUD with Microsoft.Sql resource provider, you must re-register the Microsoft.Sql resource provider for the changes to take effect. To re-register the Microsoft.Sql resource provider:
- Go to your subscription on Azure portal.
- Select the Resource Providers tab.
- Search and select Microsoft.Sql resource provider.
- Select Re-register.

Removing Block T-SQL CRUD
To remove the block on T-SQL create or modify operations from your subscription, first unregister the previously registered T-SQL block. Then, re-register the Microsoft.Sql resource provider as shown above for the removal of T-SQL block to take effect.
When to use Block T-SQL CRUD feature
When you are using Azure Policies to enforce organizational standards through ARM templates. Since T-SQL does not adhere to the Azure Policies, a block on T-SQL create or modify operations can be applied. The syntax blocked includes CRUD (create, update, delete) statements for databases in Azure SQL, specifically CREATE DATABASE, ALTER DATABASE, and DROP DATABASE statements.
Blocked statement
- CREATE DATABASE statements
- DROP DATABASE statements
- A subset of ALTER DATABASE statements, as follows:
- ALTER DATABASE … ADD SECONDARY ON SERVER
- ALTER DATABASE … REMOVE SECONDARY ON SERVER
- ALTER DATABASE … FAILOVER
- ALTER DATABASE … MODIFY NAME …
- ALTER DATABASE … MODIFY (MAXSIZE | EDITION | SERVICE_OBJECTIVE …)
- ALTER DATABASE … MODIFY BACKUP_STORAGE_REDUNDANCY …
- ALTER DATABASE … SET ENCRYPTION …
Disclaimer
Please note that the products and options presented in this article are subject to change. This article reflects Block T-SQL CRUD in June 2023. To check for new update or more information please check the below link:
Block T-SQL commands to create or modify Azure SQL resources – Block T-SQL commands to create or modify Azure SQL resources | Microsoft Learn
I hope this article was helpful to you, please feel free to share your feedback in the comments section.
by Contributed | Jun 24, 2023 | Technology
This article is contributed. See the original author and article here.
Azure Portal Admin is a cloud-based management console provided by Microsoft Azure. It is a web-based interface that allows users to manage and monitor their Azure resources and services, configure security settings, and monitor costs. It provides a single, unified view of all Azure resources and services, making it easier to manage and monitor your cloud infrastructure.
Importance of Effective Cloud Management
Effective cloud management is critical for businesses that use cloud computing services. Cloud computing has many benefits, including cost savings, scalability, and flexibility. However, without effective cloud management, these benefits can quickly turn into liabilities. Poorly managed cloud resources can lead to security vulnerabilities, inefficient resource usage, and increased costs.
Overview of the guide
This guide will provide a comprehensive overview of Azure Portal Admin and how to use it for effective cloud management. We will cover everything from setting up your Azure account to managing resources, configuring security, monitoring costs, and best practices for effective cloud management. By the end of this guide, you will have a solid understanding of how to use Azure Portal Admin to manage and monitor your cloud infrastructure effectively.
Setting up Azure Portal Admin
Before you can start using Azure Portal Admin, you need to create an Azure account. You can sign up for a free trial or a paid account, depending on your needs. Once you have an account, you can sign into Azure Portal Admin and start managing your cloud resources.

Understanding the Azure Portal Interface
Azure Portal Admin has a web-based interface that provides a single, unified view of all your Azure resources and services. The interface is customizable, allowing you to create dashboards and customize views to suit your needs. You can also use the search bar to quickly find resources and services.
Configuring Azure Services and Resources
Azure Portal Admin allows you to configure and manage a wide range of Azure services and resources, including virtual machines, storage accounts, databases, and more. You can provision and deploy new resources, configure settings, and monitor resource usage.
Managing Access and Permissions
Azure Portal Admin allows you to manage access and permissions for your cloud resources. You can create roles and assign permissions to users and groups, controlling who can access and manage your resources. You can also configure authentication and authorization settings to ensure that only authorized users can access your resources.
In this section, we covered the basics of setting up Azure Portal Admin. By creating an Azure account, understanding the interface, configuring services and resources, and managing access and permissions, you can get started with managing your cloud infrastructure effectively.
Managing Azure Resources
Azure resources are the building blocks of your cloud infrastructure. They include virtual machines, storage accounts, databases, networking resources, and more. Managing Azure resources effectively is critical for ensuring that your cloud infrastructure is running smoothly and efficiently.

Provisioning and Deploying Azure Resources
Provisioning and deploying Azure resources involves creating and configuring resources to meet your specific needs. Azure Portal Admin provides a simple, user-friendly interface for provisioning and deploying resources. You can choose from a wide range of pre-configured templates or create your own custom templates.
Monitoring and Optimizing Resource Performance
Monitoring resource performance is essential for ensuring that your cloud infrastructure is running efficiently. Azure Portal Admin allows you to monitor resource usages and performance metrics, such as CPU usage, memory usage, and network bandwidth. You can also set up alerts to notify you when resources reach certain thresholds.
Optimizing resource performance involves identifying and addressing performance bottlenecks. Azure Portal Admin provides tools for identifying and resolving performance issues, such as scaling resources, optimizing storage, and tuning database performance.

Scaling Azure Resources
Scaling resources involves adjusting resource capacity to meet changing demand. Azure Portal Admin allows you to scale resources up or down, depending on your needs. You can also configure autoscaling to automatically adjust resource capacity based on predefined rules.
In this section, we covered the basics of managing Azure resources. By provisioning and deploying resources, monitoring, and optimizing performance, and scaling resources, you can ensure that your cloud infrastructure is running smoothly and efficiently.
Security and Compliance – Understanding Azure Security
Security is a top concern for businesses using cloud computing services. Azure provides a wide range of security features and tools to help you secure your cloud infrastructure. Azure Portal Admin allows you to configure and manage security settings for your resources and services.

Configuring Azure Security Features
Azure Portal Admin provides a range of security features that you can configure to secure your resources and services. These include network security groups, virtual network security, firewall rules, access control lists, and more. You can also configure identity and access management settings, such as single sign-on and multifactor authentication.
Managing Azure Security Risks
Managing security risks involves identifying and addressing security vulnerabilities and threats. Azure Portal Admin provides tools for identifying and mitigating security risks, such as security centers, threat protection, and vulnerability assessment. You can also configure alerts to notify you when security risks are detected.
Compliance Considerations for Azure
Compliance is a critical consideration for businesses that store and process sensitive data in the cloud. Azure Portal Admin provides tools for ensuring compliance with a range of regulations and standards, such as HIPAA, PCI DSS, and GDPR. You can configure compliance settings and monitor compliance status using Azure Portal Admin.
In this section, we covered the basics of security and compliance in Azure. By understanding Azure security features, configuring security settings, managing security risks, and ensuring compliance, you can secure your cloud infrastructure and protect sensitive data.
Cost Management – Understanding Azure Pricing
Understanding Azure pricing is essential for effective cost management. Azure offers a range of pricing models, such as pay-as-you-go, reserved instances, and spot instances. Azure Portal Admin provides tools for estimating and optimizing costs based on your usage and needs.

Managing Azure Costs
Managing Azure costs involves monitoring and controlling your cloud spending. Azure Portal Admin provides tools for managing costs, such as cost analysis, budget alerts, and cost allocation. You can also use Azure Advisor to identify cost-saving opportunities.
Cost Optimization Strategies
Cost optimization involves reducing costs without sacrificing performance or functionality. Azure Portal Admin provides tools for optimizing costs, such as resource tagging, resource consolidation, and resource deletion. You can also use Azure Cost Management to identify areas where you can reduce costs.
Monitoring and Tracking Azure Spending
Monitoring and tracking your Azure spending is essential for ensuring that you stay within your budget. Azure Portal Admin provides tools for monitoring and tracking spendings, such as cost analysis and spending reports. You can also set up alerts to notify you when you approach or exceed your budget.
In this section, we covered the basics of cost management in Azure. By understanding Azure pricing, managing costs, optimizing costs, and monitoring and tracking spending, you can ensure that you are using Azure in a cost-effective way that aligns with your business needs and goals.
Best Practices for Azure Portal Admin – Tips for effective cloud management
Effective cloud management involves adopting best practices that help you get the most out of your Azure infrastructure. Some tips for effective cloud management include implementing automation, using templates and scripts, monitoring performance and availability, and establishing clear governance policies.
Common Mistakes to Avoid
There are also common mistakes that you should avoid when managing Azure infrastructure. These include:
- Failing to properly configure security settings,
- Not monitoring and optimizing costs,
- Not keeping software and infrastructure up to date, and
- Failing to establish clear governance policies.
Conclusion
In this guide, we covered the basics of Azure Portal Admin and effective cloud management. We explored how to set up Azure Portal Admin, manage Azure resources, ensure security and compliance, manage costs, and adopt best practices for effective cloud management.
Effective cloud management is essential for ensuring that your cloud infrastructure is secure, optimized, and cost-effective. By implementing the strategies and best practices covered in this guide, you can effectively manage your Azure infrastructure and achieve your business goals.
As technology continues to evolve, cloud computing will continue to play an increasingly important role in businesses of all sizes. By mastering Azure Portal Admin and effective cloud management, you can stay ahead of the curve and position your business for success in the digital age. Remember to continue learning and staying up to date with the latest developments in cloud computing, and don’t hesitate to seek out help and resources when needed.
Thank you for reading this comprehensive guide on mastering Azure Portal Admin and effective cloud management. We hope that you found it informative and useful in your journey toward becoming a cloud management expert.
Resources for Ongoing Learning
Learning is an ongoing process, and there are many resources available to help you deepen your knowledge of Azure and cloud computing. Some resources for ongoing learning include:

by Contributed | Jun 23, 2023 | Technology
This article is contributed. See the original author and article here.
In this episode of MidDay Café hosts Tyrelle Barnes and Michael Gannotti discuss Human/AI partnership. Many organizations are trying to figure out AI strategy but seem to be taking a tech/product first approach. What Tyrelle and Michael discuss is how to anchor on people/employees first with AI/Tech in support.
Listen to the Audio podcast version:
Resources:
Thanks for Visiting!
Tyrelle Barnes LinkedIn : Michael Gannotti LinkedIn | Twitter


Recent Comments