by Contributed | Oct 1, 2023 | Technology
This article is contributed. See the original author and article here.
As you embark on your journey back to college or university, it’s essential to prioritize the security of your digital assets, especially when dealing with platforms like Microsoft Azure. One of the most effective ways to fortify your online defenses is by implementing Two-Factor Authentication (2FA), and in this comprehensive guide, we’ll walk you through the process, step by step of how-to setup 2FA and recovery your (2FA) authenticator setting is loose or misplace your device.
The Step-by-Step Process to Safeguard Your Azure Account
By following these steps, you’ll have successfully added Two-Factor Authentication to your Microsoft Azure account, significantly enhancing your online security. Remember that you can also easily remove your account’s connection to a previous Microsoft
Authenticator App.
Thank you for prioritizing the security of your online accounts, and we hope this guide has been helpful. If you have any questions or encounter issues along the way, feel free to reach out for assistance. Your digital safety is paramount, and taking these steps will go a long way in safeguarding your valuable information.
The Step by Step Process
Step 1
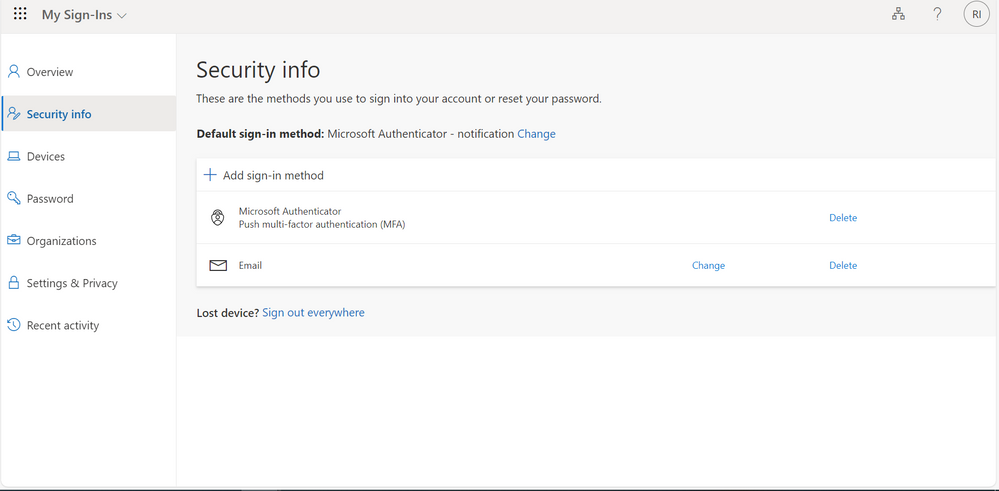
Go to My Sign-Ins | Security Info | Microsoft.comnt
Step 2
Sign into your account
Make sure at the left hand of your screen, you are on Security info.
Note: This page will look different for you, before I hid my email address and device name the previous Authenticator App is connected to.
Step 3
Click on Add sign-in method

Step 4
Choose a method by clicking on the drop down icon


Step 5
Here, I will be using Microsoft Authenticator
Select Microsoft Authenticator


Step 6
Click on Add


Step 7
Download the Microsoft Authenticator App if you previously do not have it on your phone or tablet.
Step 8
Next, after sorting out Step 7 click on Next


Step 9
On the Set up your account screen, click on Next


Step 10
Scan the barcode by
- Clicking on the Authenticator App in your device
- Click on the + sign at the top right of your screen
- Select what type of account you are adding
This are the options
Personal account
Work or school account
Other(Google, Facebook, etc.)
Step 11
Click from this option on what you are using, for me I clicked on Work or school account
There is new option to add work or school account that gives you an option to
Sign in
Scan QR code
Cancel
Click on Scan QR code
If this does not work for you that is fine, mine showed an error message
For me it showed an error message that reads:
You’ve have already used this QR code to add an account. Generate a new QR code and try again.
Let’s resolve this together, you can either use of any this steps
- By starting the process again and scan the image (this worked for me)
- Or clicking on manually on your device and adding the code and URL
Adding the code and URL
Step 12
Click on Can’t scan image


Step 13
Either you are continuing from Step 11 or Step 12
Click on Next


Step 14
After this step, this will show a number for you to enter in your Authenticator App,
Enter the number and click on Next


Note: you can easily delete the connection of your account to the previous Microsoft Authenticator App so if you lose your device or change device simply follow the steps above to add a new device.
Thank you very much for reading keep secure and stay safe.
by Contributed | Sep 29, 2023 | Technology
This article is contributed. See the original author and article here.
Segundo relatórios de investigações da Verizon Data Breach em 2020, foi constatado que 80% das violações de segurança em aplicações Web estão relacionadas a credenciadas roubadas; e 83% das aplicações hoje possuem ao menos uma vulnerabilidade de segurança. Essas brechas são grandes oportunidades para pessoas mal-intencionadas explorarem seus aplicativos e causarem grandes danos.
Organizações que adotam práticas de DevSecOps (checks de segurança, busca por vulnerabilidades diariamente etc.) reduzem o tempo de recuperação para problemas de segurança em 72% em relação a organizações que rodam essas validações apenas ocasionalmente.
Em ordem de suprir estes pontos de melhoria em um mundo onde o desenvolvimento de softwares está em contante e rápida transformação de forma maravilhosa as comunidades ao nosso redor, a Microsoft traz o GitHub Advanced Security for Azure DevOps (GHAzDO) para dentro do suíte de serviços do Azure DevOps.
O que é GHAzDO?
Conforme mencionado, o GHAzDO é um serviço que provê funcionalidades de segurança para implantação de shift-left (prática que consiste em iniciar os testes de aplicação mais cedo e duram todo o ciclo de vida do desenvolvimento de software), tornando mais simples diagnosticar e prevenir brechas de segurança da sua aplicação em estágios de desenvolvimento mais iniciais.
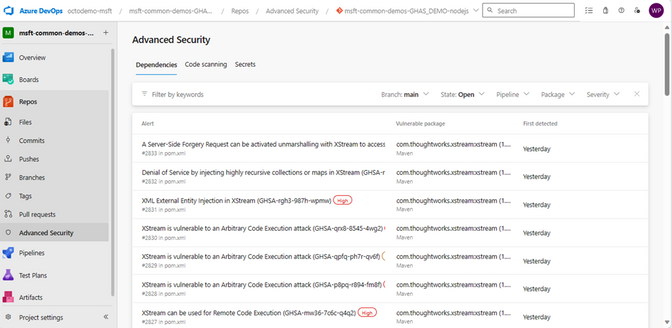
O GHAzDO é dividido em 3 abordagens: Secure Dependencies, Secure Code e Secure Secrets.
Secure Dependencies
Ataques a ferramentas de código aberto são cada vez mais frequentes. Com o Dependency Scanning, é possível identificar vulnerabilidades em pacotes presentes no código e receber um conjunto de orientações em como mitigar essas aberturas.
Secure Code
Com o conceito de Code Scanning, o GHAzDO inclui uma ferramenta de análise estática capaz de detectar centenas de vulnerabilidades de segurança no código como SQL Injection, XPath Injection, Authorization bypass em uma ampla variedade de linguagens (C/C++, C#, Go, Java/Kotlin, Javascript/Typescript, Python etc.). Tudo isso, é executado dentro do contexto do Azure Pipelines sobre o código no Azure Repos. Ou seja, é uma ferramenta nativa focada em ser totalmente natural para os usuários do Azure DevOps.

Secure Secrets
Metade das brechas de segurança em aplicações estão relacionadas com credenciais expostas. Com a funcionalidade do Secret Scanning, é possível listar todos os segredos expostos no repositório e seus respectivos arquivos. Não só isso, com apenas 1 clique é possível bloquear o envio de segredos para o repositório, impedindo que brechas de segurança sejam causadas.
Uma vez que um segredo está exposto no repositório, ele faz parte do histórico de commits. Em uma situação como essa, é necessário revogar o segredo, e atualizar todos os recursos que potencialmente façam uso deste para um novo. Se porventura algum recurso for esquecido, é possível causar uma indisponibilidade na aplicação. Não o bastante, será necessário também resetar o histórico do repositório para o commit anterior ao momento em que o segredo foi exposto. Se este foi exposto há um tempo considerável, isso pode causar sérios danos em relação ao trabalho que foi desenvolvido até então, gerando um grande atraso a equipe de desenvolvimento.
Portanto, certificar-se de que secrets, credenciais, ou qualquer outra informação sensível nunca seja exposta ao repositório (push protection) é de extrema importância para a saúde e segurança da aplicação.


Para aprender mais sobre o GitHub Advanced Security para o Azure DevOps, veja: https://aka.ms/advanced-security

by Contributed | Sep 28, 2023 | Technology
This article is contributed. See the original author and article here.
As a Microsoft Most Valuable Professional (MVP) and a Microsoft Certified Trainer (MCT), I can say from experience that if you want to improve your skills, expand your knowledge, and advance your career, Microsoft Learn can be an essential resource for you. This family of skill-building offerings brings together all Microsoft technical content, learning tools, and resources, providing practical learning materials both for professionals and beginners. Among the many features that Microsoft Learn offers, four of my favourites are collections, career path training, Practice Assessments, and exam prep videos.
1. Collections
Collections let you customise your own learning journey. Often you come across something on Microsoft Learn that’s interesting, and you want to save it for later. This is where collections come in handy. Collections let you organise and group content on Microsoft Learn—whether it’s a module about a particular topic, a learning path, or an article with technical documentation. You can even share your collections via a link with others.
I frequently create collections to keep track of all the content that will be useful in preparing for a Microsoft Certification exam. This might include the official learning path, along with any extra documentation that could help during exam prep. To place a module or learning path into a collection, from the Training tab, on the content of interest, select Add. You can revisit collections from your Microsoft Learn profile.
The Add button on a Microsoft Learn training module.
2. Career path training
As you may have already discovered, one of the challenges to learning new technologies is finding the right resources for your skill-building needs. Perhaps you’re not sure where to begin your learning journey. I’ve found that a good starting point is to explore learning content based on your career path or on one that interests you. You can find this option on the Microsoft Learn Training tab, and it points you to a collection of modules, learning paths, and certifications that are relevant and tailored to your chosen job role. Whether you want to become a business user, a data scientist, a solutions architect, a security engineer, or a functional consultant, you can find the appropriate learning content for your role and level of expertise. Plus, with career path training, you can learn at your own pace, gain practical experience, and validate your skills with Microsoft Certifications.

Career path collection options on Microsoft Learn.
3. Practice Assessments
If you’re preparing to earn a Microsoft Certification, you can get an idea of what to expect before you take the associated exam by trying a Practice Assessment. This option is available for some certifications and is a great way to gauge the topics you’re strong in and the ones for which you could use more practice. They help you build confidence by giving you a feel for the types of questions, style of wording, and level of difficulty you might encounter during the actual exam.

Sample Practice Assessment questions.
If your certification exam has a Practice Assessment available, it’s listed on the Microsoft Learn exam page, under Schedule exam. Just select Take a free practice assessment.
4. Exam prep videos
Other valuable Microsoft Learn resources to help you get ready for earning a Microsoft Certification are exam prep videos, available for some certifications. These videos are designed to help you review the key concepts and skills that are covered on the exam and to provide tips and tricks on how to approach the questions. They offer an engaging way to absorb essential knowledge and skills, making it easier to grasp technical concepts and their practical applications. The videos, hosted by industry experts, provide a structured, guided approach to the exam topics.
These exam prep videos complement your other Microsoft Learn study materials. Even if you consider yourself an expert on a topic, the videos are a good way to refresh your memory before exam day. To browse through available exam prep videos, check out the Microsoft Learn Exam Readiness Zone and search for your topic of interest or exam number, or even filter by product.
Share your favourite Microsoft Learn features
Creating your own collections of content, exploring new career paths, or preparing to earn Microsoft Certifications by taking Practice Assessments or watching exam prep videos are just some of the ways that Microsoft Learn can help you achieve your skill-building and certification goals, and they’re some of my favourite features in Microsoft Learn. What are your favourites? Share your top picks with us, and help others on their learning journeys.
Meet Rishona Elijah, Microsoft Learn expert
Rishona Elijah is a Microsoft Most Valuable Professional (MVP) for Business Applications and a Microsoft Certified Trainer (MCT). She works as a Trainer & Evangelist at Microsoft Partner Barhead Solutions, based in Australia. She is also a LinkedIn Learning instructor for Microsoft Power Platform certifications. Rishona has trained thousands of individuals on Microsoft Power Platform and Dynamics 365, delivering impactful training sessions that empower them to use the no-code/low-code technology to build their own apps, chatbots, workflows, and dashboards. She enjoys sharing her knowledge and ideas on her blog, Rishona Elijah, in addition to speaking at community conferences and user groups.
“Power Platform with Rishona Elijah” is a Microsoft learning room that provides a supportive and encouraging environment for people starting their Microsoft Power Platform journey. The room offers assistance and guidance on Microsoft Power Platform topics, including certifications, Power Apps, Power Virtual Agents, Power Automate, and AI Builder. It’s also a great space to network with like-minded peers and to celebrate your success along the way. Sign up for the “Power Platform with Rishona Elijah” learning room.
Learn more about Rishona Elijah
by Contributed | Sep 27, 2023 | Technology
This article is contributed. See the original author and article here.
The Azure Functions team is thrilled to announce General Availability of version 4 of the Node.js programming model! This programming model is part of Azure Functions’ larger effort to provide a more flexible and intuitive experience for all supported languages. You may be aware that we announced General Availability of the new Python programming model for Azure Functions at MS Build this year. The new Node.js experience we ship today is a result of the valuable feedback we received from JavaScript and TypeScript developers through GitHub, surveys, user studies, as well as suggestions from internal Node.js experts working closely with customers.
This blog post aims to highlight the key features of the v4 model and also shed light on the improvements we’ve made since announcing public preview last spring.
What’s improved in the V4 model?
In this section, we highlight several key improvements made in the V4 programming model.
Flexible folder structure
The existing V3 model requires that each trigger be in its own directory, with its own function.json file. This strict structure can make it hard to manage if an app has many triggers. And if you’re a Durable Functions user, having your orchestration, activity, and client functions in different directories decreases code readability, because you must switch between directories to look at the components of one logical unit. The V4 model removes the strict directory structure and gives users the flexibility to organize triggers in ways that makes sense to their Function app. For example, you can have multiple related triggers in one file or have triggers in separate files that are grouped in one directory.
Furthermore, you no longer need to keep a function.json file for each trigger you have in the V4 model as bindings are configured in code! See the HTTP example in the next section and the Durable Functions example in the “More Examples” section.
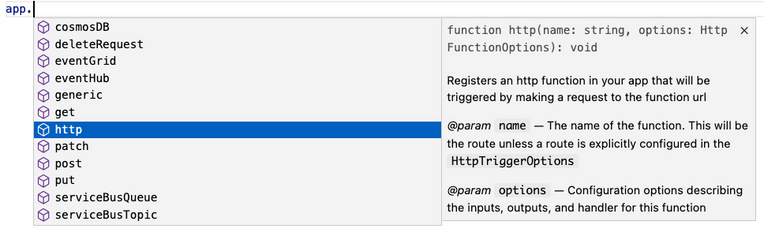
Define function in code
The V4 model uses an app object as the entry point for registering functions instead of function.json files. For example, to register an HTTP trigger responding to a GET request, you can call app.http() or app.get() which was modeled after other Node.js frameworks like Express.js that also support app.get(). The following shows what has changed when writing an HTTP trigger in the V4 model:
File Type
|
V3
|
V4
|
JavaScript |
module.exports = async function (context, req) {
  context.log('HTTP function processed a request');

  const name = req.query.name
    || req.body
    || 'world';

  context.res = {
    body: `Hello, ${name}!`
  };
};
|
const { app } = require("@azure/functions");

app.http('helloWorld1', {
  methods: ['GET', 'POST'],
  handler: async (request, context) => {
    context.log('Http function processed request');

    const name = request.query.get('name')
      || await request.text()
      || 'world';

    return { body: `Hello, ${name}!` };
  }
});
|
JSON |
{
  "bindings": [
    {
      "authLevel": "anonymous",
      "type": "httpTrigger",
      "direction": "in",
      "name": "req",
      "methods": [
        "get",
        "post"
      ]
    },
    {
      "type": "http",
      "direction": "out",
      "name": "res"
    }
  ]
}
|
 Nothing Nothing 
|
Trigger configuration like methods and authLevel that were specified in a function.json file before are moved to the code itself in V4. We also set several defaults for you, which is why you don’t see authLevel or an output binding in the V4 example.
New HTTP Types
In the V4 model, we’ve adjusted the HTTP request and response types to be a subset of the fetch standard instead of types unique to Azure Functions. We use Node.js’s undici package, which follows the fetch standard and is currently being integrated into Node.js core.
HttpRequest – body
V3
|
V4
|
// returns a string, object, or Buffer
const body = request.body;
// returns a string
const body = request.rawBody;
// returns a Buffer
const body = request.bufferBody;
// returns an object representing a form
const body = await request.parseFormBody();
|
const body = await request.text();
const body = await request.json();
const body = await request.formData();
const body = await request.arrayBuffer();
const body = await request.blob();
|
HttpResponse – status
V3
|
V4
|
context.res.status(200);

context.res = { status: 200}
context.res = { statusCode: 200 };

return { status: 200};
return { statusCode: 200 };
|
return { status: 200 };
|
To see how other properties like header, query parameters, etc. have changed, see our developer guide.
Better IntelliSense
If you’re not familiar with IntelliSense, it covers the features in your editor like autocomplete and documentation directly while you code. We’re big fans of IntelliSense and we hope you are too because it was a priority for us from the initial design stages. The V4 model supports IntelliSense for JavaScript for the first time, and improves on the IntelliSense for TypeScript that already existed in V3. Here are a few examples:

More Examples
NOTE: One of the priorities of the V4 programming model is to ensure parity between JavaScript and TypeScript support. You can use either language to write all the examples in this article, but we only show one language for the sake of article length.
Timer (TypeScript)
A timer trigger that runs every 5 minutes:
import { app, InvocationContext, Timer } from '@azure/functions';

export async function timerTrigger1(myTimer: Timer, context: InvocationContext): Promise {
    context.log('Timer function processed request.');
}

app.timer('timerTrigger1', {
    schedule: '0 */5 * * * *',
    handler: timerTrigger1,
});
Durable Functions (TypeScript)
Like in the V3 model, you need the durable-functions package in addition to @azure/functions to write Durable Functions in the V4 model. The example below shows one of the common patterns Durable Functions is useful for – function chaining. In this case, we’re executing a sequence of (simple) functions in a particular order.
import { app, HttpHandler, HttpRequest, HttpResponse, InvocationContext } from '@azure/functions';
import * as df from 'durable-functions';
import { ActivityHandler, OrchestrationContext, OrchestrationHandler } from 'durable-functions';

// Replace with the name of your Durable Functions Activity
const activityName = 'hello';

const orchestrator: OrchestrationHandler = function* (context: OrchestrationContext) {
    const outputs = [];
    outputs.push(yield context.df.callActivity(activityName, 'Tokyo'));
    outputs.push(yield context.df.callActivity(activityName, 'Seattle'));
    outputs.push(yield context.df.callActivity(activityName, 'Cairo'));

    return outputs;
};
df.app.orchestration('durableOrchestrator1', orchestrator);

const helloActivity: ActivityHandler = (input: string): string => {
    return `Hello, ${input}`;
};
df.app.activity(activityName, { handler: helloActivity });

const httpStart: HttpHandler = async (request: HttpRequest, context: InvocationContext): Promise => {
    const client = df.getClient(context);
    const body: unknown = await request.text();
    const instanceId: string = await client.startNew(request.params.orchestratorName, { input: body });

    context.log(`Started orchestration with ID = '${instanceId}'.`);

    return client.createCheckStatusResponse(request, instanceId);
};

app.http('durableOrchestrationStart1', {
    route: 'orchestrators/{orchestratorName}',
    extraInputs: [df.input.durableClient()],
    handler: httpStart,
});
In Lines 8-16, we set up and register an orchestration function. In the V4 model, instead of registering the orchestration trigger in function.json, you simply do it through the app object on the durable-functions module (here df). Similar logic applies to the activity (Lines 18-21), client (Lines 23-37), and Entity functions. This means you no longer have to manage multiple function.json files just to get a simple Durable Functions app working!
Lines 23-37 set up and register a client function to start the orchestration. To do that, we pass in an input object from the durable-functions module to the extraInputs array to register the function. Like in the V3 model, we obtain the Durable Client using df.getClient() to execute orchestration management operations like starting a new orchestration. We use an HTTP trigger in this example, but you could use any trigger supported by Azure Functions such as a timer trigger or Service Bus trigger.
Refer to this example to see how to write a Durable Entity with the V4 model.
What’s new for GA?
We made the following improvements to the v4 programming model since the announcement of Public Preview last spring. Most of these improvements were made to ensure full feature parity between the existing v3 and the new v4 programming model.
- AzureWebJobsFeatureFlags no longer needs to be set
During preview, you needed to set the application setting “AzureWebJobsFeatureFlags” to “EnableWorkerIndexing” to get a v4 model app working. We removed this requirement as part of the General Availability update. This also allows you to use Azure Static Web Apps with the v4 model. You must be on runtime v4.25+ in Azure or core tools v4.0.5382+ if running locally to benefit from this change.
- Model v4 is now the default
We’re confident v4 is ready for you to use everywhere, and it’s now the default version on npm, in documentation, and when creating new apps in Azure Functions Core Tools or VS Code.
- Entry point errors are now exposed via Application Insights
In the v3 model and in the preview version of the v4 model, errors in entry point files were ignored and weren’t logged in Application Insights. We changed the behavior to make entry point errors more obvious. It’s a breaking change for model v4 as some errors that were previously ignored will now block your app from running. You can use the app setting “FUNCTIONS_NODE_BLOCK_ON_ENTRY_POINT_ERROR” to configure this behavior. We highly recommend setting it to “true” for all v4 apps. For more information, see the App Setting reference documentation.
- Support for retry policy
We added support for configuring retry policy when registering a function in the v4 model. The retry policy tells the runtime to rerun a failed execution until either successful completion occurs or the maximum number of retries is reached. A retry policy is evaluated when a Timer, Kafka, CosmosDB or Event Hubs-triggered function raises an uncaught exception. As a best practice, you should catch all exceptions in your code and rethrow any errors that you want to result in a retry. Learn more about Azure Functions Retry policy.
- Support for Application Insights npm package
Add the Application Insights npm package (v2.8.0+) to your app to discover and rapidly diagnose performance and other issues. This package tracks the following out-of-the-box: incoming and outgoing HTTP requests, important system metrics such as CPU usage, unhandled exceptions, and events from many popular third-party libraries.
- Support for more binding types
We added support for SQL and Table input and output bindings. We also added Cosmos DB extension v4 types. A highlight of the latest Cosmos DB extension is that it allows you to use managed identities instead of secrets. Learn how to upgrade your Cosmos DB extension here and how to configure an app to use identities here.
- Support for hot reload
Hot reload ensures your app will automatically restart when a file in your app is changed. This was not working for model v4 when we announced preview, but has been fixed for GA.
How to get started?
Check out our Quickstarts to get started:
See our Developer Guide to learn more about the V4 model. We’ve also created an upgrade guide to help migrate existing V3 apps to V4.
Please give the V4 model a try and let us know your thoughts!
If you have questions and/or suggestions, please feel free to drop an issue in our GitHub repo. As this is an open-source project, we welcome any PR contributions from the community.
by Contributed | Sep 26, 2023 | Technology
This article is contributed. See the original author and article here.
Announcements have been a core part of Viva Engage for years but have recently become a critical way to keep employees informed and engaged with leaders. The broad delivery of announcements across Viva Engage, Viva Connections, Outlook, and Microsoft Teams means that employees can use rich engagement features like reactions, replies, and sharing from within the apps that they use every day. Analytics help track the reach of the announcements, meaning our customers have come to rely on announcements to help run their business and measure the impact their communications are having in your network.
We’ve taken it one step further by enabling specific employees as leaders because we know leaders want to share vision, updates, and perspectives to build culture and manage change. When leaders are selected in Viva Engage, and their audiences have been set up they can send storyline announcements. And now leaders can reach and connect with employees in their organizations and send their posts to multiple audiences. Leaders and their delegates can now configure multiple audiences and effectively target storyline announcements to them.
Leaders can now send targeted storyline announcements to different audiences
Leaders, and their delegates can now target storyline announcements to preconfigured audiences, expanding the leader’s ability to reach people beyond their direct reporting organization. Upon creating an announcement, the leader’s default audience will be preselected. To add additional audiences, select Change option. This will bring up the Storyline announcements options window in which the default audience can be changed for any of the configured ones. Once an audience is selected, confirm the channels before you send your message.

Set up multiple audiences
To view information about how to configure audiences, please visit Identify leaders and manage audiences in Viva Engage. To define a leader’s audience, you add individual users or groups, such as security, distribution, or Microsoft 365 groups. When you add a group, changes to the group’s membership, including nested members, automatically update the audience within 24 hours. This functionality makes it easy to apply existing groups that define a leader’s organization to define the leader’s audience in Viva Engage. Customers may have existing distribution lists that they use to communicate with an audience by email. You can add those lists to the leader’s audience in Viva Engage for continuous communication.

Send announcements to your audience across apps
Leaders can make an announcement and select your audience and reach people across apps. Once the announcement is delivered, your audiences can react and reply regardless of what app they receive the announcement. To make your announcements more engaging, attach images or videos, ask a question, pose a poll to your community, or draw attention to specific actions by using rich media within your announcement. Announcements made by leaders will also be highlighted in leadership corner.

Analyze the impact of your communication
When you post an announcement in Viva Engage, you can expect the message to reach your audience. From the notifications with Microsoft Teams, Outlook interactive messages, Engage notifications, we want to make sure that you understand the impact of your communications by tracking the reach of your communications and the sentiment of your audience. With conversation insights, you’ll be able to view how well your announcement has performed. With personal analytics, you can track the effectiveness across multiple posts and announcements. With audience analytics, leaders can track levels of sentiment analysis to help monitor the engagement, contributions and themes across your audience, beyond what you have sent. You can start to understand and know what your audience thinks is important and can help you identify what to post next.

What’s new and next for storyline….
• Storyline can be made available for only specific employees
• Storyline announcements coming to multiple tenant organizations
Learn more about Viva Employees Communications and Communities and stay tuned to the M365 Roadmap for the latest updates about what’s coming for Viva Engage.
If you are looking to share important news and information with employees, try using announcements on your storyline posts. With the speed of delivery, ability to measure reach, and a way to spark two-way engagement, announcements are an essential way to keep your employees informed.

Recent Comments