by Contributed | Jun 23, 2021 | Technology
This article is contributed. See the original author and article here.
The latest Maven plugin for Azure Web Apps provides a brand new experience that enables you to deploy not only application artifacts such as JAR, WAR, and EAR files but also application dependencies like libraries, module definitions, and startup scripts — using one single Maven Goal.
mvn azure-webapp:deploy
Why use it?
Starting from version 1.16.1, the Maven plugin for Azure Web Apps now supports deploying extra file types like JAR, WAR, EAR, libraries, app server module definitions, startup scripts, and more. This new experience gives you:
- Simplicity: Infrastructure as Code (IaC) by defining everything in your pom.xml and applying changes to Azure with a single Maven deploy Goal. You can easily embed the process in your CI/CD and avoid context switching between multiple tools.
- One single app restart: Many file changes require Web App restart in order to take effect. The Maven plugin will manage restart policy during the deployment for you so that, no matter how many files are deployed, the Maven plugin will trigger only one restart.
- Fewer errors: The Maven plugin ensures files are deployed in the right location for Azure App Service. (For example, startup scripts can only take effect if they are deployed under “/home/site/scripts/”.) Using this plugin can help you avoid many errors.
How to get started
The Maven plugin for Azure Web Apps greatly simplifies the development experience for Tomcat, Spring Boot, and JBoss EAP apps on Azure App Service. Starting from a Maven project, run the following config goal, follow the wizard to authenticate with Azure, and generate configurations in your pom.xml that are ready to deploy.
mvn com.microsoft.azure:azure-webapp-maven-plugin:1.16.1:config
      <plugin>
        <groupId>com.microsoft.azure</groupId>
        <artifactId>azure-webapp-maven-plugin</artifactId>
        <version>1.16.1</version>
        <configuration>
          <schemaVersion>v2</schemaVersion>
          <subscriptionId>xxxxxx</subscriptionId>
          <resourceGroup>xxx-rg</resourceGroup>
          <appName>xxx</appName>
          <pricingTier>P1v3</pricingTier>
          <region>westeurope</region>
          <appServicePlanName>asp-xxx</appServicePlanName>
          <appServicePlanResourceGroup>xxx-rg</appServicePlanResourceGroup>
          <runtime>
            <os>Linux</os>
            <javaVersion>Java 8</javaVersion>
            <webContainer>Jbosseap 7.2</webContainer>
          </runtime>
          <deployment>
            <resources>
              <resource>
                <directory>${project.basedir}/target</directory>
                <includes>
                  <include>*.war</include>
                </includes>
              </resource>
            </resources>
          </deployment>
        </configuration>
      </plugin>
The above configuration includes only your build artifact. As demonstrated in the PetStore JBoss EAP sample app, you might need to upload a script containing extra steps to prepare the environment before running the artifact. Now, instead of uploading files to the Web App with FTP, deploying the WAR package, and triggering an app restart, you can simply add the configurations below in your pom.xml.
<deployment>
  <resources>
    <resource>
      <type>war</type>
      <directory>${project.basedir}/target</directory>
      <includes>
        <include>*.war</include>
      </includes>
    </resource>
    <resource>
      <type>lib</type>
      <directory>${project.basedir}/.scripts/3B-mysql</directory>
      <includes>
        <include>*.jar</include>
      </includes>
    </resource>
    <resource>
      <type>startup</type>
      <directory>${project.basedir}/.scripts/3B-mysql</directory>
      <includes>
        <include>*.sh</include>
      </includes>
    </resource>
    <resource>
      <type>script</type>
      <directory>${project.basedir}/.scripts/3B-mysql</directory>
      <includes>
        <include>*.cli</include>
        <include>*.xml</include>
      </includes>
    </resource>
  </resources>
</deployment>
You can then deploy the app with one single command and everything is up and ready!
mvn package azure-webapp:deploy
Try our tools
Please do not hesitate to try it! Your feedback and suggestions are especially important to us and will help shape our product in future.
by Contributed | Jun 23, 2021 | Technology
This article is contributed. See the original author and article here.
When your team members are working on multiple projects using Project for the Web, it can be difficult for them to know what tasks they are assigned, and when they should be completed across all their projects. This blog shows you how to create a My Tasks experience using Power Apps to help your team stay on track.
Step 1: Create a new View for Project in Power Apps
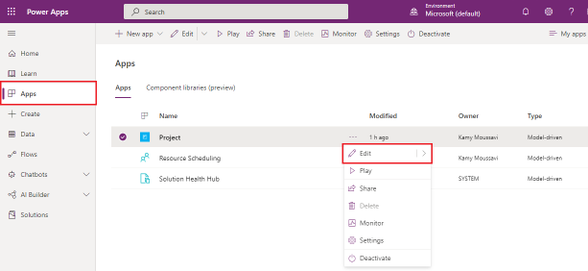
- Go to Powerapps.com and sign in.
- Click on Apps on the left navigation menu.
- Locate the Project App in the Apps list and click the More Commands ellipses menu and click Edit.
4. Click the + Add button on the top left, and then select Views.
5. On the right options pane, use the drop-down menu to select Project Task.
6. Press the Create New button above the drop-down menu.

Step 2: Create a filter for Tasks Assigned to You
- Create a new filter by opening the Filter Pane and pressing Add Filter.
- Select Resource Assignment (Task) in the drop-down menu.
- In the Resource Assignment (Task) box, Press Add Filter.
- Select Bookable Resource (Bookable Resource) in the drop-down menu.
- In the Bookable Resource (Bookable Resource) box, Press Add Filter.
- Select User in the drop-down menu.
- In the drop-down menu that says Equals, select Equals Current User.

Step 3: Add Columns Attributes for more details on your View
- In the right pane, select the Components tab and press Column Attributes: Primary Entity.
- Drag and drop any new column attribute necessary for you in the Columns section in the bottom left.
- We recommend adding Project, Start Date, Due Date, % Complete.
- Once satisfied with this view, press Save on top right, the name your view My Tasks.

Step 4: Add the Project Task view to your Project Site Map
- On the App Designer landing page, press the edit icon on the Site Map (the first tile in the canvas)

2. Select the blue Projects text under the Projects Tab press + Add to add a Subarea.
3. Use the Type drop-down menu to select Entity.
4. Use the Entity drop-down menu to select Project Task.
5. In the Title text field, name this Entity Project Tasks.
6. Press Save, then Publish, then Save and Close.

Step 5: Try out your new My Tasks view in Project Power Apps
- In the App Designer landing page, press Play in top right to launch Project.
- Select the new Project Tasks subarea under Projects in the left menu.
- In the view selector at the top left defaulted to My Open Project Tasks, select your My Tasks view.
- Voila! You can now see all tasks assigned to you across all projects, and click either the task name or the project name to go the respective project.

FAQ
What license do users need to view this My Tasks view once it is created?
All users with Office, P1, P3 and P5 will be able to view this My Task View.
What license do I need to be able to create this My Tasks view?
Project P1, P3 and P5 all have access to Power Apps and can design this custom My Tasks view.
How can I add more details to the My Tasks view?
You can customize the view by going through Step 3 and adding any column attribute to this view.
by Contributed | Jun 23, 2021 | Technology
This article is contributed. See the original author and article here.
The 21.06 Azure Sphere OS quality update is now available in the Retail feed. This release includes bug fixes in the Azure Sphere OS; it does not include an updated SDK. If your devices are connected to the internet, they will receive the updated OS from the cloud.
21.06 includes updates and enhancements in the following areas.
- Open-source code can now be built in a manner that better reflects its use in the Azure Sphere OS. Previously wpa_supplicant did not properly link to wolfSSL.
- When writing to flash devices over SPI from high level apps, corruption was possible under certain conditions due to using byte aligned writes instead of word aligned writes. This issue is resolved, and writes are now optimized for cases smaller and larger than 1 word.
For more information on Azure Sphere OS feeds and setting up an evaluation device group, see Azure Sphere OS feeds and Set up devices for OS evaluation.
For self-help technical inquiries, please visit Microsoft Q&A or Stack Overflow. If you require technical support and have a support plan, please submit a support ticket in Microsoft Azure Support or work with your Microsoft Technical Account Manager. If you would like to purchase a support plan, please explore the Azure support plans.
by Contributed | Jun 23, 2021 | Technology
This article is contributed. See the original author and article here.
Today, Microsoft is announcing the general availability of Android Enterprise corporate-owned devices with a work profile in Endpoint Manager. With this release, Endpoint Manager now supports the complete set of Android Enterprise management scenarios, including dedicated devices, fully managed devices, and personally-owned devices with a work profile.
Nowadays, it is not uncommon for many of us to use our corporate-owned devices for personal use. Employees want to be sure that their personal data and information remains private, and organizations want to be confident that corporate devices are secure and compliant with company policies. Corporate-owned devices with a work profile is the best of both worlds: the work profile provides the same data separation capabilities available on personally-owned work profile, with added device management capabilities designed for a corporate device. Once enrolled, this will automatically keep corporate applications, data, and contacts in the work container (work profile) and personal applications, data, and contacts in the personal container (personal profile). This corporate-owned personally-enabled (COPE) scenario offers end users confidence that their company administrators will not have visibility into the data and applications in the personal profile.
As more and more employees work from home or in hybrid office environments, corporate-owned devices with a work profile can help enable people to stay securely connected to their work and personal data from virtually anywhere. Employees can easily transition from checking company email to monitoring the status of personal deliveries and then back to their work apps, seamlessly and securely on the same device. During the preview over the past few months, we have seen incredible growth and satisfaction in customer adoption of these capabilities. Let’s dive into the details of enabling Android Enterprise corporate-owned devices with a work profile in Endpoint Manager:
Device Enrollment
Corporate-owned devices with a work profile is available for Android 8+ (Oreo and higher). Endpoint Manager supports these popular provisioning methods:
- Knox Mobile Enrollment
- Zero Touch Enrollment
- NFC – Near Field Communications (only supported on Android 8-10 for COPE devices)
- Token Entry (only supported on Android 8-10 for COPE devices)
- QR code
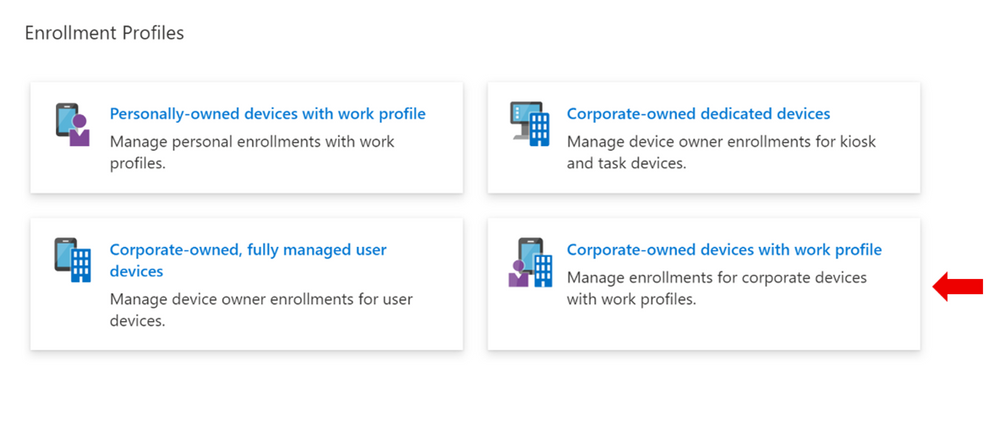
IT Administrators can enable enrollment for this scenario by selecting the “Corporate-owned devices with a work profile” enrollment tile (indicated with the red arrow below). They can create multiple enrollment profiles with unique tokens that do not expire.
End User Enrollment
The experience for end users to enroll corporate-owned devices with a work profile includes new screens that inform them about the functionality of the work and personal profiles on the device. For example:

Additionally, the experience will guide end users through setting up administration requirements such as creating a device password, installing work applications, and registering the device. Once successfully set up, users will have two sections labeled work and personal in their full application list.

Device Configuration
A subset of the existing settings for fully managed and dedicated devices are available for corporate-owned devices with a work profile. Additionally, we’ve added new settings to configure the work profile password and capabilities in the personal profile (indicated with the red arrows below).

You can create device configuration profiles under the “Fully Managed, Dedicated, and Corporate-Owned Work Profile” category and assign them to corporate-owned devices with a work profile to disable device features, assign certificates, or configure Wi-Fi or VPN. These device configuration profiles can be applied to fully managed, dedicated, and corporate-owned work profile devices.

Some of the settings in the Device Restrictions profile do not apply to corporate-owned devices with a work profile; however, there are headers under each setting category that indicate which device types a particular setting can be applied to. Below is an example of these headers used in the Users and Accounts category.

Some settings that apply device wide on fully managed and dedicated devices only apply at the work-profile level for corporate-owned devices with a work profile. These settings are marked with the “work profile-level” descriptor in the setting name, as shown in the example below.

Device Compliance
The compliance settings and Conditional Access capabilities that are available for fully managed and dedicated devices will also apply to corporate-owned devices with a work profile. IT administrators should select “Android Enterprise” as the platform and “Fully managed, dedicated, and corporate-owned work profile” as the policy type.

App Management
IT administrators can deploy apps and utilize app configuration and app protection policies for corporate-owned devices with a work profile. IT administrators should select “Android Enterprise” as the platform and “Fully Managed, Dedicated, and Corporate-Owned Work Profile” as the profile type.

Device Actions
Wipe device (factory reset), lock device, and reset work profile passcode are available for corporate-owned devices with a work profile.
What new capabilities will be added?
We still plan to add a few new capabilities to the corporate-owned devices with a work profile in the coming months. This includes:
- Single sign-on during end user enrollment flow
- Separate device filtering for corporate-owned work profile, fully managed, and dedicated devices
- Block and allow apps in the personal profile
Get Started
If you have IT administrator credentials for your org, you can start enrolling devices here in the Microsoft Endpoint Manager admin center. Review the Product Documentation for instructions. There are known issues around Wi-Fi reporting documented here: Troubleshoot and review Wi-Fi device profile logs – Intune | Microsoft Docs
Customer Support
The available features are fully supported through our Microsoft Endpoint Manager support channels.
How Can You Reach Us?
Keep us posted on your experience with Android Enterprise corporate-owned devices with a work profile through comments on this blog post, through Twitter (@IntuneSuppTeam), and request any new features on UserVoice.
Android Enterprises Resources
For information about the new privacy protections on company-owned Android devices, refer to Google’s blog post.
Previous Blogs Posts
Microsoft Documentation
by Contributed | Jun 23, 2021 | Technology
This article is contributed. See the original author and article here.
With all of us figuring out how to do things remotely, this past year was not easy. But you made it—congratulations!
As many of you ease into summer break, we’re excited to share some new features coming up, to help you find everything you need for your school, faster and easier.
Here’s a sneak peek at what’s coming soon as part of the back-to-school offering. Our goal is to help make managing school work, assignments, and tasks as easy as searching the web—for you and your students.

Look up your assignments and classes
On Bing, you will be able to search and find your school specific information, like your classes and assignments from Teams, and much more.
Classes
See your upcoming classes and join them easily with Microsoft Teams.
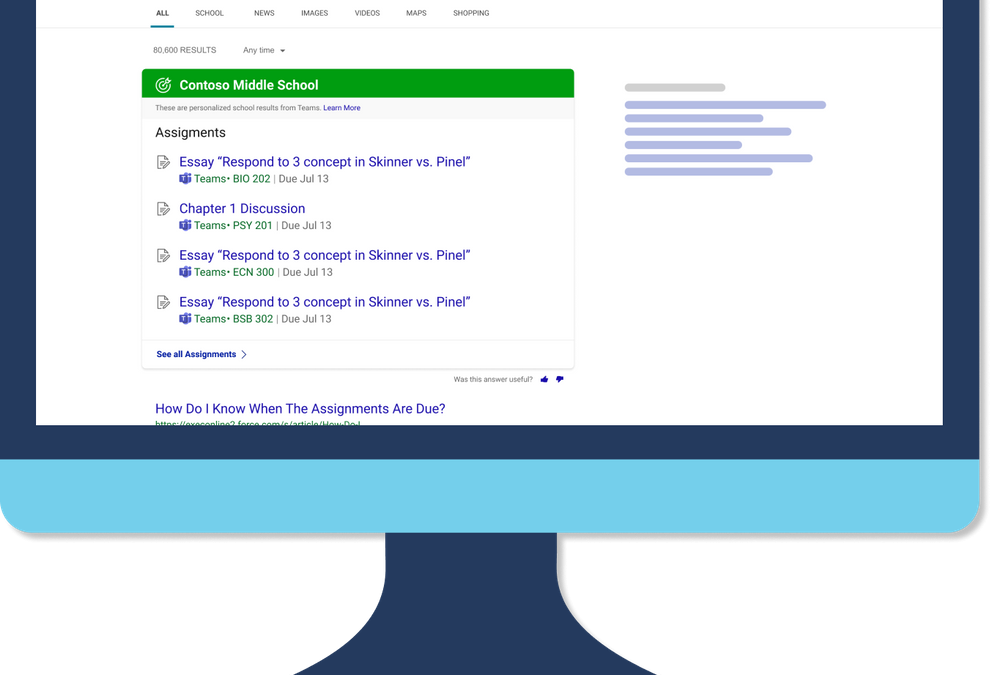
Assignments
Students can find out which homework assignment is due next and start working on it with just a click.
Bookmarks
Find answers to common questions about your school and links to popular resources and tools.
People
See your profile, connect with other teachers, and more.
Pick up where you left off
On Bing, you will be able to look up and find files, conversations, site you access often easily, saving a lot of time having to location these.
Files
Get quick access to your documents and files, as well as files others have shared with you. To keep your school’s info private and secure, you can only find files you have access to.
Conversations
Read messages sent to you in private chats and see what other teachers and students have said in public conversations.
Sites
Find SharePoint sites and other school pages you have access to.
Get info and answers faster
Here are a few other things you can do on Bing to improve yours and your students productivity.
Acronyms
Look up definitions for acronyms and abbreviations used at your school.
Groups
See groups you and others are members of and learn more about them.
In addition to these, we understand your student’s privacy and safety is very important to you. We’ll be sharing more information soon about the new privacy and safety features as well as more details about all the new and upcoming features, so please stay tuned. Until then, whether you’re on a school break or in the classroom, stay safe and have a great time!

Recent Comments