by Contributed | Sep 9, 2024 | Technology
This article is contributed. See the original author and article here.
The new semester is just beginning, and over the past few months, we’ve enhanced Copilot with exciting new features to support your quiz creation. With the capabilities like generating detailed answer explanations for each question, rewriting questions, and smart suggestions for fine tuning the quiz. Copilot is now more powerful than ever. Let’s explore how these updates can help you create quizzes more effectively and efficiently this semester.
Please note that a Copilot for Microsoft 365 license is required to access the following features.
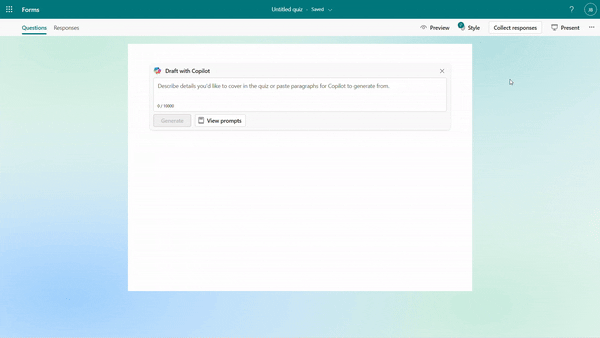
Generate quiz draft based on prompt/pasted content
You can specify your intentions, such as the quiz subject, audience, types of questions, and more to generate a quiz. Besides, Copilot can also generate a quiz from pasted content, such as a paragraph in textbook. For example, as a middle school teacher, you could instruct Copilot to create a physics quiz for 9th grade students or simply copy and paste content from a textbook to generate the quiz.
Generate quiz draft based on prompt
Quiz draft with answer explanations
After the quiz draft is generated, if you select “Including answer explanations,” each question will come with detailed explanations to clarify the reasoning behind the correct answers. You can review the solutions for each question and keep the draft to use. As shown below, when we are generating a math quiz for grade 9 students, Copilot shows us the step-by-step solutions to calculate the correct answer.
 Step-by-step answer explanation
Further instructions to refine the draft
You have the flexibility to add/remove questions and refine the draft further by providing additional details to Copilot. For instance, if you forgot to include trigonometric questions in a math quiz, you could keep asking to add two questions on that topic.
 Further instructions to refine the draft
Rewrite questions and answer explanations
Once you keep the draft to use, if you need to do further modifications on questions, options or the answer explanation, you can easily rewrite it with Copilot’s assistance. For example, you can make the question easier or add more details to the answer explanation for better clarity. You can also manually customize the answer explanations as needed.
 Rewrite answer explanations
Generate answer explanation for newly created questions
After adjusting the generated questions, if you still need to add new ones, Copilot can help by generating answer explanations based on the correct answers you mark, saving you time on manual input.
 Generate answer explanation for newly created questions
Copilot smart suggestions
Before sending out the quiz, Copilot will offer suggestions to enhance its quality. You can add a fun theme to boost students’ motivation and enthusiasm, adjust settings such as time duration and practice mode, and choose appropriate distribution channels like sharing via URL or presenting live. With just one click, you can apply these suggestions to create a more engaging and effective quiz.
 Copilot smart suggestions
Immediate results and answer explanation for responders
When respondents submit the quiz, they can view the results immediately and review the answer explanations to understand which areas they already mastered or where they could improve.
 Check result with answer explanations after submitting
Hope you find these new features useful for the new semester. Discover more about Copilot for Microsoft 365 here.
by Contributed | Sep 7, 2024 | Technology
This article is contributed. See the original author and article here.
Question Description:
A customer has designed a database schema for a Terabyte-level Azure SQL database, but the original design lacks a unique key. As the data volume increases, performance issues become more pronounced.
- To address these performance issues, Azure SQL uses a hidden index with uniqueifier identifiers, which have a maximum limit of 2,147,483,648.
- When the number of data rows in a table exceeds 2.1 billion, any insert or update operations will result in the following error:
Msg 666, Level 16, State 2, Line 25
This error can lead to partial or complete database outages, severely impacting business operations.
It isn’t a good idea to create a clustered index on a uniqueidentifier column and generate your GUIDs with NEWID(). The reason for this is that NEWID() generates GUIDs in non-sequential order and SQL Server orders a clustered index sequentially. It will work – SQL Server will let you build a clustered index around a uniqueidentifier column, however it will cause the SQL Server to do unnecessary work and cause performance slowdowns. The reason for this is that to insert data into the middle of a clustered index (out of sequential order) causes SQL Server to make room for the data by rearranging the cluster.
Mitigation Strategies:
1. Quick Workaround:
- Make index creation online and resumable by specifying ONLINE=ON and RESUMABLE=ON. This allows the operation to use smaller transactions, making it possible to resume from the failure point if it fails for any reason.
2. Permanent Fix:
- Rebuild the clustered index with a unique key by adding a new column. The steps are as followed:
- I: Create the index with the new definition offline.
- II: Use the DROP_EXISTING option for online index creation. This keeps both indexes up-to-date, and once the new index is built, it will replace the existing one.
- III: Use the resumable option to break the creation into smaller transactions, reducing transaction log bloat. Note that there is some performance impact.
- IV: Manually create a new copy of the table, copying all cold data, then rename the table. This involves scanning the source table, adding a small additional load to the system. Use a shorter outage and a merge statement for the new data.
- V: Create a partitioned view that is a union of the old and new tables with different index schemes. Ensure that insert statements supply values for every field in the table. This method can be complex and may require taking the database offline, with the rebuilding process taking anywhere from a few hours to several days.
Best Practice:
Planning early and carefully designing the clustered index is crucial to avoid these issues.
References
- uniqueidentifier
- How to design clustered index
- Create a clustered index
by Contributed | Sep 7, 2024 | Technology
This article is contributed. See the original author and article here.
As you may be aware, Azure Automation Agent-based User Hybrid Runbook Worker (Windows and Linux) was retired on 31 August 2024, and support has been discontinued.
For guidance on migrating, please refer to this article: Migrate an existing agent-based hybrid workers to extension-based-workers in Azure Automation | Microsoft Learn
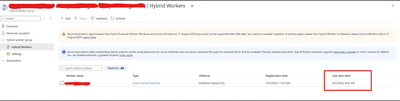
Nonetheless, users might want to verify whether their runbooks and jobs are utilizing the extension or agent-based system when they transition. It’s worth noting that versions V1 and V2 of the same hybrid worker machine can be registered simultaneously with Azure Automation but will have different names.
If the V1 agent wasn’t uninstalled before the V2 extension was installed, this would lead Azure to detect both versions on the same machine.
The “last seen time” suggests V1 and V2 are communicating with Azure Automation if both exist.
It’s also worth noting that some automation tasks are still being performed by the V1 worker, which accounts for its continued activity. Runbook jobs can be executed on any machine within the Hybrid Worker Group. Currently, this group includes both V1 and V2 versions, so the tasks are distributed between them.
The installation of V2 does not mean that the Hybrid Worker Group will disregard V1 and exclusively use V2.
Happy Learning!
by Contributed | Sep 6, 2024 | Technology
This article is contributed. See the original author and article here.
In my previous blog posts of containerising .NET apps and Function apps, I discussed how to containerise .NET apps and Azure Functions apps with and without Dockerfile. However, deploying these containerised apps to Azure Container Apps (ACA) is a different story.
Since its release in May 2023, Azure Developer CLI (azd) has evolved significantly. azd nowadays even automatically generates Bicep files for us to immediately provision and deploy applications to Azure. With this feature, you only need the azd up command for provisioning and deployment.
Throughout this post, I’m going to discuss how to provision and deploy .NET apps including Azure Functions to ACA through just one command, azd up.
You can find a sample code from this GitHub repository.
Prerequisites
There are a few prerequisites to containerise .NET apps effectively.
Running the app locally
The sample app repository already includes the following apps:
Let’s make sure those apps running properly on your local machine. In order to run those apps locally, open three terminal windows and run the following commands on each terminal:
# Terminal 1 – ASP.NET Core Web API

dotnet run –project ./ApiApp
# Terminal 2 – Azure Functions

cd ./FuncApp

dotnet clean && func start
# Terminal 3 – Blazor app

dotnet run –project ./WebApp
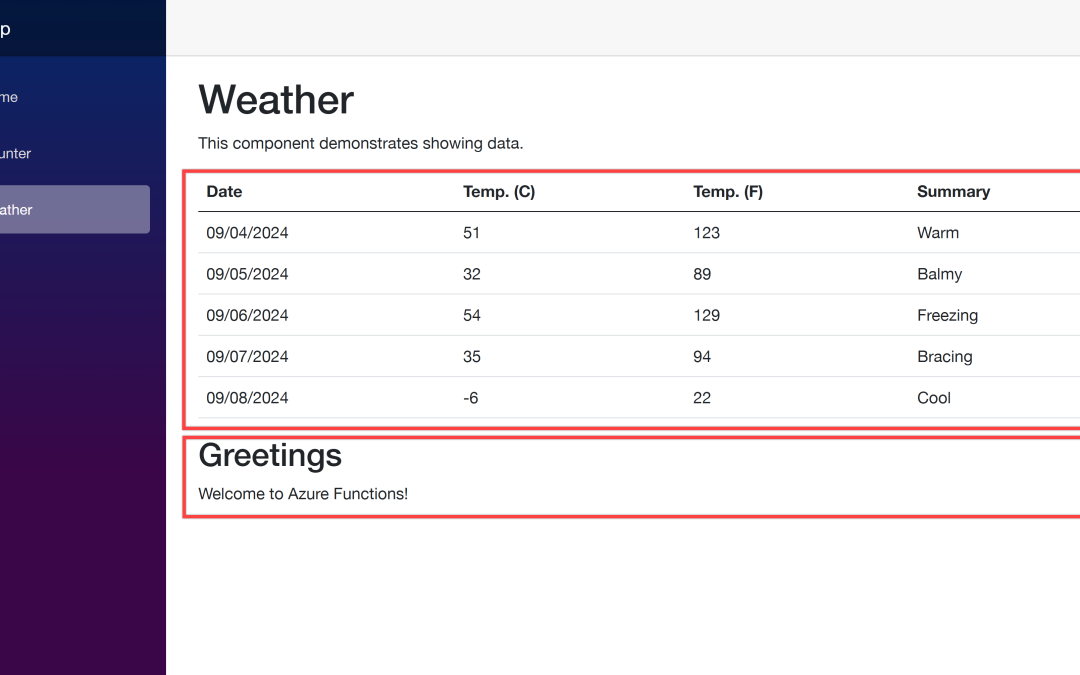
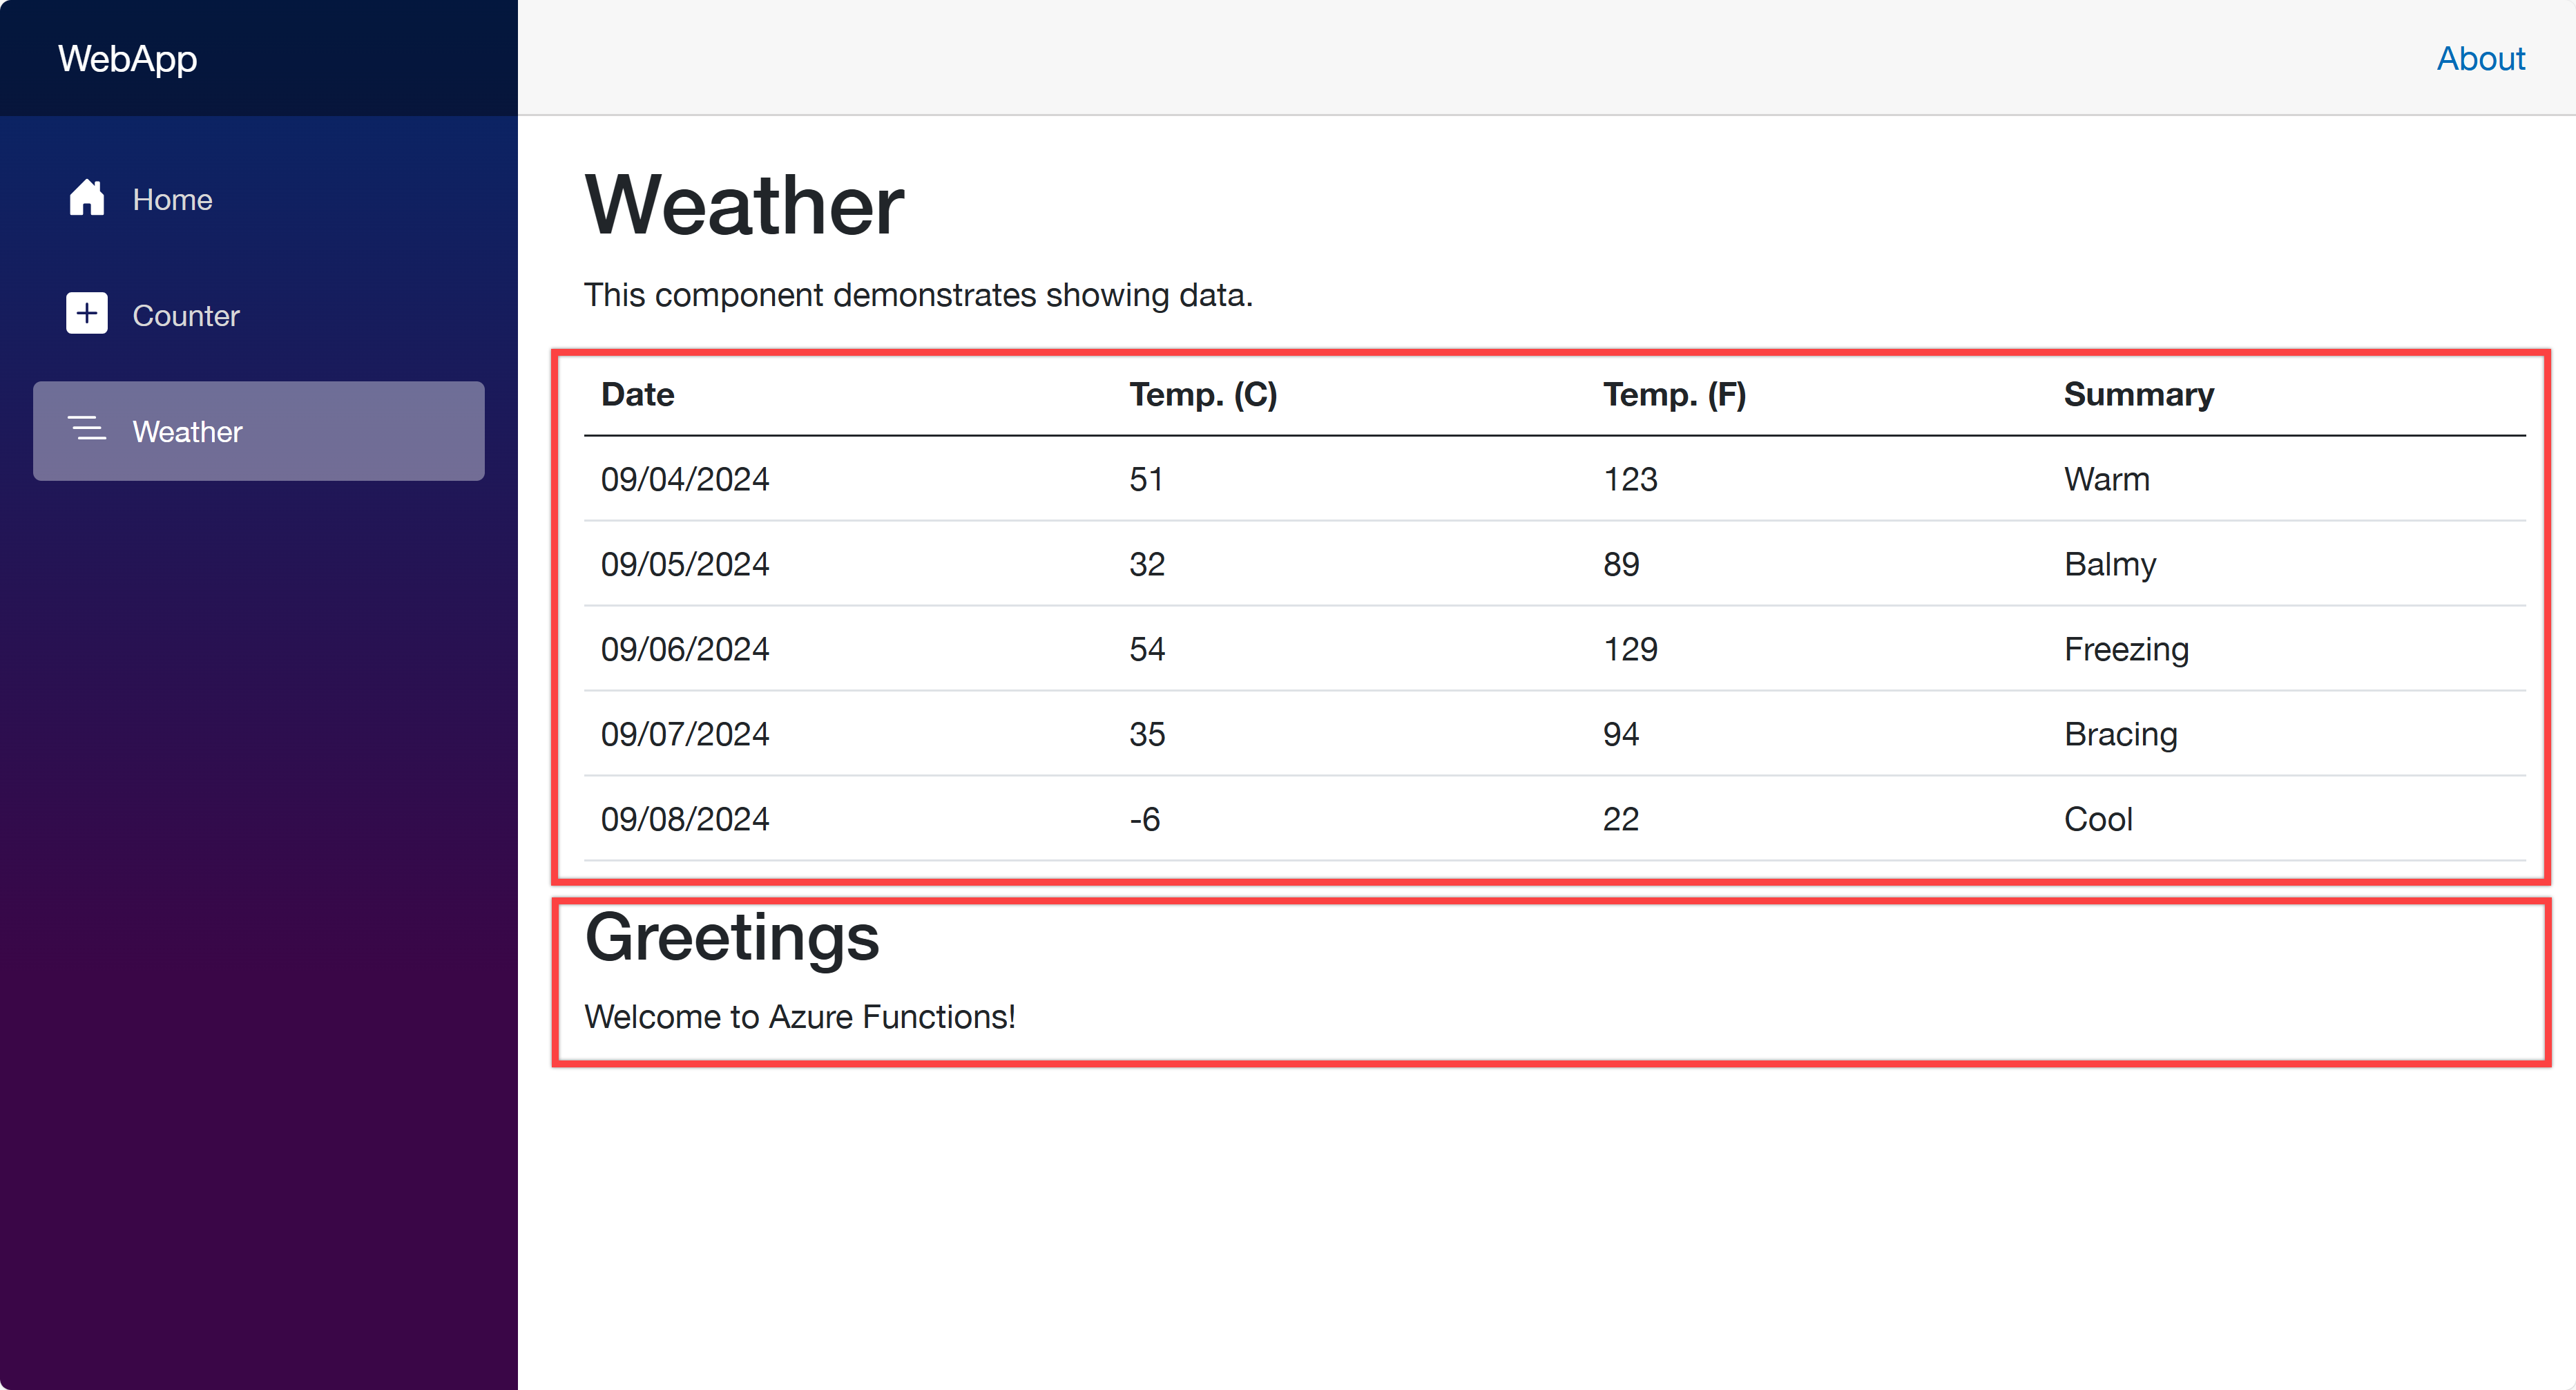
Open your web browser and navigate to https://localhost:5001 to see the Blazor app running. Then navigate to https://localhost:5001/weather to see the weather data fetched from the ApiApp and the greetings populated from the FuncApp.
Now, let’s start using azd to provision and deploy these apps to ACA. Make sure that you’ve already logged in to Azure with the azd auth login command.
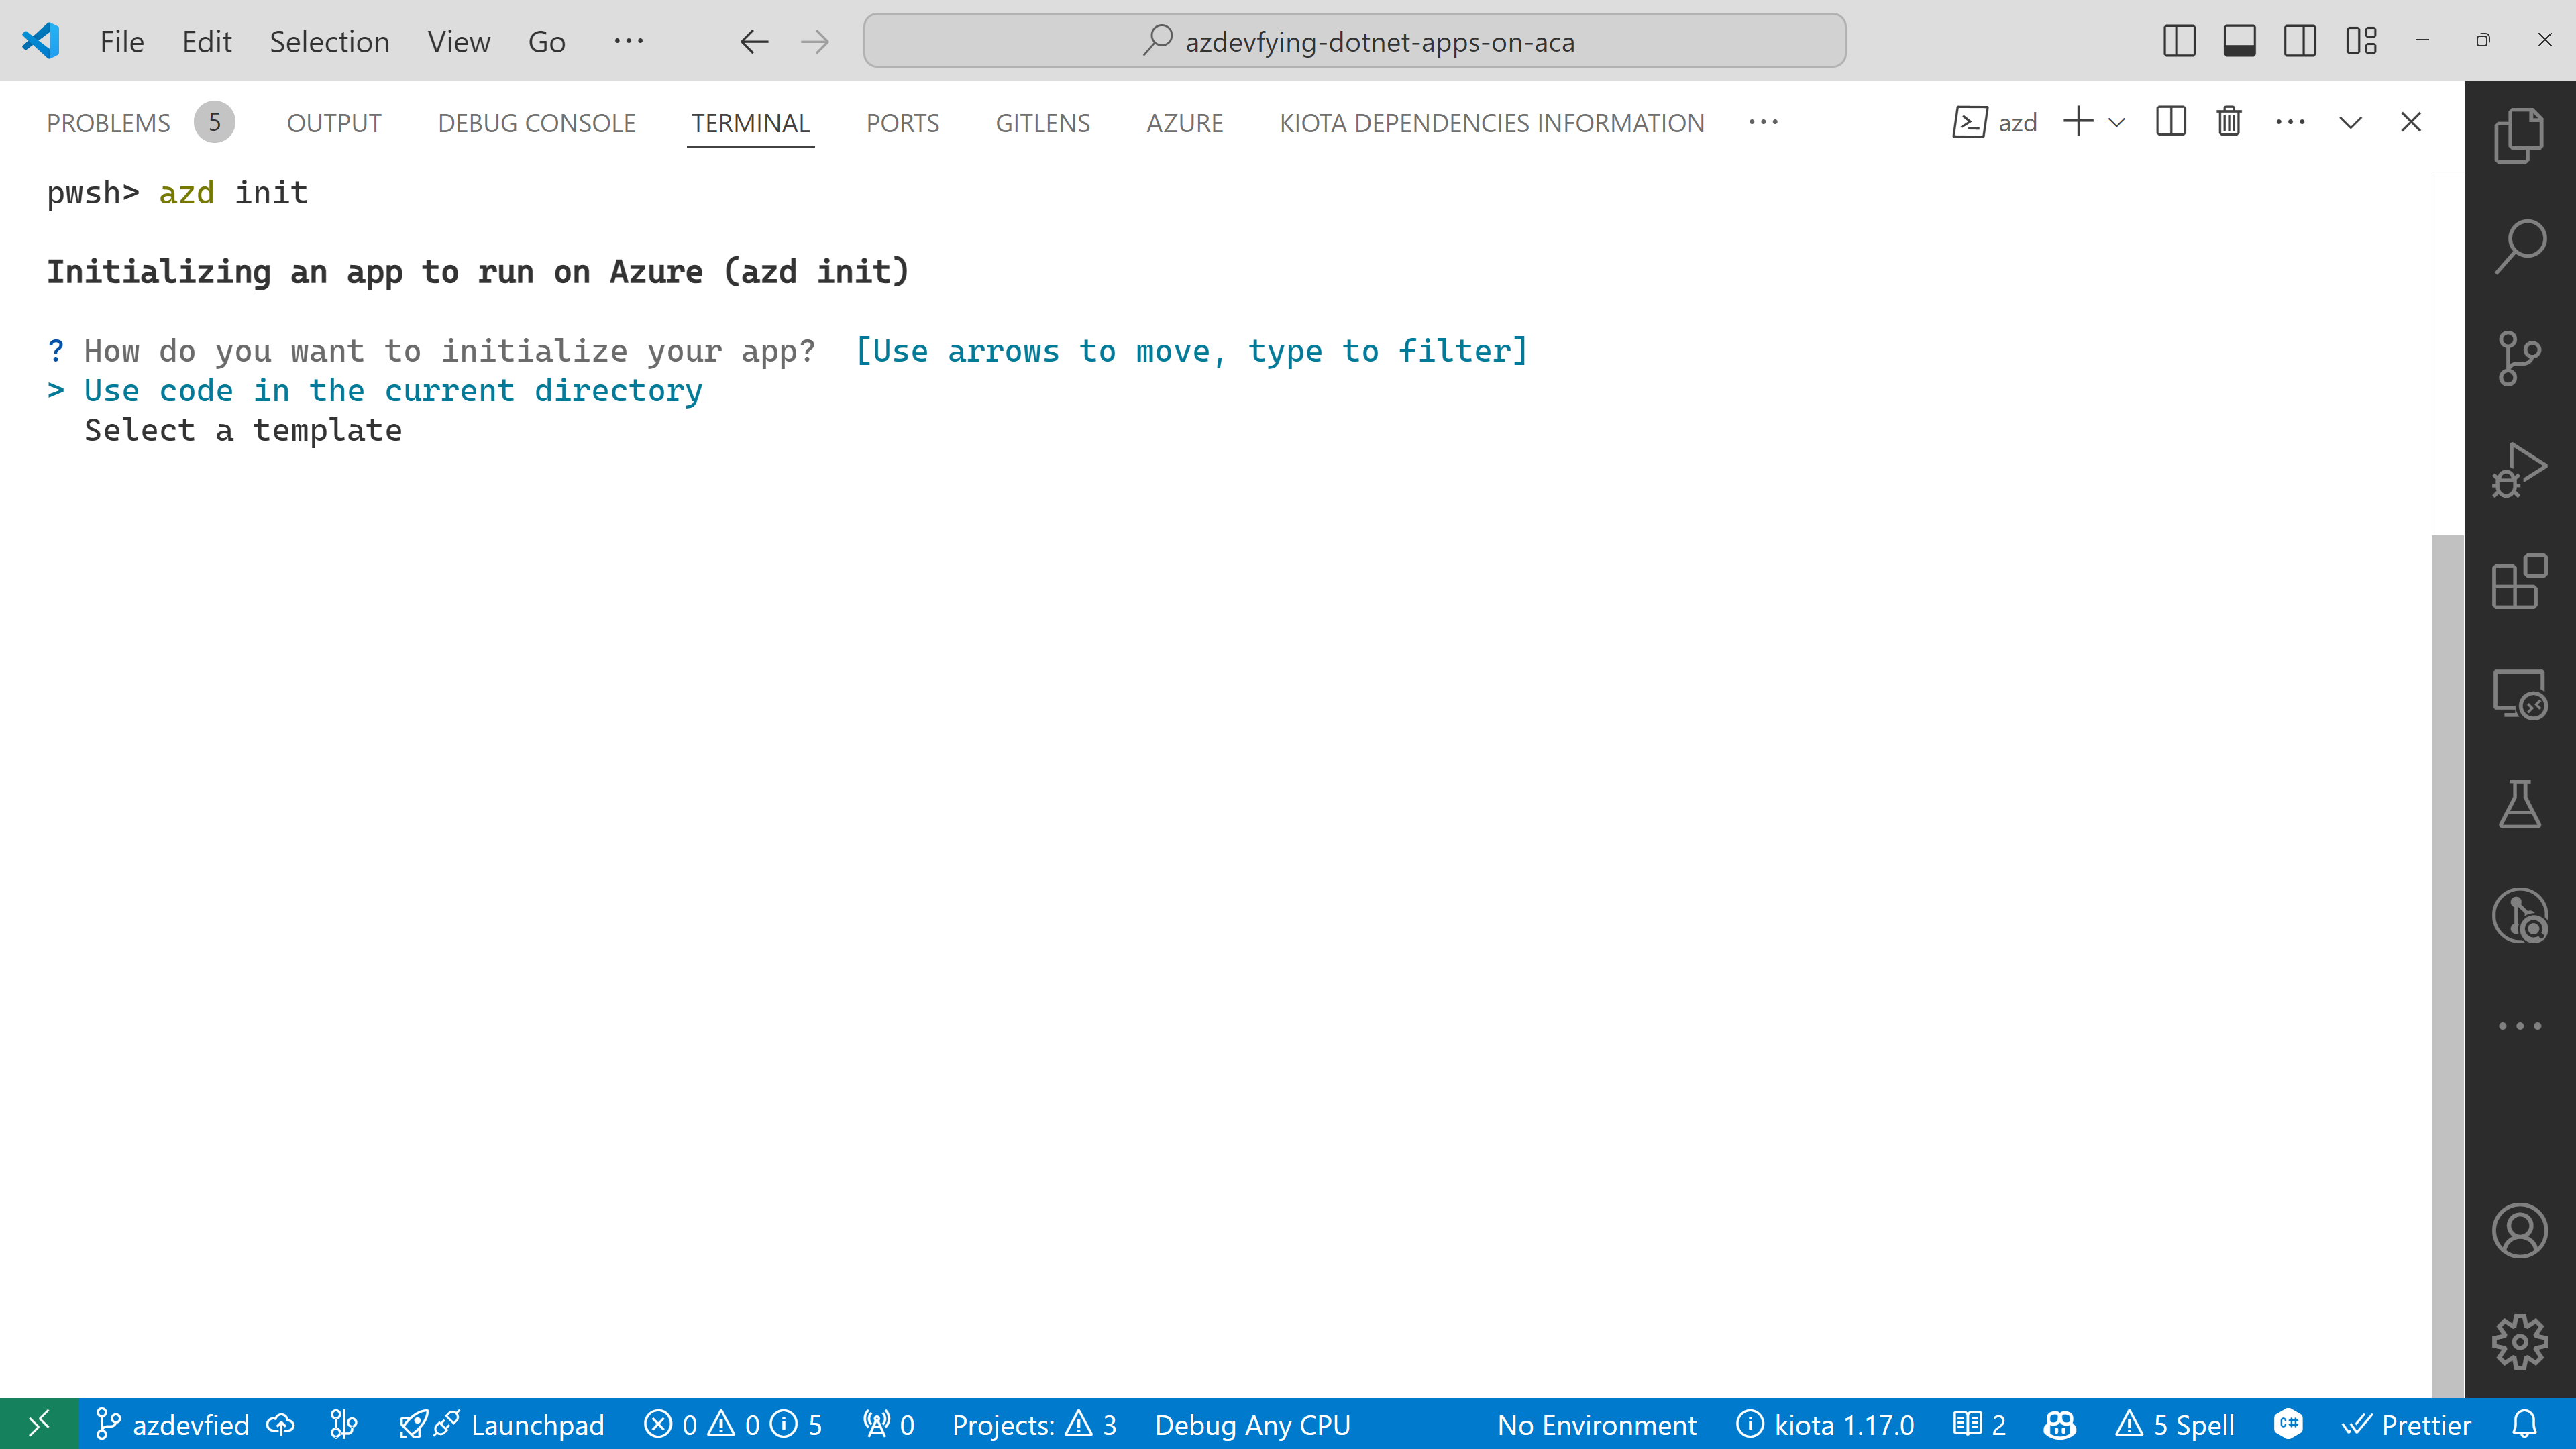
azd init – Initialisation
In order to provision and deploy the apps to ACA, you need to initialise the azd configuration. Run the following command:
azd init
You’ll be prompted to initialise the app. Choose the Use code in the current directory option.
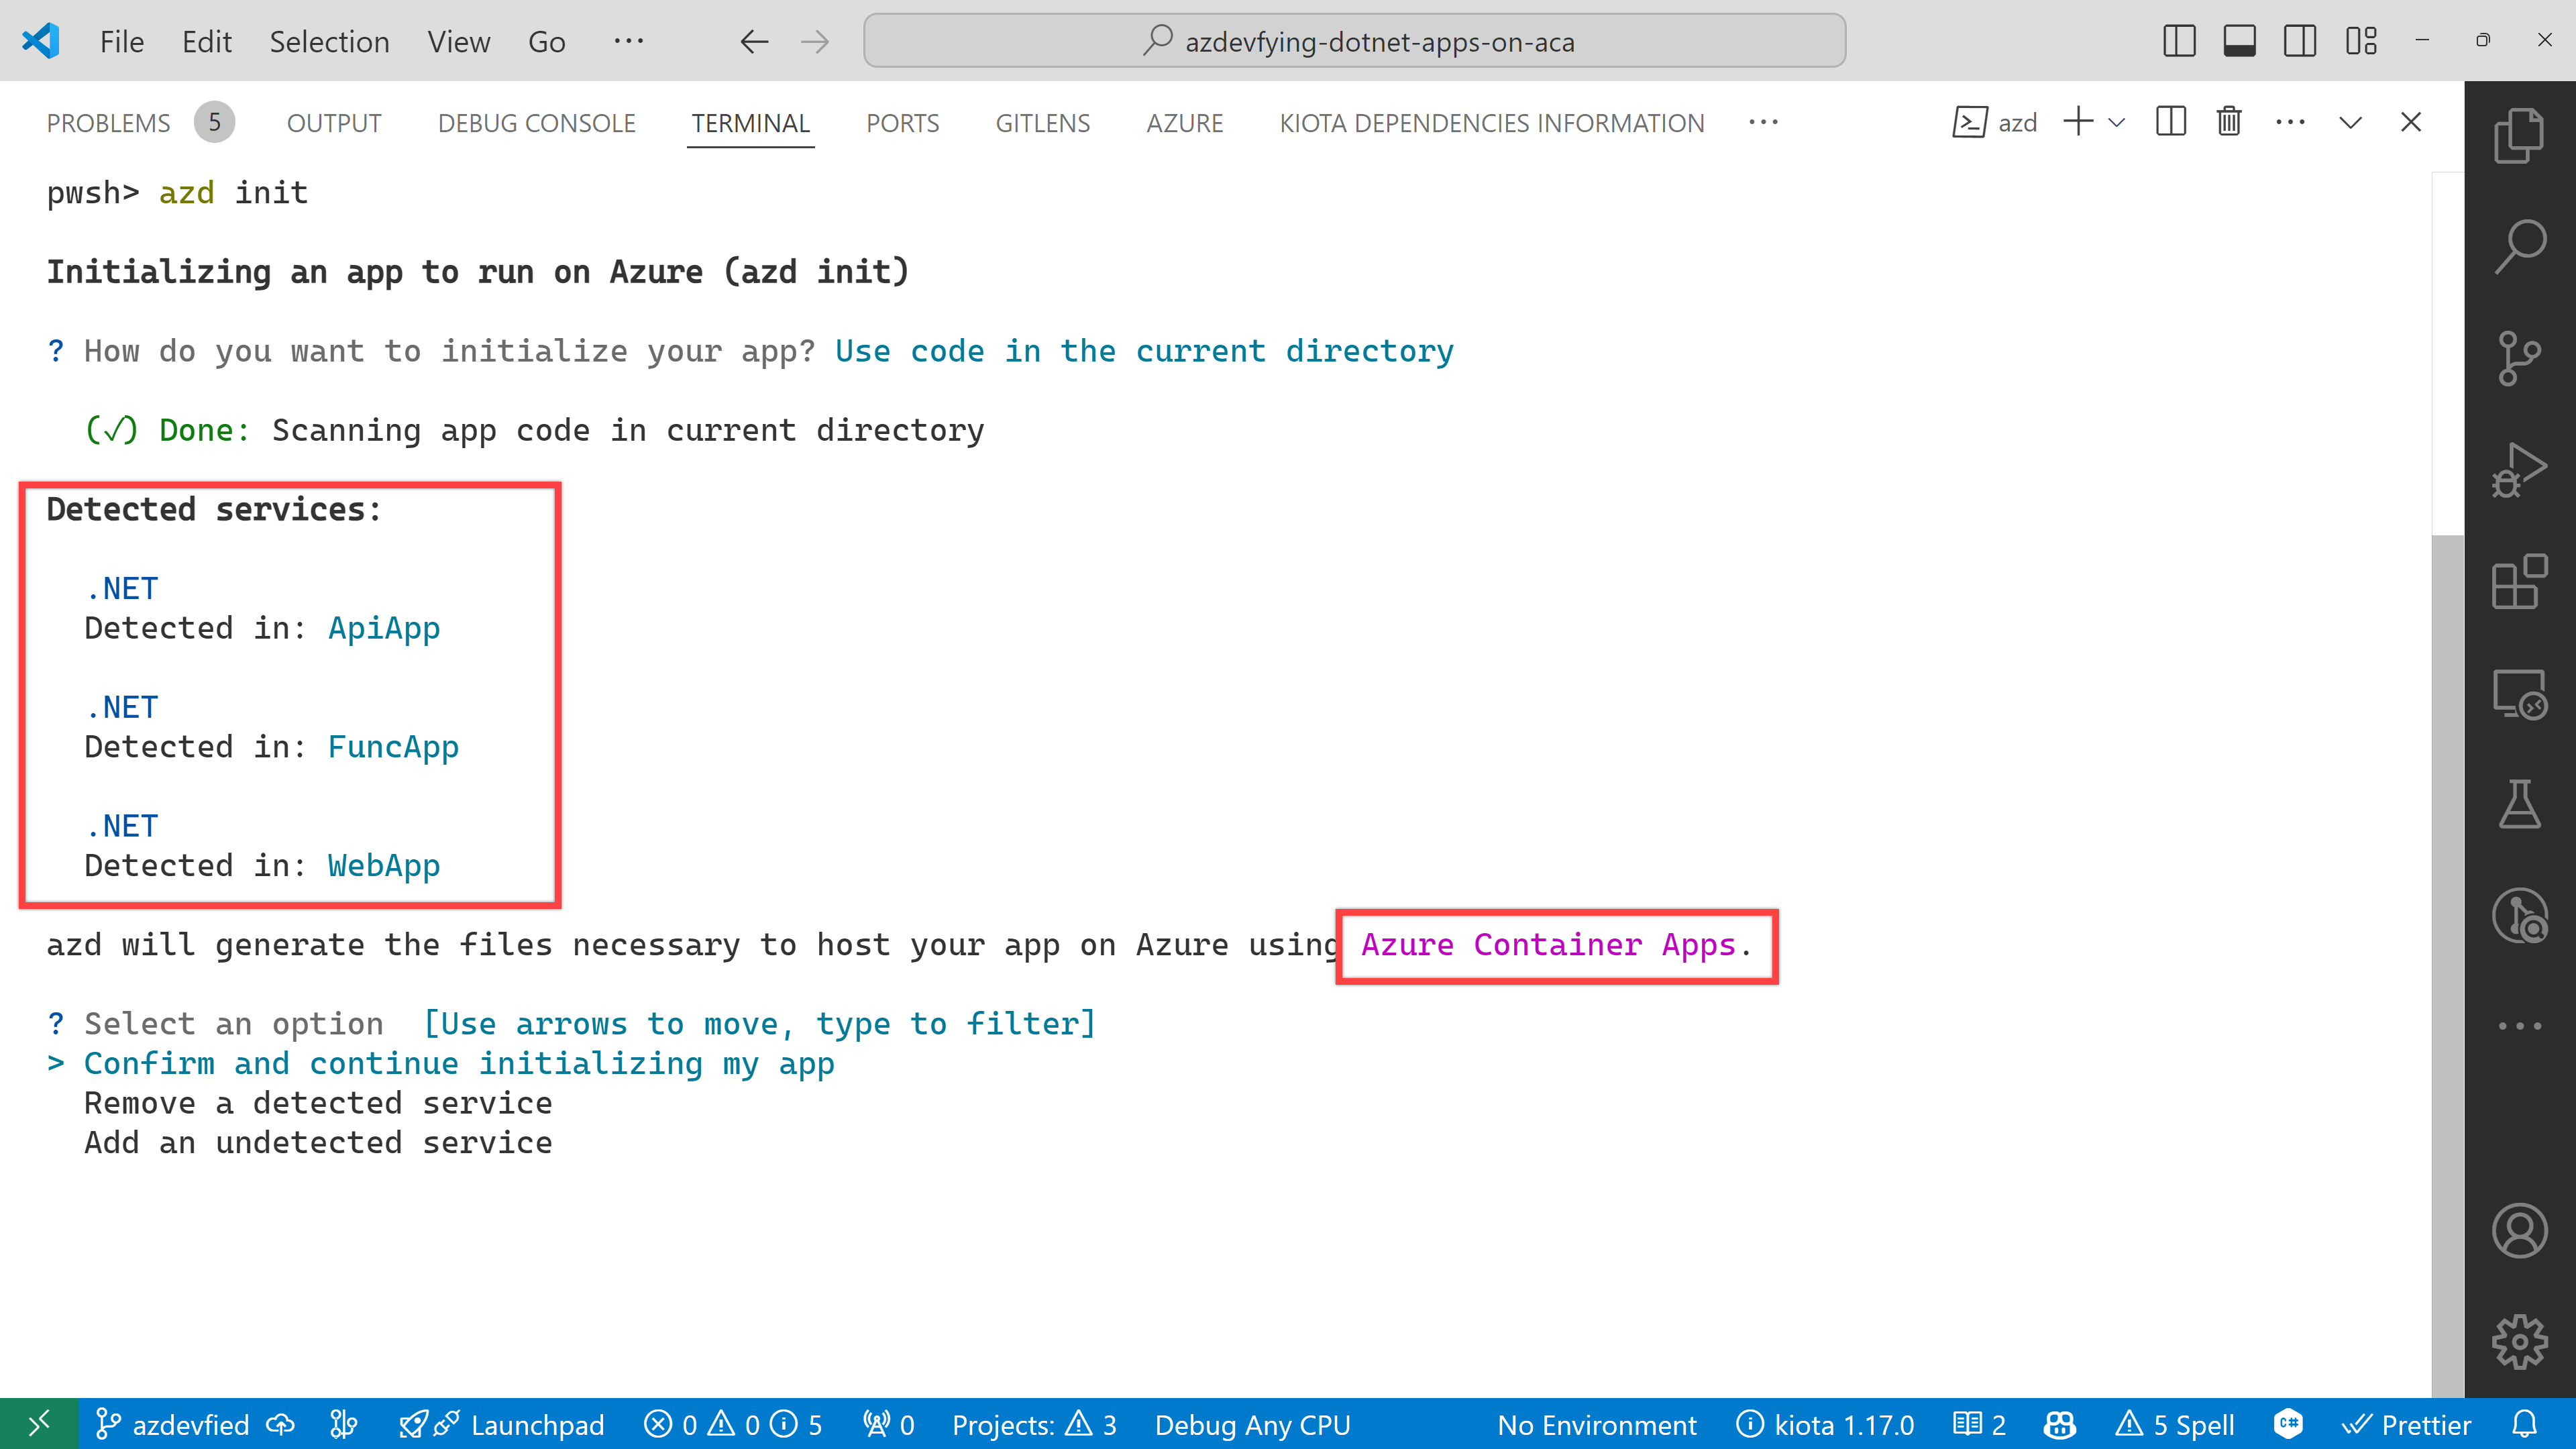
azd automatically detects your three apps as shown below. In addition to that, it says it will use Azure Container Apps. Choose the Confirm and continue initializing my app option.
The function app asks the target port number. Enter 80.
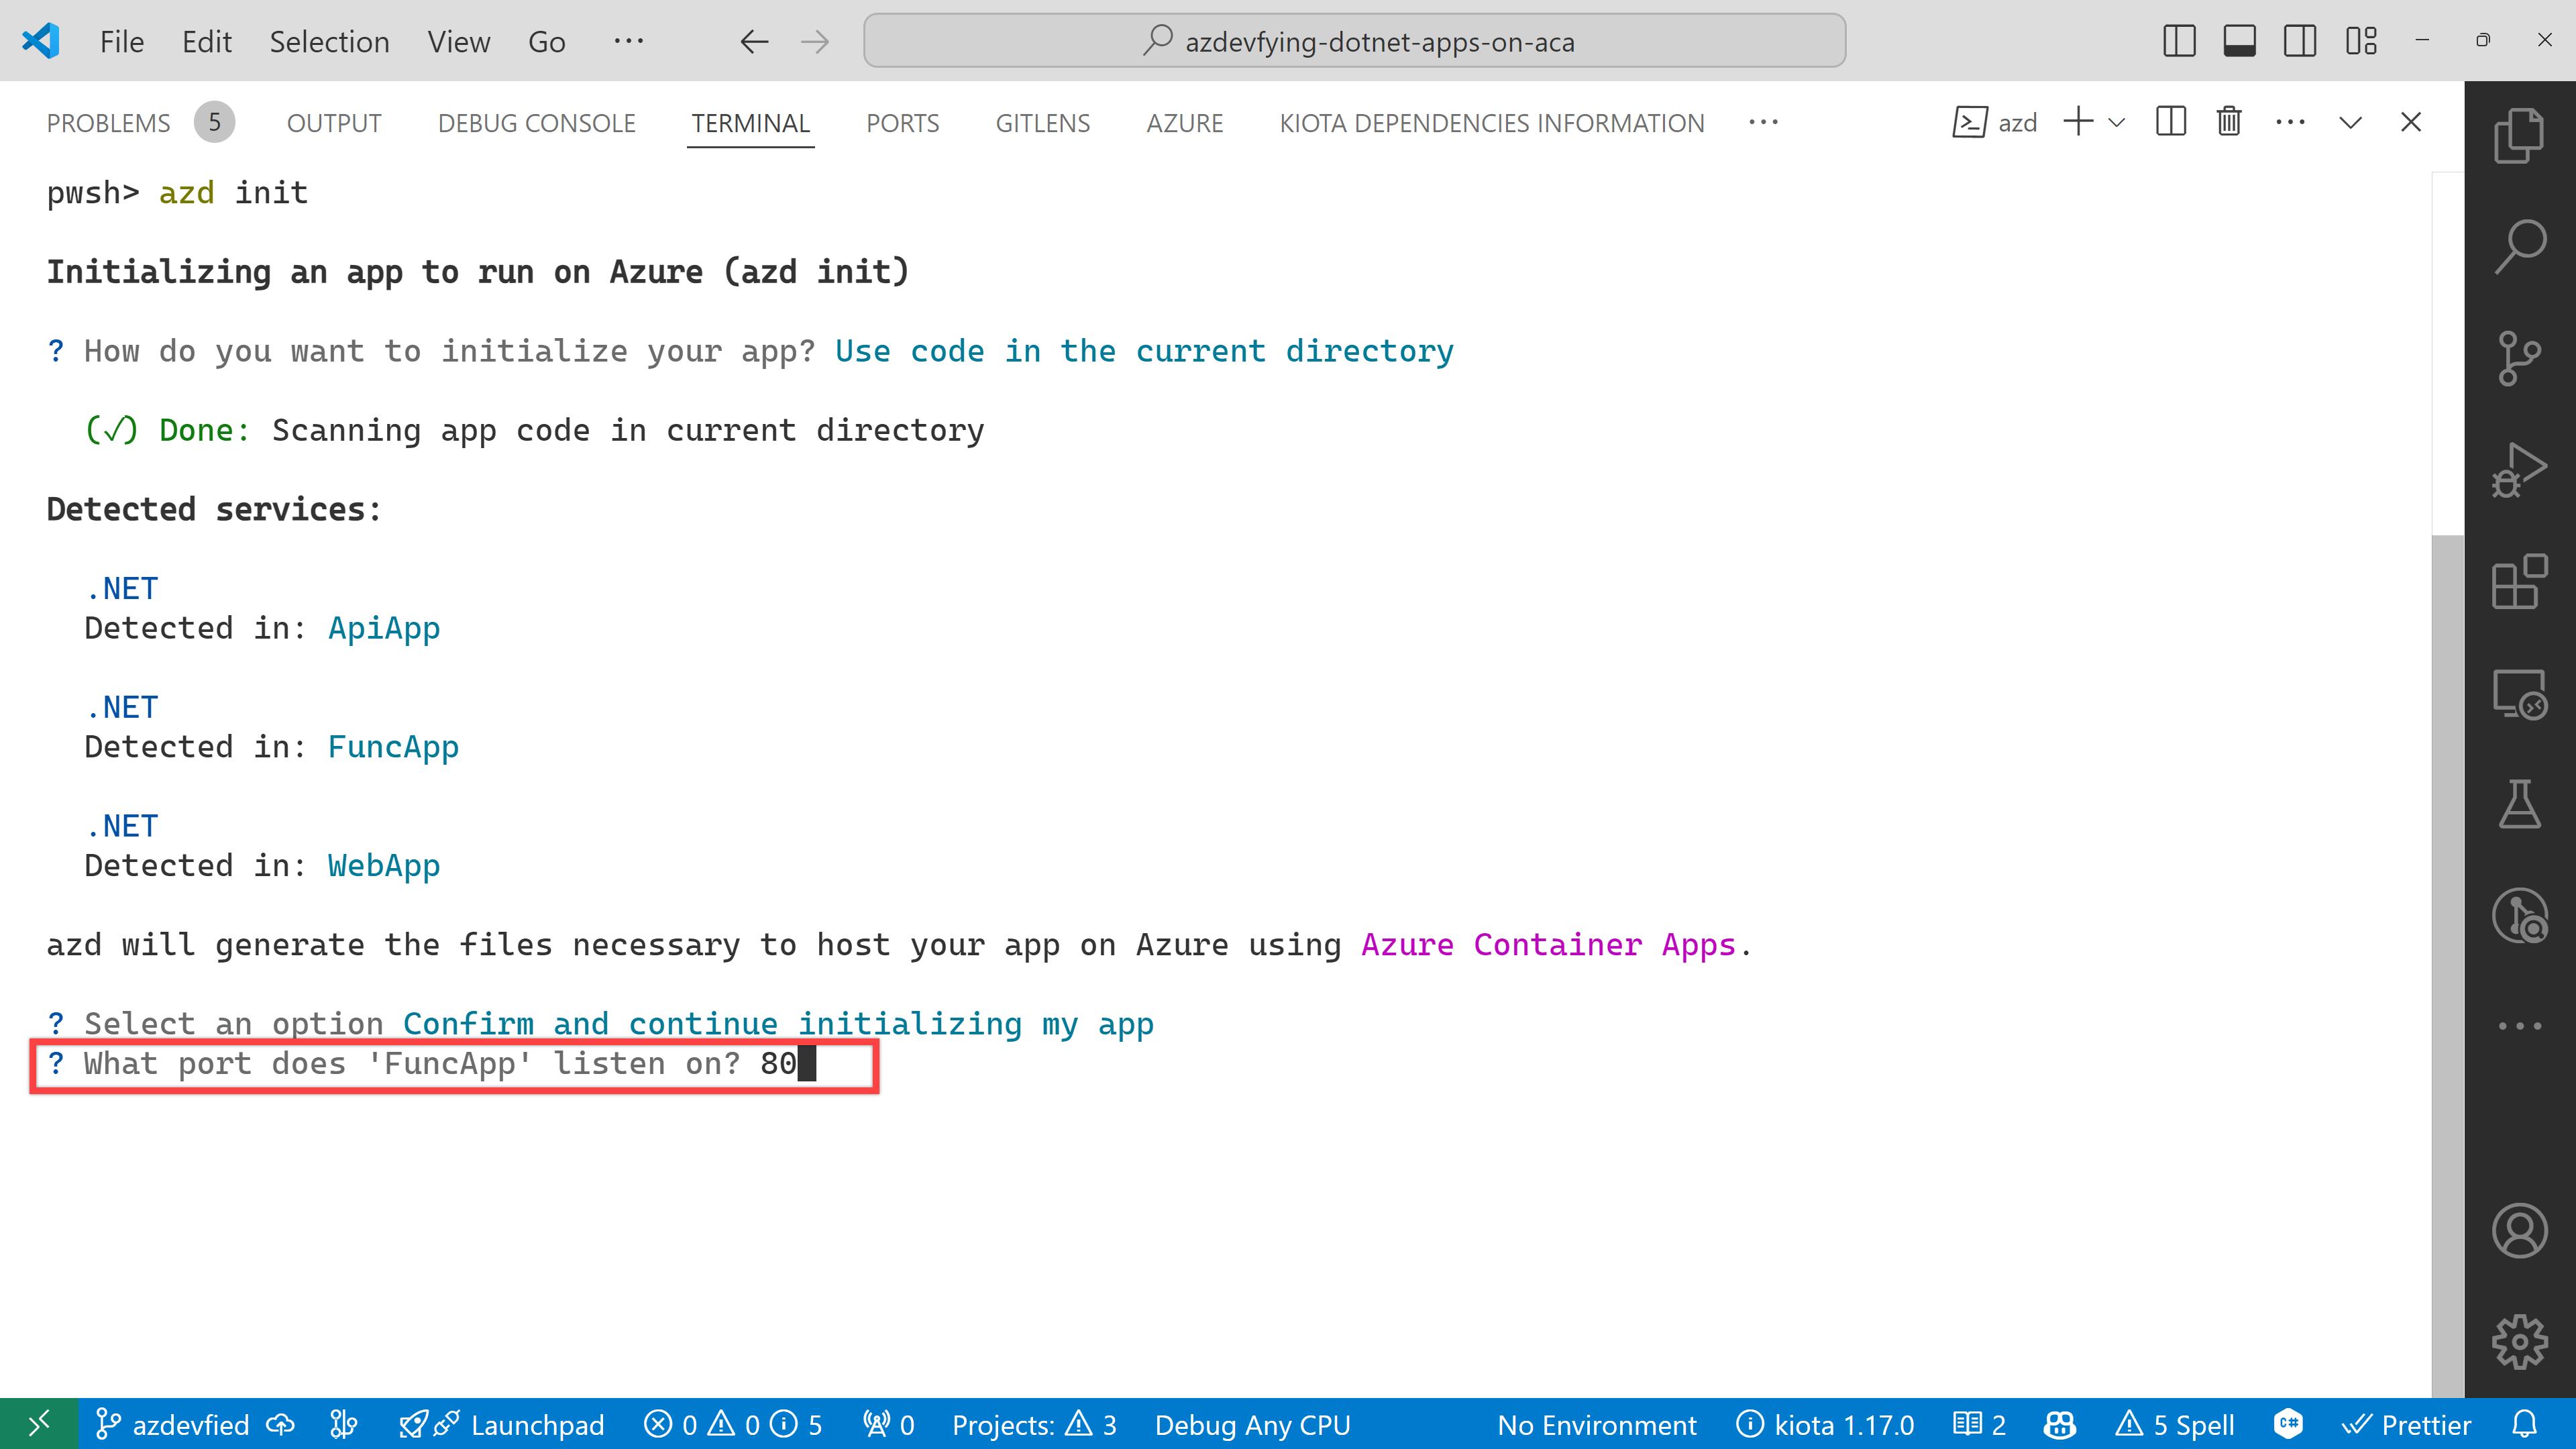
And finally, it asks the environment name. Enter any name you want. I just entered aca0906 for now.

Now, you’ve got two directories and two files generated:
.azure directory
infra directory
next-steps.md file
azure.yaml file
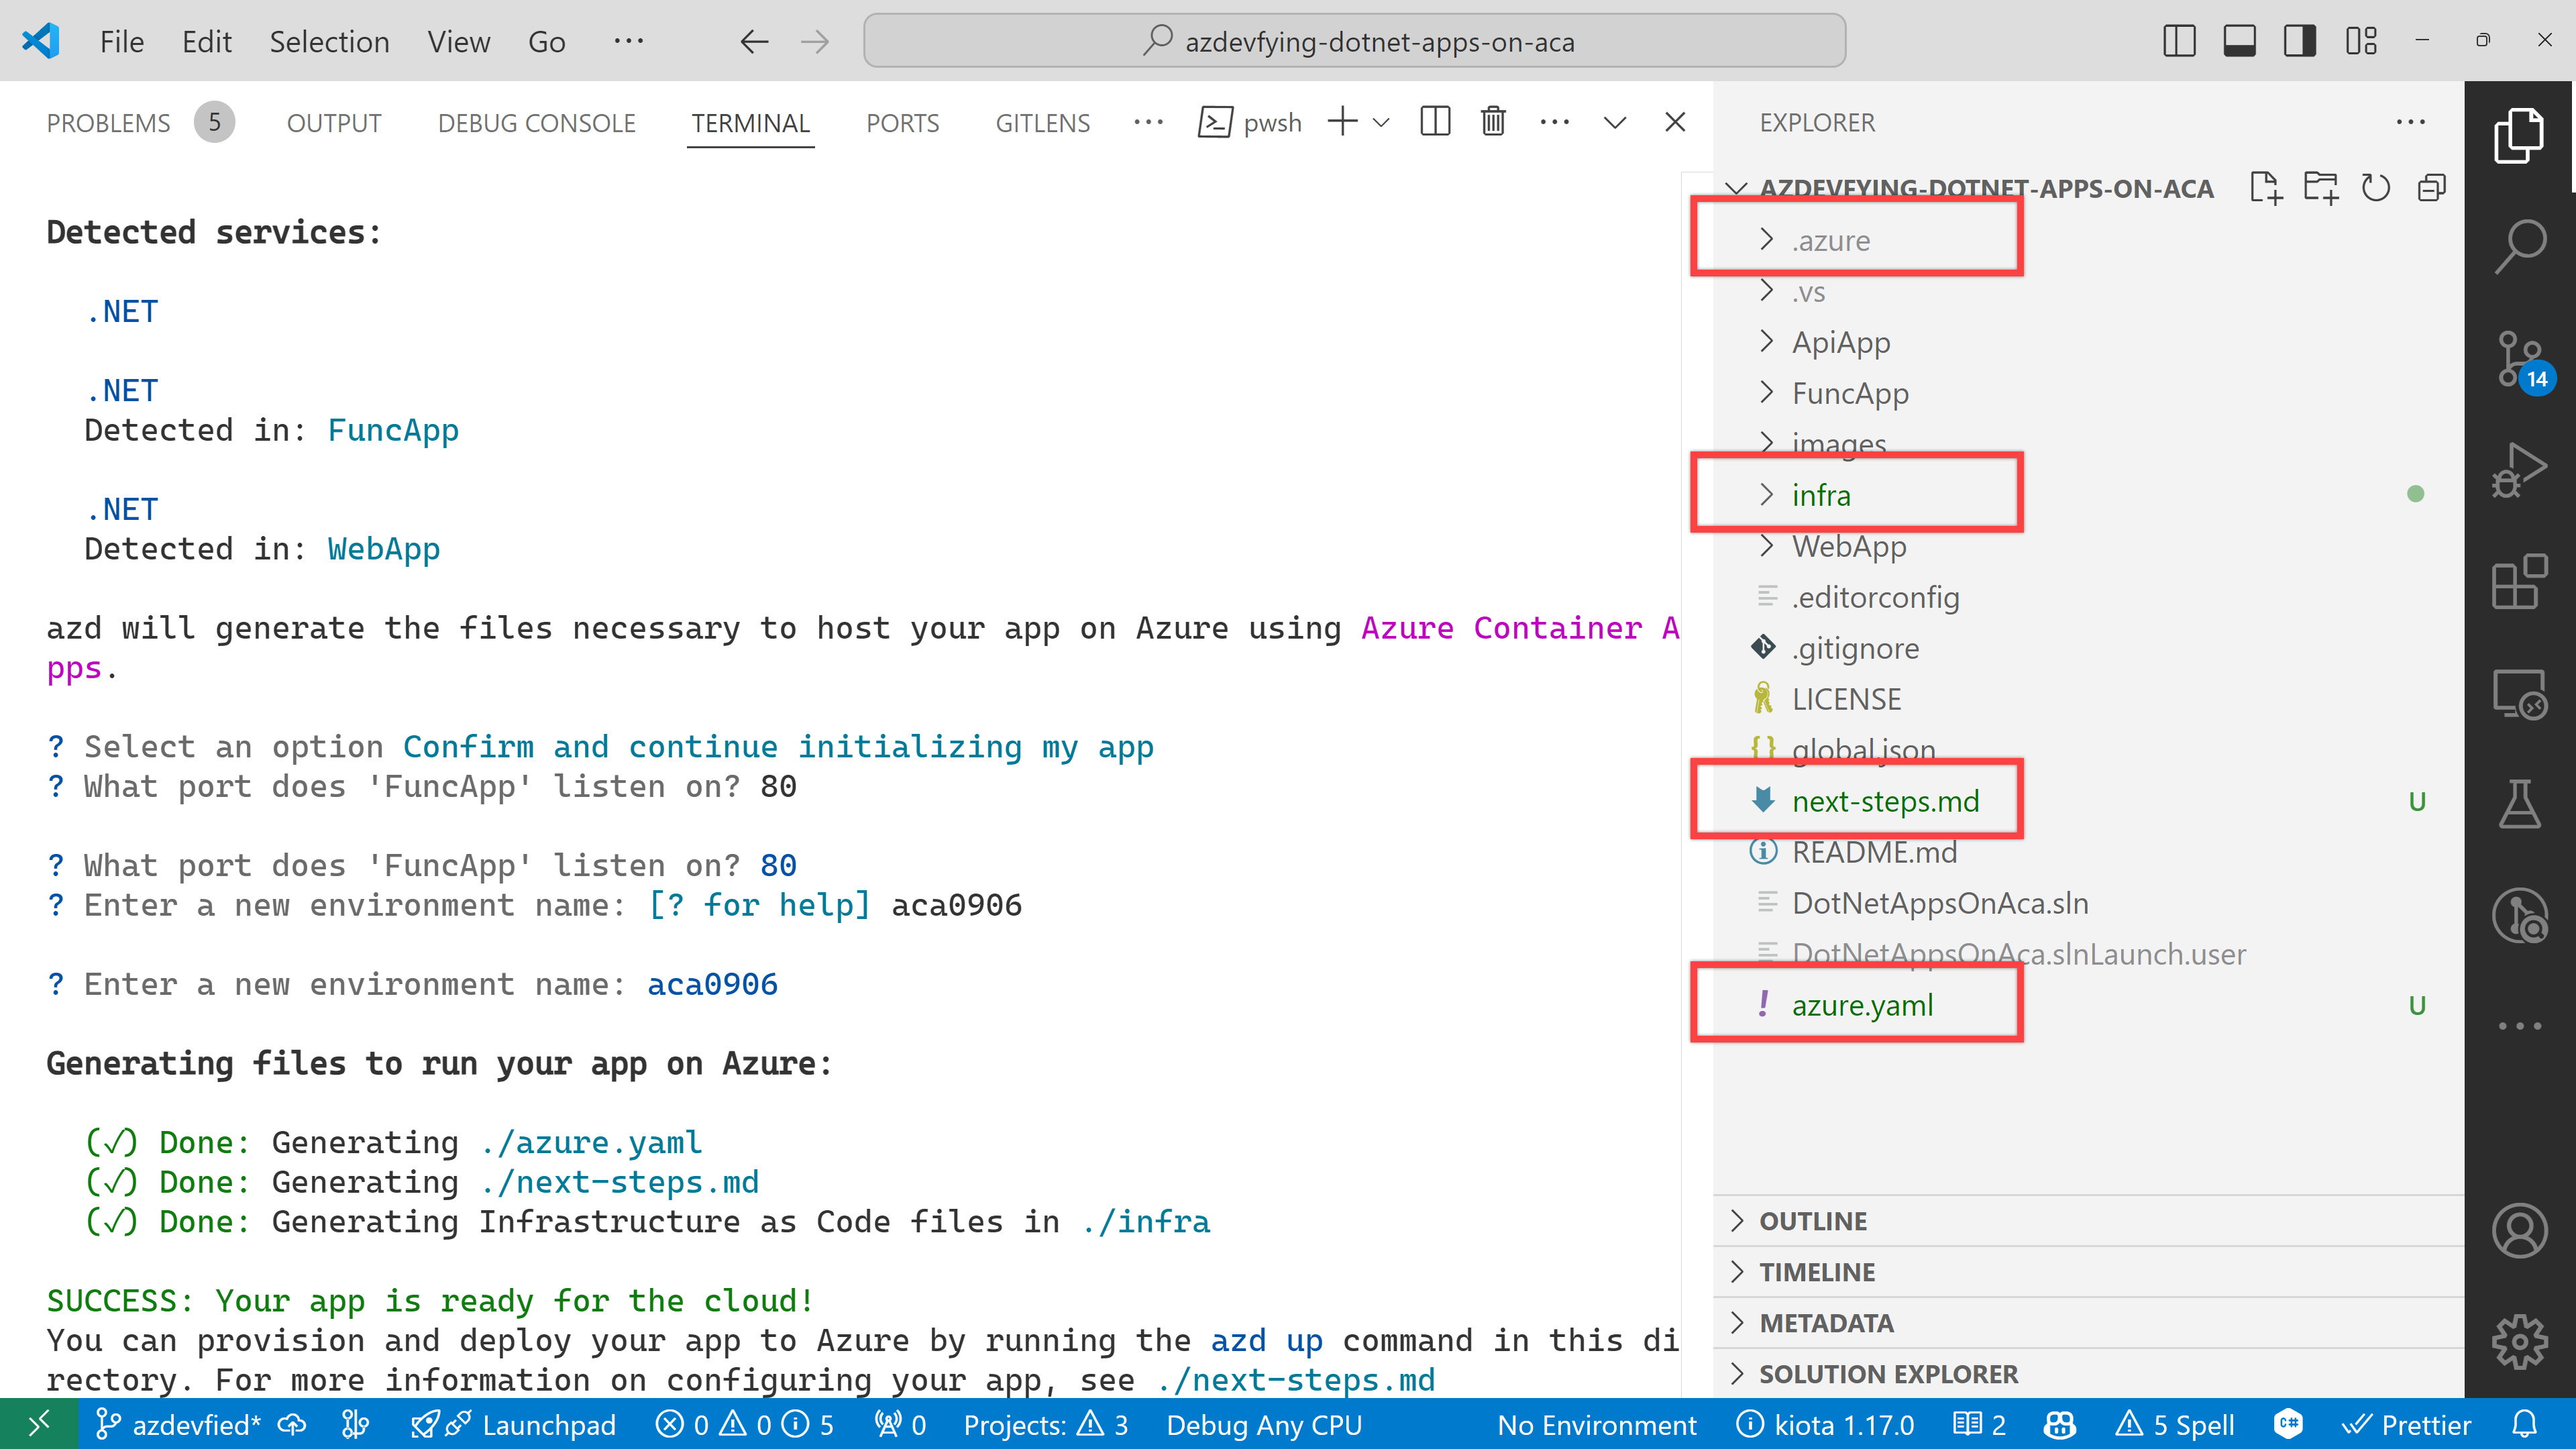
Under the infra directory, there are bunch of Bicep files automatically generated through azd init.
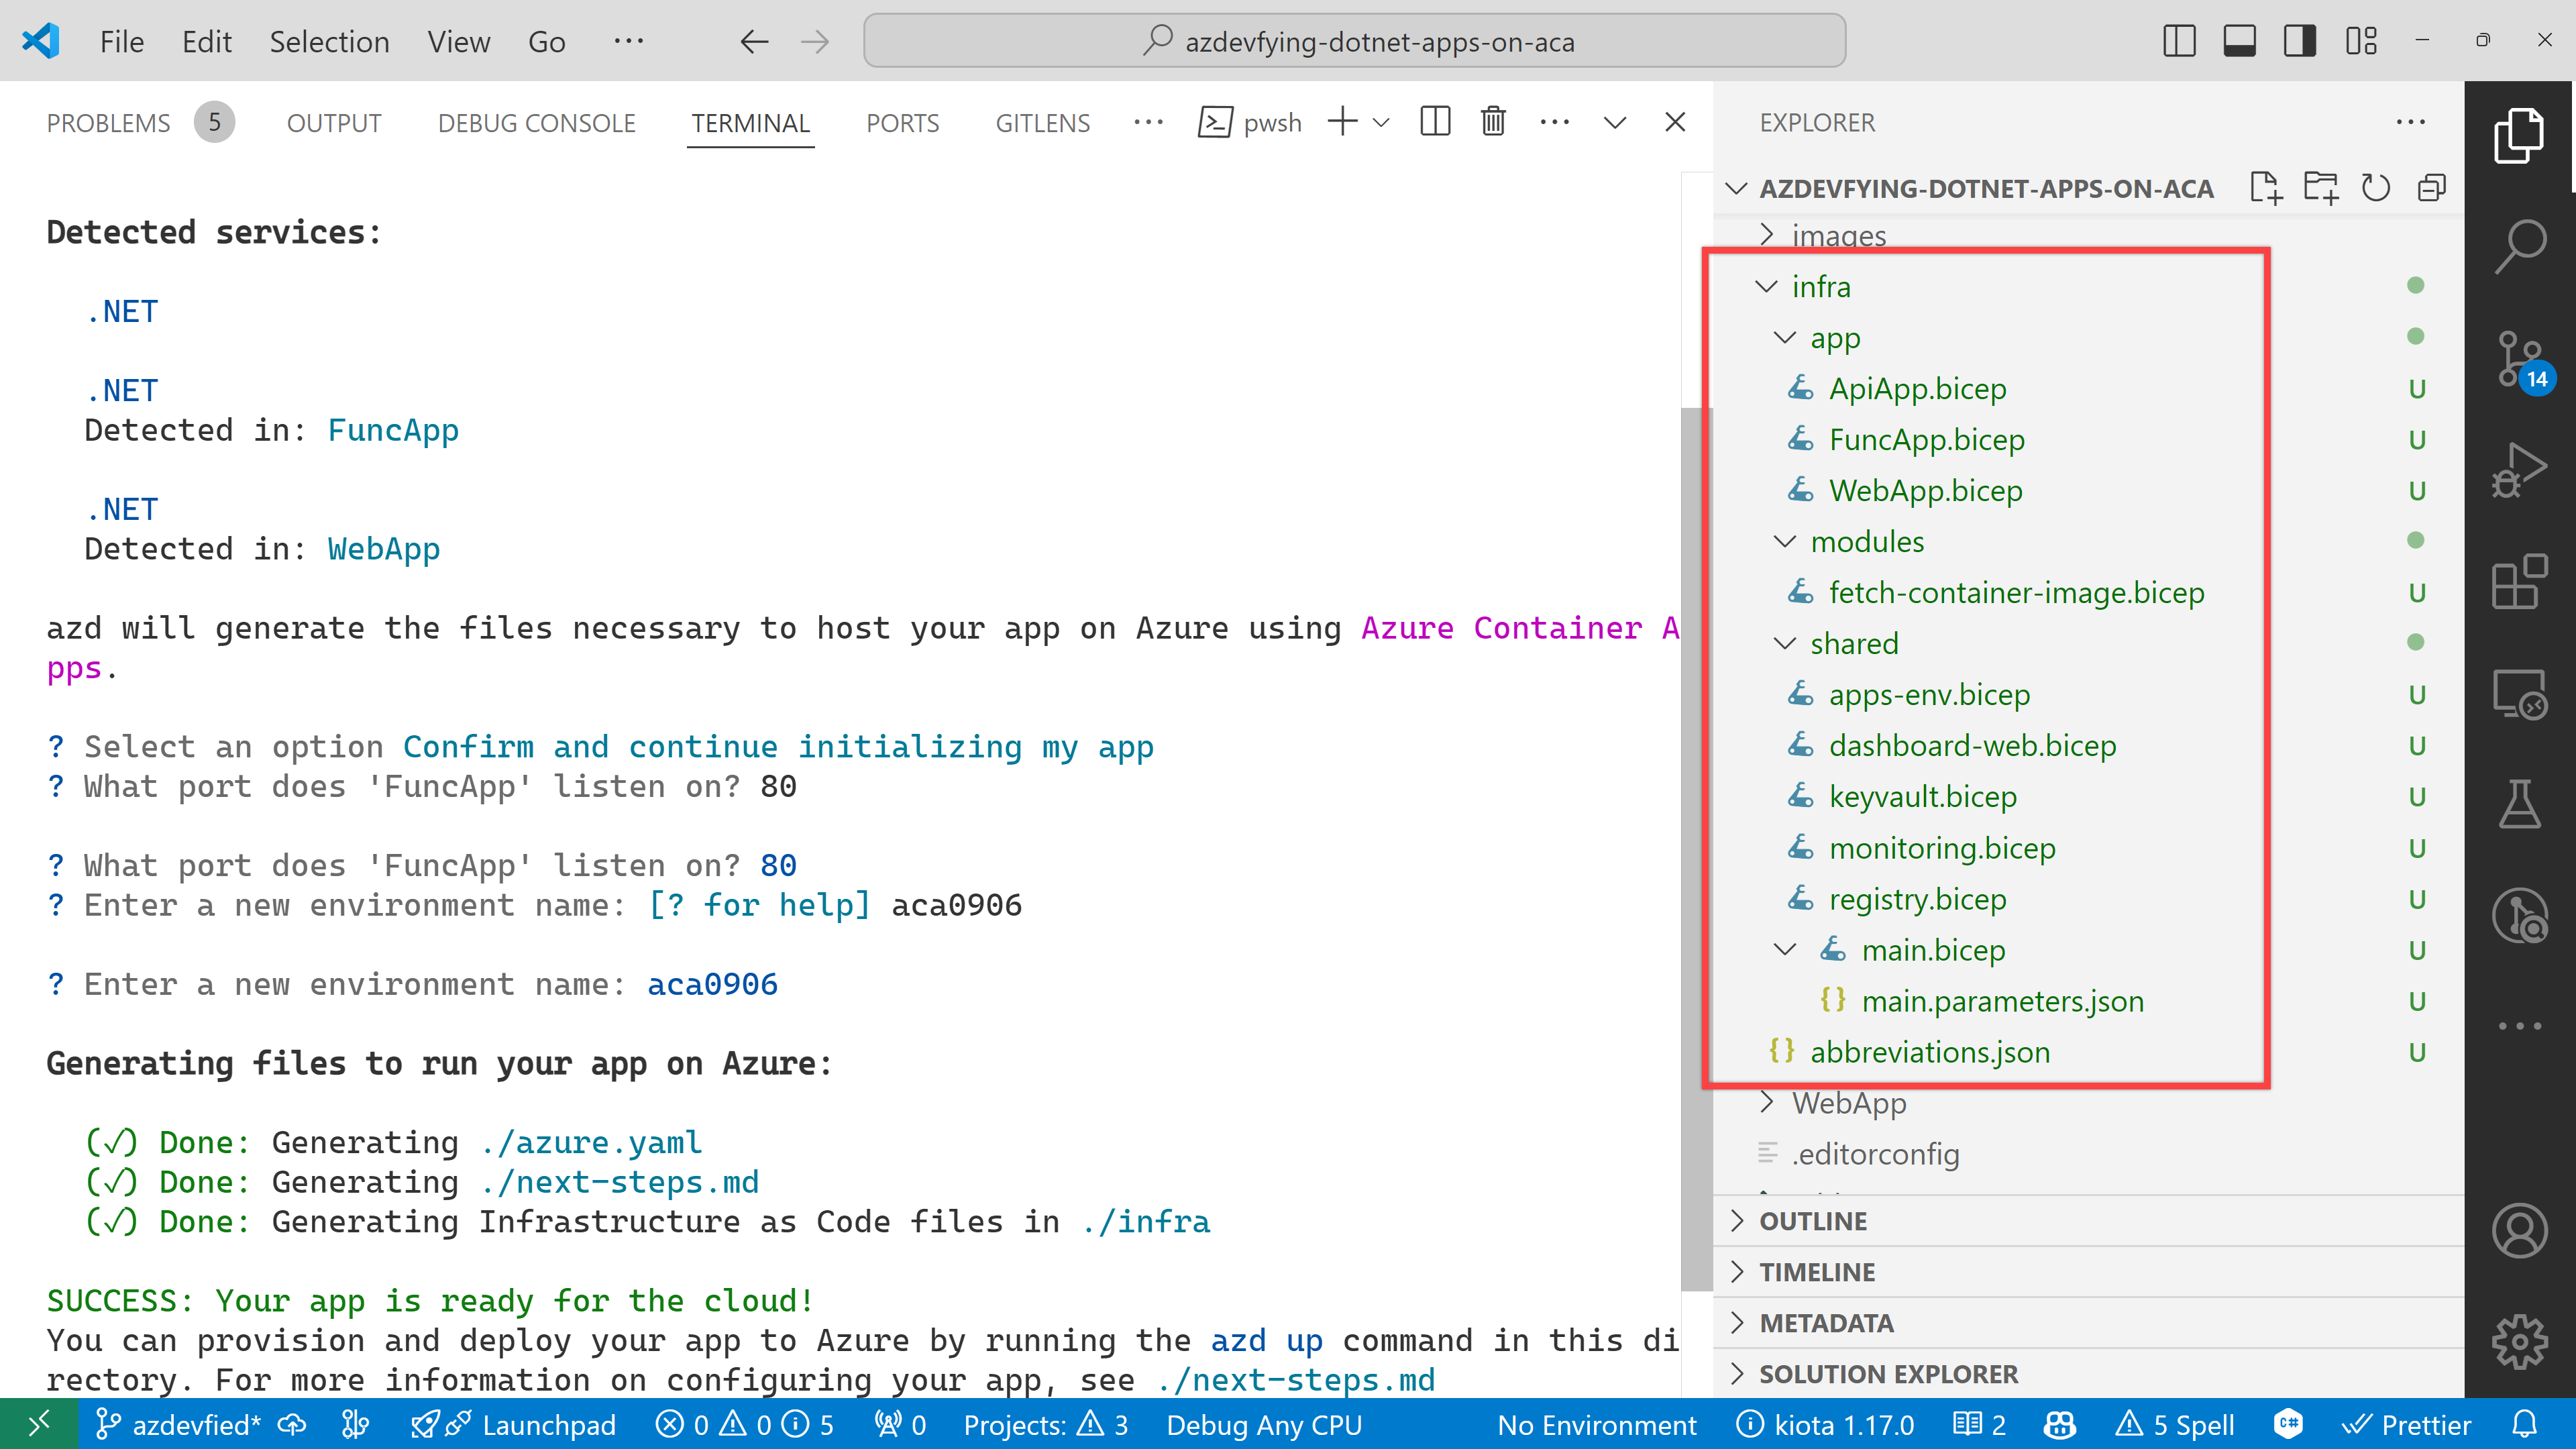
As a result of running the command, azd init, you don’t have to write all necessary Bicep files. Instead, it generates them for you, which significantly reduces the time for infrastructure provisioning. Now, you’re ready to provision and deploy your apps to ACA. Let’s move on.
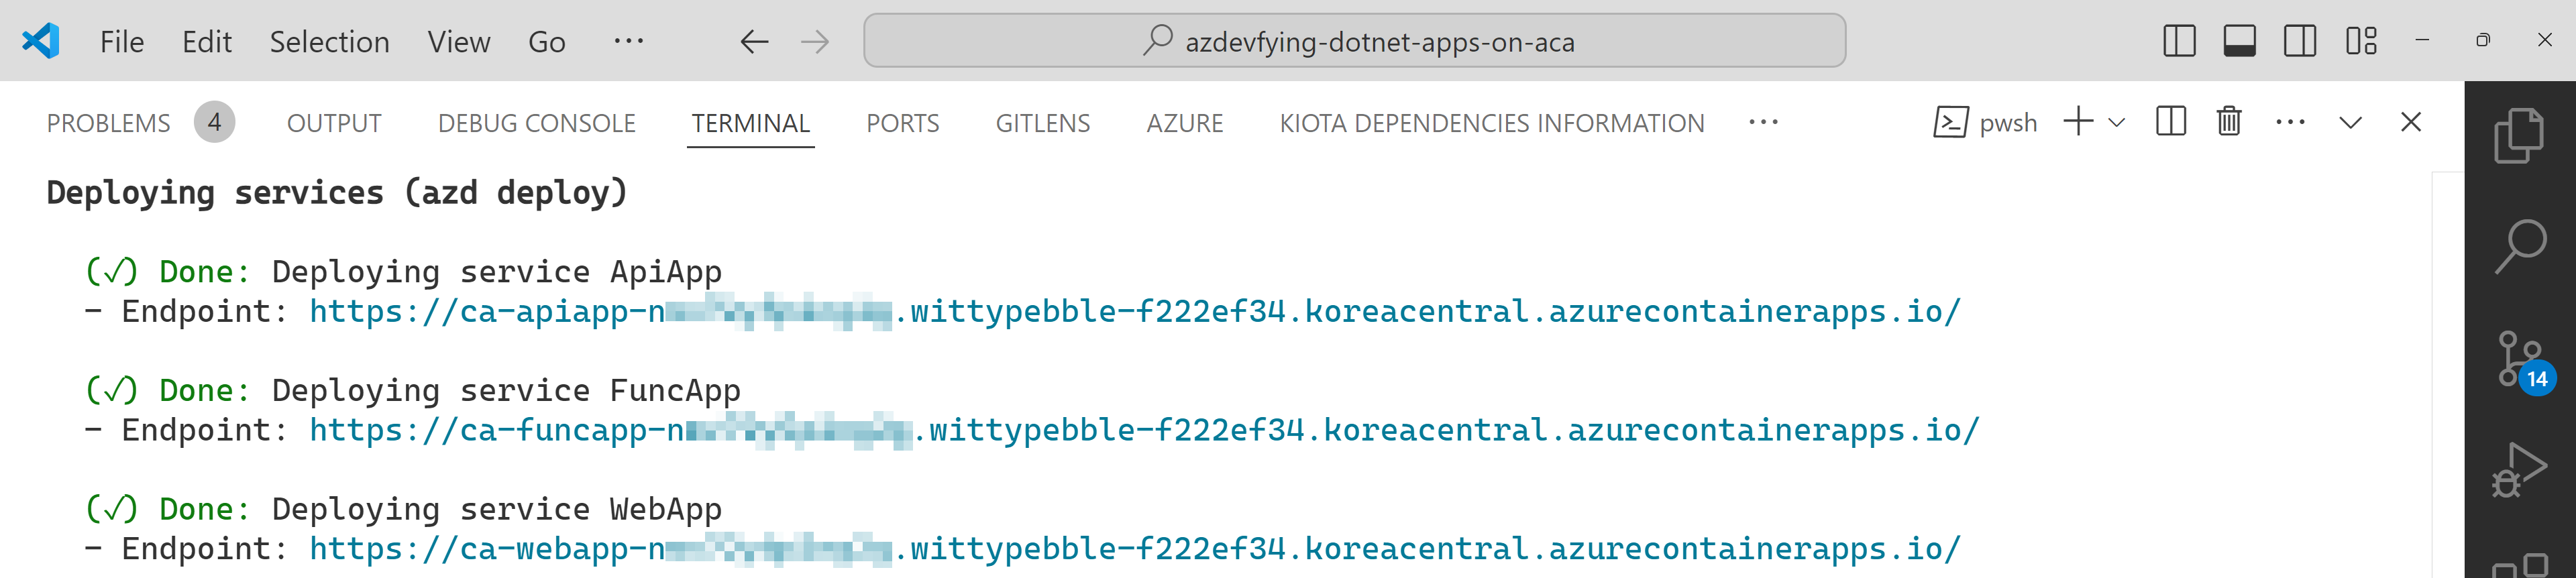
azd up – Provision and deployment
All you need to run at this stage is:
azd up
Then, it asks you to confirm the subscription and location to provision the resources. Choose the appropriate options and continue.

All apps are containerised and deployed to ACA. Once the deployment is done, you can see the output as shown below:
Click the web app URL and navigate to the /weather page. But you will see the error as shown below:
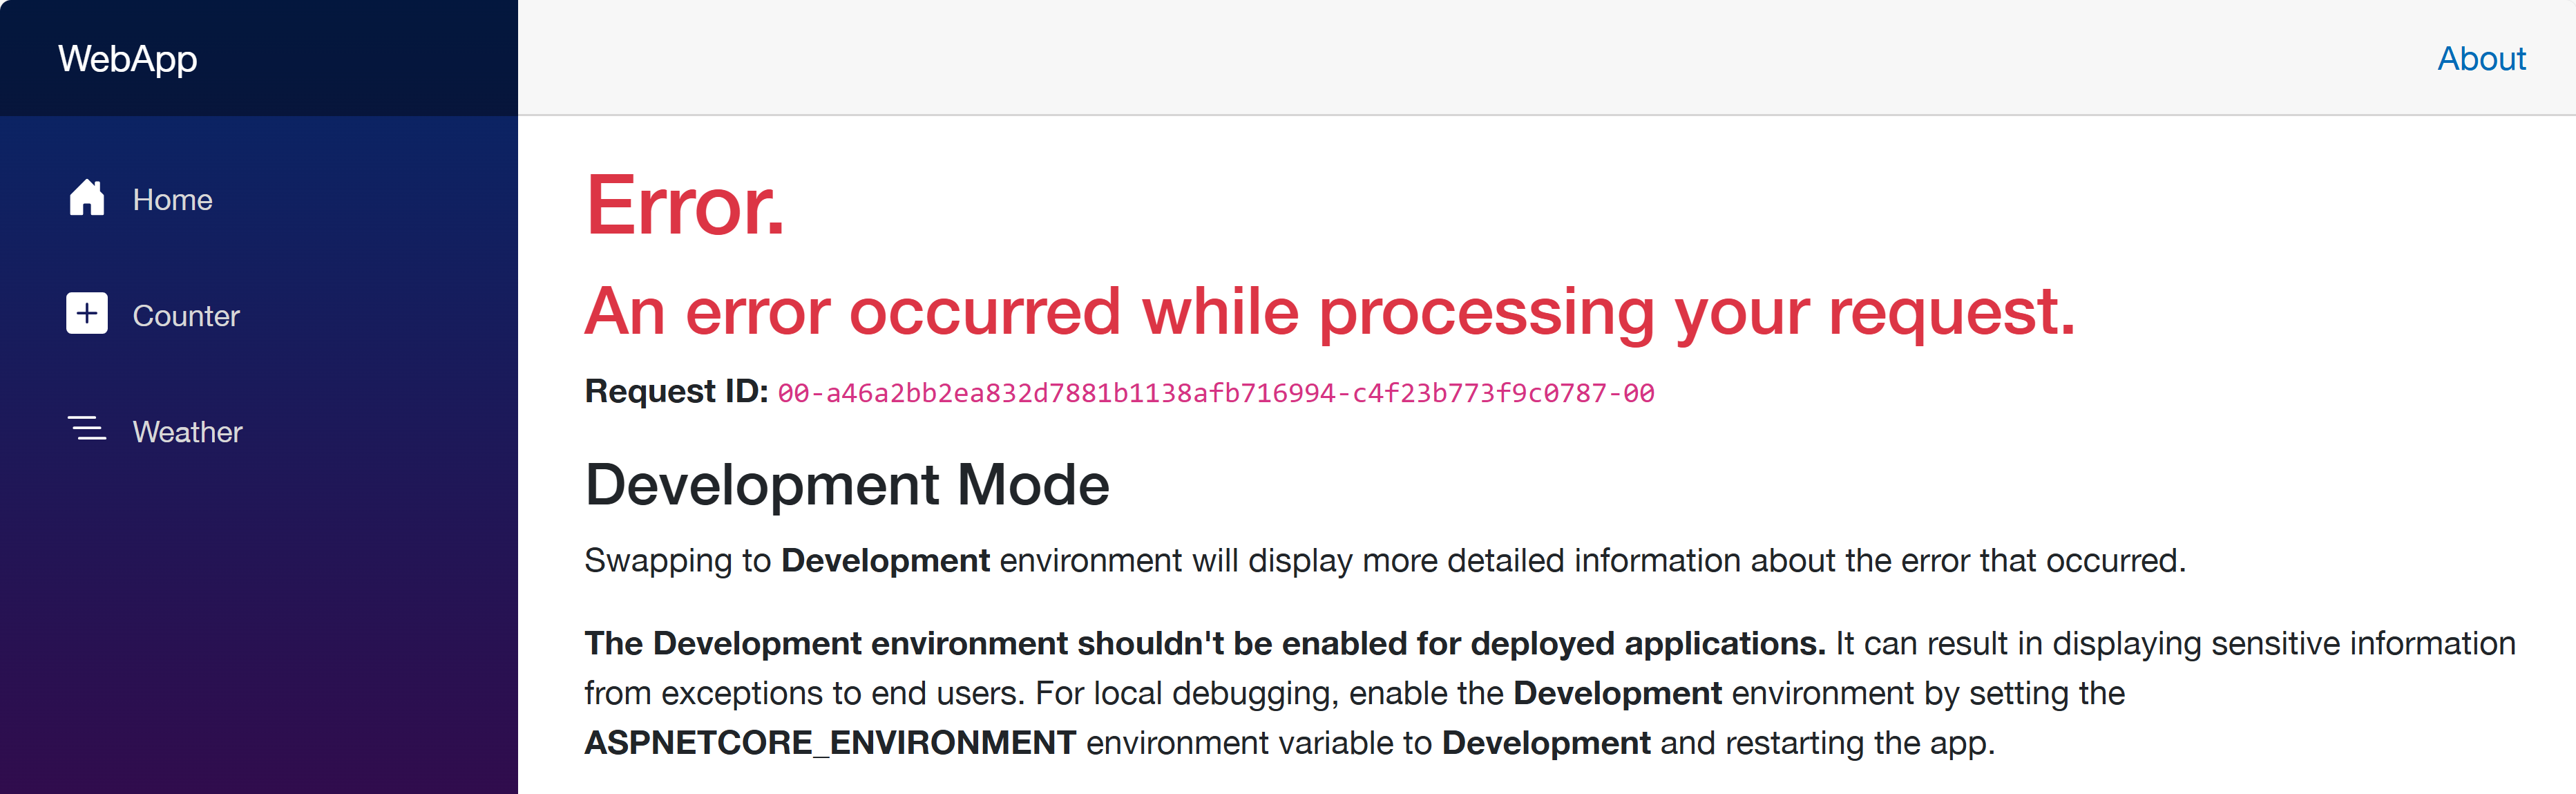
This is because each app doesn’t know where each other is. Therefore, you should update the Bicep files to let the web app know where the other apps are.
Update Bicep files – Service discovery
Open the infra/main.bicep file and update the webApp resource:
module webApp ‘./app/WebApp.bicep’ = {

  name: ‘WebApp’

  params: {

    …

    // Add these two lines

    apiAppEndpoint: apiApp.outputs.uri

    funcAppEndpoint: funcApp.outputs.uri

  }

  scope: rg

}
Then, open the infra/app/WebApp.bicep file and add both apiAppEndpoint and funcAppEndpoint parameters:
…

@secure()

param appDefinition object
// Add these two lines

param apiAppEndpoint string

param funcAppEndpoint string

…
In the same file, change the env variable:
// Before

var env = map(filter(appSettingsArray, i => i.?secret == null), i => {

  name: i.name

  value: i.value

})
// After

var env = union(map(filter(appSettingsArray, i => i.?secret == null), i => {

  name: i.name

  value: i.value

}), [

  {

    name: ‘API_ENDPOINT_URL’

    value: apiAppEndpoint

  }

  {

    name: ‘FUNC_ENDPOINT_URL’

    value: funcAppEndpoint

  }

])
This change passes the API and Function app endpoints to the web app as environment variables, so that the web app knows where the other apps are.
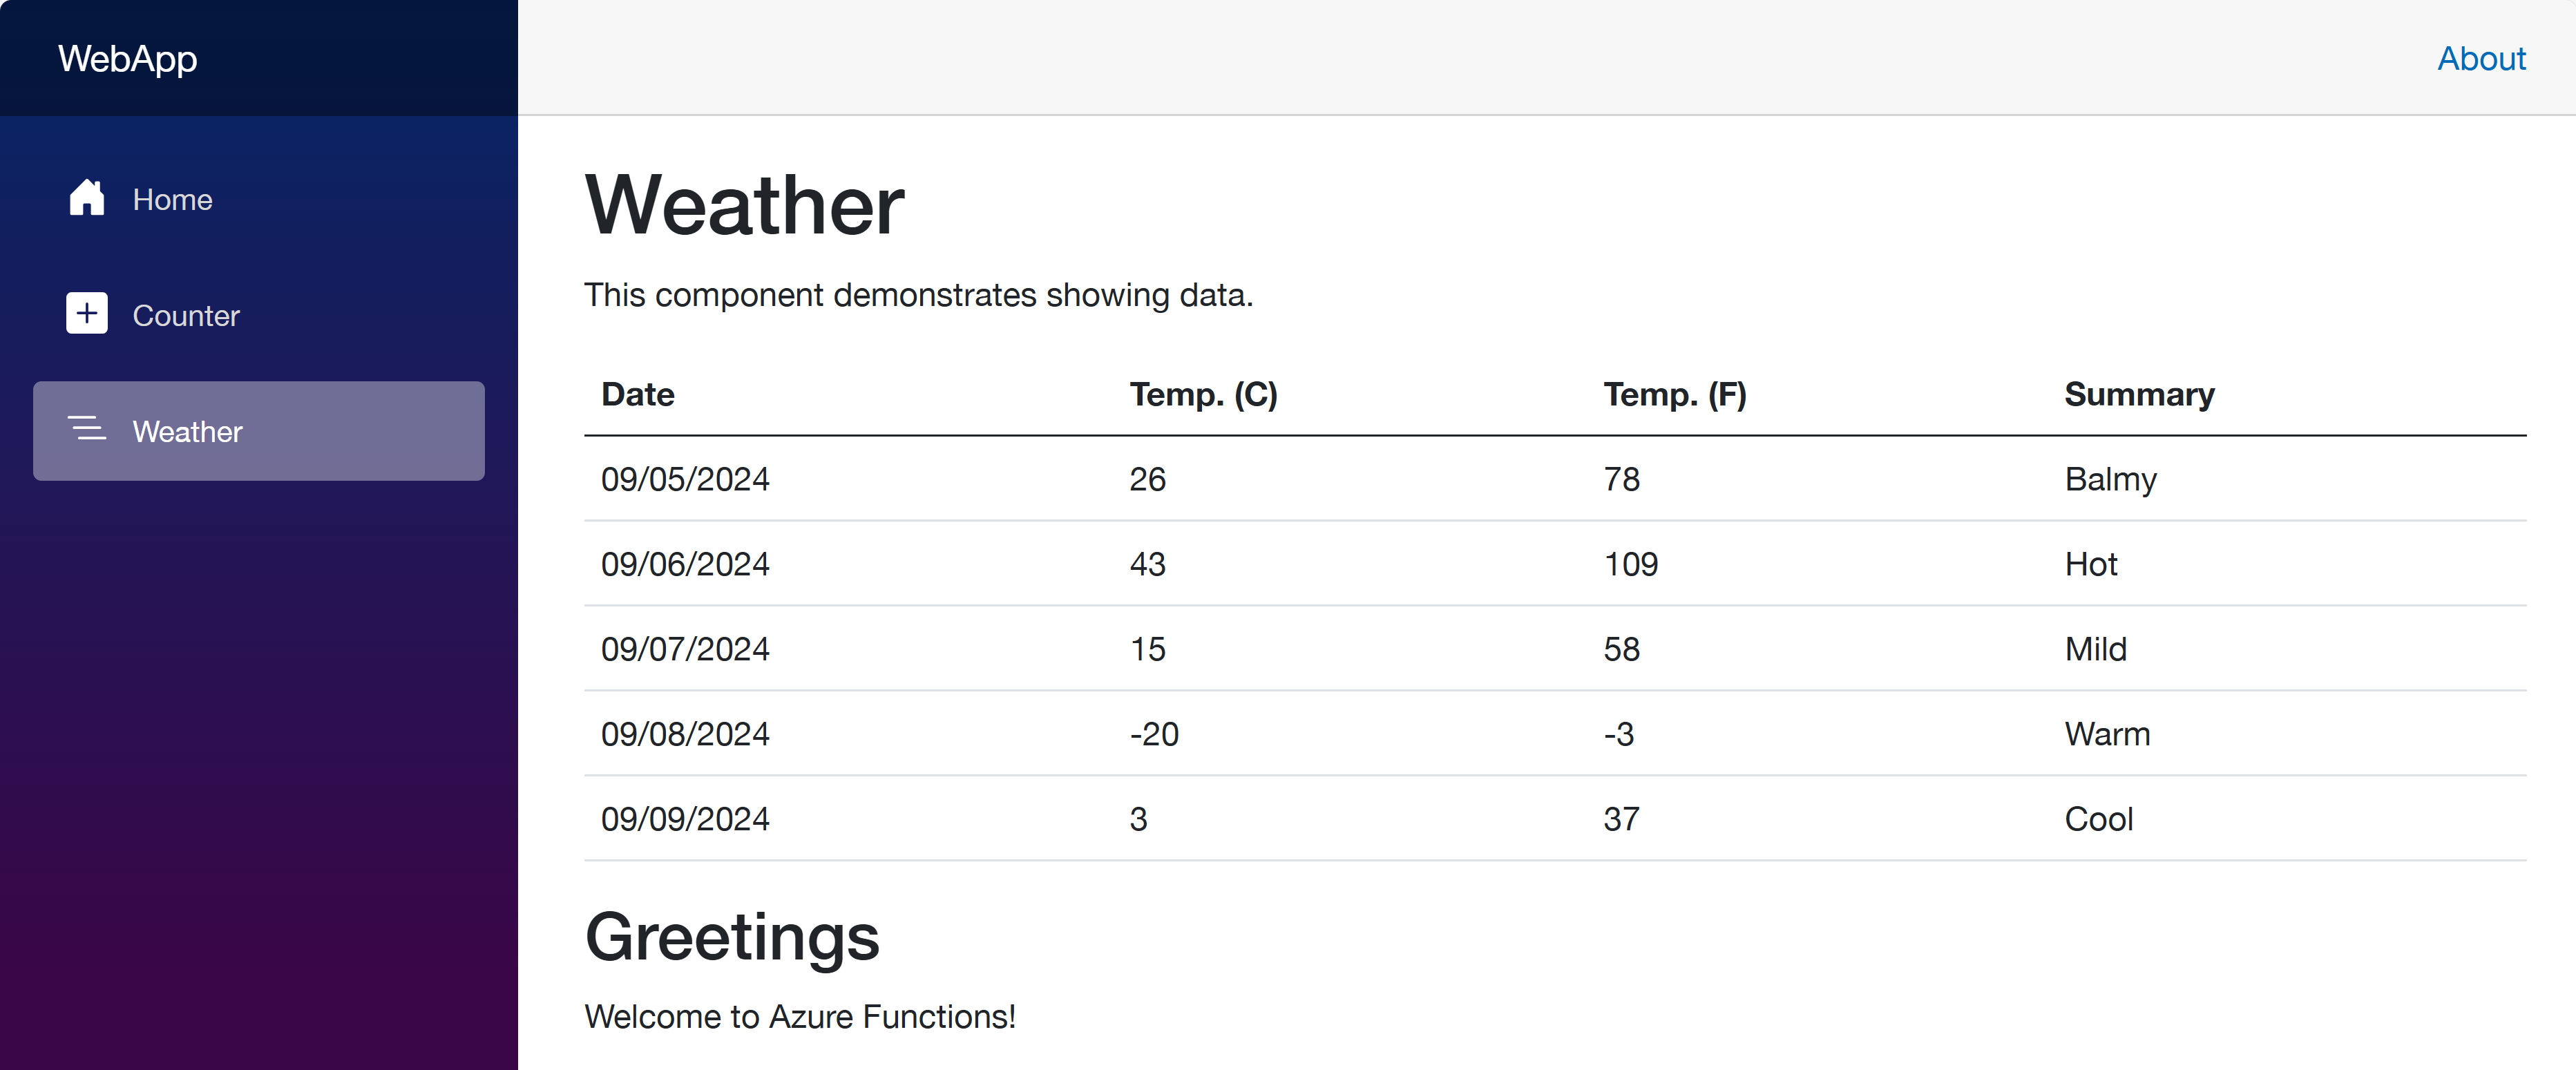
Once you’ve made the changes, run the azd up command again. It will update the resources in ACA. After that, go to the web app URL and navigate to the /weather page. You will see the weather data and greetings fetched from the API and Function apps.
So far, I’ve discussed how to provision and deploy .NET apps including Azure Functions to ACA with just one command, azd up. This is a very convenient way to deploy apps to Azure. However, to let the apps know each other, you should slightly tweak the auto-generated Bicep files. With this little tweak, all your .NET apps will be seamlessly provisioned and deployed to ACA.
One more thing I’d like to mention here, though, is that, if you use .NET Aspire, this sort of service discovery is automatically handled.
More about deploying .NET apps to ACA?
If you want to learn more options about deploying .NET apps to ACA, the following links might be helpful.
This article was originally published on Dev Kimchi.
by Contributed | Sep 5, 2024 | Technology
This article is contributed. See the original author and article here.
In today’s digital era, where data breaches and cyber threats are increasingly sophisticated and pervasive, the need for robust data security measures has never been more critical. Traditional security approaches are proving insufficient against the complex and evolving nature of modern cyber threats. This has led to a growing consensus among security experts and industry leaders on the imperative to incorporate Generative AI (GenAI) into data security frameworks. GenAI’s ability to analyze vast amounts of data in real-time, identify patterns, and predict potential threats offers a transformative approach to safeguarding sensitive information. According to a recent report by Gartner, the use of AI in cybersecurity is expected to reduce the number of data breaches by up to 20% by 2025, underscoring the industry’s recognition of AI’s vital role in enhancing data security (Gartner, 2022). This blog explores how Microsoft is leveraging GenAI to revolutionize data security, providing organizations with the tools they need to protect their digital assets effectively.
Leverage the power of Copilot to secure your organization
Human ingenuity and expertise will always be an irreplaceable component of defense, so we need technology that can augment these unique capabilities with skill sets, processing speeds, and rapid learning of AI. Technology that can work alongside us, detect hidden patterns and behaviors, and inform response at machine speed with the latest and most advanced security practices.
In this scenario, Microsoft Copilot for Security helps professionals across the many cybersecurity disciplines to be more effective and efficient at all the roles they play. It helps you enhance and grow your capabilities and skills, while also supporting the workflows and teams you collaborate with to solve security challenges. Since Copilot for Security uses GenAI to analyze data from many sources, including other Microsoft Security solutions, it can also help analysts catch what they might have otherwise missed. Copilot for Security synthesizes data and detects those important signals better than ever before, all in a single pane of glass, without having to jump between different solutions to get additional context.
Boost your data protection efficiency with Copilot for Security embedded in Purview
An important application of Copilot for Security is to empower and strengthen data security and data compliance teams in securing data with more efficiency and agility. Data security admins are often challenged by the high volume and complexity of alerts, and the integration between Microsoft Purview and Copilot for Security enables these tools to work together to protect your data at machine speed.
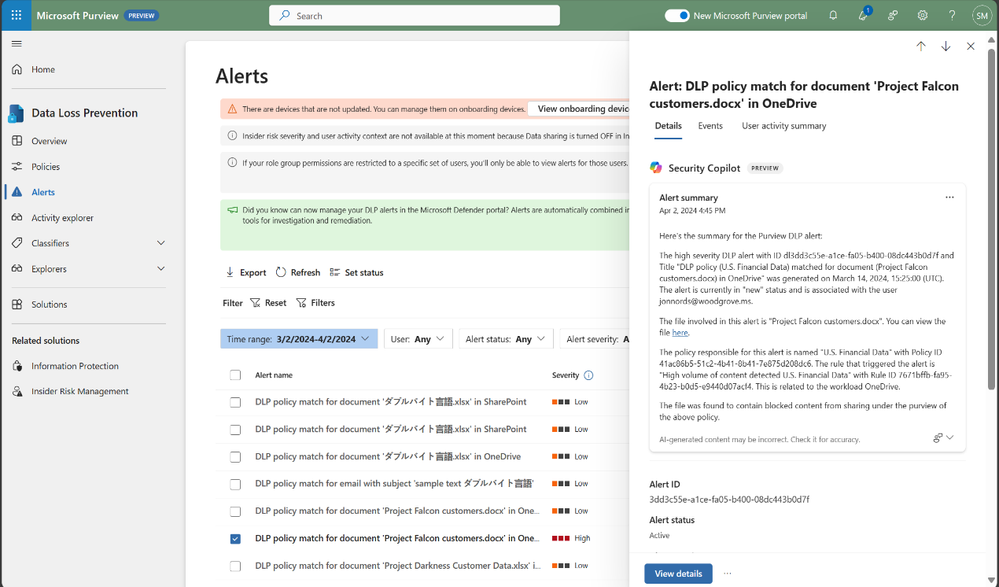
The speed at which data security investigations are conducted is crucial to preventing data loss. However, the task of analyzing a vast array of sources can pose a significant challenge for analysts at any experience level. With Copilot-powered comprehensive summaries of Microsoft Purview Data Loss Prevention (DLP) alerts, data security admins can identify, act on alerts and prevent data risks much faster and effectively. When an alert is summarized, it includes details such as policy rules, the source, and the files involved, as well as user risk level context pulled from Insider Risk Management (IRM).
Figure 1: embedded Copilot summarization into Data Loss Prevention
Your team can also leverage summaries in Microsoft Purview Insider Risk Management alerts, which enables faster understanding of potentially risky activity, user context, behavior sequences. and intent present in an alert. Moreover, we’re excited to announce the public preview of the Copilot for Security-powered enhanced hunting in IRM, where admins will be able to use GenAI-driven analytics to deepen investigations and double-click into a user’s risk profile and activities, beyond the alert summary.
 Figure 2: embedded Copilot summarization into Insider Risk Management
Compliance admins, forensic investigators, legal, and other teams can also strongly benefit from GenAI being incorporated into their workflows. Not only do they spend most of their time reviewing lengthy content and evidence; but admins need to invest time to learn complex technical capabilities like keyword query language to conduct a search, with 60% of admin time spent reviewing evidence collected in review sets.
Compliance teams are subject to regulatory obligations, like industry regulations or corporate policies related to business communications. This requires teams to review communication violations that contain lengthy content like meeting transcripts, group chats, long email threads and attachments. With concise and comprehensive contextual summaries on Microsoft Purview Communication Compliance, content can be evaluated against relevant compliance polices and investigators are able to get a summary of the policy match and better identify risky communication.
 Figure 3: embedded Copilot summarization into Communication Compliance
These contextualized summaries are also invaluable in Microsoft Purview eDiscovery, where they help simplify the exploration of large about of evidence data, which can take hours, days, even weeks to do. This process often requires costly resources like an outside council to manually go through each document to determine relevancy to the case, and this embedded Copilot for Security capability enables reducing days of legal investigations into seconds, by allowing an investigator to use Copilot to summarize items in a review set.
 Figure 4: embedded Copilot summarization into eDiscovery
Search is one of the most difficult and time-intensive workflows in an eDiscovery investigation. Now, you can simplify investigation by leveraging Copilot for Security to translate inquiries from natural to keywork query language. This feature allows organizations to take Natural Language and convert that into assertive evidence queries, in doing so this can correct possible errors, boost team expertise, and enable analysts at all levels to carry out advanced investigations.
 Figure 5: embedded Copilot search with Natural Language on eDiscovery
All these recent developments are just the beginning of the Copilot for Security journey into Microsoft Purview, and we’ll continue to share new advancements and GenAI-powered capabilities that will take your data security program to the next level.
To learn more about how Microsoft Purview can help you protect your data, check our website, or explore our learning resources focused on Copilot for Security in Purview.
Get Started

Recent Comments