by Contributed | Feb 1, 2023 | Technology
This article is contributed. See the original author and article here.
As economic conditions continue to be uncertain and hybrid poses a unique challenge to keep people connected, organizations everywhere are asking the question “How can we do more with less?” and are looking to optimize and consolidate for cost savings and efficiencies while accelerating growth – and the virtual events space has been no exception. Now more than ever, event hosts and organizers are looking for an end-to-end platform that’s familiar to use, provides a secure and reliable experience, and enables customization and management for all aspects of before, during, and after when delivering virtual events.
Today, we’re excited to share how we’ve evolving the webinar experience in Teams, both the new advanced webinars within Teams Premium generally available now and existing webinars within Office 365 and Microsoft 365 offerings. Below, we’ll take a closer look at how Microsoft Teams is delivering new engaging and richer digital-first event experiences.
General availability of advanced webinars in Teams Premium
We’re excited to announce the general availability of Teams Premium and new advanced webinar functionality¹. Built upon the familiar experience of Teams, advanced webinars enable you to host high-quality webinars to drive deeper engagement and generate new leads. Whether you are promoting a new product, onboarding and training new team members, or connecting with potential leads to grow your business, advanced webinars are designed to enable more dynamic and richer experiences for presenters and attendees for before and during your event.
Seamless setup and preparation before your event
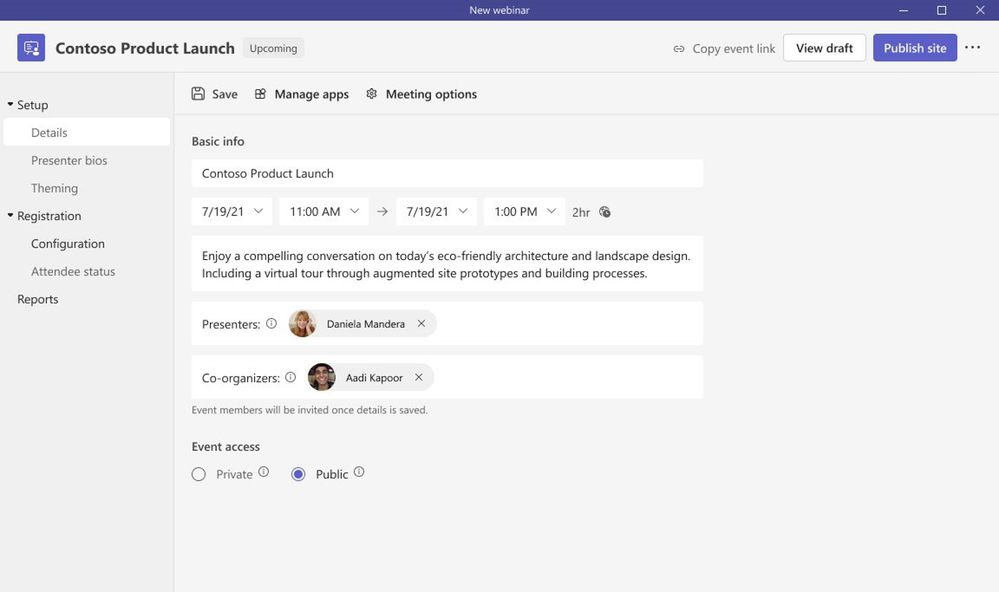
As every webinar is unique, we’ve revamped the setup and management of registration with a new structure and expanded options to customize registration details and event settings. We previously announced this new innovation last year and are excited to share the new experience is now generally available for both Teams Premium and Office and Microsoft 365 offerings. We’ve streamlined the setup of the webinar to offer broader options to tailor the registration experience:
- Designating co-organizers and adding the relevant event details
- Enhancing presenter bios to showcase their expertise and social credentials
- Showcasing your brand to align to the theme of your event; managing registration capacity limits for up to 1,000 attendees
- Specifying custom questions to gather pertinent information about your prospective attendees and enabling consent for event terms and conditions upon registration
- Viewing attendees status for registrations and cancellations, along with attendee reporting all in one central location
Once registration is set and invites are sent to attendees, you can enable registration waitlist and manual approval to make it easier to manage registration ahead of the webinar. Enabling the waitlist will keep webinar registration open even after the event has reached the capacity set by the organizer. This allows additional people to register and be automatically added to the waitlist. As new spots open up, people will be automatically moved to the pending approval state, which enables the organizer to review their registration information and manually approve or reject each of the registrants. In addition, you can customize the registration start and end time to specify when you want registration to start and end, making it easier to plan for and manage your event.

To build excitement and drive attendance as the webinar draws near, you can leverage timely, automated reminder emails¹ to ensure the event remains top of mind. These emails will be sent to every confirmed registrant at a configured date and time you set ahead of the event and will include a custom-branded header, webinar details, and a link to join the event.

On the day of the webinar, presenters are able to join together with one another and the host in the virtual green room to ensure preparation is seamless. With the virtual green room, presenters have a separate, dedicated space separate from attendees where they can connect and chat real-time, stage content, do a quick briefing, and test run without disturbing attendees. While attendees join and wait for the event to start, they’re greeted with a welcome screen to inform them the event will start shortly and can engage with the presenters and one another through chat and Q&A.

Maintain focus and drive engagement during your event
As the webinar is underway, elevate and easily manage the production of your webinar to showcase a more dynamic, curated presentation by managing what attendees see. To keep your attendees focused and more deeply engaged, manage their view so they only see shared content and participants brought on-screen and are no longer distracted by the multiple profiles of other attendees or an accidental attendee video popping up. This enables you to bring presenters both on and off the screen into an off screen area and sharing the relevant content for a more polished presentation, or even bringing an attendee on-screen who raises their hand to ask a question live in the webinar.

To deliver an even more professionally produced event with more dynamic content, integrate different external media feeds into your webinar using RTMP-in. By leveraging an external encoder and enabling RTMP-in, you’ll be able to live stream a custom RTMP source, whether it be a professionally produced video or high-quality screen sharing, to all attendees in the event.

Improve live event experiences with Microsoft eCDN in Teams Premium
To improve live event experiences within an organization, our Microsoft Enterprise Content Deliver Network (eCDN) is now included in Teams Premium. With Microsoft eCDN, organizations can seamlessly and securely live stream global meetings, all-hands gatherings, and town halls, and distribute company-wide trainings using Teams Live Events. Microsoft eCDN helps reduce the load on the corporate network, helps prevent connectivity failure and poor video quality, and doesn’t require any additional installation on user endpoints and devices.

Enhancing existing webinar experiences
While we are excited for users to try new advanced webinar experiences in Teams Premium, we are also excited to share continuous improvements² we are adding to the existing webinar experience in Office 365 and Microsoft 365 plans that users have relied on every day to deliver events around the world. As mentioned above, we’ve revamped the setup and management of registration with a new structure and expanded options to customize registration details and event settings. We previously announced this new innovation last year and are excited to share the new experience is now generally available for Office and Microsoft 365 customers. We’ve streamlined the setup of the webinar to offer broader options to tailor the registration experience: Designating co-organizers and adding the relevant event details; enhancing presenter bios to showcase their expertise and social credentials; showcasing your brand to align to the theme of your event; managing registration capacity limits for up to 1,000 attendees; specifying custom questions to gather pertinent information about your prospective attendees and enabling consent for event terms and conditions upon registration; and viewing attendees status for registrations and cancellations, along with attendee reporting all in one central location.
Live stream Teams Meetings and Webinars to Meta Workplace Live
As webinars are intended to reach a broader audience, typically outside of your organization, we’re making it easier to connect with your extended network, right within Meta Workplace Live. Now organizers can live stream a Teams meeting or webinar to Meta Workplace Live to increase your reach and enable attendees to engage where works best for them. This new functionality allows your audience to watch the event on Workplace real-time and engage with emoji reactions and comments or catch up later and watch the recording within Workplace.

To enable this new streaming functionality, add the Workplace Live app in your Teams meeting or webinar, sign in using your Workplace account, and select the Workplace Event you want to live stream to. Once you go live with your event, users of both Teams and Workplace can view, react, and comment on the live video.
Manage and control Teams meetings and webinars with a touch of a button on Elgato Stream Deck
As hybrid is the new norm, people continue to present and attend meetings and webinars more remotely on Teams. As a presenter, it can be challenging to manage your presentation and how you show up on camera without the added stress of wondering whether you started to record the event, blurred your background, or put yourself on mute when you aren’t actively presenting. And it can be challenging to quickly react real-time while searching for the right live reaction to use and remembering to raise or lower your hand once you’ve spoken. With the new Elgato Stream Deck plugin integration with Teams³, you can now easily manage and control functions directly in a Teams meeting and webinar with a touch of a button. By programming custom keys on the Elgato Stream Deck device for some of the most widely used, common features in Teams, you’ll be able to manage controls more seamlessly, ensure you never get stuck on mute again, and remember to leave the event once it’s done.

The new plugin enables you to program the following keys on your Elgato Stream Deck device:
- Toggle camera on/off
- Toggle mute on/off
- Toggle record on/off
- Toggle background blur on/off
- Leave the meeting
- Display live reactions including applause, laugh, like, love, and wow
- Raise or lower hand
To leverage this integration, ensure you have latest version of the Elgato Stream Deck plugin installed. Before you join your meeting or webinar, click on the ellipses within Teams (next to your profile), select settings, choose privacy, and click manage API at the bottom of the menu. Toggle on to enable API and generate the API token and copy this API to input into Stream Deck. Within Stream Deck, scroll down to the Microsoft Teams section and drag and drop one of the Teams actions on to a key and paste in the API token. The API token will now automatically be applied with any additional Teams actions you add. Once you join your next meeting or webinar, you’ll see your new Teams keys light up on your Elgato Stream Deck device and be able to have a more seamless experience with Teams.
We’re excited to bring these new webinar experiences to our customers, partners, and community around the world. Whether you’re a seasoned Teams user or recently new to the app, start exploring today and learn how our webinar experiences can elevate your next event and help generate leads and drive results for your business. To get started, learn more about advanced webinars in Teams Premium, existing webinars in Office and Microsoft 365 plans, and how to get started with Webinars.
- These webinar capabilities are available now, with the exception of automated email reminders which will be available in March 2023.
- These new capabilities are available in Office 365 and Microsoft 365 E3/E5/A3/A5 plans. Microsoft 365 Business Standard and Microsoft 365 Business Premium plans will include all the webinar features for up to 300 attendees. Please visit the Microsoft 365 roadmap and Microsoft Docs for additional feature details and availability.
- This functionality will start rolling out this month for general availability.
by Contributed | Jan 31, 2023 | Technology
This article is contributed. See the original author and article here.
In this guest blog post, Ravit Aviv, Technology Alliances Director at Transmit Security, discusses passwordless multifactor authentication and how Transmit Security works with Microsoft Azure Active Directory B2C.
We are all too familiar with the problems of passwords. New data from Microsoft provides a unique perspective on the state of cybersecurity based on 43 trillion signals from billions of logins every day. The 2022 Microsoft Digital Defense Report reveals:
- The volume of password attacks has risen to roughly 921 attacks every second.
- Password attacks increased 74 percent in the past year.
- Roughly 20 percent of people reuse the same passwords for many websites and apps, making them easy targets for credential stuffing or password spraying.
- Over 90 percent of accounts compromised by password attacks lack strong multifactor authentication (MFA), like SMS OTPs or FIDO2 authentication.
The report goes on to say, “We have seen a rise in targeted password spray attacks, with very large spikes in the volume of attacker traffic spread across thousands of IP addresses.” The attackers’ efforts to hide from standard defenses and remain untraceable highlight yet another problem. Threats are growing more sophisticated.
Why replace passwords and basic MFA?
MFA has become essential to fend off the growing volume of digital identity threats and prevent account takeover (ATO) fraud. But for many organizations, SMS one-time passcodes (OTPs), magic links, and authenticator apps add more friction than their customers will tolerate.
More importantly, these multi-step MFA methods are still vulnerable to smishing, man-in-the-middle, and other attacks, resulting in a clunky customer experience that is susceptible to compromise.
PSD2 compliance: Is your MFA strong and simple enough?
To comply with security regulations like PSD2’s strong customer authentication (SCA), most financial services use SMS OTPs or an authenticator app. But the added friction of having to download and use an app reduces the customer adoption rate, and OTPs can lead frustrated customers to call support or drop off entirely.
The combination of an OTP and a password technically meets the requirement for two factors, but this won’t prevent ATO fraud if the device is infected with spyware or the session is hijacked. To take over accounts at scale, hackers are now using OTP interception bots that make it easier than ever to snag passcodes in transit. Plus, some bad bots bypass OTP authentication altogether.
How passwordless MFA works differently
When you authenticate customers based on FIDO2, the most current set of passwordless standards by the FIDO Alliance, you know who is accessing the account. And, if done correctly, you completely eliminate shared secrets — not just passwords but OTPs and all data that could expose you to attacks.
With true passwordless authentication, customers simply use a fingerprint or facial biometric to achieve the strongest form of MFA in one simple user action. Logging in is faster, easier, and vastly more secure.
How is it multifactor? Only the real customer’s biometric (inherence factor) unlocks a private key (possession factor) stored on the user’s device.
What’s to prevent the biometric and private key from being compromised? By leveraging public key cryptography (PKI), the biometric and the private key remain secure, never leaving the user’s device. The private key signs the authentication challenge, and only the signed challenge, void of any identifying data, is sent over the web. On the receiving end, the matching public key is used to verify the challenge. It all happens in a few seconds, and you’ll know who the individual is with a high level of confidence.
Key differentiators to look for in a passwordless solution
- MFA by design: Methods should include FIDO-based passwordless and passkeys.
- With or without an app: Gain flexibility to optimize customer experience and security as needed.
- Omnichannel experiences: Let users move across channels with a single identity.
- Multi-device support: Enable users to log in from any of their devices.
- Ease of deployment: Plug-and-play services optimize all scenarios and flows.
- Continually updated for compliance: Stay in compliance with a service that’s continually updated to meet the latest requirements.
Integrate Transmit Security passwordless MFA with Azure AD B2C
You can now fortify Microsoft Azure Active Directory B2C with Transmit Security passwordless MFA (available in the Azure Marketplace), designed to authenticate customers based on their true identities.
With Transmit Security, customers only register one account with your business and then log in with a biometric on any channel, using any of their devices, without ever entering a password or storing credentials in the cloud. Our unique device-binding method makes it easy and secure for customers to transfer trust to any of their devices, binding them all to one unified identity.
This cloud-native service seamlessly integrates within your new or existing Azure implementation. Passwordless MFA works alongside all methods of authentication provided by Azure AD B2C and supports other implementations like FIDO passkeys, an extended version of FIDO credentials. This allows you to give customers login options that satisfy their preferences while enhancing your security posture. Over time, you’ll be able to transition all customers to passwordless.
In a press release announcing support for the FIDO standard, Alex Simons, Corporate Vice President, Identity Program Management at Microsoft, said, “The complete shift to a passwordless world will begin with consumers making it a natural part of their lives. Any viable solution must be safer, easier, and faster than the passwords and legacy multifactor authentication methods used today.”
“Microsoft is thrilled to have Transmit Security as a Solutions Partner for Security,” said Yvonne Muench, Senior Director - Marketplace & ISV Journey at Microsoft. “Transmit Security is committed to helping Microsoft customers leverage the benefits of passwordless authentication via Microsoft Azure Active Directory B2C. Having an experienced and trusted security partner like Transmit Security building on and augmenting native Azure capabilities really helps support and drive the vision of a passwordless future.”
Visit Microsoft Learn for a simple step-by-step guide on how to configure Transmit Security passwordless MFA with Azure AD B2C. You can customize or brand the UI and roll out hundreds of user flows out of the box. It’s easy to set up secure and smooth password-free experiences across all channels and devices.

Secure the full identity lifecycle
By removing customer passwords, your greatest security risk is gone. But today’s more sophisticated ATO fraud can compromise customer accounts before, during, and after the login. By implementing passwordless MFA as well the Transmit Security Account Protection service, you’ll seal the cracks across the full identity lifecycle.
Real-time risk and trust assessments correlate hundreds of signals to detect signs of ATO fraud anywhere in the customer journey, from registration to account recovery and every step in between. Any time risk is detected, you can challenge the user with true passwordless MFA. Together with Azure AD B2C, you’ll gain a formidable defense against ATO fraud.
Explore what you can do with Azure AD B2C and Transmit Security.

Recent Comments