by Contributed | Apr 3, 2024 | Technology
This article is contributed. See the original author and article here.
Last updated 4/3/2024 to include v2 Tiers features.
Authors: Faisal Mustafa, Ben Gimblett, Jose Moreno, Srini Padala, and Fernando Mejia.
There are different options when it comes to integrating your API Management with your Azure Virtual Network (VNet) which are important to understand. These options will depend on your network perimeter access requirements and the available tiers and features in Azure API Management.
This blog post aims to guide you through the different options available on both the classic tiers and v2 tiers of Azure API Management, to help you decide which choice works best for your requirements.
TL; DR
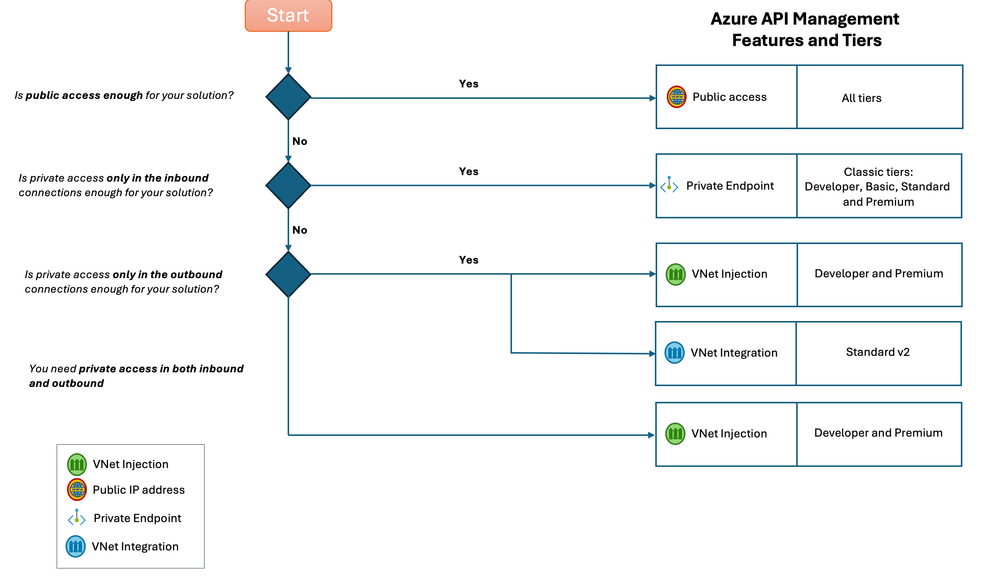
Decision tree describing how to choose the right Azure API Management tier based on networking scenarios.
Here is the relevant documentation to implement these tiers and features:
- Tiers
- Networking Features
Background
Before we jump into the options and differences it’s worth taking a step back to understand more about how Azure Platform as a Service products (PaaS) work regarding networking. If you need a refresher and so we don’t repeat ourselves here, we’d ask the reader to spend a few minutes over at Jose’s excellent “Cloudtrooper blog” and his deep dive post on all things “PaaS networking”. We’ll use some of the same labels and terms in this post for consistency Taxonomy of Azure PaaS service access – Cloudtrooper.
What is API Management, what tiers are available and why does it matter in relation to networking?
The first thing to remember is that the API Management API Gateway is a Layer 7 (in OSI model terms) HTTP Proxy. Keeping this in mind helps a lot when you think about the networking options available through the different tiers. In simple terms:
An HTTP proxy terminates HTTP connections from any client going to a set of [backend] servers and establishes new HTTP connections to those servers. For most API Management Gateway use cases the resource would reside close to the [backend] servers its facades (usually in the same Azure region).

Diagram describing all the components included in Azure API Management, and the difference between inbound and outbound sections.
Why does this matter? When we talk about the available networking-options we talk about features which relate to the initial client connection to API Management(inbound) OR features relating to the connection from API Management to the API backends(outbound). From now on, we will call them inbound and outbound connections, and there are different options/features for each type.
Regarding Azure API Management tiers we will rely in the following categories:
- Consumption tier, the tier that exposes serverless properties.
- Classic tiers, this category refers to the Developer, Basic, Standard and Premium tiers.
- V2 tiers, this category refers to the Basic v2 and Standard v2.
Networking scenarios
Let’s jump right in. To make it easier to navigate and for you to get the information you need to make the right decisions for your use case, lets summarize by the applicable use-cases, we’ll list the tiers where the functionality is available and add any applicable notes.
I have no specific networking requirements and just want to keep things simple.
Supported tiers: Consumption, Classic tiers, and V2 tiers.
Of course, there’s more to implementing a workload with API Management than just networking features and still a lot of choice when it comes to an API Management tier that fits your workload and scale requirements. But if you are ok with having inbound and outbound connections going through the Azure Backbone or Public Internet, any tier of Azure API Management can help you with this scenario. Of course, we recommend securing your endpoints using Authentication/Authorization mechanisms like subscription keys, certificates, and Oauth2/OIDC.

Diagram describing what tiers of Azure API Management allow public access for inbound and outbound.
I have a requirement to connect privately to API Management for one or more of my Client Applications
Option 1: Consider deploying a Private Endpoint into API Management.
Supported tiers: Classic tiers.
“Private endpoints allow you to access services privately within your virtual network, avoiding exposure over the public internet.” (Thanks Microsoft co-pilot).
Deploying a Private Endpoint for inbound connectivity is a good option to support secure client connections into API Management. Remember, in this context the Private Endpoint you deploy for API Management creates an alternative network path into your API MANAGEMENT service instance; it’s about facilitating inbound communication (the client connecting to API Management), and it is “one way only” meaning it doesn’t help for scenarios where you also want to connect privately to your backends.

Diagram describing what tiers of Azure API Management allow public access and private endpoint for inbound.
Note: Whilst it’s supported to use Private Endpoints in the Premium or Developer tiers – the service must not have been added to a Virtual Network (VNET). This makes private endpoints and the “VNET Injection” capability supported by Premium and Developer mutually exclusive. The Basic and Standard tiers can’t be added to a Virtual Network.
Option 2: Consider adding your API Management to your VNet.
Supported tiers: Developer tier and Premium tier.
Developer and Premium are the only tiers where you can deploy the service into your virtual network – what we sometimes refer to as “VNet injection” – and allows you to set the inbound as public or private.

Diagram describing what tiers of Azure API Management allow private access for both inbound and outbound.
As far as the Developer Tier is concerned, this is NOT meant for production use and no workloads showed be deployed on this Developer Tier.
The API backends I want to reach from API Management are private.
Supported tiers: Developer tier, Premium tier, and Standard v2 tier.
For the classic tiers Developer and Premium, as we mentioned before you can deploy the service into your virtual network. This could be in “internal” (private) or external mode.

Diagram describing what tiers of Azure API Management allow private access for both inbound and outbound.
For the v2 tiers, Standard v2, allows you to rely on a feature called “VNet Integration” (please not the difference between VNet Integration and VNet injection) which allows API Management to “see” into your network and access services through a private IP in the connected Virtual Network, or in peered / connected network(s).

Diagram describing what tiers of Azure API Management allow private access for outbound using VNet integration.
I need to connect to API Management privately as well as reach private backends with no public access.
Supported tiers: Developer tier and Premium tier.
Add API Management Premium or Developer to your Virtual Network. The best practice would be to set the mode to “internal” – meaning inbound connectivity is via a private IP, via an internal load balancer.

Diagram describing what tiers of Azure API Management allow private access for both inbound and outbound.
This allows you to keep all API’s private/internal but offers the option of later placing a Reverse Proxy in front of API Management (for example Azure Application Gateway) to electively open access to any private APIs you want to make publicly accessible.
A last word about IP Addresses…
It’s something that relates to networking and is oft asked, so it would be remiss of us not to add a few lines summarizing the behavior and NAT (network address translation) for the different deployment modes:
Inbound
- By default, inbound is via a public IP address assigned to the service.
- This changes if you opt into using a Private Endpoint (for any of the tiers supporting this feature). Always remember to explicitly turn off the public ingress if you deploy a private endpoint instead and no longer require it.
- This also changes if you deploy the Premium (or Developer) tier, added to your Virtual Network (“VNet-injected”), and set the mode to “internal”. In this mode, although a public IP is still deployed for control plane traffic, all data plane traffic will go through the private IP (Internal load balancer endpoint) which is provided in this mode.
Outbound
- By default, outbound traffic is via the public IP(s) assigned to the service.
- This changes for Premium (or Developer) tiers when the service is added to your Virtual Network (irrespective of the inbound mode being public or private). In this case
- For internal traffic leaving API Management – for example API Management reaching to a backend service hosted on a downstream VM within the network – there is no SNAT (source network address translation). If the next hop is an NVA (network virtual appliance/firewall) any rules for the source should use the subnet prefix, not individually mapped IPs.
- External bound traffic breaking out (non RFC1918) is SNAT to the single-tenant (dedicated) public IP assigned. This includes traffic to other PaaS services via a public endpoint (although you should note the traffic in this instance stays on the Azure backbone).
- For Standard V2 using “VNet integration”
- NAT for internal traffic is the same.
- External bound traffic breaking out is SNAT to one of the hosting stamps shared public IPs. If you want control over the outbound IP, use an Azure NAT Gateway on the subnet or route via an NVA (network virtual appliance, or firewall). Same note as above applies for PaaS-to-PaaS traffic via Public IPs.
Note for v2 tiers: API MANAGEMENT control plane and its own dependency traffic is not seen on the customers network, which is an enhancement from the GA tiers, and simplifies scenarios requiring force-tunnelling / firewall integration.
by Contributed | Apr 2, 2024 | Technology
This article is contributed. See the original author and article here.
Microsoft is excited to participate in Embedded World, April 9-11, 2024 in Nuremberg, Germany, the leading international fair for embedded systems. This event showcases the latest innovations and trends in the field. From hardware and software to tools and services, this event brings together experts and industry leaders from around the globe to share their knowledge and insights. In this blog, we will give you a sneak peek at Microsoft’s presence at the event, including highlights on key topics, and what to expect from Embedded World.
Makers of embedded devices will be interested in Azure Private MEC (Multi-access Edge Compute) for several reasons:
- Low Latency and Edge Compute: Azure private MEC provides low-latency and high-bandwidth connectivity combined with highly available edge computing services, for IoT and other edge devices, enabling real-time data processing and decision-making.
- Scalability: Azure private MEC allows makers of embedded devices to easily scale their solutions, adding new devices and capabilities as needed.
- Security: Azure private MEC provides a secure and isolated environment for processing sensitive data, reducing the risk of data breaches and cyber-attacks.
- Device Density: Azure private MEC can support a high density of devices on a manufacturing floor, allowing for seamless connectivity and communication between numerous devices.
Connect with us in Hall 5 Stand 353
Visit us at our booth in Hall 5 to explore our innovative demos and experiences, connect with product and partner experts on featured products, and meet one-on-one with Microsoft leaders.
Microsoft invites attendees to join the following sessions where they will discover more about Azure private MEC and how private 5G is unlocking industry transformation. This is a great opportunity to get practical guidance on how to prepare your organization for innovation and growth, including learning on tools and frameworks to determine when, where, and how to focus on specific use cases emerging across industries today.
Understanding the ROI of a 5G-enabled factory April 9 | 12:00 pm
Intelligent factories leverage advanced technologies and automation to optimize manufacturing processes and enhance overall efficiency. These factories integrate various technologies such as artificial intelligence (AI), machine learning, Internet of Things (IoT), robotics, and data analytics to create a connected and intelligent production environment.
Hand on Lab with Azure Private 5G Core April 10 | 4:00 pm
April 11 | 1:30 pm
Register for a deep dive session in our Microsoft Learning Center, located across from the Microsoft booth (#5-469) where we will explore:
- Azure private MEC solutions and their use in different industry verticals.
- Why build applications and devices supporting the private MEC platforms.
- Opportunity for growth with 5G and private MEC
Learn more about Azure private MEC
- Whether you’re an enterprise , looking to leverage our solutions, a developer eager to create network-aware applications, or an application ISV seeking to collaborate with Microsoft on MEC solutions, we invite you complete this form to get contacted by a member of the private MEC team.
- To learn how Microsoft is helping organizations embrace 5G with modern connected applications, sign up for news and updates delivered to your inbox.
by Contributed | Mar 31, 2024 | Technology
This article is contributed. See the original author and article here.
Effective cost management in Azure Monitor and Azure Log Analytics is essential for controlling cloud expenditures. It involves strategic measures to reduce costs while maximizing the value derived from ingested, processed, and retained data. In Azure, achieving this balance entails adopting efficient data ingestion methods, smart retention policies, and judicious use of table transformations with Kusto Query Language (KQL).
Understanding the impact of data management practices on costs is crucial since each byte of data ingested and stored in Azure Log Analytics incurs expenses. Table transformations—such as filtering, projecting, aggregating, sorting, joining, and dropping data—are a great way to reduce storage and ingestion costs. They allow you to filter or modify data before it’s sent to a Log Analytics workspace. Reducing ingestion cost and also reducing long-term storage.
This document will explore four key areas to uncover strategies for optimizing the Azure Monitor and Azure Log Analytics environment, ensuring cost-effectiveness while maintaining high performance and data integrity. Our guide will provide comprehensive insights for managing cloud expenses within Azure services.
Key Areas of Focus:
- Ingestion Cost Considerations: The volume of data ingested primarily influences costs. Implementing filters at the source is crucial to capture only the most relevant data.
- Data Retention Strategies: Effective retention policies are vital for cost control. Azure Log Analytics allows automatic purging of data past certain thresholds, preventing unnecessary storage expenses.
- Optimization through Transformations: Refining the dataset through table transformations can focus efforts on valuable data and reduce long-term storage needs. Note that these transformations won’t reduce costs within the minimum data retention period.
- Cost Management Practices: Leveraging Azure Cost Management and Billing tools is crucial for gaining insight into usage patterns. These insights inform strategic adjustments, aligning costs with budgetary limits.
1) Ingestion Cost Considerations:
Efficient data ingestion within Azure Monitor and Log Analytics is a balancing act between capturing comprehensive insights and managing costs. This section delves into effective data ingestion strategies for Azure’s IaaS environments, highlighting the prudent use of Data Collection Rules (DCRs) to maintain data insight quality while addressing cost implications.
Data ingestion costs in Azure Log Analytics are incurred at the point of collection, with volume directly affecting expenses. It’s imperative to establish a first line of defense against high costs at this stage. Sampling at the source is critical, ensuring that applications and resources only transmit necessary data. This preliminary filtering sets the stage for cost-effective data management. Within Azure’s environment, DCRs become a pivotal mechanism where this essential data sampling commences. They streamline the collection process by specifying what data is collected and how. However, it’s important to recognize that while DCRs are comprehensive, they may not encompass all types of data or sources. For more nuanced or complex requirements, additional configuration or tools may be necessary beyond the standard scope of DCRs.
In addition:
Navigating Azure Monitor Ingestion in IaaS:
Azure Virtual Machines (VMs) provide a spectrum of logging options, which bear on both the depth of operational insights and the consequent costs. The strategic use of DCRs, in concert with tools like Log Diagnostic settings and Insights, is essential for proficient monitoring and management of VMs.”
A) Log Diagnostic Settings:
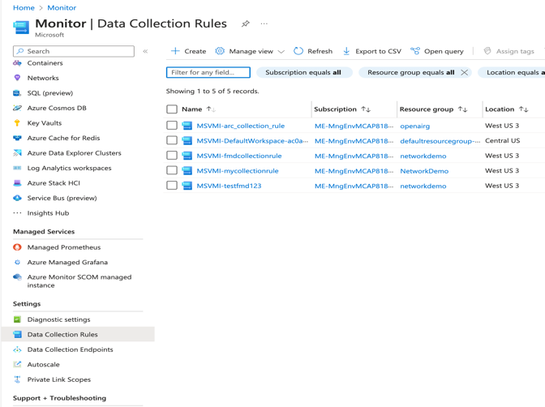
When enabling Log Diagnostic Settings in Azure, you are presented with the option to select a Data Collection Rule, although you are not given an option to modify the collection rule, you can access the DCR settings by navigating to the Azure Monitor Service Section. DCRs help tailor what logs and metrics are collected. They support routing diagnostics to Azure Monitor Logs, Storage, or Event Hubs and are valuable for detailed data needs like VM boot logs or performance counters.
To minimize costs with DCRs:
Filter at Source: DCRs can enforce filters to send only pertinent data to the workspace, to modify the filters, Navigate to the Azure Portal, select Azure Monitor, under Settings select Data Collection Rules, select the collection rule you are trying to modify and click on Data Sources, here you can modify what is collected. Some Items such as Microsoft-Perf allows you to add a transformation at this level.
Efficient Collection: DCRs can reduce collection frequency or focus on key metrics, which may require additional insights for complex data patterns. In the Azure portal under the collection rule, select the data source, such as Performance Counters, and here you can adjust the sample rate (frequency) of data collection such as CPU sample rate 60 seconds, adjust the counters based on your need.

Regular Reviews: While DCRs automate some collection practices, manual oversight is still needed to identify and address high-volume sources.
B) Insights (Azure Monitor for VMs):
Purpose: Azure VM Insights is an extension of Azure Monitor designed to deliver a thorough monitoring solution, furnishing detailed performance metrics, visual dependency maps, and vital health statistics for your virtual machines.
Details: Leveraging the Log Analytics agent, Azure VM Insights captures and synthesizes data from your VMs, offering a cohesive dashboard that showcases CPU, memory, disk, and network performance, alongside process details and inter-service dependencies.
Use Cases: Azure VM Insights is pivotal for advanced performance monitoring and diagnostics. It enables the early detection of performance issues, aids in discerning system alterations, and proactively alerts you to potential disruptions before they manifest significantly.
To Enable VM Insights, select the Data Collection Rule which defines the Log analytics workspace to be used.

Cost-saving measures include:
Selective Collection: DCRs ensure only essential metrics are collected, yet understanding which metrics are essential can require nuanced analysis.
Metric Collection Frequency: Adjusting the frequency via DCRs can mitigate overload, but determining optimal intervals may require manual analysis.
Use Automation and Azure policy for Configuration: The cornerstone of scalable and cost-effective monitoring is the implementation of standardized configurations across all your virtual machine (VM) assets. Automation plays a pivotal role in this process, ensuring that monitoring configurations are consistent, error-free, and aligned with organizational policies and compliance requirements.
Azure Policy for Monitoring Consistency: Azure Policy is a service in Azure that you can use to create, assign, and manage policies. These policies enforce different rules over your resources, so those resources stay compliant with your corporate standards and service level agreements. Azure Policy can ensure that all VMs in your subscription have the required monitoring agents installed and configured correctly.
You can define policies that audit or even deploy particular settings like log retention periods and specific diagnostic settings, ensuring compliance and aiding in cost control. For example, a policy could be set to automatically deploy Log Analytics agents to any new VM that is created within a subscription. Another policy might require that certain performance metrics are collected and could audit VMs to ensure that collection is happening as expected. If a VM is found not to be in compliance, Azure Policy can trigger a remediation task that brings the VM into compliance by automatically configuring the correct settings.
C) Logs (Azure Monitor Logs):
Purpose: Azure Monitor Logs are pivotal for storing and analyzing log data in the Log Analytics workspace, leveraging Kusto Query Language (KQL) for complex queries.
Cost Control in Detail: While Azure Monitor Logs are adept at aggregating data from diverse sources, including VMs and application logs, effective cost management is essential. DCRs control the collection of logs for storage and analysis in Log Analytics same collection rules apply.
Azure Monitor Basic Logs: Azure monitor logs offers two log plans that let you reduce log ingestion and retention costs and take advantage of Azure Monitor’s advanced features and analytic capabilities based on your needs. The default value of the tables in an Azure Log Analytics Workspace is “Analytics” this plan provides full analysis capabilities and makes log data available for queries, it provides features such as alerts, and use by other services. The plan “Basic” lets you save on the cost of ingesting and storing high-volume verbose logs in your Log Analytics workspace for debugging, troubleshooting, and auditing, but not for analytics and alerts. The retention period is fixed at 8 days.
– From the Log Analytics workspace menu select Tables
– Select the context menu for the table you want to configure and select “manage table”

– From the table plan dropdown on the table configuration screen, select “Basic” or Analytics.
– Not all tables support the Basic plan for a list of tables please visit the documentation listed at the end of this document.

– Select Save.
2) Data Retention Strategies:
Effective retention policies play a vital role in cost control. Azure Log Analytics enables the automatic purging of data past certain retention thresholds, avoiding unnecessary storage expenses for data that is no longer needed. Azure Monitor Logs retain data in two states: interactive retention, which lets you retain Analytics logs for interactive queries of up to 2 years, and Archive, which lets you keep older, less used data in your workspace at a reduced cost. You can access data in the archived state by using search jobs and restore you can keep data in archive state for up to 12 years.
- Purpose: Implementing well-defined data retention policies is essential to balance the accessibility of historical data with cost management in Azure Log Analytics. The purpose is to retain only the data that adds value to your organization while minimizing storage and associated costs.
- Automated Purging: Azure Log Analytics facilitates cost control through automated data purging. Set retention policies to automatically delete data that exceeds your specified retention threshold, ensuring you’re not paying for storage you don’t need.
- Retention Policy Design:
- Assessment of Data Value: Regularly evaluate the importance of different data types and their relevance over time to determine the appropriate retention periods.
- Compliance Considerations: Ensure that retention periods comply with regulatory requirements and organizational data governance policies.
- Cost Reduction Techniques:
- Reduction in Retention Period: By retaining only necessary data, you reduce the volume of data stored, leading to direct cost savings on storage resources. Some techniques include data purging, data deduplication, data archiving and life-cycle management policies.
- Setting the Global Retention Period: Navigate to the Azure portal and select the Log Analytics Workspace. In the Settings, locate Usage and Estimated Costs, select Data Retention and specify the retention period. This will set the retention period globally for all tables in a Log Analytics workspace.

Setting Per Table Retention period:
you can also specify retention periods for each individual table in the Log Analytics Workspace. In the Azure portal navigate and select the Log Analytics Workspace. In the Settings, select Tables, at the end of each table select the three dots and select manage table, here you can change the retention settings for the table. If needed, you can reduce the interactive retention period to as little as four days using the API or CLI.

Interactive and Archive Retention Period:
lets you retain Analytic logs for interactive queries of up to 2 years. From the Log Analytics workspaces menu in the Azure portal, select your workspaces menu, select Tables. Select the context menu for the table you want to configure and select Manage Table. Configure the interactive retention period. i.e. 30 days Configure the Total Retention Period the difference between the interactive period and the total period is the Archive Period. This difference will show up under the configuration menu. Blue for interactive and orange for Archive period.

Automatic Purging data: If you set the data retention period to 30 days, you can purge older data immediately by using the immediatePurgeDataOn30Days parameter in the Azure Resource Manager. Workspaces with a 30-day retention might keep data for 31 days if this parameter is not set.
Data Deduplication: Azure log analytics workspaces does not offer built-in data de-duplication features, however you can implement data duplication as part of the ingestion process before sending the data to Azure Log Analytics using an Azure function or a logic app.
Move older data to Azure Blob using Data export: Data Export in a log analytics workspace lets you continuously export data per selected tables in your workspace. The data can be exported to a storage account or Azure event hubs. Once the data is in a storage account the data can use life-cycle policies. Another benefit of exporting data is that smaller data sets result in quicker query execution times and potentially lower compute costs

3) Optimization Through Transformations:
The primary purpose of data transformations within Azure Log Analytics is to enhance the efficiency of data handling, by honing in on the essential information, thus refining the datasets for better utility. During this process, which occurs within Azure Monitor’s ingestion pipeline, data undergoes transformations after the source delivers it but before it reaches its final destination (LAW). This key step not only serves to reduce data ingestion costs by eliminating extraneous rows and columns but also ensures adherence to privacy standards through the anonymization of sensitive information. By adding layers of context and optimizing for relevance, the transformations offer enriched data quality while simultaneously allowing for granular access control and streamlined cost management.
There are two ways to do transformations, one at the Data Collection Rule level, which means you select only the items you need such as the Windows performance counters from a VM running the Windows OS in Azure, the second option is to do a transformation at the Table-Level in the Azure Log Analytics Workspace (LAW).
- Transformation Process:
- Data Selection: Transformations are defined in a data collection rule (DCR) and use a Kusto Query Language (KQL) statement that’s applied individually to each entry in the incoming data and create output in the structure expected by the destination.
- Table Transformations: Utilize Azure Log Analytics’ Kusto Query Language (KQL) to perform transformations on specific tables within the Azure Log Analytics Workspace. Not all tables support transformations please check the for a complete list.
- As an example, to add a table transformation for the ‘events’ table in Azure Log Analytics for cost optimization, you could perform the following steps:
- Navigate to the Azure portal
- Go to your Log Analytics Workspaces
- Select the workspace
- Under Settings select Tables.
- Under the tables panel select the three dots to the right of the table row and click on “create transformation”

– Select a Data Collection Rule

– Under the Schema and transformation select “Transformation editor”

Source will show all data in the table, and a KQL query will allow you to select and project only the data needed.
source
| where severity == “Critical”
| extend Properties = parse_json(properties)
| project
TimeGenerated = todatetime([“time”]),
Category = category,
StatusDescription = StatusDescription,
EventName = name,
EventId = tostring(Properties.EventId)
- Cost Reduction Techniques:
- Reduced Storage: Setup Data Collection Rules to only capture the desired data, and setup Table Transformations to only allow data required into the Log Analytics workspace.
- Regular Revision: Continuously evaluate and update transformation logic to ensure it reflects the current data landscape and business objectives.
4) Cost Management Practices:
The primary objective in the cost management is finding out where the charges are coming from and figuring out ways to optimize either ingestion at the source, or by adopting some or all the strategies outlined in this document. The primary tool that can be used in Azure is the Azure Cost Management and Billing tool. It is used to obtain a clear and actionable view of your Azure expenditure. These tools provide critical insights into how resources are consumed, enabling informed decision-making for cost optimization. In addition to the strategies outlined already, the following are other Cost and Management techniques:
- Cost Control Mechanisms:
- Budgets and Alerts: Set up budgets for different projects or services and configure alerts to notify you when spending approaches or exceeds these budgets.
- Commitment Tiers: Provide a discount on your workspace ingestion costs when you commit to a specific amount of daily data. Commitment can start at 100GB per day at a 15% discount from the pay-as-you-go pricing and as the amount increases the percent discount grows as well. To take advantage of these navigate to the Azure portal, select log analytic workspaces, select your workspace, under settings select Usage and estimated costs, scroll down to see the available commitment tiers.

- Log analytic workspaces placement: thoughtful placement of the Log Analytics Workspaces is important and can significantly impact expenses. Start with a single workspace to simplify management and querying. As your requirements evolve, consider creating multiple workspaces based on specific needs such as compliance. Regional placement should also be considered to avoid egress charges. Creating separate workspaces in each region might reduce egress costs, but consolidating into a single workspace could allow you to benefit from Commitment Tiers and further cost savings.

- Implementation Strategies:
- Tagging and Grouping: Implement resource tagging to improve visibility and control over cloud costs by logically grouping expenditures.
- Cost Allocation: Allocate costs back to departments or projects, encouraging accountability and cost-conscious behavior. To find data volume by Azure Resource, Resource Group, or subscription you can use KQL queries such as the following from the Log Analytics workspace Log section :
find where TimeGenerated
between(startofday(ago(1d))..startofday(now())) project
ResourceId, IsBillable
| where IsBillable == true

In conclusion, this document has provided a structured approach to cost optimization in Azure, specifically for services related to Azure Monitor and Log Analytics. Through careful planning of ingestion strategies, data retention policies, transformative data practices, and prudent cost management practices, organizations can significantly reduce their cloud expenditures without sacrificing the depth and integrity of their analytics. Each section outlined actionable insights, from filtering and sampling data at ingestion to employing intelligent retention and transformation strategies, all aimed at achieving a cost-effective yet robust Azure logging environment. By consistently applying these strategies and regularly reviewing usage and cost patterns with Azure Cost Management tools, businesses can ensure their cloud operations remain within budgetary constraints while maintaining high performance and compliance standards.
Resources:


Recent Comments