News to Know: Volume 1, Edition 10

News to Know: Volume 1, Edition 10

This article is contributed. See the original author and article here.

Welcome to the Viva Glint newsletter. These recurring communications coincide with platform releases and enhancements to help you get the most out of the Viva Glint product. You can access the current newsletter and past editions on the Viva Glint blog.


Glint released its latest new features and enhancements on September 21, 2024. Scheduled monthly releases and regular maintenance are how we best serve our customers. Your dashboard provides date and timing details two or three days before releases. See our future release and downtime dates. Follow along with what features are ahead: Viva Glint product roadmap.


Microsoft 365 Copilot in Viva Glint


Copilot in Viva Glint summarizes non-English survey comments. As a Copilot user, you’ll still interact with Copilot in English, but Copilot now summarizes non-English comments left by survey respondents. To gather the best feedback, encourage your employees to leave comments in their native language. Microsoft 365 Copilot currently supports 27 languages.


Learn how Microsoft HR uses Viva and Microsoft 365 Copilot to empower employees. Using a human-centric approach, Microsoft HR rolled out Microsoft 365 Copilot to their global HR organization. Read the blog about how Microsoft uses Viva to communicate, encourage skilling and development, and measure success.


New on your Viva Glint platform


360 feedback programs are included with all Viva Glint purchases! 360 feedback programs provide multiple perspectives for gathering insights into an employee’s strengths and opportunities, with a long-term focus on improvement.


Export reports to PDFs easily and quickly. Now the Export feature in all Glint reports includes a full PDF experience with quick generation time and capabilities such as search, markup, highlight, and preview. You can also select which report sections to export – an enhancement our customers have been requesting! Read about PDF enhancements.


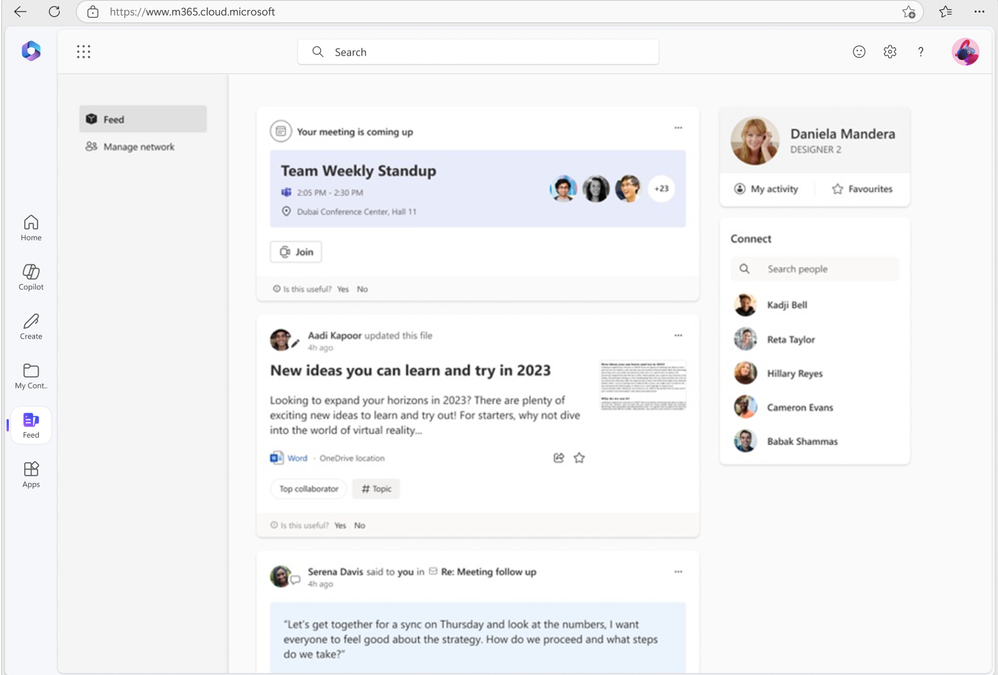
Navigate between Viva apps with ease. The Viva App Bar is a shared Microsoft component that enables Viva suite users to seamlessly discover and navigate between Viva apps they have purchased on the web. Viva Glint is integrating with these shared navigation elements to allow our users to have consistent experiences across Viva apps.


image (3).png


Enhanced data controller experience. Microsoft Viva Glint Administrators can decide how survey responses are handled for deleted users and how Glint reuses employee IDs over time. Learn about new user data options in the General Settings feature and its impact on user deletion.


Collaborate in Viva Glint across multiple tenants. Use Microsoft 365’s multitenant organization (MTO) feature to let survey takers and dashboard users from multiple tenants access Glint on a home tenant. Get a holistic view of your organization’s employee sentiment, no matter how complex your tenant configuration.


Upcoming events


Ask the Experts | October 15 


Our next session in this popular series focuses on maximizing survey participation. Bring your questions! Register


AI Empowerment: How HR uses AI | October 22


Join us to hear how HR professionals use AI to work more effectively. This session covers key features, capabilities, and use cases for AI within the HR function, and recommendations on how it can help you be more effective in your role. Register


Events you may have missed


Catch up with recordings and recaps released since our last newsletter:


For your managers


Do your managers feel equipped to understand and act on feedback? Viva People Science conducted a study with 700+ US-based managers across a variety of industries to gain a deeper understanding of their experience, from common practices to barriers when it comes to acting on employee feedback. Learn more about the critical findings


Help managers build psychological safety within their teams. Share this new learning path with your managers to help them identify and cultivate psychological safety within their teams. Managers can earn their Microsoft Viva badge in psychological safety with Credly. 


Exciting new resources for all stakeholders


Accelerate AI transformation with our new eBook. The state of AI change readiness, from the Viva People Science team, outlines findings on AI readiness, discusses implications, and provides practical guidance for leaders and HR on best to support people through change related to AI at work.


Build a holistic employee listening strategy. Take time to align with your internal stakeholders and complete our Holistic Listening Vision and Strategy Discovery Workbook from the Viva People Science team. This workbook helps you consider information important to your listening strategy and for tracking progress.


Coming soon: learn about the combined powers of Viva Glint, Viva Insights, and Viva Pulse. Together these apps measure employee engagement and productivity while giving you actionable insights. Keep your eyes out for a new communication where we will be highlighting features, customer success stories, and events featuring these products. 

Microsoft Ignite Sold Out? Not for Security Professionals! Secure Your Spot

This article is contributed. See the original author and article here.

Attention security professionals! Microsoft Ignite 2024 is just around the corner, taking place from Monday, November 18, 2024, through Friday, November 22, 2024, in Chicago, Illinois. This is your chance to dive deep into the latest advancements in AI and security to help you build a security-first culture within your organization. 


General in-person passes are sold out, but don’t worry—you can still purchase a pass using Microsoft Security’s RSVP code. Use the RSVP code ATTNLIYL to purchase your in-person pass while supplies last. 


Why attend?


For security professionals and teams, AI offers a significant advantage, empowering organizations of all sizes and industries to tip the scales in favor of defenders. It also introduces new uncertainties and risks that require organizations to create a culture of security to stay protected. Now, more than ever, is the time to put security first. But how? 


The answer is: with our innovations in AI-first, end-to-end security. 


Ignite is our opportunity to share and showcase our latest security product innovations with you, and then dive into the technical details together—so the information you learn at Microsoft Ignite can have an immediate benefit to your digital environments and your customers. 


Here’s what you can expect: 


  • See your favorite products in action during sessions, demos, interactive labs, and workshops. 


  • Learn how our global-scale threat intelligence informs the products you use daily. 


  • Gain AI-specific cybersecurity skills to make you an invaluable asset to your organization.  


  • Engage with Microsoft security product innovators and thought leaders. 


  • Network with fellow security leaders, partners, and technical enthusiasts. 


Microsoft Security at Microsoft Ignite: An expanded experience 


Last year, you asked for more security content, we delivered—and we received great feedback. So this year we’re planning even more, with a focus on our continuing commitment to securing our technology and our customers. 


See an overview of the week below to plan your travel. 


Day 0 November 18, 2024 


Microsoft Ignite Security Forum 


Join us one day early at Microsoft Ignite for a security-only program, designed for decision makers from businesses of all sizes. Learn how AI, threat intelligence, and insights from our Secure Future Initiative can advance your security strategy. Be sure to sign up for this experience in registration. 


Pre-day Labs Sessions 


We’re also offering two technical pre-day learning labs: 


1. “Secure your data estate for a Copilot for M365 deployment”: In this lecture-based workshop, Microsoft experts will walk you through a best practice, staged approach to securing your data estate ready for Copilot and other AI tools. 


2. “AI Red Teaming in Practice”: This pre-day hands on workshop, led by Microsoft AI Red Team experts, is equipped to probe any machine learning system for vulnerabilities, including prompt injection attacks. 


Day 1 November 19, 2024 


Keynote  


Satya Nadella said in May that security is job #1. Don’t miss the live keynote for the latest security innovations impacting Microsoft. 


Security General Session 


Microsoft Security’s top engineering and business leaders will share an overview of how our most exciting innovations help you put security first and best position your organization in the age of AI.  


Security programming  


Dive deeper into topics that interest you. Choose from over 30 breakout sessions, demos, and discussions covering end-to-end protection, tools to secure and govern AI, responsible AI, and threat intelligence.  


Day 2 November 20, 2024 


Security programming  


Dive deeper into topics that interest you. Choose from over 30 breakout sessions, demos, and discussions covering end-to-end protection, tools to secure and govern AI, responsible AI, and threat intelligence.  


Secure the Night Party 


Security is often a thankless job. If no one else celebrates you, Microsoft Security will! Join us for a special party for the cybersecurity community.  


Day 3 November 21, 2024 


Security programming  


Dive deeper into topics that interest you. Choose from over 30 breakout sessions, demos, and discussions covering end-to-end protection, tools to secure and govern AI, responsible AI, and threat intelligence.  


Closing Microsoft Ignite Celebration  


Close out Microsoft Ignite with the other 10,000+ attendees across job functions, industries and the world.  


Don’t miss this opportunity to elevate your security strategy and stay ahead of evolving cyber threats. Plan your travel now and be part of this transformative event! Use the RSVP code ATTNLIYL to purchase your in-person pass while supplies last. 

How to Configure and Collect Schannel and CAPI2 Logs

How to Configure and Collect Schannel and CAPI2 Logs

This article is contributed. See the original author and article here.

Introduction


CAPI2 log is a diagnostic log in Windows that tracks cryptographic operations. It track events related to certificate validation, key exchange. It also record how Windows and applications use cryptographic algorithms for securing data. This is crucial for diagnosing issues with SSL/TLS, digital signatures, and other encryption-related processes. CAPI2 logs are particularly useful for diagnose security-related problems in Windows systems. When troubleshooting issues related to cryptographic operations in Windows, it may be necessary to enable and collect logs for both Schannel and CAPI2. This article will help you to configure and collect these logs for diagnostic purposes.


Schannel Logging


Before enabling CAPI2 logs, you need to configure Schannel logging. Schannel is responsible for handling encryption and certificate-based authentication on Windows systems. Follow the below steps to enable Schannel logging:


  • Open Registry Editor.

  • Go to Run type regedit, and then click OK.

  • Take a backup of your registry. Go to File -> Export and choose a location and backup name and click Save. Refer the warning section before making any changes in registry.

  • Locate the following key in the registry –


HKEY_LOCAL_MACHINESystemCurrentControlSetControlSecurityProvidersSCHANNEL


HridayDutta_0-1726906281215.png


  • Right-click and select Modify the EventLogging key.

  • Update the value to 0x0003

    Value Name: EventLogging


    Data Type: REG_DWORD


    Value:  3


  • Click OK and close the Registry Editor.

  • You need to reboot the system to logging take effect.

  • To disable the Schannel log update EventLogging value to 0x00000.


Warning


Serious problems might occur if you modify the registry incorrectly by using Registry Editor or by using another method. These problems might require that you reinstall your operating system. Microsoft cannot guarantee that these problems can be solved. Modify the registry at your own risk.


CAPI2 Log


To enable CAPI2 logs follow the below steps –


  • Open Event Viewer (press Win + R, type eventvwr, and press Enter).

  • Navigate to Applications and Services Logs -> Microsoft -> Windows -> CAPI2 -> Operational

  • Now right-click and Clear Log to delete all existing logs (if any).


HridayDutta_1-1726906891204.png


  • To enable the logs right-click again and select Enable Log.

  • Reproduce the issue.

  • To disable the CAPI2 logs right- click and select Disable Log.


Conclusion


By following these steps, you can configure and collect both Schannel and CAPI2 logs for cryptographic troubleshooting. Remember to disable Schannel and CAPI2 logging after the issue is resolved to avoid unnecessary log generation in the future.  This log will be helpful to diagnose and troubleshoot SSL, TLS and other cryptographic related issues. If you want us to do that, please contact us with a case and we will do it for you.


Help Shape the Future of Azure Monitor Alerts: Your Feedback Matters!

This article is contributed. See the original author and article here.

We are excited to announce that we are conducting a survey to gather your feedback on Azure Monitor Alerts.


Your insights and opinions are critical to us, and by participating in this survey, you will have the opportunity to influence the product roadmap and help us improve the service capabilities that matter most to you.


The survey is designed to be quick and easy, taking only a few minutes to complete. Your responses will be kept confidential and will only be used to improve Azure Monitor Alerts.


Link to Survey

Microsoft 365 Copilot - Small Business Guide to Prepare your Data for Search

Microsoft 365 Copilot - Small Business Guide to Prepare your Data for Search

This article is contributed. See the original author and article here.

Find and control oversharing in SharePoint as you get ready for Microsoft 365 Copilot. With simple practices as a SharePoint site owner or a SharePoint admin using the admin center you can adjust site privacy settings and site memberships, ensuring only authorized members can access sensitive content. Microsoft 365 Copilot respects individual access permissions and in turn what each user can find using search in Microsoft 365, so it’s important to right-size information access. 


Set up test accounts to identify potential oversharing and take corrective actions. By right-sizing permissions you can protect valuable information while also enhancing the relevance of AI-generated responses.


Main.png


Jeremy Chapman, Director of Microsoft 365, shares how to find and control oversharing, so you can optimize search and protect your data as a small business. This helps whether you’re looking to adopt Microsoft 365 Copilot or not. 


Prepare your data for search.


1.png


See how to ensure secure access to sensitive or high value data before implementing Microsoft 365 Copilot. Click to watch.


Check for possible overexposed information.


2.png


Set up a test account to look for overly permissive sharing in Microsoft 365. Get started.


Manage access to sensitive content.


3.png


From the Microsoft 365 admin center, navigate to the SharePoint admin center, select active sites, and adjust site privacy settings from public to private and narrow down site membership to only those who need access to sites and the files within them. Check it out.


Watch our video here: 


QUICK LINKS:


00:00 — Prepare data for search
01:22 — Search hygiene
02:04 — Test to see who has access
02:33 — How to set up a test account
03:32 — Search for items
05:08 — Information retrieval process
05:45 — Shared items by invitation link
06:19 — Oversharing
07:33 — How to reduce oversharing
08:35 — Check permissions
11:07 — Confirm permissions are in place
11:52 — Wrap up


Link References


Get to the SharePoint admin center from Microsoft 365’s admin center at https://admin.microsoft.com


Unfamiliar with Microsoft Mechanics?


As Microsoft’s official video series for IT, you can watch and share valuable content and demos of current and upcoming tech from the people who build it at Microsoft.


Keep getting this insider knowledge, join us on social:


Video Transcript: 


-Part of what sets a Microsoft 365 Copilot apart is its ability to generate content and responses based on the information you have in SharePoint and other Microsoft 365 services like email, Microsoft Teams and more. If you’re in a small or medium-sized business, today, you’ll see what you can do so that you don’t need to worry about people having access to information they shouldn’t have, then you can just take advantage of all that Microsoft 365 Copilot has to offer. 


-But before I do that, let me take a step back to explain how your data works with Microsoft 365 Copilot. Microsoft 365 Copilot is a set of powerful generative AI experiences to assist you with getting work done. 


-It’s different from the other AI tools that you might have tried before in that it takes what you ask in your prompt, instead of just presenting that to the AI model, like in other tools, it interprets what you’re asking for or telling it to do, and then it determines if any of the information that you have access to in your SharePoint sites, OneDrive, email, calendar, or Microsoft Teams, even the internet might provide it more useful context. 


-Then it retrieves that information and appends it to your original prompt to provide as much context as possible to the AI model, so that it can generate a highly-relevant response all in the format of the app that you’re using, and in just a few seconds, you’ll have what you asked for using the context that you specified in your prompt. 


-So, this is why as a user, it’s so important to write good, descriptive prompts in the first place, and why as an organization, you should also have a good handle on the information that your users should or should not have access to. A good way to test for this is via search. In fact, search hygiene is important regardless of whether you use generative AI or not. 


-So, as a rule, the information that you are generally able to search and retrieve, that same information can be used by Microsoft 365 Copilot. Conversely, you can’t search for content like emails or any meetings that you were not part of, and Microsoft 365 Copilot can’t either. Now, these are only searchable if you are sent the email or were invited to the meeting, so there’s nothing to do there. Where this does apply is where you have shared content like sites or files in SharePoint. 


-Of course, no one wants to manually check each file, folder or site for permissions, so what’s the fastest way then to find out if everyone in your company has access to confidential or valuable information that should be limited? Well, one way to check if all or most people in your Microsoft 365 or Office 365 environment have access to more information they should have is by setting up a new account to test for this. 


-So here, in fact, I’m setting up an account called Test Account. This new account only needs the most basic type of account like Microsoft 365 Business Basic E1, or even a 30-day free trial account, because it only needs to access SharePoint and web experiences. Because search and Microsoft 365 only will display information that you’re allowed to access, what you can see using search is not the same as what someone else in your company see, unless all or most of the files can be accessed by them. 


-So, this new account is the most basic way of spot-checking what everyone in your organization can access. You’ll then create a list of items or sites that you don’t think everyone in your company should be able to find, then using that account, you’ll go to Microsoft365.com and first sign in using that account. So, I’m going to paste in the email address, then the password, and I recommend using multi-factor authentication even for test purposes with temporary accounts. 


-And now, I’m in the site for the first time and I’ll start searching for items on my list. So first, I’ll search for customer address, and I find a few results, and this top one here, I didn’t want to find it, but it’s there, so I’m going to click on it and my brand new test account with no department affinity can find, view and edit this file with customer addresses. 


-So, let’s go back and try to search for company acquisition. Not only do I find a document for next year’s company acquisitions, but I can also see Ultra Secret 2025 plans with Do Not Share even in the title, so that’s not good. And I can also follow the link to the 2025 Company Acquisition Plan, so now I’ll go back and just do a few keyword searches. 


-First, I’ll search for confidential, and there’s a result right up on top that I shouldn’t see, and below that there are a bunch of 2017 files that should probably be archived and removed from search because you likely don’t want Copilot referencing those either. So, now let’s search for Secret, and again, I can see quite a few different sites and pages and files that I shouldn’t see. So, in my case, I have some work to do. 


-Now, if in your tests, you don’t see anything that you don’t think that you should, then there’s a good sign that people in your company are setting up SharePoint sites and sharing only to the people that need that information. And then you can just prioritize a few important sites to protect those and set permissions accordingly, which I’ll show you how to do in a moment. 


-That said, if you did find just about everything that you were searching for, then it means that anyone in Microsoft 365 in your environment can find and access even your most sensitive documents just by searching for them like you saw in my case. And as I mentioned, by extension, Microsoft 365 Copilot’s information retrieval process will find these items too. So, let me first explain why this happens. 


-As you create a SharePoint team site using the normal process, in Privacy settings, there are two different options, Private, where only members can access the site, and Public, where anyone in the organization can access the site. Now, those permissions extend also to any of the stored files and locations within that site. So here, you can see where members can be manually added too, and we’ll come back to members’ access for private sites in just a moment. 


-So next, if you’ve shared files before, you might think that sharing links using the people in your company option means that everyone in your company will immediately see the item shared the moment that you create that link. That’s not true though, and those files won’t appear in search unless you’ve clicked on that link. So, this type of link is like an invitation, and only once a person has redeemed that link by clicking on it will that individual be able to find the shared item in search. 


-Also, every person with that share link would need to redeem it to be able to search for the corresponding file. So, that was public sites, and the next most common culprit for oversharing are cases where sites, groups or teams, have too many internal members. So first, let me walk through your controls to address this as a SharePoint site owner, then as a Microsoft 365 administrator. 


-As a non-admin owner of a SharePoint site, you can check if it’s a public group site in the upper right corner. A public group means that everyone in the company can find the site and its contents. Now, if I open Settings and Site permissions, I can show you why. So, expanding Site members shows that there’s a group called Everyone except external users, which is just like it sounds, with permissions to all contents in the site. 


-Now, if you want to change it to a private group where only invited members can access it, in Site information, under Privacy settings, you can change the site to a private site. Now, if I go back to Site permissions and its members list, you’ll see that this step removed the Everyone except external users group. 


-And once you close out of these controls, you’ll likely need to remove unwanted members from the site by clicking on the members control, then the member you want to remove and select Remove from group and repeat this process until only the people who need access have access. So now, let me show you one more control to help reduce oversharing sprawl from happening again in the future. 


-You can limit members from granting access to others and in turn making them members by going into Site permissions, then Advanced permission settings, then using the Access Request Settings control. So here, you can control whether or not you want to allow members to share the entire site and membership to its corresponding group using the second checkbox, or files and folders as well using the first checkbox. 


-Then by default, only site owners will be able to approve membership or file permissions requests. So, for sites with very sensitive information that you really need to protect, even though this introduces additional work for site owners to approve access requests, it will help you protect your information and reduce membership and permission sprawl over time. 


-And those are just some of the steps that you can take as a SharePoint site owner, and as a SharePoint administrator, you can do many of these actions in bulk across all of your company sites and teams using SharePoint admin controls. So, from Microsoft 365’s Admin Center at admin.microsoft.com, you can go to the SharePoint Admin Center. 


-On the left navigation, if you don’t yet see SharePoint, click on Show all, then scroll down and click on that. Once you’re in the SharePoint Admin Center, expand Sites on the left and select Active sites. So now, in order of priority or information risks, select the site that you want to edit by clicking onto the site name directly. 


-I’m going to choose Business Development because that’s where our first customer addresses spreadsheet is located, and let’s find out why the test account could find it. So, I’ll head over into settings, and then here, I need to change privacy from public to private so that only members can search over the sales and customer-related content. 


-Now, I’ll head over to the Membership tab, and everything looks good. In fact, in Members, there are nine Sales Team members, Site admins and Site owners are the owners group, that looks good. And Site members, these are groups, and this group represents the nine people we just saw in the Members tab, so there’s nothing to do there. 


-Now, let’s head over to the site with some of the secret plans and confidential information that we saw before, the Business Strategy and Planning Site. This time in Settings, you can see that it’s set to be Private, and this is promising, but I was still able to access those sensitive files, so the problem is likely going to be that the site has too many members. 


-So, we’ll head over to the Membership tab for the site. The members count as only four people, and that’s just the Senior Leadership Team, so that’s not our problem. The Site admins and owners also look right, and this group would basically only have our CEO Patti Fernandez. 


-That said though, in Site members, I can see Patty Fernandez’s Executive Team as a group. This is different from before, so let’s see who’s in that group. So, to do that, I need to head over to the Microsoft 365 Admin Center, in teams and groups, I’ll scroll down and find our group, and there it is. And if I click into it and look at its membership, you can see the entire company is there, even the Test Account that we just created. 


-So, in this case, it was a dynamic group set up to be anyone at any level reporting up through Patti Fernandez, but she’s the CEO, so by definition, the entire company reports up through her. So, back in our SharePoint Admin Center, I’ll select the group and remove it as a site member. So now, just the right people have access to our sites, and both were hosting a lot of confidential information. 


-Of course, when you’re making permissions decisions, you need to be familiar with the site and who should have access. So, you want to work with your site owners if you need to or ask them to right-size permissions for their sites. So, now let’s see if this worked. So, to save a little bit of time, I’ve started creating another new account called Validation Account and assigned it the trial license that I removed from my first test account. 


-So, now the account’s active, I’ll switch over to that account and search for customer address, and you’ll see there are no results. 2025 Customer Acquisition Plan for my next search. Again, no results. I’ll search now for keywords, Confidential, and that shows outdated items from before, which we should remove, but not the things that we didn’t want to see. And Secret also produces the outdated items, but nothing sensitive, so it’s much better than our first test.


-And while I walk through just a few sites in a small business environment, these controls I demonstrated today will work with any size organization using SharePoint online, and there’s more that you can do with Microsoft Purview Controls, but I wanted to keep things simple today. Now, with that, we’ve right-sized site and file access for people, and it will be visible in SharePoint search results, which in turn, will be respected by the underlying search used with Microsoft 365 Copilot. 


-All you have to do now is grant access to Microsoft 365 Copilot, and you’re ready to take full advantage of it at your company. And if you’re watching this as an enterprise with thousands of SharePoint sites, soon we’ll cover more controls and options to find and control over sharing at scale. So, subscribe if you haven’t already. Thanks for watching.