Operationalizing Microsoft Security Copilot to Reinvent SOC Productivity
This article is contributed. See the original author and article here.
In a Security Operations Center (SOC), time to resolve and mitigate both alerts and incidents are of the highest importance. This time can mean the difference between controlled risk and impact, and large risk and impact. While our core products detect and respond at machine speed, our ongoing mission is to upskill SOC analysts and empower them to be more efficient where they’re needed to engage. To bridge this gap, we are bringing Security Copilot into our industry-leading XDR platform, Microsoft 365 Defender, which is like adding the ultimate expert SOC analyst to your team, both raising the skill bar and increasing efficiency and autonomy. In addition to skilling, we know that incident volumes continue to grow as tools get better at detecting, while SOC resources are scarce, so providing this expert assistance and helping the SOC with efficiency are equally important in alleviating these issues.
Security Copilot provides expert guidance and helps analysts accelerate investigations to outmaneuver adversaries at scale. It is important to recognize that not all generative AI is the same. By combining OpenAI with Microsoft’s security-specific model trained on the largest breadth and diversity of security signals in the industry–over 65 trillion to be precise. Security Copilot is built on the industry-transforming Azure OpenAI service and seamlessly embedded into the Microsoft 365 Defender analyst workflows for an intuitive experience.
Streamline SOC workflows
To work through an incident end to end, an analyst must quickly understand what happened in the environment and assess both the risk posed by the issue and the urgency required for remediation. After understanding what happened, the analyst must provide a complete response to ensure the threat is fully mitigated. Upon completion of the mitigation process, they are required to document and close the incident.
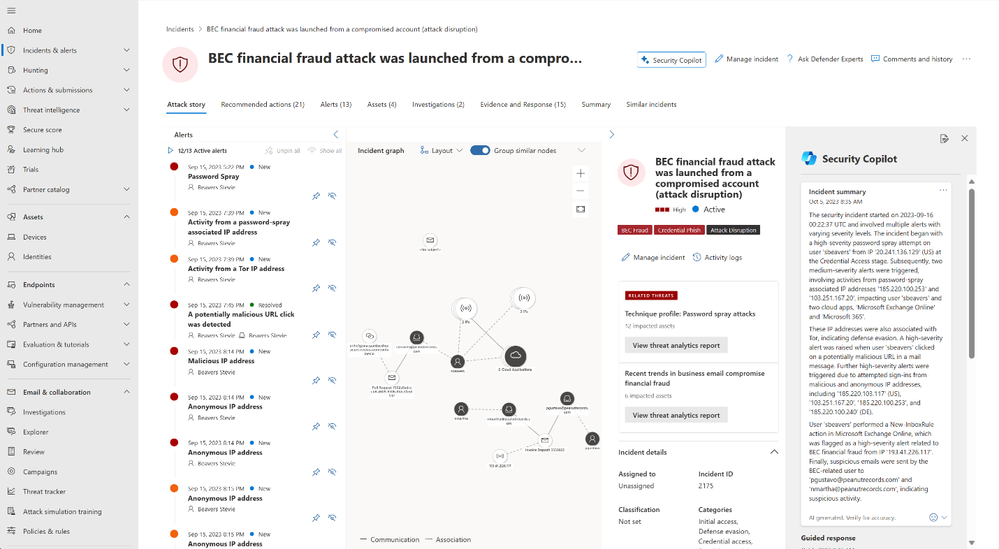
When the SOC analyst clicks into an Incident in their queue in the Microsoft 365 Defender portal, they will see a Security Copilot-generated summary of the incident. This summary provides a quick, easy to read overview of the story of the attack and the most important aspects of the incident. Our goal is to help reduce the time to ramp up on what’s happening in the SOC’s environment. By leveraging the incident summary, SOC analysts no longer need to perform an investigation to determine what is most urgent in their environment, making prioritization, understanding impact and required next steps, easy and reducing time to respond.
After verifying the impact and priority of this incident, the analyst begins to review IOCs. The analyst knows that this type of attack usually starts with a targeted attack on an employee and ends with that employee’s credentials being available to the threat actor for the purposes of finding and using financial data. Once the user is compromised the threat actor can live off the land in the organization and has legitimate access to anything that user would normally have access to such as financial account information for the company. This type of compromise must be handled with urgency as the actor will be difficult to track after initial entry and could continue to pivot and compromise other users through the organization. If the targeted organization handles this risk with urgency, they can stop the actor before additional assets/accounts/entities are accessed.
The SOC analyst working on this incident is in the incident summary page and sees that the attack began with a password spray, or the threat actor attempting to access many users with a list of passwords using an anonymous IP address. This must be verified by the analyst to determine urgency and priority of triage. After determining the urgency of this incident, the analyst begins their investigation. In the incident summary, the analyst sees many indicators of compromise including multiple Ips, Cloud Applications, and other emails that may be related to the incident. The analyst sees that Defender disrupt suspended one compromised account and captured additional risk including phishing email identification. In an attempt to cast an organizational-level view, the analyst will investigate these IOCs to see who else interacted with or was targeted by the attacker.
The analyst pivots the hunting experience and sees see another “Security Copilot” button. This will allow the SOC analyst to ask Security Copilot to generate a KQL to review where else in the organization this IOC has been seen. For this example, we use, “Get emails that have ‘sbeavers’ as the sender or receiver in the last 10 days” to generate a KQL query. This reduces the time to produce the query and the need to look up syntax. The analyst now understands there’s another user account that was reached out by the adversary and the SOC needs to validate risk level / check the account state. The “llodbrok” account will be added to the incident by the analyst.

After identifying all entry vectors and approached users, the SOC analyst shifts focus to the action on targets and what happened next for the incident they are investigating. This incident does not contain a PowerShell IOC, but if the analyst found PowerShell on the “llodbrok” user’s machine, the analyst would be able to click on the PowerShell-related alert and scroll down in the righthand pane to find the evidence component. After the analyst clicks on the PowerShell evidence, they see the “Analyze” button with the Copilot symbols. This will take a command line and turn it into human-readable language. Oftentimes attackers leverage scripts to perform network discovery, elevate privilege, and obfuscate behavior. This script analysis will reduce the time it takes to understand what the command does and respond quickly. Having human-readable scripts is also useful when the analyst is investigating an alert in a language, they are unfamiliar with or haven’t worked with recently.

After the analyst has confirmed these indicators of compromise are legitimate, the next step is to initiate the remediation process. To do this, the analyst navigates back to the Incident page in the Microsoft 365 Defender portal and scrolls down in the right-hand pane. Right below the incident summary, the analyst will see a set of “guided response” recommendations. The SOC analyst has verified the incident IOCs are legitimate and selects the “Classify” dropdown and the option “Compromised Account” to indicate to other analysts this was a true positive of BEC. The SOC analyst also sees ‘quick actions’ they can take to quickly remediate the compromised user’s account, selecting “Reset user password” and “Disable user in Active Directory” and “Suspend user in Microsoft Entra ID.”
In this process, the SOC analyst is assisted by Security Copilot in what actions to take based on past actions taken by the organization in response to similar alerts or incidents in the past. This will improve their abilities from day one, reducing early training requirements.

Finally, the analyst needs to send a report to their leadership. Reporting and documenting can be a challenge and time-consuming task, but with Security Copilot, the analyst can generate a post-response activity report with the click in seconds and provide partners, customers, and leadership with a clear understanding of the incident and what actions were taken.
Here is how it works: the SOC analyst selects the “Generate incident report” button in the upper right corner of the Incident page or the icon beside the ‘x’ in the side panel. This generates an incident report, that can be copied and pasted, showing the incident title, incident details, incident summary, classification, investigation actions, remediation actions (manual or automated actions from Microsoft 365 Defender or Sentinel) and follow-up actions.

What sets Security Copilot apart
As a part of this effort, our team worked side-by-side with Security Researchers to ensure that we weren’t providing just any response but providing a high-quality output. Today, we are reviewing a few key indicators to inform us of our response quality using clarity, usefulness, omissions, and inaccuracies. These measures are made up of three core areas that our team focused on: lexical analysis, semantic analysis, and human-oriented clarity analysis. There are three core areas that our team focused on: lexical analysis, semantic analysis, and human-oriented clarity analysis. The combination of core areas provides a solid foundation for understanding human comprehension, content similarity, and key insights between the data source and the output. With the help of our quality metrics, we were able to iterate on different versions of these skills and improve the overall quality of our skills by 50%.
Quality measurements are important to us as they help ensure we aren’t losing key insights and that all the information is well connected. Our security Researchers and Data Scientists partnered together across organizations to bring a variety of signals across our product stack, including threat intelligence signals, and a diverse range of expertise to our skills. Security copilot has obviated the necessity for labor-intensive data curation and quality assessment prior to model input.
You’ll be able to read more about how we performed quality validation in future posts.
Share your feedback with us
We could not talk about a feature without also talking about how important your feedback is to our teams. Our product teams are constantly looking for ways to improve our product experience, and listening to the voices of our customers is a crucial part of that process SOC analysts can provide feedback to Microsoft through each of the skill’s User Interface (UI) components (as shown below). Your feedback will be routed to our team and will be used to help influence the direction of products. We use this constant pulse check via your feedback, and a variety of other signals to monitor how we’re doing.

Security Copilot is in Early Access now, but to sign up here to receive updates on Security Copilot and the use of AI in Security. To learn more about Microsoft Security Copilot, visit the website.
Getting started
- Analyze scripts and codes with Security Copilot in Microsoft 365 Defender | Microsoft Learn
- Summarize incidents with Security Copilot in Microsoft 365 Defender | Microsoft Learn
- Create incident reports with Security Copilot in Microsoft 365 Defender | Microsoft Learn
- Use guided responses with Security Copilot in Microsoft 365 Defender | Microsoft Learn
- Microsoft Security Copilot in advanced hunting | Microsoft Learn
Learning more
- Explore Microsoft Security Copilot product page.
- Want to learn more about Microsoft’s XDR? Visit our website.
- Subscribe to the Microsoft 365 Defender Blog to stay up to date with our latest innovations and best practices.


Recent Comments