by Contributed | Oct 29, 2023 | Technology
This article is contributed. See the original author and article here.
In this blog article, we will cover how to prevent and deny the automated backup retention days for Azure SQL database to be lower than X number of days.
We have received some service requests from customers that would like to ensure that they have for example 14 days as a retention period for their automated backup and would like to do this using a custom policy since they have multiple databases.
You can follow the steps below to create a custom policy and ensure this:
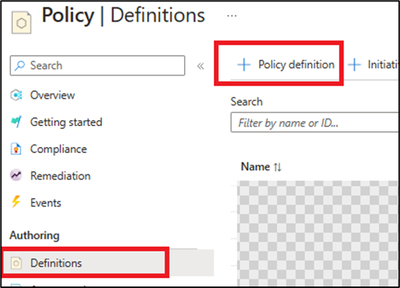
1) From the Azure portal, access Azure policy, then definitions blade.
2) Create a new policy definition.
3) Add the definition location (which subscription will be hosting this policy), Name, and description.
4) Set the category to use existing and select SQL (as below):

5) Then add the below policy definition into the rule field:
Note: you can adjust the below format to have tags or parameters as needed, also the below example is set to 14 days as retention period days.
{
  "mode": "All",
  "policyRule": {
    "if": {
      "allOf": [
        {
          "field": "type",
          "equals": "Microsoft.Sql/servers/databases/backupShortTermRetentionPolicies"
        },
        {
          "anyOf": [
            {
              "field": "Microsoft.Sql/servers/databases/backupShortTermRetentionPolicies/retentionDays",
              "exists": false
            },
            {
              "field": "Microsoft.Sql/servers/databases/backupShortTermRetentionPolicies/retentionDays",
              "less": 14
            }
          ]
        }
      ]
    },
    "then": {
      "effect": "deny"
    }
  },
  "parameters": {}
}
6) Then save the policy.
Now since the policy definition has been created, you can add an assignment that refers to which resource will have this policy applied on.
From Azure policies page, and access definitions blade -> select the created custom policy, and click assign policy (you can assign on the Subscription level or a specific resource group depending on your business requirements).

After the assignment, if you try to have the retention backup days below 14 days, you can expect the below error:


References
Automatic, geo-redundant backups – Azure SQL Database | Microsoft Learn
Tutorial: Create a custom policy definition – Azure Policy | Microsoft Learn
Disclaimer
Please note that products and options presented in this article are subject to change. This article reflects automated backups retention days custom policy for Azure SQL Database in October, 2023.
Closing remarks
I hope this article was helpful for you, please like it on this page and share it through social media. Please feel free to share your feedback in the comments section below.
I hope this article was helpful for you, please feel free to share your feedback in the comments section.
by Contributed | Oct 27, 2023 | Technology
This article is contributed. See the original author and article here.

Come visit Microsoft at Supercomputing 2023 (SC23) November 12 – 17 where we’ll deep dive into high-performance computing (HPC) and AI solutions during an exciting week of sessions, hands on experiences and peer connections. Learn how to unlock your AI and HPC innovation!
Held in Denver, Colorado this year, SC is an international conference for high-performance computing, networking, storage, and analysis. Here you can expand your knowledge, enrich your experiences, and network with others in the HPC community. Offering an unparalleled mix of thousands of scientists, engineers, researchers, educators, programmers, and developers, this is the event HPC enthusiasts.

Visit Microsoft at Booth #925, right near the entrance to the exhibitor hall.
- Engage with Microsoft Azure HPC and AI experts and our amazing partners.
- Learn the latest advancements during our in-booth sessions.
- Get hands-on with our demo pods for HPC, AI and Quantum.
- Enjoy our hardware bar featuring our newest technology.
- Take a break in our lounge area and enjoy coffee served by Artly, the barista bot.
- And enter for a chance to win Surface Earbuds along with other cool stuff!
Beyond our booth, join us for lightning sessions at Booth #2195 and after-hour events for food and fun!
Keep reading for all the details.

It simply would not be a Microsoft booth without a session theatre. Attend a session presented by Microsoft and partner experts in Booth #925 to learn the latest advancements for HPC and AI. Engage and ask questions.
Monday night
7:15 pm – 7:35 pm
|
Performance of Azure AI Infrastructure for Large Language Models at Scale
Azure empowers intelligent services like CoPilot and ChatGPT that have captured the world’s imagination. These services, facilitating various applications like Microsoft Office 365, chatbots and search engines with generative AI, owe their magic to Large Language Models (LLMs). In this session, we will explain the performance of Azure AI Infrastructure for LLMs through public benchmarking.
|
8:15 pm – 8:35 pm
|
Reduce CAE Simulation Time with TotalCAE on Azure
TotalCAE on Azure reduces simulation times for CAE applications by up to 80% in just a few clicks for hundreds of CAE applications. See how easy it is to adopt the latest Azure HPC technologies without being an IT expert. Case studies of how innovative companies receiving HPCwire 2023 nominations with TotalCAE are using Azure to accelerate their designs.
|
Tuesday
10:15 am -10:35 am
|
Introducing Azure Quantum Elements: Accelerating Scientific Discovery
In this session, Dr. Alexis Mills, Chemist and Microsoft Machine Learning Engineer, will present Azure Quantum Elements and explore how advancements in cloud technologies, artificial intelligence, high performance computing, and quantum computing are accelerating progress for scientists around the world. Dr. Mills will also be joined by a special guest from Pacific Northwest National Lab, Dr. Wendy Shaw, to highlight how Azure Quantum Elements will be used to help them accelerate their discoveries.
|
11:15 am – 11:35 am
|
Supercomputing on Azure for AI Workloads with Massive Scale and Performance
Join us as Microsoft dives into the latest Azure supercomputing capabilities and performance.
|
12:15 pm-12:35 pm
|
Ansys and Azure: Accelerating Innovation with HPC Leadership
Learn how Ansys advances engineering simulation solutions with Microsoft Azure’s HPC cloud infrastructure. In the first half of 2024, Ansys will be releasing a powerful new platform to simply the successful migration of Ansys workloads to Azure to take advantage of its industry leading HPC capabilities. This platform is called Ansys Access on Microsoft Azure and will enable customers to easily and optimally deploy Ansys simulation in their own Azure enrollments. This talk will cover the broad range of Ansys solvers that are being optimized on Azure, go through some benchmarks and performance plots, and touch on roadmap of different pathways to Azure cloud.
|
1:15 pm -1:35pm
|
Enabling Access to HPC in Academic Medical Centers
HPC is critical to research that takes place in academic medical centers. Yet many university HPC centers struggle to serve the diverse needs of medical research. Biomedical research codes change frequently and have changing hardware requirements, are bursty, and often are run on sensitive data that must be carefully protected under standards such as HIPAA. We describe how Rescale, a cloud-based HPC platform, can be used by academic researchers to conduct research with enterprise-level governance and financial controls with Microsoft Azure. We will also demonstrate Rescale Essentials, a free platform edition of Rescale that can be used through the API to submit jobs via scheduler-like interfaces or simple web portals.
|
2:15 pm – 2:35 pm
|
NVIDIA and Microsoft
|
4:15 pm – 4:35 pm
|
AMD and Microsoft: Together We Advance Cloud HPC
|
Wednesday
10:15 am -10:35 am
|
How AMD and Microsoft Built a Powerful Cloud System on Open Source Software
Learn more about the AMD ROCm software stack and how it powers some of the largest implementations of AI applications today—including workloads on the Microsoft Explorer system. We will highlight the advantages of the AMD ROCm open ecosystem and ongoing collaboration between AMD and Microsoft.
|
11:15 am – 11:35 am
|
What’s New: The latest Azure AI Infrastructure innovation with AMD
|
12:15 pm – 12:35 pm
|
Virtual Human Modeling On Azure – Case Studies about Heart, Brain, and Liver Simulations on the UberCloud Platform
In the past few years, UberCloud and Dassault supercomputers built with Azure HPC performed several challenging human modeling projects in the cloud. Projects were dealing with Drug-induced Arrhythmias of a Human Heart, Neuromodulation in Schizophrenia, Artificial Aortic Heart Valves, Personalized Left Atrial Appendage Occluder Device, Repairing Cardiac Valve Leakage Using Machine Learning, and Multiscale Multiphysics Living Liver Simulations.
|
1:15 pm – 1:35 pm
|
What’s New: The latest Azure AI Infrastructure innovation with NVIDIA
|
2:15 pm – 2:35 pm
|
Achievement Unlocked- Weather Forecasting in the Cloud
This talk tells the story of the Met Office’s world class weather and climate science and their transformational journey in partnership with Microsoft.
|
3:15 pm – 3:35 pm
|
The Future of Networking with Azure Quantum
|
4:15 pm – 4:35 pm
|
NVIDIA and Microsoft
|
Thursday
10:15 am – 10:35 am
|
Hybrid HPC Powering NOAA’s Multi-cloud and AI/ML Workloads
GDIT is a large HPC systems integrator for the Federal Government. NOAA’s vision promotes an accelerated transformation to the cloud, urging a culture that embraces agility, learning, innovation, and cloud native architecture. Parallel Works and GDIT enable NOAA researchers with an intuitive platform to run weather models like Unified Forecasting system reanalysis, and Earth Prediction Innovation models using Azure services. The increasing use of AI and ML workloads for this work will be discussed.
|

Get hands-on with HPC, AI and Quantum demos in Booth #925.
Monday
|
HPC demo | AI demo | Quantum demo
|
Tuesday
|
HPC demo | AI demo | Quantum demo | AMD partner demo
|
Wednesday
|
HPC demo | AI demo | Quantum demo | NVIDIA, Rescale, Ansys and other partner demos
|
Thursday
|
HPC demo | AI demo | Quantum demo
|

Discover the latest Azure and partner HPC and AI technology at our hardware bar in Booth #925.

Events are entertaining but also tiring! Stop by Booth #925 for a place to relax and enjoy a good cup of coffee served by Artly, the barista bot!


Here from Azure HPC and AI experts during our lightning sessions in Booth #2195.
Tuesday
12:45 pm – 1:00 pm
Wednesday
1:30 pm – 1:45 pm
Thursday
10:30 am – 10:45 am
|
Driving the AI Revolution with Azure Supercomputing
We will discuss the growth of AI, especially LLMs and generative AI, and the supercomputing making this possible. Azure HPC provides purpose-built supercomputing infrastructure to support training/tuning of foundational AI models, plus HPC infrastructure to support inferencing as consumers in all industries use AI models to assist their everyday productivity.
|

You’re invited to attend our after-hour events for networking, drinks, food, and fun! Sign up today.
Tuesday, Nov 14
7:00 pm – 9:00 pm
|
Special Networking Evening with Microsoft and AMD
Join Microsoft and AMD for an evening of connections, delicious food and cocktails. Space is limited. Contact AzureHPCEvents@microsoft.com to reserve your spot today! Location provided during registration.
|
Wednesday, Nov 15
11:30 am-1:00 pm
|
Luncheon Hosted by Microsoft and Rescale
Join Microsoft and Rescale for an informative lunch session. Discover how hybrid cloud HPC is empowering the next generation of scientists and engineers and enjoy a locally curated Southwestern lunch. Space is limited. Contact AzureHPCEvents@microsoft.com to reserve your spot today! Location provided during registration.
|
Wednesday, Nov 15
6:30 pm – 8:30 pm
|
Dinner with Microsoft and NVIDIA
Join Microsoft and NVIDIA for a European-inspired meal curated with local
ingredients and network with peers. This event is by invite-only.
|

by Contributed | Oct 27, 2023 | Technology
This article is contributed. See the original author and article here.
In this blog series dedicated to Microsoft’s technical articles, we’ll highlight our MVPs’ favorite article along with their personal insights.
Sander ten Brinke, Developer Technologies MVP in Netherlands
Performance Improvements in .NET 8 – .NET Blog
“For the last few years, I have looked forward to Stephen Toub’s blog posts about performance improvements in .NET. It shows that performance is very important to the .NET team, and it’s jaw dropping when you realize that this blog post will take HOURS to read. The blog post goes very in-depth, and you will learn many new things about .NET when reading it.”
Jev Suchoi, Developer Technologies MVP in Netherlands

Microsoft Cloud Adoption Framework for Azure – Cloud Adoption Framework | Microsoft Learn
“It is the most comprehensive and tightly packed content library for Azure Cloud. Not only encapsulating technology and architecture topics but also addresses cultural and business best practices. It even covers well-known anti-patterns.
I use the Cloud Adoption Framework daily to explain “how to Cloud” to clients”.
*Relevant Blog:
– Mastering Cloud Adoption Framework: Quick Start Backlog essentials :flexed_biceps: – (devjev.nl)
– The perfect Azure naming convention – (devjev.nl)
Luke Murray, Microsoft Azure MVP in New Zealand

What’s new in the Microsoft Cloud Adoption Framework – Cloud Adoption Framework | Microsoft Learn
“I use this almost every day as a reference point to learn and accelerate adoption! One of my favourite pages is the ‘What’s New’! As Cloud Adoption can change and new content gets added, the What’s New page helps me keep up to date with the latest Cloud Adoption frameworks.”
*Relevant Blog: Cloud Adoption Framework for Azure – Tools and Templates – luke.geek.nz The Cloud Adoption Framework also includes various templates and assessments to keep track of your Cloud Journey across the Strategy, Plan, Ready, Adopt and Govern cycles. The blog post, written below, is only a fraction of the content available.
Nobushiro Takahara, Data Platform MVP in Japan

Migrate SQL Server workloads to Azure SQL – Training | Microsoft Learn
“This Microsoft Learn content is a exhaustive and easy-to-understand guide that provides useful information for Fit & Gap analysis, migration planning (assessment), and migration methods for migrating SQL Server on on-premise environment to Azure. It also describes how to assess the database using Microsoft Data Migration Assistant and specific procedures for data migration, so I believe that this is a good content you should refer to when planning a migration.”
(In Japanese: Azureへオンプレミス環境のSQL Serverを移行するための Fit & Gap 分析に役立つ情報、および、移行計画(アセスメント)、移行方式に関する情報が網羅的に分かりやすくまとまっています。また、Microsoft Data Migration Assistant を使用したデータベース評価の仕方、および、データ移行などの具体的な手順が記載されており、移行計画を立てる際に是非参照したほうが良いコンテンツだと思います。)
*Relevant Blog: 【保存版】SQL ServerのAzure移行に向けた移行フローチャート – NOBTAの気ままにITブログ (nobtak.com)
by Contributed | Oct 26, 2023 | Technology
This article is contributed. See the original author and article here.
If you’ve been working with Azure OpenAI for a while, chances are you’ve heard of Semantic Kernel. It is a library implemented in multiple programming languages that can handle prompt templates, manage conversation state, integrate with plugins and many other features essential to building an advanced LLM-infused application. But how exactly do you “deploy” Semantic Kernel?
Being a software library, Semantic Kernel can be deployed to any compute option capable of running Python, C# or Java. You’ve probably seen sample repositories with Jupyter notebooks you can use to explore the functionality. But in most cases you can’t give your end-users a notebook! In this article, we’ll give you an example and a solution accelerator that you can use to bring your AI application to production faster.
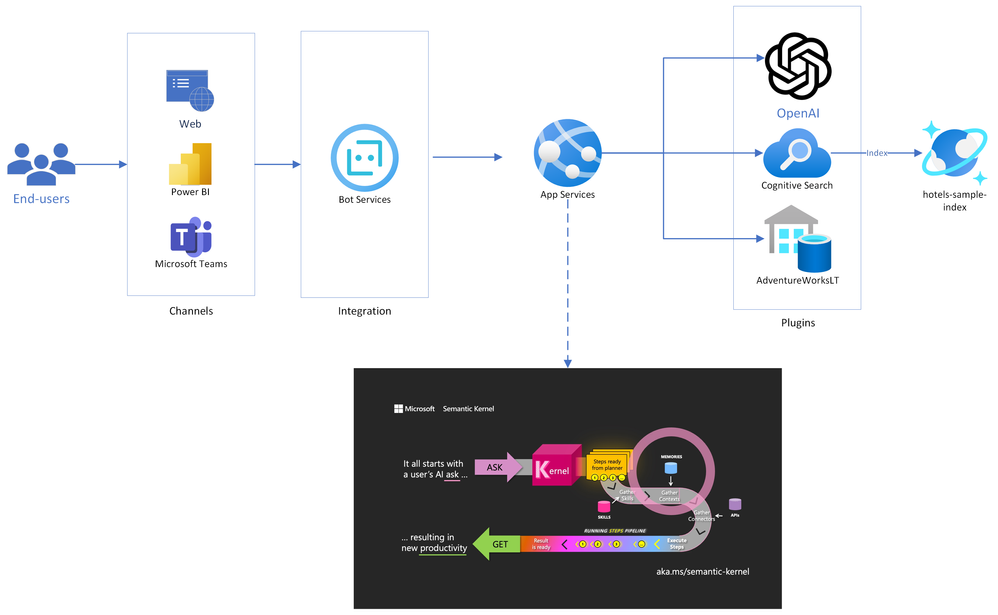
Solution Architecture
Below is the architecture diagram for the solution accelerator we put together. You can also pull the source code and deploy it yourself from our Github repo!
As you can see in the diagram, Semantic Kernel is at the core of the solution, and will act as the orchestrator of the chat experience. It is deployed into an App Services instance, which will also be running the Bot Framework SDK. This enables our bot to be deployed across multiple channels, including web pages, Teams, and even third-party chat platforms like Slack.
The flow of chat messages is as follows:
- End-users connect to a messaging channel your bot is published to, such as Web or Teams;
- Messages get processed through Azure Bot Services, which communicates with a .NET application running on App Services.
- The .NET application runs a Semantic Kernel Stepwise Planner at its core. The planner elaborates a series of steps to process the user’s request, and then executes it.
- Each step of the plan is formulated through Azure OpenAI, and the executed against Cognitive Search (traditional RAG pattern), Azure SQL (structured data RAG) or any other externally connected plugins.
- Now with the data gathered from plugins, the question is resubmitted to Azure OpenAI, where a final answer is formulated and presented to the end user. This concludes a conversation turn.
Built-in use cases
1. Traditional Retrieval-Augmented Generation (RAG)
To test out the traditional RAG pattern, we integrated a sample from the Azure Cognitive Search product called hotels-sample. It’s an index containing names, descriptions and other information about hotels, which you can search and filter through to explore the service.
First, we implemented the SearchPlugin class:

Notice how Semantic Functions – the functionality that Semantic Kernel can call upon – are structured. Each Semantic Function and each of its arguments must be annotated with a human-readable description. This description will then be passed to the LLM so it can decide when to utilize that function, and pass in the right parameters. You can check out the source code in our repo, but this function is basically submitting a search to the Azure Cognitive Search index.
With debugging enabled, we can see each step of how the interaction happens:

1. Thought: GPT-4 receives the question and determines it needs to use the SearchPlugin to respond.
2. Action: In the same step, GPT-4 formulates an action call with the appropriate parameters. The action is constructed in JSON format.
3. Observation: The plugin returns some hotel names and descriptions.
4. Final Answer: GPT-4 determines it now has all the information it needs, and provides an answer to the end user. Typically, this would be the only response the user sees!
This process of Thought-Action-Observation may repeat multiple times until the model obtains the required information. We’ll see an example of that in the next scenario.
2. Structured Data Retrieval-Augmented Generation
Much like Azure Cognitive Search, a SQL Database can be consumed by Semantic Kernel using the same technique. Again, we start by implementing a Plugin:

This is slightly more complex – we added three Semantic Functions:
- GetTables: Gets all tables in the database;
- GetSchema: Gets the schema for a specific table;
- RunQuery: Runs a query on the database;
We then expect the Semantic Kernel Planner to combine these as needed to reach a response. Let’s see an example, again with the debugging enabled to view intermediate steps:


This time, the conversation flow goes like this:
- Thought: GPT-4 receives the question and determines it needs to use the SQLPlugin to respond.
- Action: The first action required is to list tables to get the right table name for customers
- Observation: The plugin returns the table names in the database.
- Thought: Now knowing the correct table name, GPT-4 can formulate a query to get the number of customers
- Action: The action is to run a COUNT query on the SalesLT.Customer table
- Observation: The plugin returns the count of customers
- Final Answer: GPT-4 determines it now has all the information it needs, and provides the number of customers to the end user. Again, in a production scenario, this is the only answer the end-user would see.
3. Upload and analyze documents
The third and final common scenario we added to the accelerator is the upload of documents. Users can use the built-in upload function to send PDF files, and the bot will break them down and use Vector search to find relevant information.
Once again, starting with the plugin implementation:

And moving on to the Web Chat:


Conclusion
Semantic Kernel is a very powerful and extensible tool, but deployment can be a challenge if you don’t know where to start. In this article, we provided a solution accelerator template you can use to quickly get to production, and create your own plugins and extensions.
Also please note that you’re responsible for what plugins you place in the hands of your end users! Imagine what would happen if a user asked “please drop the AdventureWorksLT database”. For that reason, you need to make sure your application has the precise role assignments to enable the actions it needs to perform, while limiting anything that should be out of its reach. Always keep security first!
In case you missed the GitHub repository link, here it is! Make sure to drop a star if it helped you!
https://github.com/Azure/semantic-kernel-bot-in-a-box
by Contributed | Oct 25, 2023 | Technology
This article is contributed. See the original author and article here.
We’re excited to share the public preview of delegating Azure role assignment management using conditions. This preview gives you the ability to enable others to assign Azure roles but add restrictions on the roles they can assign and who they can assign roles to.
As the owner of an Azure subscription, you likely get requests from developers to grant them the ability to assign roles in your subscription. You could assign them the Owner or User Access Administrator role, but those roles grant permission to assign any Azure role (including Owner!), and that’s probably a lot more permission than necessary for that developer’s scenario. You could instead make role assignments for these developers on demand, but that makes you an unnecessary and impractical bottleneck in their workflow.
Another common case we hear about is a deployment pipeline that needs to make role assignments as part of the deployment process, for example to grant a virtual machine managed identity access to Azure Storage and other resources. You don’t want to assign the deployment pipeline the Owner or User Access Administrator role because again, it’s a lot more permission than is needed for the scenario.
We created this feature so you can grant permission to create role assignments, but only under specific conditions, such as for specific roles. You can do this in two ways:
- Make a role assignment that is constrained using conditions.
- Use a new built-in role that has built-in conditions.
Let’s look at each scenario.
How to delegate role assignment management using conditions
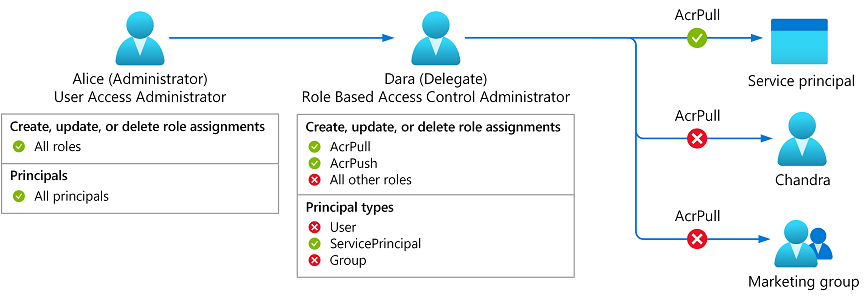
Meet Dara, a developer who needs to enable an Azure Kubernetes Service (AKS) managed identity to pull images from an Azure Container Registry (ACR). Now, you can assign Dara the Role Based Access Administrator role and add conditions so she can only assign the AcrPull and AcrPush roles and only to service principals.
Figure 1: Delegate Azure role assignment management using conditions.
Let’s look at how to do this step by step:
Step 1: When creating a new role assignment, on the Privileged administrator roles tab select the new Role Based Access Control Administrator role. You could also select any built-in or custom role that includes the Microsoft.Authorization/roleAssignments/write action.
 Figure 2: Select role
Step 2: On the Members tab, select the user you want to delegate the role assignments task to.
 Figure 3: Select members
Step 3: On the Condition tab, click Add condition to add the condition to the role assignment.
 Figure 4: Add condition to role assignment
Step 4: On the Add role assignment condition page, specify how you want to constrain the role assignments this user can perform by selecting one of the templates. For example, if you only want to restrict the roles that a user can assign (ex. AcrPull and AcrPush) and the type of principals the user can assign roles to (ex. service principals), select the Constrain roles and principal types template.
 Figure 5: Select role template
Step 5: On the Constrain roles and principal types pane, add the roles you want the user to be able to assign and select to what principal types the user can assign roles to.
 Figure 6: Select role and principal type
Step 6: Save the condition and complete the role assignment. 
 Figure 7: Review role assignment with conditions
How to delegate role assignment management using a new built-in role with built-in conditions
Now Dara wants to control who can sign into virtual machines using Microsoft Entra ID credentials. To do this, Dara needs to create role assignments for the Virtual Machine User Login or Virtual Machine Administrator Login roles. In the past, you had to grant Dara the Owner or User Access Administrator role so she could make these assignments. Now, you can grant Dara the new Virtual Machine Data Access Administrator role. Then, Dara will only be able to assign the roles needed to manage access to the virtual machine.
 Figure 8: Virtual Machine Data Access Administrator
Similarly, you can assign Key Vault Data Access Administrator role to trusted users managing key vaults, enabling them to assign only Azure Key Vault-related roles.
To assign the new built-in roles with built-in conditions, start a new role assignment, select the Job function roles tab, and select a role with built-in conditions, such as Virtual Machine Data Access Administrator. Then complete the flow to add a new role assignment.
 Figure 9 Select Key Vault or Virtual Machine Data Access Administrator
Roles with built-in conditions have Data Access Administrator as part of the role name. Also, you can check if a role definition contains a condition. In the Details column, click View, select the JSON tab, and then inspect the condition property. Over time we’ll add more roles with built-in conditions, for the most common scenarios, to make it easy to manage resources and manage access to those resources with simple role assignments.
 Figure 10: Key Vault Data Access Admin JSON view definition
Next steps
We have several examples for you to get started and customize as needed. Delegating Azure role assignments with conditions is supported using the Azure portal, Azure Resource Manager REST API, PowerShell, and Azure CLI. Try it out and let us know your feedback in the comments or by using the Feedback button on the Access control (IAM) blade in the Azure portal!
 Figure 11: Provide feedback
Stuart Kwan
Partner Manager, Product Management
Microsoft Entra
Learn more about Microsoft Entra:

Recent Comments