
by Contributed | Dec 9, 2023 | Technology
This article is contributed. See the original author and article here.
Embark on a Holiday Coding Adventure with GitHub Copilot
Hello students! Are you looking for a fun and engaging way to learn new coding concepts and languages over the holiday season? If so, you might want to check out Microsoft Copilot Adventures, a series of coding challenges powered by GitHub Copilot, an AI pair programmer that assists you in writing better code.
In this article, we’ll show you how to start your adventure, choose from different levels of difficulty and topics, and use GitHub Copilot hints to help you write your code. You’ll also learn how to share your solution with others and get feedback.
Whether you’re a beginner or an expert, Microsoft Copilot Adventures will help you improve your coding skills and have fun at the same time. So, what are you waiting for? Start your adventure today!

Welcome to Coding Adventure with GitHub Copilot
We are going to introduce you to an exciting series of coding adventures that will help you learn new concepts and languages over you holiday vacation period. This adventure experience and activities is brought to you by none other than GitHub Copilot, an AI pair programmer that assists you in writing better code.
What is GitHub Copilot?
GitHub Copilot is a tool designed to assist you in writing code. It’s like having a pair programmer who’s always ready to help.Whether you’re a beginner just starting out or an experienced coder looking to learn a new language, GitHub Copilot can be a valuable companion on your coding journey
How to Start Your Adventure
To get started, you’ll need to enter the “adventure area”. This is done by creating a GitHub Codespace Don’t worry, you can use 60 hours of GitHub Codespaces for free each month and if your registered GitHub Student Education pack user you get FREE access to codespaces Alternatively, you can clone the repo and run it locally.
Choose Your Adventure
Once you’ve set up your environment, it’s time to choose your adventure. There are several adventures available, each designed to challenge your coding skills and help you learn new concepts
Beginner Adventures
Intermediate Adventures
Advanced Adventures
Start Coding
After choosing your adventure, you’ll be given a description, high-level tasks to perform, and GitHub Copilot hints to help you write your code. You can use any language you’d like.If you’re up for a challenge, try learning a new language.
Share Your Adventure
If you’d like to share your solution with others, you can publish your adventure solution to a GitHub repo. Then, visit the issues page and select ‘New Issue’. Use the following naming convention for the issue title: ‘Solution for [Name of Your Adventure]’. Replace ‘[Name of Your Adventure]’ with the adventure name you chose to solve .
Conclusion
Embarking on a Holiday coding adventure with GitHub Copilot is a fun and engaging way to learn new coding concepts and languages. So, what are you waiting for? Start your adventure today!
Happy coding!

by Contributed | Dec 8, 2023 | Technology
This article is contributed. See the original author and article here.
In this blog series dedicated to Microsoft’s technical articles, we’ll highlight our MVPs’ favorite article along with their personal insights.
Sangkon Han, Developer Technologies MVP, Korea

Write your first code using C# (Get started with C#, Part 1) – Training | Microsoft Learn
“Although it is a beginner-level document provided by Microsoft, it is difficult for all beginners to read such documents. Therefore, as someone who is also learning C# for the first time, I have organized the contents of this document into a video. I hope that beginner C# learners can learn C# more easily and enjoyably, and I want to share this content with many people.”
(In Korean, MS에서 제공하는 초급자 문서이지만, 모든 초급자는 이러한 문서 조차 읽기 어렵습니다. 그래서 저도 C#을 처음 배운다는 입장에서 해당 문서의 내용을 영상으로 정리하였습니다. C# 초급 입문자가 조금 더 쉽고, 즐겁게 C#을 배울 수 있기를 희망하며 이 컨텐츠를 많은 사람들에게 알리고자 합니다.)
*Relevant Activity: This is my YouTube video .NET Starter 2023 – YouTube which explains this document.
(In Korean, 문서보다는 YouTube 영상을 통해서 진행하였습니다. 영상의 링크는 .NET Starter 2023 – YouTube 입니다.)
Elie Karkafy, Security, Enterprise Mobility MVP, United States

Azure updates | Microsoft Azure
“Get the latest updates on Azure products and features to meet your cloud investment needs.”
Takashi Takebayashi, Microsoft Azure MVP, Japan

Tutorial – Add app authentication to a web app on Azure App Service – Azure App Service | Microsoft Learn
“If we develop our own application that maintains unique usernames and passwords, the administrative burden becomes significant when adding or removing users across multiple applications. We also have to handle situations where a user forgets their email address. Alternatively, we can delegate this responsibility to a centralized ID provider, but many ID providers are very expensive. However, Microsoft’s authentication and authorization system is very affordable and easy to implement. Therefore, it’s content that many people should be aware of.”
(In Japanese, 独自のユーザー名とパスワードの情報を保持するアプリケーションを自分たちで開発した場合、複数のアプリケーションにまたがってユーザーを追加・削除するときに管理上の負担が大きくなります。またメールアドレスをユーザーが忘れた場合の対処も自分たちでしなくてはなりません。代わりにその責任を一元化された ID プロバイダーに委任できますが、多くの ID プロバイダーは非常に高額です。しかし、Microsoft の認証認可システムは非常に安価であり、簡単に実装もできます。そのため、多くの人に知ってもらいたいコンテンツです。)
Yutaro Tamai, Enterprise Mobility, Windows and Devices MVP, Japan

MD-102 1-Deploy Devices using Windows Autopilot – Training | Microsoft Learn
“In this eta, managing Windows devices is required for cloud-native management approach. This is good content to learn about device setup through Windows Autopilot. Why not start by getting familiar with Windows Autopilot and deepening your understanding of the latest device setup methods?”
(In Japanese: Windows デバイスの管理もクラウド ネイティブの管理手法が求められる時代です。その中で、Windows Autopilot によるデバイス セットアップの手法を学ぶに良いコンテンツです。まずは、Windows Autopilot に触れ、最新のデバイス セットアップの手法に理解を深めてみませんか。)

by Contributed | Dec 7, 2023 | Business, Gartner Magic Quadrant, Microsoft 365, Technology
This article is contributed. See the original author and article here.
We are honored to announce that Gartner® has recognized Microsoft as a Leader in the 2023 Gartner® Magic Quadrant™ for Unified Communications as a Service (UCaaS)—this is the fifth consecutive year we’ve received this recognition.
The post Microsoft named a Leader in 2023 Gartner® Magic Quadrant™ for Unified Communications as a Service for the fifth year in a row appeared first on Microsoft 365 Blog.
Brought to you by Dr. Ware, Microsoft Office 365 Silver Partner, Charleston SC.
by Contributed | Dec 6, 2023 | Technology
This article is contributed. See the original author and article here.
Greetings, Azure enthusiasts and PostgreSQL pros! As November draws to a close, we’re excited to unveil the latest enhancements to Azure Database for PostgreSQL Flexible Server. This month, we’ve rolled out a suite of features that bolster your database’s security, optimize storage scalability, and streamline the migration process, among other improvements. Join us as we delve into these November highlights that are set to elevate your Azure PostgreSQL experience.
Feature Highlights of the Month:
Server Logs for Azure PostgreSQL Flexible Server.
Support for TLS Version 1.3 – Enhanced Connectivity Security.
Introducing Pre-Migration Validations for Single Server to Flexible Server Migration Tool.
Enhanced User and Role Migration Capabilities in Azure Postgres Flexible Server.
- Microsoft Defender support **
Server Logs for Azure PostgreSQL Flexible Server

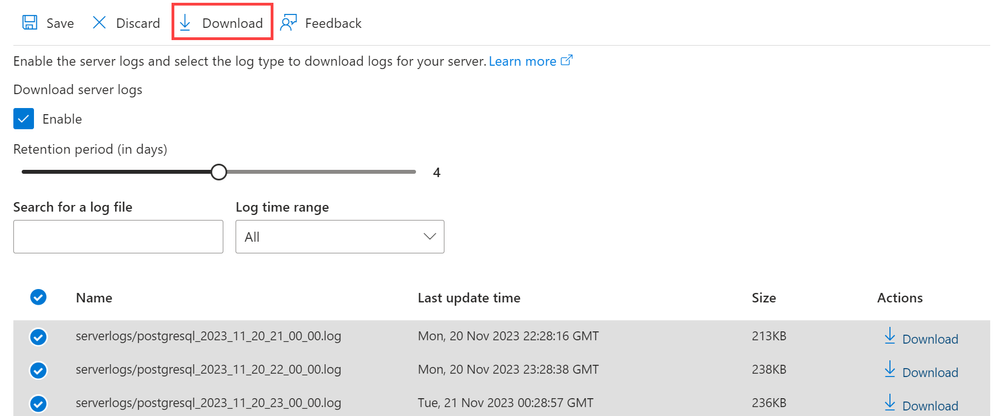
In the November update, we have introduced a significant enhancement to the Server Logs feature for Azure Database for PostgreSQL – Flexible Server. This feature is crucial for monitoring, troubleshooting, and gaining detailed insights into your server activities. Key aspects of this updated feature include:
- Easy Enablement: Initially disabled by default, you can now easily enable / disable server logs through the Azure portal.
- Customizable Retention Period: Configure the retention period for your logs, with options ranging from 1 to 7 days.
- Convenient Log Access and Download: Once enabled and logs are generated, they can be readily accessed and downloaded from the Azure portal or via Azure CLI (command-line interfaces), providing a straightforward way to analyze server activities.
This enhanced Server Logs feature adds a layer of transparency and control, enabling you to manage your PostgreSQL Flexible Server more effectively. For more details, refer Enable, list and download server logs for Azure Database for PostgreSQL – Flexible Server.
Support for TLS Version 1.3 – Enhanced Connectivity Security
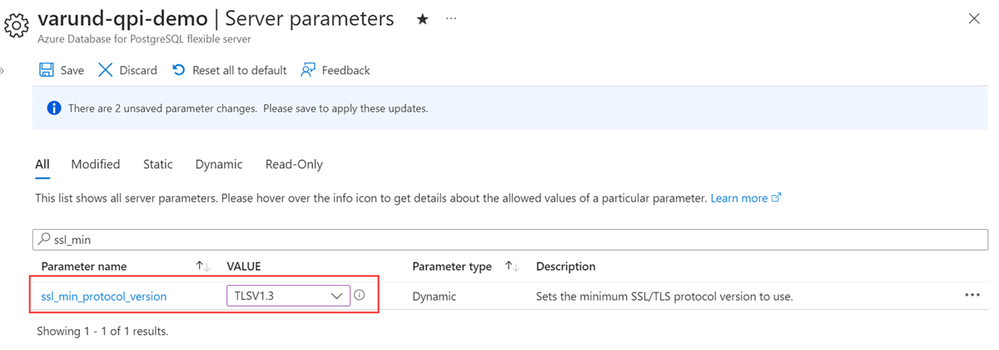
This November, we’re excited to announce the support for TLS version 1.3, the most secure and current version of the TLS protocol, for Azure Database for PostgreSQL – Flexible Server. This update is crucial in strengthening the security of client-server communications. Here’s what this enhancement entails:
- Advanced Security Protocol: By setting `ssl_min_protocol_version` to 1.3, Azure Database for PostgreSQL – Flexible Server now mandates the use of TLS 1.3 for all client connections. This ensures that the data transmitted between clients and the server is protected using the latest and most secure encryption standards.
- Improved Connection Security: TLS 1.3 not only offers enhanced security but also provides improved performance during the encryption process, making your database interactions both safer and more efficient.
With the support for TLS version 1.3, Azure Database for PostgreSQL – Flexible Server takes a significant leap forward in ensuring the highest standards of security and reliability for your database communications. For more details on this feature, please refer Azure PostgreSQL TLS versions.
Introducing Pre-Migration Validations for Single Server to Flexible Server Migration Tool
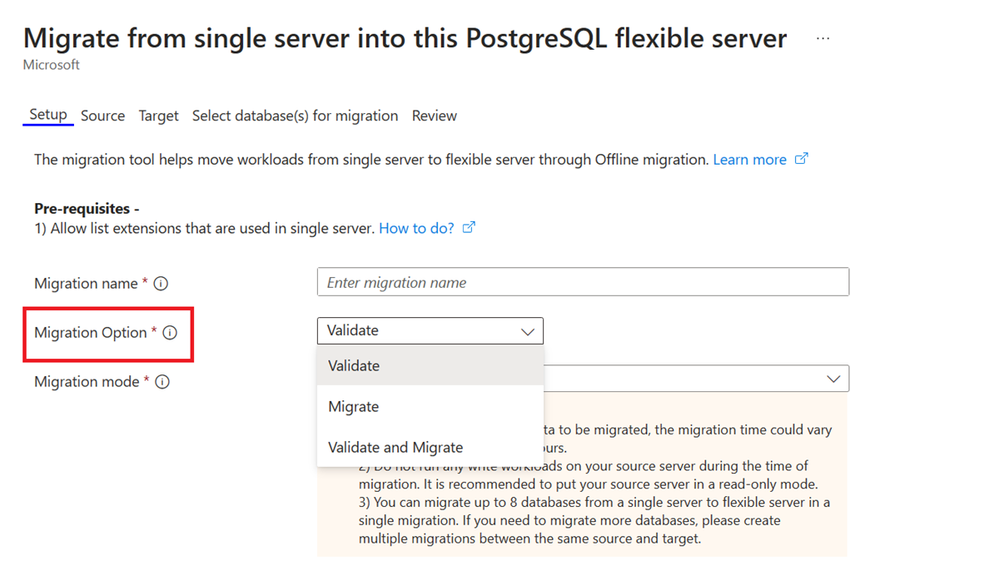
Single to Flexible server migration just got easier! We are excited to introduce the Pre-Migration Validation feature for the Single Server to Flexible Server Migration tool. After a thorough analysis of past migrations, the team identified that a considerable number of attempts faced setup-related hurdles. To tackle this, Pre-Migration Validation has been crafted to thoroughly check the readiness of both your source and target servers. The process is neatly integrated into the Azure Portal experience, offering you flexibility to:
- Validate – Examines server and database preparedness for the migration.
- Migrate – Proceeds directly to migration without prior validations.
- Validate and Migrate – Combines both steps, triggering migration only if validation passes without critical issues.
Each rule within the validation set is designed to return a status of ‘Succeeded’, ‘Failed’, or ‘Warning’, providing clear indicators of your migration path and any obstacles that may need your attention. This feature not only enhances the predictability of migrations but also significantly reduces stress by preemptively addressing potential issues. We are committed to evolving this tool, with more comprehensive validation rules in the pipeline to ensure your databases are primed for migration. For a deep dive into Pre-Migration Validations and to get started, explore our detailed documentation Pre-Migration Validations.
Enhanced User and Role Migration Capabilities in Azure Postgres Flexible Server
We’ve further upgraded the Azure Postgres Flexible Server Migration tool by adding the ability to automatically migrate users, roles, permissions, and ownerships from a Single Server to Flexible Server. Post successful migration you will observe the following:
- All users/roles from your source server have been copied to the target server.
- Database ownership and its associated objects are consistently maintained between the source and target servers.
- Permissions, including GRANT/REVOKE, on all database objects are identical on the target server compared to the source server.
This new feature underscores our commitment to making the transition to Flexible Server as seamless and accurate as possible. To make the most of these features, please refer to our customer guide.
Microsoft Defender support
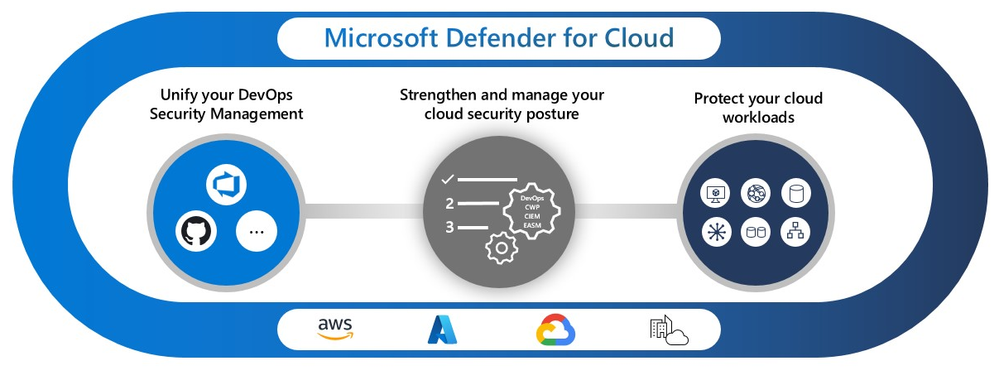
In our ongoing effort to enhance database security, we are proud to introduce Microsoft Defender for Cloud support for Azure Database for PostgreSQL Flexible Server. This new feature brings a robust layer of security to your database operations:
- Proactive Anomaly Detection: It actively monitors unusual access and query patterns, helping to identify potential security threats before they escalate.
- Real-Time Security Alerts: On detecting any anomalous activities, the system generates comprehensive alerts. These are accessible through Defender for Cloud’s security alerts page and provide essential details about the detected threats.
- Guided Resolution Steps: Each alert is accompanied by recommended actions for investigating and mitigating the threat, thereby enabling quick and effective resolution.
- Integration with Microsoft Sentinel: For deeper security analysis, the feature offers seamless integration with Microsoft Sentinel, expanding your capabilities for managing database security.
This feature represents a significant step forward in safeguarding your databases against evolving cyber threats and ensuring a secure environment for your critical data on Azure.
** this feature is scheduled to be available in December.
Ignite Feature Spotlight: Azure Database for PostgreSQL Flexible Server Enhancements
This November, Microsoft Ignite unveiled several exciting enhancements to Azure Database for PostgreSQL Flexible Server, solidifying its position as an enterprise-ready, fully managed PostgreSQL service. Here is a snapshot of the key features announced:
- Postgres 16 Support: Now generally available, Flexible Server supports PostgreSQL 16, providing users with the latest database features and improvements. Learn more about Postgres 16 in Flexible Server.
- Near-Zero Downtime Scaling: Scale your compute and storage resources with less than 30 seconds of downtime, enabling more dynamic adjustment to workload demands. Discover Near Zero Downtime Scaling.
- pgvector 0.5.1 Support: General availability of pgvector 0.5.1 allows for storing AI-generated embeddings and performing similarity searches, enhancing AI (ARTIFICIAL INTELLIGENCE) capabilities within the database. Explore pgvector in Azure Database for PostgreSQL.
- New Extensions – azure_storage & tds_fdw: Load and export data between Azure storage and PostgreSQL with the azure_storage extension. Access Microsoft SQL data seamlessly within PostgreSQL using tds_fdw. Learn about Postgres extension support.
- Premium SSD (solid state hard drives) v2: A new storage offering supporting up to 80K IOPS (input/output per second) and 64 TB storage capacity, adjustable to workload requirements. Introducing Premium SSD v2.
- Azure_AI Extension: Integrate Azure OpenAI directly with PostgreSQL for AI-powered app development using simple SQL. Read Integration with Azure OpenAI.
- Private Link: Enhance security with Private Link, allowing private network database connections without exposure to the public internet. Using Private Link with Flexible Server.
- Multi-Region Disaster Recovery (GeoDR): Achieve high availability and disaster recovery with GeoDR, allowing failover across regions under a single virtual endpoint. Introducing Multi-Region Disaster Recovery.
- IOPS Separation for Premium SSD v1: Tailor your storage configuration to your workload’s specific IOPS and size requirements. Read Storage IOPS Separation.
- Long-Term Backup Retention: Meet compliance standards and bolster disaster recovery strategies with backup retention for up to 10 years. Explore Long-term backup retention details.
For a more in-depth exploration of these features, be sure to read the blog Azure Database for PostgreSQL: AI-Ready for Enterprise Applications in Flexible Server by @charlesfeddersenMS . This coverage provides an excellent understanding of how these features can revolutionize your PostgreSQL experience on Azure.
Conclusion
As we wrap up this November recap, we also find ourselves reflecting on the incredible journey throughout 2023. It’s been a year filled with substantial growth, innovation, and community engagement in the realm of Azure Database for PostgreSQL Flexible Server. Each update and enhancement we’ve shared today not only marks the progress of this month but also contributes to the cumulative advancements we’ve achieved this year.
As the holiday season approaches, we want to take a moment to express our deepest gratitude for your ongoing support and engagement. Your feedback and involvement have been instrumental in shaping the evolution of our services. On behalf of the entire Azure Postgres Team, we wish you a joyful and safe holiday season.
Happy holidays, and here’s to a new year filled with more success and breakthroughs! Stay connected with us and keep an eye on this space for more updates. We cherish your thoughts and experiences, so please don’t hesitate to share them in the comments below. Your insights are invaluable to us.
Warm wishes,
The Azure Postgres Team

by Contributed | Dec 5, 2023 | AI, Business, Microsoft 365, Technology
This article is contributed. See the original author and article here.
Discover these three recent customer stories to better understand the full value of becoming cloud native.
The post 3 reasons why now is the time to go cloud native for device management appeared first on Microsoft 365 Blog.
Brought to you by Dr. Ware, Microsoft Office 365 Silver Partner, Charleston SC.


Recent Comments