by Contributed | Feb 1, 2024 | Technology
This article is contributed. See the original author and article here.
How Microsoft 365 Delivers Trustworthy AI Whitepaper
In the rapidly evolving business landscape, corporations are perpetually in search of innovative strategies that can amplify productivity and bolster security. Microsoft President Brad Smith wrote in his blog: AI advancements are revolutionizing knowledge work, enhancing our cognitive abilities, and are fundamental to many aspects of life. These developments present immense opportunities to improve the world by boosting productivity, fostering economic growth, and reducing monotony in jobs. They also enable creativity, impactful living, and discovery of insights in large data sets, driving progress in various fields like medicine, science, business, and security. However, the integration of AI into business operations is not without its hurdles. Companies are tasked with ensuring that their AI solutions are not only robust but also ethical, dependable, and trustworthy.
How Microsoft 365 Delivers Trustworthy AI is a comprehensive document providing regulators, IT pros, risk officers, compliance professionals, security architects, and other interested parties with an overview of the many ways in which Microsoft mitigates risk within the artificial intelligence product lifecycle. The document outlines the Microsoft promise of responsible AI, the responsible AI standard, industry leading frameworks, laws and regulations, methods of mitigating risk, and other assurance-providing resources. It is intended for a wide range of audiences external to Microsoft, who are interested in or involved in the development, deployment, or use of Microsoft AI. As Charlie Bell, EVP of Security at Microsoft describes in his blog, “As we watch the progress enabled by AI accelerate quickly, Microsoft is committed to investing in tools, research, and industry cooperation as we work to build safe, sustainable, responsible AI for all.”
The commitments and standards conveyed in this paper operate at the Microsoft cloud level – these promises and processes apply to AI activity across Microsoft. Where the paper becomes product specific, its sole focus is Microsoft Copilot for Microsoft 365. This does not include Microsoft Copilot for Sales, Microsoft Copilot for Service, Microsoft Copilot for Finance, Microsoft Copilot for Azure, Microsoft Copilot for Microsoft Security, Microsoft Copilot for Dynamics 365, or other Copilots outside of Microsoft 365.
At Microsoft, we comprehend the significance of trustworthy AI. We have formulated a comprehensive strategy for responsible and secure AI that zeroes in on addressing specific business challenges such as safeguarding data privacy, mitigating algorithmic bias, and maintaining transparency. This whitepaper addresses our strategy for mitigating AI risk as part of the Microsoft component of the AI Shared Responsibility Model.
The document is divided into macro sections with relevant articles within each:
- Responsible and Secure AI at Microsoft – this section focuses on Microsoft’s commitment to responsible AI and what this looks like in practice. The articles within address key topics including:
- The Office of the Responsible AI – read this to gain a deeper understanding of what comprises this division within Microsoft.
- The Responsible AI Standard and Impact Assessment – every Microsoft AI project must adhere to the Responsible AI Standard and have a valid impact assessment completed.
- Microsoft’s voluntary White House commitments – learn more about the commitments the White House made and how Microsoft shares these principles in our development and deployment practices.
- Artificial Generative Intelligence Security team – learn about Microsoft’s center of excellence for Microsoft’s generative AI security and the initiatives being driven by this team.
- Addressing New Risk – this section centers on the ways in which Microsoft is continuously improving its security practices and service design to mitigate new risk brought forth by the era of AI. As Brad Smith states in his blog, “Even as recent years have brought enormous improvements, we will need new and different steps to close the remaining cybersecurity gap.” This section addresses many actions Microsoft takes to address novel and preexisting risks in the era of AI. The articles within address salient topics including:
- The copilot copyright commitment – how Microsoft addresses the risk of customers inadvertently using copywritten material via Microsoft AI services.
- Updating the Security Development Lifecycle (SDL) to address AI risk – the ways Microsoft has adapted our SDL to identify and prioritize AI specific risks.
- Copilot tenant boundaries and data protection with shared binary LLMs – this article describes how your data remains protected and secured throughout the data flow process to the copilot LLMs and back to your end user in this multi-tenant environment.
- Copilot data storage and processing – this section answers the question, “what are the data storage and processing commitments applicable to Microsoft 365 copilot today?”
- AI specific regulations and frameworks for assurance – this section describes upcoming regulations relevant to artificial intelligence and how Microsoft plans to address each. Regulations and frameworks addressed include:
- European Union AI Act
- ISO 42001 AI Management System
- Cyber Executive Order (EO 14028)
- NIST AI Risk Management Framework
- Assurance Providing Resources – this comprises miscellaneous resources to providing customers assurance that Microsoft is mitigating risk as part of the shared responsibility model.
- Defense-in-depth: controls preventing model compromise in the production environment – this article outlines an entire Microsoft control set designed to mitigate model compromise through defense-in-depth.
As with everything Microsoft does, this whitepaper is subject to continuous update and improvement. Please reach out to your Microsoft contacts if you have questions regarding this content; thank you for your continued support and utilization of Microsoft AI.
Download the Whitepaper
We hope this whitepaper has provided you with valuable insights into how Microsoft delivers trustworthy AI across its products and services. If you want to learn more about our responsible and secure AI strategy, you can download the full whitepaper here: https://aka.ms/TrustworthyAI. This document will give you a comprehensive overview of the Microsoft promise of responsible AI, the responsible AI standard, industry leading frameworks, laws and regulations, methods of mitigating risk, and other assurance-providing resources. You will also find detailed information on how Microsoft Copilot for Microsoft 365 adheres to these principles and practices. Download the whitepaper today and discover how Microsoft can help you achieve your AI goals with confidence and trust.
by Contributed | Jan 31, 2024 | Technology
This article is contributed. See the original author and article here.
In our January 2024 edition of What’s New in Microsoft Teams, we are highlighting 33 new features and enhancements to Microsoft Teams. These updates will help you collaborate more effectively, streamline workflows, and stay connected with your team. Keep reading to find out more about the latest updates and how they can help you and your organization. From new enhancements to meetings to improvements in chats, Teams Phone, Teams Devices, Platform, and Frontline Workers, there is something for everyone.
Some of my favorite features are Immersive Spaces and Decorate your Background. Immersive Spaces lets you transform your meeting into a 3D immersive experience by allowing your team to join a pre-built immersive space by selecting the view menu in a Teams meeting. Decorate your Background uses AI decorate and customize your real-world room, such as by removing clutter or adding plants to a wall. And this month we announced Intelligent recap is included with the Copilot for Microsoft 365 so users with a Copilot license will now also have access to Intelligent Recap in Teams even if you do not have a Teams Premium license.
And every month we highlight new devices that are certified and ready to use for Teams. You can find more devices for all types of spaces and uses at aka.ms/teamsdevices.
Please check out all the updates and give me your feedback! I’ll try to reply and answer questions as they come up.
Chat and Collaboration
Meetings
Virtual Appointments
Teams Rooms and Devices
Teams Phone
Mobile
Collaborative Apps
IT Administration and Security
Frontline Worker Solutions
Chat and Collaboration
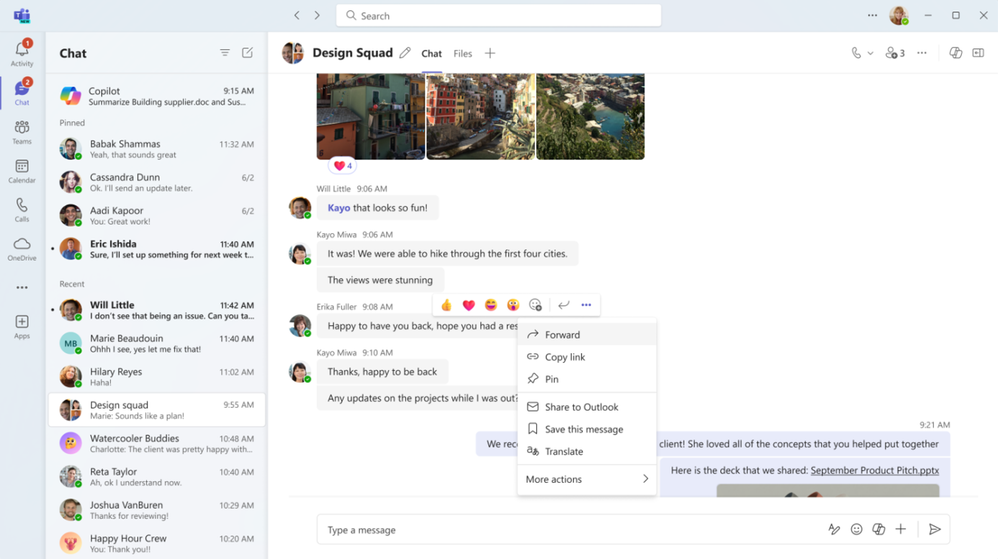
Forward chat messages
Forward chat makes it easier to get your work done with fewer clicks. Share a message with another colleague by right clicking the message and selecting “forward” or by clicking the “…” on the message and then “forward”. You can also add additional context to the message to provide greater clarity for the recipient. Messages can be forwarded to 1:1 chats and group chats.
Meetings
Mesh in Microsoft Teams
To support hybrid work and geographically distributed organizations, we created Microsoft Mesh and integrated it right into Teams.
Mesh in Teams transforms your Teams meeting into a 3D immersive experience using next-generation technology that helps virtual connections feel more like face-to-face ones.
Getting started is easy. From the View menu in a Teams meeting, select the immersive space (3D) option, and enter a pre-built immersive space where you can connect and collaborate with others in 3D and with those in the standard 2D meeting experience. Whether you choose to use Mesh in Teams for a team social gathering, a brainstorming session, or a round-table discussion, you can use the same Teams features you love from within a 3D space, like accessing shared content for collaboration, communicating with Teams chat, and using live reactions to express yourself.
Mesh in Teams enhances your favorite Teams features by making you feel like you are physically co-located with others. Being in the same 3D environment creates a strong feeling of togetherness, or co-presence. This co-presence can spark spontaneous moments of dialogue and strengthen the bond of a shared experience. Visual and audio cues enable a sense of immersion that help keep you in the moment and eliminate external distractions. Spatial Audio and audio zones enable you to have multiple, simultaneous conversations and communicate effectively in subgroups without talking over each other – just like in the physical world.
Mesh in Teams is available with core Teams licenses. Organizations can also host larger events with custom, immersive experiences tailored to their needs with Microsoft Mesh, available through Teams Premium.
Learn more about Mesh in Teams.
Intelligent recap included with Copilot for Microsoft 365 License
If you have a Copilot for Microsoft 365 License you now have intelligent recap for Teams included in your license. Use intelligent recap after meetings to get a summary of the meeting. This summary includes personalized timeline markers to easily browse recordings by when you joined or left, when a screen was shared, and when your name was mentioned. You can also browse recordings by speakers, chapters, and topics as well as access AI-generated meeting notes, tasks, and go to name mentions in the transcript.
Decorate your background
Make meetings more fun and personal with Decorate your background. Meeting participants can now use generative background effects in Teams to show up their best – even when the space they’re working from isn’t at its best. With Decorate your background, meeting participants can use the power of AI to generate a background that decorates and enhances their real-world room, such as by cleaning up clutter or adding plants to a wall. This capability is available for users with a Teams Premium license.

People specific link support for Collaborative notes
With the launch of Collaborative notes, we are making meetings more effective and secure by using a new link type created by Collaborative notes. The new Collaborative notes component will generate a People specific link (PSL) by default. This link type offers more controlled access than a Company specific link (CSL) and aligns with tenants who have their file-sharing policy set as specific people. Tenants who previously had Collaborative notes disabled due to lack of PSL support can now enable and use the feature.
Automatically view up to 9 videos (3×3) in Teams meetings in Chrome and Edge
With this update, you will now be able to automatically see up to 9 videos (3×3) on Chrome and Edge on your screen by default without an explicit action. Previously, Microsoft Teams Meetings supported a maximum of 4 videos (2×2) on the screen by default on web browsers.
Simplified audio and video controls
Audio and video fly-outs in meetings are designed to make it easier and more efficient for you to manage your audio and video settings during Teams meetings. Now, when you want to select your camera or mic device, you can choose the right device directly from the fly-outs. You can also adjust the volume, spatial audio, and noise suppression controls from the audio fly-out. If you didn’t select your background during the pre-join screen, you can easily change your background directly from the camera fly-out. We’ve also made avatars accessible from the camera fly-out so you can use avatars in meetings. You can also adjust brightness and soft focus from the camera fly-out.

Virtual appointments
Assign staff and set duration for on-demand Virtual Appointments
Scheduling administrators and staff managing on-demand appointments can assign specific staff members and set appointment duration to handle on-demand services. This ensures that when an on-demand appointment is requested, there is a designated staff member assigned to the appointment and the duration of the appointment will be determined. The designated staff member also receives a notification to attend the on-demand appointment. This capability is available for users with a Teams Premium license.

SMS notifications in Virtual Appointments template
SMS notifications are available for appointments set up and scheduled using the virtual appointments template within the Teams app to improve the attendees’ appointment experience. Attendees will receive SMS text notifications about their appointment, including appointment details and the meeting join link so they can join directly from mobile if desired. Text notifications are sent for appointment confirmation, updates, and a reminder 15 minutes before the appointment begins. This capability is available for users with a Teams Premium license and is available for users in Canada, United Kingdom, and United States.

Teams Rooms and Devices
Find Certified for Teams devices for all types of spaces and uses at aka.ms/teamsdevices.
Newly certified for Teams AVer VB350
With a Hybrid 18X Zoom for Medium & Large Rooms With a streamlined design, dual 4K lenses, seamless lens switching, upgraded audio technology, and simple setup, the VB350 is the ultimate all-in-one solution for next-level video meetings. Level up to premium audio and video by using this powerful new video bar in your mid-to-large conference rooms. Learn more about AVer – VB350.

Newly certified for Teams Lenovo ThinkSmart 180
This premium conference bar delivers superior audio and visual experience featuring a modern form factor and best-in-class AI-accelerated performance. This stylish and easy-to-set-up meeting room bar will transform your small and medium-sized meeting rooms into next-generation collaboration spaces in no time at all. Impressive AI features follow the conversation, adjusting the view and audio to allow remote participants to feel like they’re sitting around the table, even if they’re across the world. Learn more about Smart Collaboration | Lenovo Tech today.

AudioCodes RXV200-B20 bundle is now certified for Teams
The RXV200 bundle is designed to deliver an optimal hybrid meeting experience for focus rooms and includes the RXV200 intelligent A/V hub, the RX-PAD touch room controller, the RXVCam50 camera and RX15 speaker. The RXV200 is an Android Microsoft Teams Rooms device that orchestrates multiple audio and video peripherals to deliver an optimal hybrid meeting experience for all participants wherever they are located. The RXV200’s modular design supports content sharing, allowing participants to connect their personal devices via an HDMI cable, as well as dual screens and a wide range of AI capabilities. Learn more about AudioCodes RXV200 bundles.

AudioCodes RXVCam10-CC
AudioCodes RXVCam10-CC content camera is now certified for Teams. The RXVCam10-CC enables whiteboard content to be easily shared between physically present and remote meeting participants. In conjunction with Microsoft Teams AI content enhancement capabilities, the RXVCam10-CC simplifies team collaboration and brainstorming in hybrid meetings. Leveraging Microsoft Teams AI, the RXVCam10-CC offers intelligent whiteboard detection and automatically adjusts the frame to include the entire whiteboard. It also offers additional content enhancements such as image sharpening, contrast adjustment and overlaying a transparent view of the presenter. The RXVCam10-CC is designed for durability and is easy to install in any meeting room thanks to its adjustable whiteboard mount accessory.
Learn more about RXVCam10-CC.

Management of BYOD (Bring your own device) meeting spaces with Teams Rooms Pro Management
The ability to view BYOD (bring your own device) rooms in the Pro Management Portal provides IT admins with a comprehensive overview of their BYOD rooms’ utilization and activities. With this new addition, IT admins will gain valuable insights into how these spaces are being utilized, enabling them to make data driven decisions.
New Shared display mode for BYOD meeting rooms
The new shared display mode provides you the ability to extend your Teams meeting via a pop-out and view-only version of the stage onto the TV screen in BYOD meeting rooms. This mode ensures the meeting content is extended to the front of the room for others to see and provides you the peace of mind that your desktop is for their viewing only, minimizing the personal information others in the room can see.
Teams Phone
New partner integrations for Teams Phone contact center
The Teams Phone contact center and compliance recording certification programs ensure that contact center and compliance recording solutions work smoothly and dependably with Teams by requiring them to pass third-party testing. We have recently certified two new ISV partners, BrightPattern and CenterPal. With these additions we now have 24 Contact Center certified solution partners and 13 Compliance Recording certified solution partners, and there are many more on the way.
Mobile
Updates to mobile in-call user experience
Improving your access to calling features with a new and improved user interface during calls.
Live meeting status for mobile
On mobile devices, Teams calendar shows the live status of a meeting with the pictures of the people who are on the call, if the meeting is being recorded and how long the meeting has lasted.
Play Azure protected voicemail in mobile Teams app
You can now use a link to get to your Azure protected voicemails from the Teams App. You will see a notification for the voicemail on the Teams App and can click the attached link to open the voicemail on the web browser.
Collaborative Apps
1Page
The 1Page app is the all-in-one productivity tool that creates a platform to empower sales professionals by connecting them with data, insights, and even prospective or existing customers. Now, with a co-pilot plugin, streamlined data and real-time insights can be accessed from the 1Page app with conversational language prompts across the Microsoft 365 ecosystem.
Alvao
Alvao for Microsoft Teams automates routine processes, boosts team productivity, and helps users focus on key projects. With the latest extension into Microsoft 365 applications, tickets opened in outlook can more easily connect with an agent. The app helps with logging chat messages to tickets, creating a simple to track list of tickets to solve, and gives agents the ability to take and resolve tickets immediately.
Calm
Calm for Microsoft Teams integrates the #1 app for sleep, meditation, and relaxation into your everyday workflow. Calm’s mindfulness content helps you feel more relaxed, productive, and connected by allowing you to engage with more than 3,000 Calm sessions within the Teams interface. This includes content to prepare for key moments at work, music to help focus, breathing exercises, movement, and more. You can access mindfulness sessions for yourself or with others during meetings, share mindfulness content via chat, and set reminders for mental health breaks to help reduce stress and anxiety, reset, refocus, and build resilience.


Planning for Educators
Planning for Educators gives users the tools to streamline the planning process in Microsoft Teams so they can spend more time focusing on teaching. This flexible planning tool allows educators to organize and manage class resources including lesson plans, assignments, files, videos, and links. Students can also benefit from Planning’s comprehensive visual timeline and content made more accessible through Microsoft’s Immersive Reader.
SYNQ Frontline Hero
The SYNQ Frontline Hero app brings SYNQ’s retail services to Microsoft Teams to connect retail store staff with customers at the speed and convenience of Teams. Staff can use this to efficiently manage in-store and curbside pickup orders, quickly answer customer queries in chat, and respond to requests for staff assistance or customer service.
IT Administration and Security
Configure maintenance window for Teams devices
Within the Teams Admin Center, admins can set up the time windows for their Teams devices maintenance. These time windows will be used for performing any device maintenance tasks, such as automatic updates.
Extended real-time telemetry retention for up to 7 days
Admins in Teams admin center can troubleshoot meeting quality more efficiently thanks to real-time telemetry that is available for an extended period (up to 7 days following the conclusion of a meeting) for users with Teams Premium licenses. This helps admins find and solve quality issues with detailed telemetry after the meeting for up to 7 days. s This feature is available with a Teams Premium license.
Microsoft Teams admin center – external domain activity report
Teams administrators can see which managed domains their users interact with using the external domain activity report. The report will surface the list of domains that your tenant has communicated with via managed communication, and how many internal users have been part of that communication. This report is available for those with open federation on and those with explicit allow lists.

Watermark support for recording playback
Watermarked meetings can now have recording enabled. A watermark with an email ID will show up during the playback of the recorded meeting. After a meeting is over, users can view the recorded content with watermarking on web and mobile platforms. This feature requires a Teams Premium license.
New Meeting Option and Meeting Policy ‘Turn off copying or forwarding of meeting chat’
A new meeting option called ‘Turn off copying or forwarding of meeting chat’ lets the meeting organizer disable the ability to copy and share meeting chat messages for participants to prevent data leakage. With this restriction on, meeting participants will not be able to copy chat messages using the menu option or keyboard shortcut, forward messages, or share messages to Outlook. Admins can control whether an organizer can use this feature in the Meeting Options page by using Meeting Policy setting in Teams admin center. Admins can also choose the default value for this meeting option in Meeting Templates they create. This feature requires a Teams Premium license.
Frontline Worker Solutions
Walkie Talkie: Automatically listen to multiple channels
Frontline workers who use Walkie Talkie in Teams can now choose to automatically listen to incoming messages from any of their pinned favorite Teams channels (up to 5 favorite channels). This new feature helps you keep in touch with and easily initiate PTT transitions on multiple channels without needing to switch channels manually.
.gif")
Allow frontline teams to set their shift availability for specific dates
Frontline workers can now choose their preferred dates to work, making it easier for them to handle different scheduling needs. This new feature adds to the existing options for weekly availability that repeat. To learn more about recent enhancements to Shifts in Teams, read the latest blog – Discover the latest enhancements in Microsoft Shifts.


Recent Comments