Rapidly scope NC2 on Azure using Nutanix Sizer
This article is contributed. See the original author and article here.
Overview
A global enterprise wants to migrate thousands of Nutanix AHV or VMware vSphere virtual machines (VMs) to Microsoft Azure as part of their application modernization strategy. The first step is to exit their on-premises data centers and rapidly relocate their legacy application VMs to the Nutanix Cloud Clusters on Azure (NC2 on Azure) service as a staging area for the first phase of their modernization strategy. How can they quickly size NC2 on Azure to meet their workload requirements?
NC2 on Azure is a third-party Azure service from Nutanix that provides private clouds containing Nutanix AHV clusters built from dedicated bare-metal Azure infrastructure. It enables customers to leverage their existing investments in Nutanix skills and tools, allowing them to focus on developing and running their Nutanix-based workloads on Azure.
In this post, I will introduce the typical customer workload requirements, describe the NC2 on Azure architectural components, and describe how to use Nutanix Sizer to quickly scope an NC2 on Azure solution.
In the next section, I will introduce the typical sizing requirements of a customer’s workload.
Customer Workload Requirements
A typical customer has multiple application tiers that have specific Service Level Agreement (SLA) requirements that need to be met. These SLAs are usually named by a tiering system such as Platinum, Gold, Silver, and Bronze or Mission-Critical, Business-Critical, Production, and Test/Dev. Each SLA will have different availability, recoverability, performance, manageability, and security requirements that need to be met.
For the initial sizing, customers will have CPU, RAM, Storage and Network requirements. This is normally documented for each application and then aggregated into the total resource requirements for each SLA. For example:
SLA Name | CPU | RAM | Storage | Network |
Gold | Low vCPU:pCore ratio (<1 to 2), Low VM to Host ratio (2-8) | No RAM oversubscription (<1) | High Throughput or High IOPS (for a particular I/O size), Low Latency, Low Capacity, RAID policy, Redundancy Factor | High Throughput, Low Latency |
Silver | Medium vCPU:pCore ratio (5 to 8), Medium VM to Host ratio (10-15) | Medium RAM oversubscription ratio (1.1-1.3) | Medium Latency, Medium Capacity | Medium Latency |
Bronze | High vCPU:pCore ratio (10-15), High VM to Host ratio (20+) | High RAM oversubscription ratio (1.5-2) | High Latency, High Capacity | High Latency |
Table 1 – Typical Customer SLA requirements for Performance
The concepts introduced in Table 1 have the following definitions:
- CPU: CPU model and speed (this can be important for legacy single threaded applications), number of cores, vCPU to physical core ratios.
- Memory: Random Access Memory size, Input/Output (I/O) speed and latency, oversubscription ratios.
- Storage: Capacity, Read/Write Input/Output per Second (IOPS) with Input/Output (I/O) size, Read/Write Input/Output Latency, RAID policy, RF policy.
- Network: In/Out Speed, Network Latency (Round Trip Time).
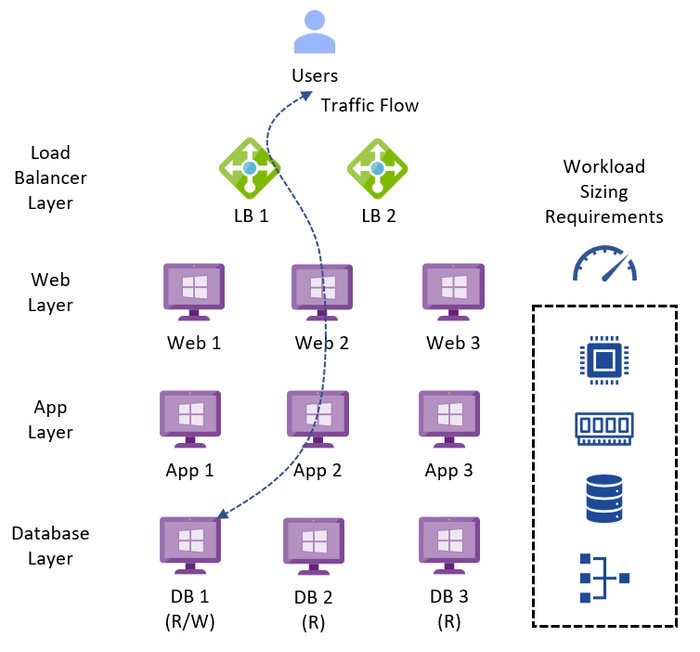
A typical legacy business-critical application will have the following application architecture:
- Load Balancer layer: Uses load balancers to distribute traffic across multiple web servers in the web layer to improve application availability.
- Web layer: Uses web servers to process client requests made via the secure Hypertext Transfer Protocol (HTTPS). Receives traffic from the load balancer layer and forwards to the application layer.
- Application layer: Uses application servers to run software that delivers a business application through a communication protocol. Receives traffic from the web layer and uses the database layer to access stored data.
- Database layer: Uses a relational database management service (RDMS) cluster to store data and provide database services to the application layer.
The application can also be classified as OLTP or OLAP, which have the following characteristics:
- Online Transaction Processing (OLTP) is a type of data processing that consists of executing several transactions occurring concurrently. For example, online banking, retail shopping, or sending text messages. OLTP systems tend to have a performance profile that is latency sensitive, choppy CPU demands, with small amounts of data being read and written.
- Online Analytical Processing (OLAP) is a technology that organizes large business databases and supports complex analysis. It can be used to perform complex analytical queries without negatively impacting transactional systems (OLTP). For example, data warehouse systems, business performance analysis, marketing analysis. OLAP systems tend to have a performance profile that is latency tolerant, requires large amounts of storage for records processing, has a steady state of CPU, RAM and storage throughput.
Depending upon the requirements for each service, the infrastructure design could be a mix of technologies used to meet the different application SLAs with cost efficiency.
Figure 1 – Typical Legacy Business-Critical Application Architecture
In the next section, I will introduce the architectural components of the NC2 on Azure service.
Architectural Components
The diagram below describes the architectural components of the NC2 on Azure service.

Figure 2 – NC2 on Azure Architectural Components
Each NC2 on Azure architectural component has the following function:
- Azure Subscription: Used to provide controlled access, budget, and quota management for the NC2 on Azure service.
- Azure Region: Physical locations around the world where we group data centers into Availability Zones (AZs) and then group AZs into regions.
- Azure Resource Group: Container used to place Azure services and resources into logical groups.
- NC2 on Azure: Uses Nutanix software, including Prism Central, Prism Element, Nutanix Flow software-defined networking, Nutanix Acropolis Operating System (AOS) software-defined storage, and Azure bare-metal Acropolis Hypervisor (AHV) hosts to provide compute, networking, and storage resources.
- Nutanix Move: Provides migration services.
- Nutanix Disaster Recovery: Provides Disaster Recovery automation and storage replication services.
- Nutanix Files: Filer services.
- Nutanix Objects: Object storage services.
- Nutanix Self Service: Application Lifecycle Management and Cloud Orchestration.
- Nutanix Cost Governance: Multi-Cloud Optimization to reduce cost & enhance Cloud Security.
- Azure Virtual Network (VNet): Private network used to connect Azure services and resources together.
- Azure Route Server: Enables network appliances to exchange dynamic route information with Azure networks.
- Azure Virtual Network Gateway: Cross premises gateway for connecting Azure services and resources to other private networks using IPSec VPN, ExpressRoute, and VNet to VNet.
- Azure ExpressRoute: Provides high-speed private connections between Azure data centers and on-premises or colocation infrastructure.
- Azure Virtual WAN (vWAN): Aggregates networking, security, and routing functions together into a single unified Wide Area Network (WAN).
In the next section, I will describe how to use the Nutanix Sizer to quickly scope the NC2 on Azure service for a customer workload.
Using the Nutanix Sizer
The Nutanix Sizer is available to Nutanix Employees and Nutanix Partners. If you are a Nutanix Customer, please reach out to your Nutanix, Microsoft, or Partner account team to engage an architect to size your NC2 on Azure solution. Customers also have access to Nutanix Sizer Basic.
Unless specified, all other settings can be left at the default values. Once the scenario is built, it can be later tweaked to meet the customer requirements.
Step 1: Access My Nutanix and select the Nutanix Sizer Launch button.

Figure 3 – My Nutanix Dashboard
Step 2: Select the Create Scenario button.

Figure 4 – Nutanix Sizer My Scenarios
Step 3: Enter the Scenario Name, Install Country, and select the Create button.

Figure 5 – Nutanix Sizer Create New Scenario
Optionally, if you have a good understanding of the problem the customer is trying to solve, you can fill out the Scenario Objectives (Executive Summary, Requirements, Constraints, Assumptions, and Risks) to start building out the design. This will also allow you to use the advanced export features at the end of the sizing process.
Step 4: Press the Add button in the Create Workloads pane. If you want Import a Nutanix Collector or RVTools files as the source file for workload, select the Import button instead.

Figure 6 – Nutanix Sizer Create Workloads
Step 5: Define the Workload Name, Workload Type, Server Profile Size, and Number of VMs. Then select the Save & Review Cluster button.

Figure 7 – Nutanix Sizer Add Workload
Step 6: Select NC2 on Azure from the Vendor section of the Platform Settings. Then scroll down to the Cluster Settings.

Figure 8 – Nutanix Sizer Platform Settings
Step 7: Select the Environment Type from the Cluster Settings and press the Apply button.

Figure 9 – Nutanix Sizer Cluster Settings
Step 8: In the Workloads Summary page, select the Solution tab.

Figure 10 – Nutanix Sizer Workloads Summary
Step 9: In the Solution Summary page, verify the NC2 on Azure tag is present in each cluster.

Figure 11 – Nutanix Sizer Solution Summary
Step 10: In the Solution Summary page, scroll down to the Sizing Details for the detailed breakdown.

Figure 12 – Nutanix Sizer Solution Sizing Details
Step 11: To share the Scenario with others:
- Select BOM, Download BOM
- Select Quote, Generate Budgetary Quote or Generate Frontline Quote
- Select More, Share Scenario or Create Proposal

Figure 13 – Nutanix Sizer Export & Sharing Options
In the following section, I will describe the next steps that need to be made to progress this high-level design estimate towards a validated detailed design.
Next Steps
The NC2 on Azure sizing estimate has been assessed using Nutanix Sizer. With large enterprise solutions for strategic and major customers, a Nutanix Solutions Architect from Azure, Nutanix, or a trusted Nutanix Partner should be engaged to ensure the solution is correctly sized to deliver business value with the minimum of risk. This should also include an application dependency assessment to understand the mapping between application groups and identify areas of data gravity, application network traffic flows, and network latency dependencies.
Summary
In this post, we took a closer look at the typical sizing requirements of a customer workload, the architectural building blocks, and the use of Nutanix Sizer to quickly scope the NC2 on Azure service. We also discussed the next steps to continue an NC2 on Azure design.
If you are interested in NC2 on Azure, please use these resources to learn more about the service:
- Homepage: Elevate Azure Clusters with Nutanix
- Documentation: What is BareMetal Infrastructure for Nutanix Cloud Clusters on Azure?
- Use-cases: Use cases and supported scenarios
- Solution Design: Solution design – Azure Baremetal Infrastructure
- Architecture: Architecture of BareMetal Infrastructure for NC2
- Getting Started: Microsoft Azure Marketplace
- Solution Requirements: Requirements – Azure Baremetal Infrastructure
- Azure Regions: Supported instances and regions
- SKUs: SKUs – Azure Baremetal Infrastructure
- User Guide: Nutanix Cloud Clusters on Azure Deployment and User Guide
- Nutanix Sizer: Sizer 6.0 User Guide
- FAQ: FAQ – Azure Baremetal Infrastructure
Author Bio
René van den Bedem is a Principal Technical Program Manager at Microsoft. His background is in enterprise architecture with extensive experience across all facets of the enterprise, public cloud & service provider spaces, including digital transformation and the business, enterprise, and technology architecture stacks. René works backwards from the problem to be solved and designs solutions that deliver business value with the minimum of risk. In addition to being the first quadruple VMware Certified Design Expert (VCDX), he is also a Dell Technologies Certified Master Enterprise Architect, a Nutanix Platform Expert (NPX), an NPX Panelist, and a Nutanix Technology Champion.


Recent Comments