by Contributed | Mar 14, 2024 | Technology
This article is contributed. See the original author and article here.
Meet the needs of your frontline
Whether a sales associate in a store, a machine operator in a manufacturing plant, or a care clinician in a hospital, frontline workers account for over 2.7 billion of the global workforce (Gartner 2022). That’s over twice the number of desk-based workers.
They are a vital component of the global economy, and yet face some of the greatest challenges like labor shortages and supply chain issues. This puts pressure on the workforce to deliver the same consistent quality, but faster and with less support.
But the frontline is also often faced with a technology landscape of siloed information from paper-based processes, legacy systems and different devices all required to do their work. This adds another pressure to frontline workers, who end up spending more time searching for information than creating value in your business.
Golden opportunity for transformation
There is a golden opportunity for business leaders to invest in technology that will power their frontline workforce to improve worker productivity, business process efficiency, and employee retention. And a key part of the opportunity to uplevel your frontline workers is by transforming the way they work with next generation AI.
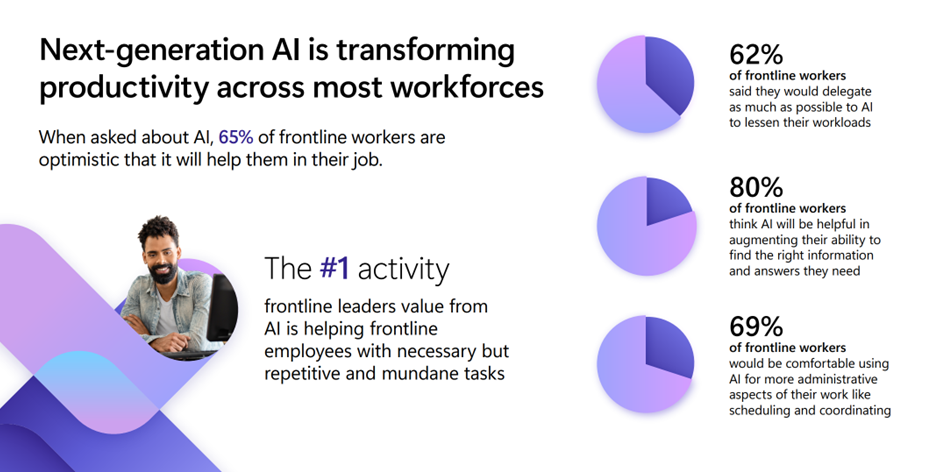
An image providing statistics about how next-generation AI is transforming productivity across most workforces.
When we talked to customers, we found that AI can help frontline workers in three main ways:
- Answers and guidance in the moment: Enable in-the-moment answers and guidance to find the right information they need to make a decision.
- Automate common workflows: Speed up everyday processes like reporting incidents or creating tasks to save workers’ much needed time.
- Advise workers on what to focus on: Advise and summarize information, from shift handovers to missed communications, so workers can quickly get up to speed on information they need to do their job informed.
We are excited to show you how you can meet these AI needs on the frontline by easily creating a custom copilot that fits your unique frontline use cases using Copilot Studio or by empowering them with the full, out-of-the-box Microsoft Copilot for Microsoft 365.
Create your copilot, your way, for your frontlinewith Copilot Studio
We are empowering you to easily build your own custom copilot, your way to meet the specific needs of your frontline workers. Whether you create a copilot for a singular purpose, like HR or IT support, or as a comprehensive copilot to meet the various needs of your frontline, you can create the right AI assistant to meet the challenges faced on your frontline.
Answers and guidance in the moment
We often hear from customers that their frontline workers are struggling with finding the right information in the moment to make a decision quickly. Many of them search across different resources or hundreds of pages of content to find the right answer. In fact, 62% of frontline workers say they struggle with too much time spent searching for information (Work Trend Index, 2022). This hurts their ability to be effective or respond to customers. Create a copilot connected to the knowledge systems you use today like SharePoint, websites or system of records to equip your frontline with the ability to find the right information, guidance and answers at their fingertips. Now AI is helping your frontline workers get answers quickly, spend less time on operations, and improve customer interactions.
 An image demonstrating examples of copilot prompts retail frontline workers input on the Microsoft Teams mobile app.
Automate common workflows
Many frontline workers are also struggling with having to handle multiple processes and tasks spread across systems. In fact, data from our Work Trend Index shows that over 60% of frontline workers struggle with repetitive and tedious tasks that take time away from valuable work like providing quality customer service and efficiently fulfilling meaningful components of their work. Create a copilot that automates common workflows like task management with intelligent capabilities to increase execution visibility and smooth task completion. This will enable your team to have more operational visibility into the work that needs to be completed, while also enhancing the ability to execute processes faster.
 An image demonstrating how copilot can automate common workflows like task management in the Microsoft Teams mobile app.
Advise workers on what to focus on
We also know that your frontline workers are often faced with a lot of information and work they need to digest and put into action to create the best customer experience and complete work efficiently. But they are often too overwhelmed with the amount of content they need to take into account and miss crucial information that could personalize how they complete work. Create a copilot that advises and shares pertinent information in the moment so they can focus on delivering their best to your customer or the work at hand. Frontline workers will be able to bring more personalized and relevant information into their interactions with customers as well as their tasks to increase customer satisfaction and upselling of products and services.
 An image demonstrating how copilot can provide a response that advises and shares pertinent information, such as providing a list of customers with the following prompt: “Do I have visit proposals?”
All of these scenarios can be created today in as fast as a few days using Copilot Studio.
Copilot for Microsoft 365: Your AI assistant at work integrated into the Microsoft 365 apps
For frontline workers who work in the Microsoft 365 apps millions of people use every day like Word, Excel, PowerPoint, Outlook, Teams, and more, you can enable them with an AI assistant at work. We are excited to announce that Copilot for Microsoft 365, which works across your entire universe of data at work and is integrated into the Microsoft 365 apps and the web, will now be available as an add-on to all F SKU licenses. This AI addition will enhance frontline worker and manager productivity by combining powerful large language models with their work content and context to help them deliver at a higher level.
With Copilot for Microsoft 365, frontline workers can recap a patient visit or a regional sales call on a Teams meeting with intelligent notes or quickly catch up on any town halls and trainings they miss. They can find information quickly, whether searching for patient and customer information or scouring through manuals, with content across Microsoft 365. And they can use Copilot to draft and edit customer responses in Outlook to improve customer response rate and satisfaction. This means frontline managers and workers will be able to spend less time searching for and cataloguing information, and more time on the work and human interactions that are meaningful to your business.
Plus, Microsoft Copilot is built on Microsoft’s trusted and comprehensive approach to enterprise-grade security, privacy, identity, compliance, and responsible AI—so you know it’s enterprise ready.
Here’s how you can get started and transform your frontline with AI
Whether you want to enable your frontline workforce with a custom copilot, or a Copilot integrated with Microsoft 365 productivity suite, you can transform your frontline today with next generation AI to uplevel their productivity.
Here are two ways you can get started:
- Get started today with Copilot Studio and learn more about how you can transform your business processes with a custom copilot.
- Learn more about how Copilot for Microsoft 365 can uplevel the productivity of your frontline workforce. Copilot for Microsoft 365 will be available for Frontline licenses in the coming weeks.
We are looking forward to seeing how you transform your frontline workforce with AI.

by Contributed | Mar 14, 2024 | AI, Business, Microsoft 365, Technology
This article is contributed. See the original author and article here.
Continuing our vision for Microsoft Copilot to bring the power of generative AI to everyone across work and life, we’re expanding availability and purchase options for individuals and organizations and bringing new value to Copilot Pro subscribers.
The post Bringing Copilot to more customers worldwide—across life and work appeared first on Microsoft 365 Blog.
Brought to you by Dr. Ware, Microsoft Office 365 Silver Partner, Charleston SC.
by Contributed | Mar 13, 2024 | Technology
This article is contributed. See the original author and article here.
The Microsoft Defender Threat Intelligence (MDTI) team is excited to announce that we are revealing previews for each of our 350+ intel profiles to all Defender XDR customers for the first time. This represents Microsoft’s broadest expansion of threat intelligence content to non-MDTI premium customers yet, adding nearly 340 intel profiles to Defender XDR customers’ view, including over 200 tracked threat actors, tools, and vulnerabilities that Microsoft has not named anywhere else.
We are also revealing the full content for an additional 31 profiles, building on our initial set of 17 profiles released to standard (free) users at Microsoft Ignite. Defender XDR customers now can access 27 full threat actor profiles, including new profiles like Periwinkle Tempest and Purple Typhoon; 13 full tool profiles, such as Qakbot and Cobalt Strike; and eight full vulnerability profiles, including CVE-2021-40444 and CVE-2023-45319.
Note: Profiles in the standard edition will not contain indicators of compromise (IOCs), which are reserved for MDTI premium customers.
Intel Profiles standard edition experience
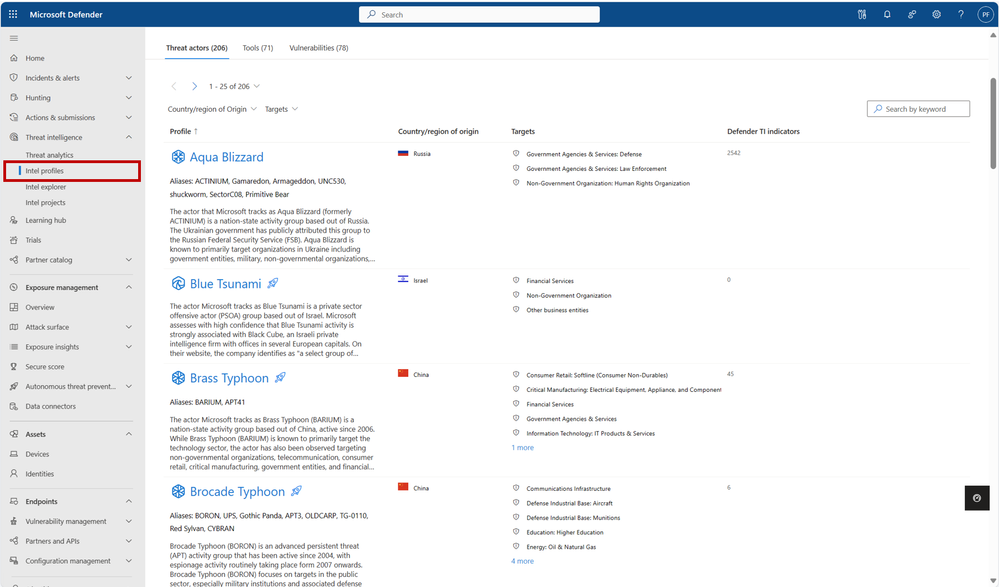
You can visit our more than 350 intel profiles on the “Intel profiles” tab under the “Threat intelligence” blade in the left navigation menu:
350+ intel profiles are now available to all Defender XDR customers via the “Intel profiles” tab under the threat intelligence blade, including information on over 200 threat actors, tools, and vulnerabilities that Microsoft has not mentioned publicly to date.
Currently, our corpus of shareable finished threat intelligence contains 205+ named threat actors, 70+ malicious tools, and 75+ vulnerabilities, with more to be released on a continual basis. To view our full catalog for each of the three profile types – Threat Actors, Tools, and Vulnerabilities – click their respective tab near the top of the page.
In the intel profiles page list view, profiles containing limited information are marked with an  icon. However, don’t let this symbol stop you – each of these profiles contain the same detailed summary (“Snapshot”) written at the start of the content for premium customers. For threat actor profiles, this section often includes a valuable description of the actor’s origins, activities, techniques, and motivations. On tool and vulnerability profiles, these summaries describe the malicious tool or exploit and illustrate its significance, with details from real-world activity by threat actor groups when available. This information enables leaders of threat intelligence and security programs to take an intel-led approach, starting with the threat actors, tools, and vulnerabilities that matter most to their organization and building a robust strategy outward.
Our intel profiles containing full content can be distinguished from the limited profiles in the list view as they do not contain the icon. Full profiles can contain much additional detail beyond a Snapshot, including:
- Real details from past threat actor activity, tool usage, and vulnerability exploits, including phishing templates, malicious attachments, code excerpts and more from actual threat investigations
- Detailed TTPs (tactics, techniques, and procedures) and attack path analyses, based on both past and potential future exploitation attempts, and their corresponding MITRE ATT&CK (Adversarial Tactics, Techniques, and Common Knowledge) techniques
- Detections and Hunting Queries, which list alerts and detections that may indicate the presence of the above threats
- Advanced Hunting queries to identify adversary presence within a customer’s network
- Microsoft Analytic Rules, which result in alerts and incidents to signal detections associated with adversarial activity
- Recommendations to protect your organization against the threat
- And References for more information.
 Full intel profiles contain extensive information on threat actors, tools, and vulnerabilities by leveraging details from actual threat investigations.
To see the full content and IOCs for all intel profiles, start a free trial or upgrade to premium.
Discovering relevant profiles
On the intel profiles page, each of the tabs for the three profile types contains a local search box, enabling you to quickly discover profiles of interest by matching keywords. Additionally, the Threat actors tab enables you to filter for the Country/Region of Origin and Targets (representing Targeted Industries) of actor groups, helping to narrow the list down to the profiles that are most important to your organization:
 Use the filter and search functions to narrow profile lists down to the content that is most relevant to your organization.
With the inclusion of MDTI results in Defender XDR’s global search bar, you also may use this top-level search to discover intel profiles from anywhere in the portal based on keywords. Refer to the linked blog for inspiration on what you can search for and what other MDTI results you can expect.
About intel profiles
Intel profiles are Microsoft’s definitive source of shareable knowledge on tracked threat actors, malicious tools, and vulnerabilities. Written and continuously updated by our dedicated security researchers and threat intelligence experts, intel profiles contain detailed analysis of the biggest threats facing organizations, along with recommendations on how to protect against these threats and IOCs to hunt for these threats within your environment.
As the defender of four of the world’s largest public clouds, Microsoft has unique visibility into the global threat landscape, including the tools, techniques, and vulnerabilities that threat actors are actively using and exploiting to inflict harm. Our team of more than 10,000 dedicated security researchers and engineers is responsible for making sense of more than 65 trillion security signals per day to protect our customers. We then build our findings into highly digestible intel profiles, so high-quality threat intelligence is available where you need it, when you need it, and how you need it.
Just one year after launching intel profiles at Microsoft Secure last year, Microsoft’s repository of shareable threat intelligence knowledge has expanded to over 205 named threat actors, 70 tools, and 75 vulnerabilities, with more added every month.
Next steps
Learn more about what you can do with the standard edition of MDTI in Defender XDR.
We want to hear from you!
Learn more about what else is rolling out at Microsoft Secure 2024, and be sure to join our fast-growing community of security pros and experts to provide product feedback and suggestions and start conversations about how MDTI is helping your team stay on top of threats. With an open dialogue, we can create a safer internet together. Learn more about MDTI and learn how to access the MDTI standard version at no cost.

by Contributed | Mar 12, 2024 | Technology
This article is contributed. See the original author and article here.
In this month’s Empowering.Cloud community update, we cover the latest briefings from MVPs, the Microsoft Teams Monthly Update, updates in the Operator Connect world and upcoming industry events. There’s lots to look forward to!
Troubleshooting your Meeting Room Experience
https://app.empowering.cloud/briefings/329/Troubleshooting-your-Meeting-Room-Experience
Jason Wynn, MVP and Presales Specialist at Carillion, shows us how to get the most out of our meeting room experience, troubleshoot some common issues and explains how and why we’re trying to get all this information together.
- Use of Teams Admin Center, Microsoft Pro Portal and Power BI reports
- Configuration and live information from Microsoft
- Monitoring hardware health and connectivity
- Live environment analysis and troubleshooting
- Network performance and jitter rates
- Call performance analysis and optimisation
Introduction to Frontline Workers in M365

https://app.empowering.cloud/briefings/327/Take-Charge-of-The-Microsoft-Teams-Phone-Experience
MVP Kevin McDonnell introduces us to the topic of M365 for Frontline Workers, including challenges faced by frontline works and how Microsoft 365 can help provide a solution to some of these.
- Challenges faced by Frontline Workers
- Challenges faced by managers and organizers
- Solutions in Microsoft 365 for Frontline Workers include:
- M365 can help boost productivity, improve employee experience and provide personalized information and support for Frontline Workers
Where is My Microsoft 365 Data Stored?

https://app.empowering.cloud/briefings/350/Where-is-my-Microsoft365-Data-Stored
In another one of the latest community briefings, MVP Nikki Chapple tells us all about where our M365 data is stored.
- The importance of knowing where your Microsoft 365 data is stored
- Microsoft 365 data is stored in various locations including user mailboxes, group mailboxes, OneDrive, SharePoint sites and external locations
- The location of data storage may vary depending on user location and compliance requirements
Microsoft Teams Monthly Update – February 2024

https://app.empowering.cloud/briefings/349/Microsoft-Teams-Monthly-Update-February-2024
In this month’s Microsoft Teams monthly update, MVP Tom Arbuthnot gives us the rundown on all the latest Microsoft Teams news, including new certified devices and Shared Calling in TAC.
- Teams and Microsoft Apps on Apple Vision Pro
- Shared Calling now in Teams Admin Center
- Teams 2.1 client cutover coming soon
- Improved Copilot in Teams and in Windows for prompting, chat history and a prompt library
- Microsoft 365 Backup Public Preview with fast restorability and native data format
- Android 9 and Android 10 Device Certificate Extensions
- Pexip bringing a ‘Teams-like experience’ to Cloud Video Interop (CVI)
Microsoft Teams Insider Podcast
Complex Voice Strategies for Global Organizations with Zach Bennett

https://www.teamsinsider.show/2111467/14508325
Zach Bennett, Principal Architect at LoopUp, came along to the Teams Insider Show to discuss Teams Phone options for complex and global organizations.
The Role of AI in Contact Centers and Regulatory Considerations with Philipp Beck

https://www.teamsinsider.show/2111467/14537425-the-role-of-ai-in-contact-centers-and-regulatory-considerations-with-philipp-beck
Philipp Beck, Former CEO and Founder of Luware, and MVP Tom Arbuthnot delve into key developments in the world of Microsoft Teams and Contact Center.
Microsoft Teams Operator Connect Updates
The numbers are continuing to rise in the Microsoft Teams Operator Connect world with there now being 89 operators and 86 countries covered. Will we reach 100 providers or countries first?!
Check out our full Power BI report of all the Operators here:
https://app.empowering.cloud/research/microsoft-teams-operator-connect-providers-comparison
Upcoming Community Events
Teams Fireside Chat – 14th March, 16:00 GMT | Virtual
Hosts: MVP Tom Arbuthnot
Guest Speaker: MVPs and Microsoft speakers LIVE from MVP summit
This month’s Teams Fireside Chat is a special one as Tom Arbuthnot will be hosting live from the MVP Summit at the Microsoft campus in Redmond, where he’ll be joined by other MVPs for an expertise-filled session.
Registration Link: https://events.empowering.cloud/event-details?recordId=recJNyAGoTadbcfMN
Microsoft Teams Devices Ask Me Anything – 18/19th March | Virtual
Microsoft Teams Devices Ask Me Anything is a monthly community which gives you all an update on the important and Microsoft Teams devices news, as well as the chance to ask questions and get them answered by the experts. We have 2 sessions to cover different time zones, so there’s really no excuse not to come along to at least one!
EMEA/NA – 18th March, 16:00 GMT | Virtual
Hosts: MVP Graham Walsh, Michael Tressler, Jimmy Vaughan
Registration Link: https://events.empowering.cloud/event-details?recordId=recnbltzoOt2pQ2wF
APAC – 19th March, 17:30 AEST | Virtual
Hosts: MVP Graham Walsh, Phil Clapham, Andrew Higgs, Justin O’Meara
Registration Link: https://events.empowering.cloud/event-details?recordId=recsMBe3O6J10xSC2
Everything You Need to Know as a Microsoft Teams Service Owner at Enterprise Connect – 25th March | In-Person
Training Session: led by MVP Tom Arbuthnot
Whether you’re in the network team, telecoms team or part of the Microsoft 365 team, MVP Tom Arbuthnot’s training session will help you avoid common pitfalls and boost your success as he takes you through everything you need to know as a Microsoft Teams Service Owner.
Registration Link: https://enterpriseconnect.com/training
Teams Fireside Chat – 11th April, 16:00 GMT | Virtual
Hosts: MVP Tom Arbuthnot
Guest Speaker: Vandana Thomas, Product Leader, Microsoft Teams Phone Mobile
Join other community members as we chat with Microsoft’s Product Leader for Teams Phone Mobile, Vandana Thomas on April’s Teams Fireside Chat. As usual, we’ll open up the floor to discussion to bring along your burning Microsoft Teams questions to get them answered by the experts.
Registration Link: https://events.empowering.cloud/event-details?recordId=recLQiD9PjZbQahog
Comms vNext – 23-24 April | In-Person | Denver, CO
Comms VNext is the only conference in North America dedicated to Microsoft Communications and Collaboration Technologies and aims to bring the community together for an event full of deep technical sessions from experts, an exhibition hall with 40 exhibitors and some great catering too!
Registration Link: https://www.commsvnext.com/
That’s all for this month, so look out for the next update in April with all the news from Enterprise Connect!
by Contributed | Mar 11, 2024 | Technology
This article is contributed. See the original author and article here.
Afua Bruce is a leading public interest technologist, professor, founder and CEO of ANB Advisory, and author of The Tech that Comes Next. Her work spans AI ethics, equitable technology, inclusive data strategies, and STEM opportunities. We were thrilled to welcome her insights and experiences to the keynote stage at the Global Nonprofit Leaders Summit.
In her keynote presentation, Afua explores:
- How nonprofit leaders can use AI to invent a better future, and shares three pillars of leadership: leading people, leading processes, and leading technology.
- Examples of how nonprofits have used AI to improve their hiring, communication, and decision making, and how they have created guidelines and policies for using AI responsibly and ethically.
- Tips on how to get started with AI—such as identifying pain points, exploring available tools, and learning with nonprofit and tech communities.
Afua explored the theme of community-guided innovation in her earlier blog, How nonprofits can manage and lead transformation together, emphasizing that collaboration and connection are critical to how nonprofits meet the challenges and speed of AI transformation.

Recent Comments