Video Transcript:
– Postgres is one of the most popular open-source databases in use today, and with its built-in vector index, plays a vital role in powering natural language generative AI experiences by searching across billions of data points to find similarity matches to support the generation of more accurate responses. But did you know that you can also use Postgres as a managed service on Azure? Today, in fact, as you build generative AI apps, we’re going to explore Azure Database for Postgres flexible server and the unique advantages such as integration with Azure AI services, as well as extensibility and compatibility, integrated enterprise capabilities to protect your data, controls for managing business continuity and more. And to walk us through all this, I’m joined, once again, by Charles Feddersen who leads the product team for Postgres on Azure. Welcome back to the show.
– Thanks for having me back, Jeremy. It’s great to be here.
– And it’s great to have you back on. You know, before we get into this, it’s probably worth explaining how Microsoft’s role is as part of the Postgres community. We’re not just putting an instance of Postgres on Azure, right?
– Yeah, what a lot of people don’t realize actually is Microsoft is a really significant contributor to Postgres, both major contributions in open-source Postgres and the surrounding ecosystem of features. We’ve contributed to many of the features that you’re probably using every day in Postgres, which include optimizations that speed up queries over highly petitioned tables. Or perhaps the single largest contribution we’re making to Postgres is to enable asynchronous and direct I/O for more efficient read and write operations in the database. We’ve learned a lot from running really demanding Postgres workloads in Azure, and this has inspired many of the performance optimizations that we’ve contributed upstream to open-source Postgres, so that everybody benefits.
– So given the pace of innovation then for the open-source community with Postgres, how do we make sure that, on Azure, we’ve got all the features and that they’re compatible with Azure Database for Postgres?
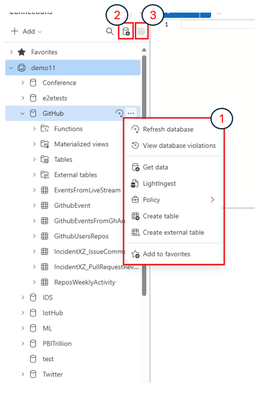
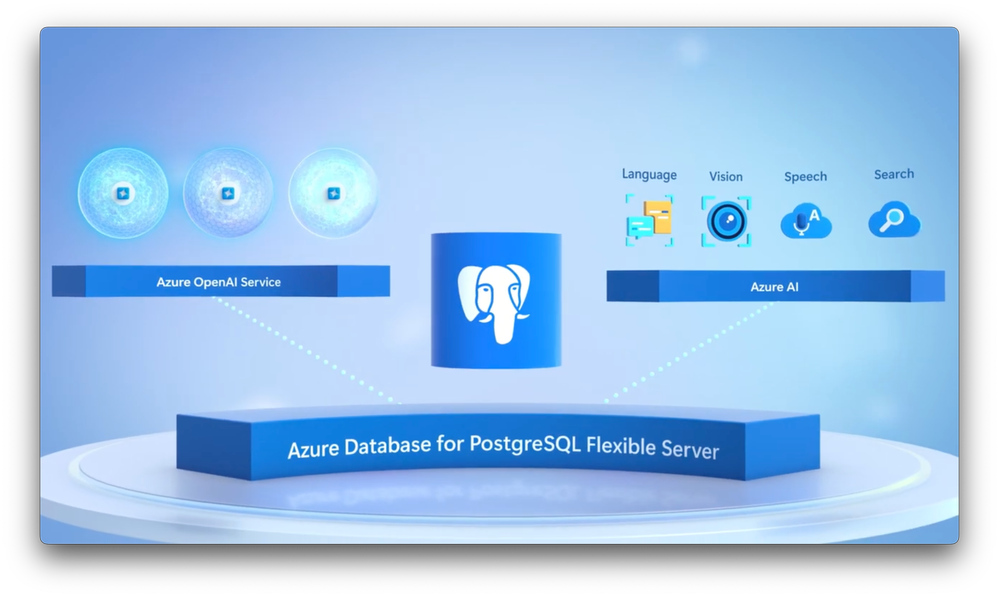
– Well, the first thing I really want to emphasize is that it’s pure open-source Postgres, and that’s by design. And this means you can run normal tools like pgAdmin, as you can see here. And there’s a really high level of compatibility with Postgres throughout the stack. And we ship new major versions of Postgres on Azure within weeks of the community release, which lets you test those latest features really quickly. Flexible service supports over 60 of the most common extensions, including PostGIS for geospatial workloads and Postgres FDW, which allows you to access data in external Postgres service. It also supports a great community-built extension called pgvector that enables Postgres to store index and query embeddings. And last year, we added the Azure AI extension, which provides direct integration between Postgres and the Azure OpenAI Service to generate vector embeddings from your data. And it also enables you to hook into capabilities like sentiment analysis, summarization, language detection and more. In fact, Azure AI support for Postgres is a major advantage of running Postgres on Azure. And this is in addition to several enterprise capabilities, such as built-in support for Microsoft Entra’s identity and access management, as well as broader security controls, like networking over private endpoints to better protect your data in transit, along with Key Vault encryption, using your own keys, including managed hardware security modules, or HSM, and more.
– Right, and this means basically that your Postgres implementation is natively integrated with your security policies for enterprise workloads, but you also mentioned that AI is a major benefit here in terms of Postgres on flexible server in Azure. So can you show us or walk through an example?
– Sure. Let me walk you through one using a travel website where the Azure AI extension has been used to generate vector embeddings for data for the travel site. And this also works for images where we can use the Azure AI Vision service to convert images to text and vectorize that information, all of which is stored in index in Postgres flexible server. And if you’re new to vectors, they’re a coordinate-like way to refer to chunks of data in your database and used for search for semantic matches. So when users submit natural language searches, those two are converted into vector embeddings. And unlike traditional keyword searches, similarity lookups find the closest semantic meaning between the vector embeddings from the user’s prompt and the embeddings stored in the database. Now additionally, the travel website uses Azure OpenAI’s GPT large language model itself to generate natural language responses using the data presented from Postgres as its context. So let’s try this out with a real app. Here’s our travel website and I’m going to book a much needed vacation. So I’ll search for San Diego and I’ve got over 120 accommodation options that I need to scroll through or filter. But now, I’m also traveling with my dog Mabel as well. So I need to find places where she can also stay. I’m going to add, allow small dogs to my search and this is going to use semantic search with embeddings to find suitable accommodations. And now, we’re down to about 90 results. So let’s look at the code to see how this works. Now, to perform the semantic similarity searches, we first need to generate text embeddings stored in a vector type in Postgres. I’ll create a new generator column of type vector and name it lodging_embedding. And this is going to store the text embeddings in our lodgings table that are based on the text descriptions column. Every time a new record is inserted, the Azure AI extension will call the OpenAI embedding model ada-002, pass the description text and return the embedding to stored. So I’ll run that query and now I’ll add an index to this new column to improve query efficiency. This is a special vector index called hnsw. It’s not your regular B-tree. And so I’ll run that and now we can do a test query against the embeddings. So I’ll switch to the vector similarity tab. And this query does a couple of interesting things. If you look at the order by clause, you can see that we’re ordering by the result of the comparison between the lodging_embedding column and the embedding we dynamically created from the search term to find the best result for allow small dogs. Now, we’re also using the PostGIS extension to add geospatial capabilities to find relevant lodging within 30 miles of a point of interest in San Diego. So I’ll run this query and you can see the top six results within 30 miles of a point of interest, ranked in order of the best semantic results for my small dog.
– So I get it, instead of creating another table or database, what you’re showing here is actually that Postgres provides a native type for embedding, so that you can actually incorporate your semantic search into your existing relational SQL workload.
– Exactly, and that’s the power of it. You don’t need a different database to handle embeddings. If you’ve got any existing Postgres apps, adding embeddings and semantic search and flexible server is as easy as adding a column and running a SQL function to call the Azure OpenAI service. So let’s go back to our hotel booking example. We also want to book a room with a beach view. I’ll add that to the search and how this works as I’m going to show you next is really cool. So I’ll head back over to a notebook and I’ve got one of the images from a property listing. Let’s take a look at the notebook cell. I can use the Azure AI Vision service to extract the embeddings from this image. And if I run this, you could see the embedding has been created and I could go ahead and store that in Postgres as well. And if we check our app again, you can see that we’re doing a text search for beach view, which is actually returning property images with a beach visible from the rooms. And the results are further refined with the suitability for my small dog. And as we can see on the left, it’s in the right distance range, within 30 miles of San Diego, which we’ve specified using geospatial in Postgres. And the amazing thing is we do it all with OpenText search, which is infinitely flexible, and not predefined filters. So I don’t need to hunt around for that often-hidden pets allowed filter.
– And the neat thing here is, as you mentioned, all of this is happening at the database layer, because we’ve actually converted all the text and all the images into vector embeddings, as part of data ingest and that’s all using Azure AI services.
– That’s right. That’s exactly right. And next, I’ll show you how you can make the search experience even richer by bringing Azure AI to summarize reviews and measure sentiment on a property. One of the most time-consuming parts of finding a great place to stay is reading the reviews. Here, we can use the Azure AI extension to calculate the sentiment and show a summarization of the reviews using Postgres. This is the output of the Coastal View College, with a 98% favorable sentiment and summary of reviews. So let’s take a look at the code. In this query, you can see we’re calling the azure_cognitive.analyze_sentiment function and passing the review_text that we want to score. I’ll run that and here you can see a positive sentiment of 98% returns. Now I’ll switch to the summary example. It’s a similar query pattern, except this time, we’re using the summarize_abstractive function to summarize the reviews into a small amount of easily-consumable text. So I’ll run this query, and here, you can see that summarized text,
– Right, and what you’ve shown here is more than just using embeddings, but also how the database can leverage other Azure capabilities to improve your app.
– That’s right. I’ve shown SQL queries that are returning results directly from the AI services, but alternatively, you could return those and store them in Postgres to reuse later. It’s really up to you, as a developer, about how you want to architect your app. Flexible server with the Azure AI extension just makes it easy to do it all using SQL. Now let’s move on to text generation, which is another area where we can use the Azure AI extension. I’m back in the website and I’ve selected the Coastal View Cottage for my stay. On the right, I can ask a freeform question about the property, but I’ve got a suggested prompt to look for hidden fees. These always seem to get me. So here, we’re using the Davinci model in the Azure OpenAI service to generate a response and it’s found a hidden fee buried in the fine print. So moving back to VS Code, I’ll run another query with the hidden fees prompt and I’ll capture those results. Now that I have the relevant context from the database, I’ll pass that to the Azure OpenAI Service Completion API and the prebuilt Davinci model to compose a response based on the results I took from the database. And this is how everything works.
– And this is a really great example of harnessing all of the AI capabilities. But something else that’s really important for an enterprise app is high availability and also disaster recovery.
– It is, and flexible server has all of those covered as well. This includes multi-zone high availability with zero data loss, zero redundant backups across regions, and recently we announced the general availability of planned failover, GeoDR. Here’s how you can configure that. I’m going to start in the portal on the Overview blade, and you can see I’ve got the Postgres flexible server called geodr running in the East US 2 region. I’ll scroll down on the left nav panel and head over to Replication where I’ve got two options: here to either create an endpoint, or create a read replica. Let’s create the read replica first. I’ll enter the replica server name and I’ll go create that in Australia Southeast, because that’s pretty much as far from East US 2 as you can get. I’ll click Review and create, and that’s now submitted. So once the replica is created on the other side of the planet, I need to create a virtual endpoint, which gives me a single endpoint for my application, so that when I do fail over, I don’t need to make any application changes to update connection strings. This time, I’ll create an endpoint. I’ll head over to the right panel and give it a name geodrvip, and you can see that the name has been appended to each of the writer and reader endpoint names below. And the reader server is the replica I just created. I’ll hit Create. And now, you can see I’ve got my virtual endpoint. So let’s test the failover using promotion. I’ll click the small Promote icon next to my replica server name. Now I’ve got some options. I can either promote this to the primary server, which means I reverse the roles of my two servers, that the replica becomes the writer, and the current writer becomes the replica. Or alternatively, I can promote this server to Standalone. I can also select if this as Planned, which means all data is synchronized to the replica prior to failover, or Forced, which executes immediately and doesn’t wait for the asynchronous replication to finish. I’ll leave everything as is and I’ll click Promote. And now, once this is finished, my geodr server that was the primary is now the replica under the reader endpoint and geodrausse is now the primary.
– Okay, so now you’ve got all your enterprise-grade data protections in place. You’ve got native vector search support and also GenAI capabilities for your apps, all powered by Postgres flexible server on Azure on the backend. So what’s next?
– So I’ve shown you how Flexible Server is a complete Postgres platform for enterprise and developers, and it’s only going to get better. We’ve got really big plans for the future, so stay tuned.
– So for everyone who’s watching right now, what do you recommend for them to get started?
– So to get started with the Azure Database for Postgres flexible server, go to aka.ms/postgresql, and to stay current with all the updates that we’re constantly shipping, check out our blog at aka.ms/AzurePostgresBlog.
– Thanks so much for joining us today, Charles. Always great to have you on to share all the updates to Postgres. Looking forward to having you back on the show. Of course, keep checking back to Microsoft Mechanics. We’ll see you next time and thanks for watching.


Recent Comments