by Contributed | Jun 28, 2021 | Technology
This article is contributed. See the original author and article here.
Want to participate in a beta exam? We’re looking for Microsoft Dynamics 365 Commerce functional consultants who design, configure, and manage Dynamics 365 Commerce and who provide ongoing support for the app. These candidates have a strong understanding of unified commerce business operations. They may also have experience deploying, using, and maintaining Dynamics 365 Commerce.
If this is your skill set, we have a new certification for you. The Microsoft Certified: Dynamics 365 Commerce Functional Consultant Associate certification validates your expertise in this area and offers you the opportunity to prove your skills. To earn this certification, pass Exam MB-340: Microsoft Dynamics 365 Commerce Functional Consultant, currently in beta.
Ready to prove your skills?
Take advantage of the discounted beta exam offer. The first 300 people who take Exam MB-340 (beta) on or before July 27, 2021, can get 80 percent off market price.
To receive the discount, when you register for the exam and are prompted for payment, use code PjMMB340. This is not a private access code. The seats are offered on a first-come, first-served basis. As noted, you must take the exam on or before July 27, 2021. Please note that this beta exam is not available in Turkey, Pakistan, India, or China.
Get ready to take Exam MB-340 (beta):
- Review the Exam MB-340 (beta) exam page for details. The skills outline document alerts you to key topics covered on the exam.
- Want even more in-depth training? Connect with in your area for in-person training. in your area for in-person training.
- Need other preparation ideas? Check out my blog post, Just How Does One Prepare for Beta Exams?
Did you know that you can take any role-based exam online? Online delivered exams—taken from your home or office—can be less hassle, less stress, and even less worry than traveling to a test center—especially if you’re adequately prepared for what to expect. To find out more, check out my blog post Online proctored exams: What to expect and how to prepare.
The rescore process starts on the day an exam goes live, and final scores for beta exams are released approximately 10 days after that. For details on the timing of beta exam rescoring and results, read my post, Creating high-quality exams: The path from beta to live. For more information, follow me on Twitter (@libertymunson).
Ready to get started?
Remember, the number of spots is limited to the first 300 candidates taking Exam MB-340 (beta) on or before July 27, 2021.
Related announcements
Exciting news at Microsoft Business Applications Summit, May 4 – Microsoft Tech Community
MCSA, MCSD, MCSE certifications retire; with continued investment to role-based certifications
Updating Microsoft Certifications: How we keep them relevant
Finding the right Microsoft Azure certification for you
by Contributed | Jun 28, 2021 | Technology
This article is contributed. See the original author and article here.
Learn interactively how to turn your React app into a Microsoft 365 app with Microsoft Graph Toolkit.
The easiest way to connect your app to Microsoft 365
Using Microsoft Graph Toolkit is the easiest way to connect your app to Microsoft 365. Toolkit’s components help you retrieve relevant data from Microsoft 365 and show it in your app in any way you want. And with toolkit’s authentication providers, setting up auth is a matter of adding a few lines of code. Never again fiddle with setting up a login, handling access tokens, building web requests, and dealing with errors.
Learn Microsoft Graph Toolkit interactively
To help you learn what Microsoft Graph Toolkit has to offer and how you’d use it in your app, we recently released a new learning path on Microsoft Learn. By following a few learn modules you’ll learn everything that you need to know to use the toolkit in your app. But that’s not all.
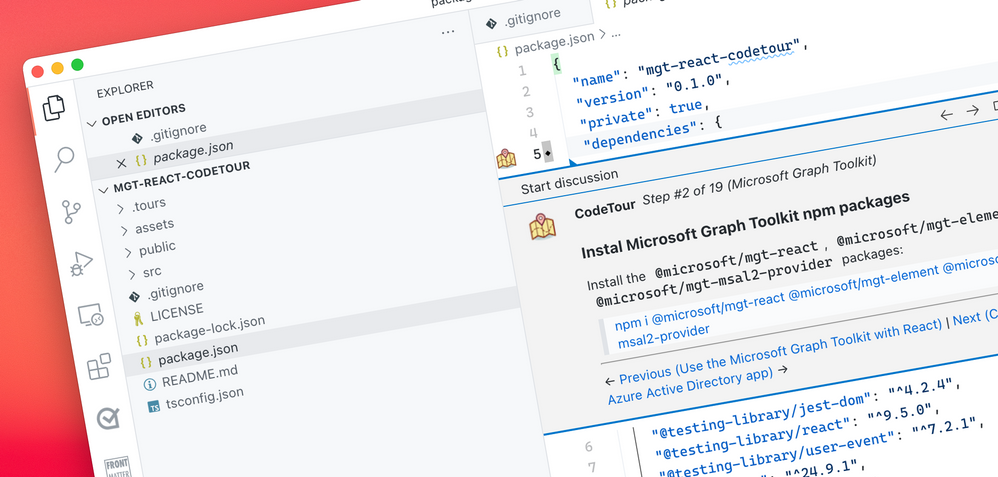
Thinking about the different ways in which people learn, we’ve launched an experiment – an interactive code tour that you can follow to add Microsoft Graph Toolkit to a React app.

By following the instructions in the tour, you gradually extend an empty React app with Microsoft Graph Toolkit turning it into a true Microsoft 365 app. What’s cool about this code tour, is that it puts the code of your app in the center. Rather than reading long-form, you’re in the code and get relevant, and in-place tips for building your app.
The Microsoft Graph Toolkit React code tour is a great way to quickly experience how you’d use the toolkit in a React app. We’d love it if you gave it a try and told us what you think. Shall we consider building tours for other technologies and scenarios?
Try the Microsoft Graph Toolkit React code tour
by Contributed | Jun 28, 2021 | Technology
This article is contributed. See the original author and article here.
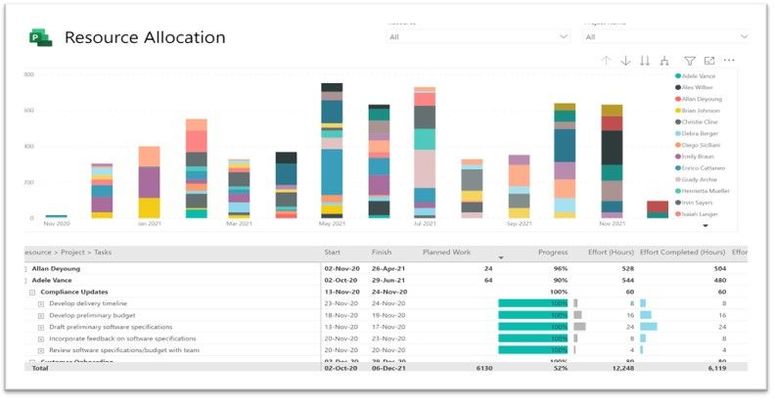
One important function of a resource manager or a project manager is to monitor the assignments for each of their resources so that they can effectively balance their team’s workloads while minimizing overallocation. To efficiently manage the resources and make necessary adjustments, project managers or resource managers need to be able to view their workloads and availability.
The Power BI Report Template for Project for the web provides a solution for powerful and effective resource management. A “Resource Allocation” report page has been added to the Power BI Template. This report can help answer questions such as how much work is allotted to a resource each day, what are the active tasks a resource needs to work on, or what are the future tasks allotted to a resource.
Where can you find the resource allocation report?
You can find the updated report here: aka.ms/ProjectReports
You can also build an allocation report on top of your previously downloaded and customized report pack by following the steps below.
How to build the allocation report?
To build a resource allocation report, you will need resource timephased data. The time phased data is stored in the Resource Assignment table . Follow the steps to get work allocated to a resource for each day:
1. Open your Project for the web Power BI Template in Power BI desktop app
2. Create a new blank query and use the “Resource Assignment Staging” table as the source
3. Remove the columns that are not needed but keep msdyn_bookableresourceid, msdyn_plannedwork, msdyn_projectid, msdyn_resourceassignmentid, msdyn_taskid.

4. Filter out any msdyn_plannedwork rows for non-null values.

5. Transform msdyn_plannedwork column to JSON.

6. Expand the List data in msdyn_plannedwork to new rows and then expand data in the records (End, Hours and Start).

7. Remove the “/Date(“ from the End and Start columns using the Replace Values function.

8. The end and start are milliseconds from midnight 1970/01/01. To convert them into the required date format, add a new custom column to calculate the End and Start date from the milliseconds value.
Planned Work End= #datetime(1970,1,1,0,0,0)+#duration(0,0,0,[PlannedWork.End]/1000)

9. Change the type of new columns to Date.
That’s it, now you can build any visualization on top of this data that you prefer.
Please submit feedback through in-app feedback button on new scenarios you would like in your Power BI Template for Project for the web.
by Contributed | Jun 27, 2021 | Technology
This article is contributed. See the original author and article here.
Configure release pipeline
Earlier we prepared the package for deployment with CI pipeline. Now finally let’s deploy it to the Azure App Service.
Create a Release pipeline
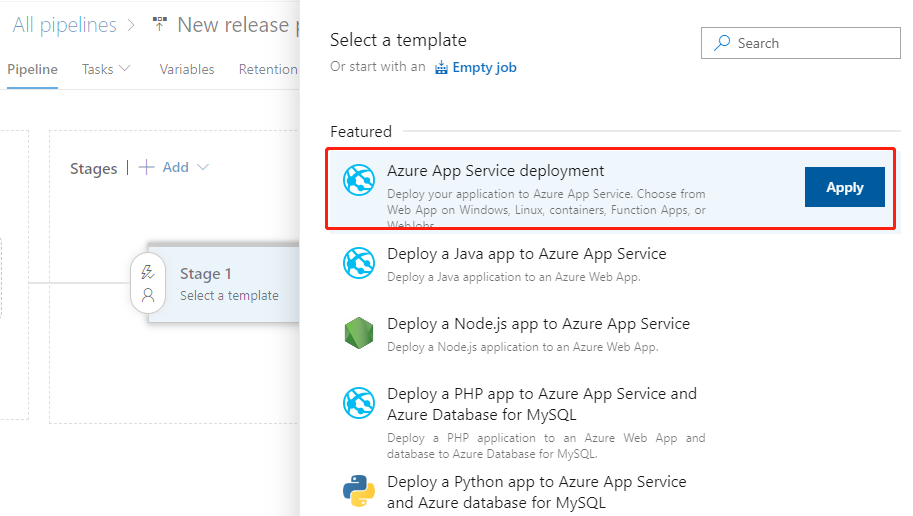
Click Releases in the left navigation menu under Pipelines. In the middle find the New button and click New release pipeline to create a new release pipeline. Open directly to the selection template page.
Let’s select the first Azure App Service deployment and click the Apply button.
Then pop up the Stage float layer.

Click on the upper right corner fork to close it the float layer. Click on the name line and enter a meaningful name.

Then click on the add an artifact button at the bottom left. Add a product.

First select the ASP_Backend that line we had prepared before for Source. Then the program automatically refreshes the lower half of the float layer. We use default values for all items, and click the bottom Add button to complete the addition.
Click the “1 job, 1 task” link to the right to open the configuration float layer for the deployment target. Start by filling out the configuration for the entire phase of Stage 1.

We mainly elect the Azure subscription and the type of App as prompted, and then select the instance we created earlier.
We then find that the Deploy Azure App Service task is ready to use with the default values.

If we click the 3-point button in the lower right corner of the Package or folder, a floating layer pops up to select a specific package file. However, it is recommended to use the default wildcard instead of not a specific file name, which is the most flexible.
Click the Save button in the upper right corner to save it, and then click the Create release button next to it to pop up the floating layer

As you can see, the latest version of the CI pipeline is shown here, and it is recommended that you write some descriptions related to this deployment in Release description for later traceability. Click the Create button at the bottom to create it.

Once the release is created and it is run immediately. And here we can see an animation showing the progress.

Click on Stage 1 and click on the View logs on the right to see the detailed logs in real time for the deployment process below.

When the deployment task is complete, we go back to the console of App Service and find the URL in Overview.
Open this URL with a browser and you’ll see that we’ve deployed a successful website.
by Contributed | Jun 27, 2021 | Technology
This article is contributed. See the original author and article here.
Protecting IoT devices using a Zero Trust approach is a security imperative
Even in the face of significant security challenges organizations continue to rapidly adopt Internet of Things (IoT). They understand IoT adoption is critical to their digital transformation journey and to advancing their business’s interests. This trend is not limited so a single industry and is in fact It’s happening across all industries including automotive, financial, healthcare, retail, energy, agriculture just to name a few.
The scenarios for IoT devices are incredibly diverse ranging from highly sophisticated autonomous vehicles and medical devices that capturing real time data to the most simple sensors such as those that monitor the occupancy of a parking space at a local shopping center. Theis diversity in these scenarios leads to diversity in the devices themselves at the hardware, operating system and application level and also in terms of form factor. Many devices are quite small,and consume littlesmall amounts of power and must be low costs and because of this don’t have the computing power to integrate sophisticated firewalls, antivirus and other security capabilities to protect them. The security challenges are further complicated by the diverse environments these devices are deployed within – ranging from inside factories with physical security measures in place to help protect them to remote locations and public spaces where physical access to device is literally there for anyone which malicious intent to tamper with. IoT devices are exposed in unique ways and offer high-value targets to attackers. Sometimes the IoT devices themselves are of interest to attackers but often times these devices are used as means to gain access to the network they are connected to which may have more interesting targets to attack. All of these factors make securing IoT devices an absolute imperative.
A large majority of our of our customers are familiar with some of these challenges. In fact a recent study conducted by Microsoft found that 97% of security decision makers believe IoT related security is a key concern and they are actively looking for better solutions and approaches securing them. Many of these same organizations are turning to a Zero Trust security approach to address these concerns.
How to implement zero trust in my IoT organization?
Today, there few if any security professionals that are unaware of Zero Trust, nearly every CIO, CTO, or CISO understands the benefits and is now on the journey to learn more about implementation best practices and that solution that can help. Microsoft recently published a Zero Trust for IoT best practice and maturity model that organizations can use to design their own Zero trust roll-out strategy based on their unique business needs. The model principal assumes you must verify any connection in your network before you trust it and then explicitly verify the security status of each identity, endpoint, network, and other resources based on all available signals and data.
How can Azure Defender for IoT help you achieve Zero Trust?
The Azure Defender for IoT provides both agentless and agent based options to help achieve Zero Trust and today we’re are going to focus on the agent based option. With it a Zero Trust model and security controls can be implemented across each of the Zero Trust pillars which identities, network, data and .
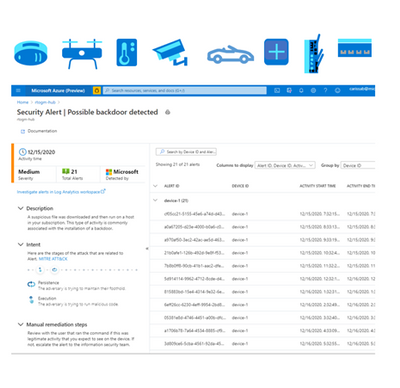
Defender for IoT offers a lightweight security “micro” agent that can be embedded into IoT device, supporting any major IoT Operating system . This agent gives Defender for IoT a much richer set of signals to monitor than can be achieved by using network signals alone. For instance, because agents can monitor the identities, processes, data being used on the device itself our ability to detect malicious and anomalous behaviors is significantly enhanced. With it we have a much better understanding of what is happening, and we can rely a lot less on inference which can lead to false alerts. The agent performs little processing and forwards event data from the device to the Azure Defender for IoT cloud services, for ongoing monitoring of your network, assisting to enforce device compliance to a secure access which helps to prevent attackers from moving laterally across the network
With the ability to perform and compliance assessments on agent based IoT devices Defender for IoT provides you with strong Zero Trust controls. It monitors for invalid configurations and operating system updates on your devices and assesses them against vulnerability assessment standards like those from the Center for Internet Security (CIS). Additionally, Defender for IoT applies behavioral analytics to both device and network telemetry to monitor and quickly detect anomalies and unauthorized activities. For instance, scenarios like:
- Is the device communicating outside of the normal hours?
- Is the device performing unauthorized outbound connections?
and many more can be achieved enabling you to indicate about a potential attack threats running on the device and ultimately take protective actions to improve your IoT security posture.
Azure Defender for IoT can also integrate with Azure Sentinel and even 3rd party SIEM systems giving security operations more comprehensive forensic capabilities and anomaly remediation for a better Zero Trust maturity and control.
We hope you find this information helpful, and we would love to hear from you. join us out community :
Azure Defender for IoT – Microsoft Tech Community
For more information about Azure Defender for IoT check out the following resources:
Azure Defender for IoT | Microsoft Azure Defender for IoT
What is agent-based solution architecture
If you have any suggestions, questions, or comments, please visit us on our discussion form on Microsoft Tech Community

Recent Comments