by Contributed | Jun 29, 2021 | Technology
This article is contributed. See the original author and article here.
Credit and thanks to Alexandru Jercaianu and Vladimir Cernov for implementation work
Over the last year, we have been improving the DNS over HTTPS (DoH) functionality in the Windows DNS client. Now we are pleased to introduce you to the different features now available through the Windows Insider program.
To start with, we want to note that the registry key controls documented in our original DoH testing blog post are no longer applicable. As stated there, those instructions were time limited to the initial DoH test rollout. If you did ever set that key, please delete it then reboot your machine before proceeding with the rest of this blog post.
Next, we will be reviewing the new configuration behavior, how Windows will know if a DNS server supports DoH, and what our next steps are in advancing encrypted DNS discovery.
UI
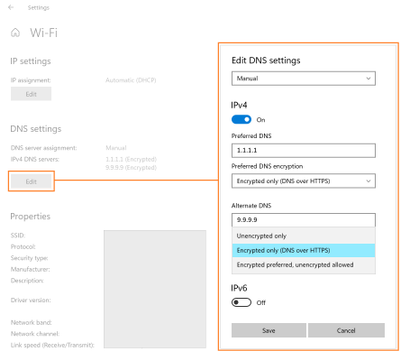
The first control you should try out is the new UI fields in the Settings app, originally announced on the Insider blog. When Windows knows a given DNS server’s IP address has a corresponding DoH server, it will unlock a dropdown that lets you decide whether to require encryption always be used, use encryption but fall back to plain-text DNS when encryption fails, or not to use encryption (the default value).
GPO
For enterprise administrators, we have provided a new GPO for controlling DoH behavior. This will allow the use of DoH to be allowed, required, or prohibited system-wide.
- Allowed will defer the use of DoH to local settings available in the UI per network adapter.
- Required will prevent the use of configured DNS servers if they do not support DoH and will disable fallback to plain-text DNS.
- Prohibited will prevent any local DoH settings from taking effect, ensuring Windows functions as it did before the DoH client using plain-text DNS only.

NRPT
The Name Resolution Policy Table (NRPT) allows administrators to specify rules for name resolution by namespace. For example, you can create an NRPT rule that specifies all queries for “*.microsoft.com” must be sent to a specific DNS server.
If Windows knows that a DNS server provided in an NRPT rule supports DoH (see the next section for how this works), then the traffic affected by the NRPT rule will inherit the benefits of using DoH. This allows admins who want to use DoH for some namespaces and not others to configure that behavior.
Knowing a server supports DoH
All these mechanisms rely on Windows already knowing a given DNS server IP address supports DoH. We ship a few definitions of known DoH servers in Windows:
Server Owner
|
Server IP addresses
|
Cloudflare
|
1.1.1.1
1.0.0.1
2606:4700:4700::1111
2606:4700:4700::1001
|
Google
|
8.8.8.8
8.8.4.4
2001:4860:4860::8888
2001:4860:4860::8844
|
Quad9
|
9.9.9.9
149.112.112.112
2620:fe::fe
2620:fe::fe:9
|
Other definitions need to be added using the netsh command. To start with, you can check to see what DoH server definitions we already know by retrieving them:
Using netsh
netsh dns show encryption
Using PowerShell
Get-DnsClientDohServerAddress
Then you can add another server definition to the list and ensure it never falls back to plain-text DNS:
Using netsh
netsh dns add encryption server=<resolver-IP-address> dohtemplate=<resolver-DoH-template> autoupgrade=yes udpfallback=no
Using PowerShell
Add-DnsClientDohServerAddress -ServerAddress ‘<resolver-IP-address>’ -DohTemplate ‘<resolver-DoH-template>’ -AllowFallbackToUdp $False -AutoUpgrade $True
If you prefer to allow fallback so that when encryption fails you can still make DNS queries, you can run the same commands with the fallback flag toggled to add a new server:
Using netsh
netsh dns add encryption server=<resolver-IP-address> dohtemplate=<resolver-DoH-template> autoupgrade=yes udpfallback=yes
Using PowerShell
Add-DnsClientDohServerAddress -ServerAddress ‘<resolver-IP-address>’ -DohTemplate ‘<resolver-DoH-template>’ -AllowFallbackToUdp $True -AutoUpgrade $True
The `-AutoUpgrade` and `-AllowFallbackToUdp` flags together represent the values present in the Setting app per-server dropdown. If for some reason you want to add these DoH server definitions but leave them to use unencrypted DNS for now, you can set the `-AutoUpgrade` flag to false instead of true as in the examples above.
If you want to edit an existing list entry rather than adding a new one, you can use the `Set-DnsClientDohServerAddress` cmdlet in place of the `Add-DnsClientDohServerAddress` cmdlet.
It would be easier for users and administrators if we allowed a DoH server to have its IP address determined by resolving its domain name. However, we have chosen not to allow that. Supporting this would mean that before a DoH connection could we established, we would have to first send a plain-text DNS query to bootstrap it. This means a node on the network path could maliciously modify or block the DoH server name query. Right now, the only way we can avoid this is to have Windows know in advance the mapping between IP addresses and DoH templates.
Coming up next
Going forward, we want to be able to directly discover DoH server configuration from the DNS server. This would mean DoH servers could be used without having to include it in Windows or manually configure the IP address to DoH template mapping. We are currently contributing to two proposals in the IETF ADD WG to enable this: Discovery of Designated Resolvers (DDR) and Discovery of Network-designated Resolvers (DNR). We look forward to updating you with our first tests in supporting DoH discovery!
by Contributed | Jun 29, 2021 | Technology
This article is contributed. See the original author and article here.
Updates to SQL Server, Reporting Services, and Analysis Services Management Packs are available (7.0.32.0). We also released an update to SQL Server Dashboards MP. You can download the MPs from the links below. Majority of the changes are based on your direct feedback. Thank you.
Microsoft System Center Management Pack for SQL Server
Microsoft System Center Management Pack for SQL Server Reporting Services
Microsoft System Center Management Pack for SQL Server Analysis Services
Microsoft System Center Management Pack for SQL Server Dashboards
Another change we’ve done recently is to move operations guides for all SQL Server family of management packs from download center to docs.microsoft.com. This unifies the content viewing experience for the user as the rest of the SCOM and SQL Server documentation is already there. Further more, it allows us to present you with the most up to date and accurate content online. The link to the operation guide for each MP can be found on the MP download page. Here are the links that show what’s new in these MPs:
Features and Enhancements in Management Pack for SQL Server
Features and Enhancements in Management Pack for SQL Server Analysis Services
Features and Enhancements in Management Pack for SQL Server Reporting Services
by Contributed | Jun 29, 2021 | Technology
This article is contributed. See the original author and article here.
Introduction
In this article, we will see a step-by-step implementation of how to break and change list item permission using Power Automate. and for this, we will use REST API.
Implementation
Create a SharePoint List
Create a Power Automate – We will create an Automated Cloud Flow
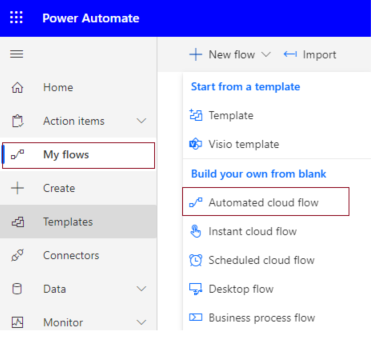
1. Go to Power Automate > My flows > Click on New flow > Select Automated Cloud Flow
2. It will ask for the flow name and trigger.
Add flow name and choose a trigger when an item is created.

3. Click on Cerate.
4. Now set Site name and list name in when an item is created in list action.

For all API Calling, we will use Send an HTTP request to SharePoint action.
5. Now we will call REST API to break role inheritance.
Set all properties as below.
Site Address |
Select Site Name from Dropdown |
Method |
POST |
Uri |
_api/lists/getByTitle(‘ListTitle’)/items(ID)/breakroleinheritance(copyRoleAssignments=false,clearSubscopes=true) |
Headers |
{
“Accept”: “application/json”,
“Content-type”: “application/json”
} |

6. Now we will set new permission so for that we need a user id to whom we have to give permission and need a role definition ID.
User ID: You can directly use User ID if you have or if you have a user name or login name then we have to find user id from the particular user so for that we will call REST API.
Role definition ID: You can use id based on permission.
Role Definition Name |
Role Definition Id |
Limited Access |
1073741825 |
View Only |
1073741924 |
Design |
1073741828 |
Edit |
1073741830 |
Contribute |
1073741827 |
Read |
1073741826 |
Full Control |
1073741829 |
1. Create a variable and set User Title or if you have any list column then you can use it.

2. Call API to get a user ID and filter it by the above-declared user name.

It will return an object as below,
{
  "d": {
    "results": [
      {
        "__metadata": {
          "id": "https://sitename.sharepoint.com/_api/Web/GetUserById(2)",
          "uri": "https://sitename.sharepoint.com/_api/Web/GetUserById(2)",
          "type": "SP.User"
        },
        "Id": 2,
        "Title": "Chandani Prajapati"
      }
    ]
  }
}
Now we want to use the only id from this so we will use an expression as below,
outputs(‘Send_an_HTTP_request_to_SharePoint_-_Get_user_id’)?[‘body’][‘d’][‘results’]?[0][‘Id’]
And we will set it in a variable called UserId.

3. Now we will set contribute permission for the above UserId.

Now we can test the flow.
Output
We can see contribute permission for an item as below,

Summary
In this article, we have seen how to break and change list item permission using power automate.
Hope this helps!
Sharing is caring!
by Contributed | Jun 29, 2021 | Technology
This article is contributed. See the original author and article here.
Windows Package Manager was announced at Build 2020 and has been in preview since. At Build 2021 the team announced version 1.0, you can see the Roadmap journey the team have been on over the past year and where they are heading here.
Now if you’ve never heard of Windows Package Manager before then in simplistic form it’s a tool that will help you manage the software/package/applications on your machine. It can help you install them, update them, and uninstall them. And a whole lot more. It’s an open-source project that the Microsoft team are excited to work on with the community.
What I want to do today is talk to you about how YOU can help the project.
The Windows Package Manager can help you install over 1,400+ packages or pieces of software onto your machine. If you install the Windows Package Manager and issue the command winget search <SomePackage> you will see what packages are available to install. This is where you can help. By growing that list. And today I want to talk to you about the best practices you should follow when submitting a new package into the Windows Package Manager repository.
Windows Package Manager Manifest Creator Preview
At Build 2021 the team launched another open-source tool, the Windows Package Manager Manifest Creator. This new tool will help you build out the manifest file that is needed to be able to install package or application via Windows Package Manager.
The Windows Package Manager Manifest Creator can be installed on your machine via the Windows Package Manager using the command winget install wingetcreate
Getting Involved
If you’ve ran the winget search <somepackage> command and not found the package or piece of software that you want to install, then you can help to add it to the repository to help you and others in the future.
First, you need to check the following things:
– GitHub account
– Windows Package Manager currently supports installers in the following formats: MSIX, MSI, and EXE, if the piece of software you want to install doesn’t have one of those kinds of installers it can’t be added to the repository.
– If the software comes in MSIX, MSI or EXE format it’s worth checking to see if someone else has already submitted it for consideration, you can do that by checking the current Pull Requests being worked on within the Community Repository
– If the software comes in MSIX, MSI or EXE format and someone else hasn’t already submitted it you need to make sure you have both the Windows Package Manager and Windows Package Manager Manifest Creator installed on your machine.
Now that checklist has been completed, it’s time to start to build the manifest needed.
You can start from scratch at creating your own manifest files, however there is a tool that can help you with the process that can make the whole process a lot easier.
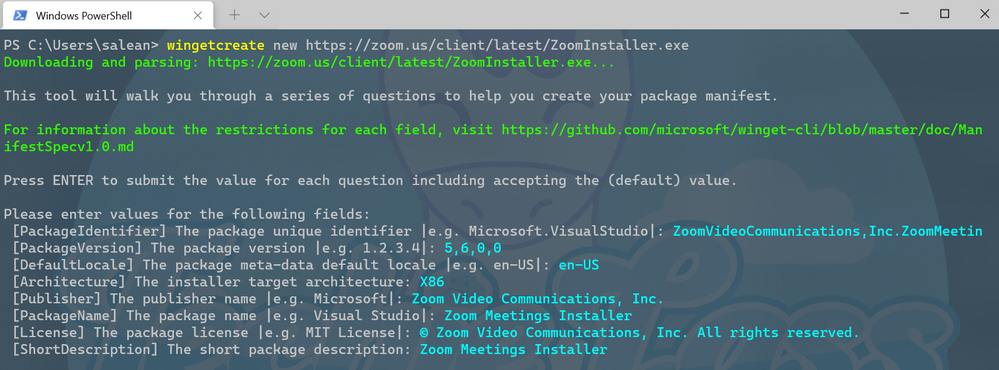
To kick start you should enter the command wingetcreate new
The tool will prompt you for the URL of the software package, this should be a publicly accessible URL and not something that is stored on your OneDrive or the like. The tool will start to query the file and pull some information out. It will start by suggesting a package identifier, package version, default language, the architecture the package will install on (think x86, x64, etc), publisher name, package name, package license and a description for the package. All this information helps people find and install the software.
WingetCreate example wizard
Custom Silent Switches
If the piece of software, you are trying to package up requires a bespoke install switch to make it install silently without any user input you can configure that within the installer.yaml file.
If we take the VMware Workstation Player as an example, we can see within its installer.yaml file it has a couple of configuration lines:
**Screenshot https://github.com/microsoft/winget-pkgs/blob/master/manifests/v/VMware/WorkstationPlayer/16.1.2/VMware.WorkstationPlayer.installer.yaml**
Tags
Another thing that can be done when submitting is adding in tags in your manifest files. Tags will help packages/software be found when folks are searching through the winget search command.
 Searching for anything that relates to audio
 Tags inside the VLC manifest file
These tags help expand the search results beyond the software maker or name of the software.
Validating and Testing
Now that you’ve setup the manifest files it’s time to validate them and test they work as they should before you are ready to submit to the repository.
The first thing to do is validate the manifest files, it will check the syntax and configures it confirms to the standards that it should. If you’ve went through the wingetcreate new process and made no manual changes to the files, then it should pass validation. However, if you have made some manual changes then there might be changes you need to make to pass the validation test.
The command to use to validate your manifest is winget validate –manifest <manifest path>
The path to your manifest file will vary depending on your setup, however it should have been displayed to you at the end of the wingetcreate process.
Once you’ve had the output from the validate command and everything is okay, you can now move on to testing the manifest installs the package/piece of software that you’ve set it up to do. You might have to test this on a separate machine or uninstall the software if you already have it installed to test this properly.
The command you need to use is winget install –manifest <manifest path>
Hopefully, this will go through without any issue and install the software as it should. If there are any issues, then you will need to look at resolving them and going through the process again until it works as expected.
Submitting the manifest
Now the manifest is validated and tested it’s time to submit your contribution to the Microsoft team to check and merge into the repository for the rest of the community to take advantage of.
The first thing to do is set up a Token, that is a GitHub personal access token that can help avoid you having to put your password into the command line for authentication to GitHub. If you haven’t set up a token before you can use this great guide from the GitHub team – Creating a personal access token.
Once you have the token you need to store it into your command line tool for winget to use, you do this by issue wingetcreate –store <token>
You are now ready to submit your creation to the Microsoft team for review. To do this you should issue the command wingetcreate submit <path to manifest>
This will create a repository store within you GitHub profile and then create a pull request on the Windows Package Manager repository.
When that command is complete, it will open a browser session to the pull request (PR). Here you will be asked to complete a checklist.

It will also start to kick off some automated tests, validating the manifest and testing it does what it should do. You can close your browser and check on this later, or you can watch it update its progress.
If any issues are detected you will have to address them, otherwise someone from the Windows Package Manager will check over the submission and either approve or give feedback on improvements.
The team do have some SLA’s that they are working on to ensure that your submissions are reviewed within a timely manner.
Call to Action
So, your call to action is look at Windows Package Manager, see if any of your favourite pieces of software aren’t there and get packaging!

by Contributed | Jun 28, 2021 | Technology
This article is contributed. See the original author and article here.
“I don’t have enough relevant data for my project”! Nearly every data scientist has uttered this sentence at least once. When developing robust machine learning models, we typically require a large amount of high-quality data. Obtaining such data and more so, labelled or annotated data can be time-consuming, tedious and expensive if we have to rely on experts. Hence, there is a compelling need to generate data for modelling using an automated or a semi-automated way. Specifically, in this work, we explore how we can utilize Open AI’s Generative Pre-trained Transformer 3 (GPT-3) for generating data to build models for identifying how credible news articles are.
GPT-3
GPT-3 is a language model that leverages deep learning to generate human-like text. GPT-3 was introduced by Open AI in May 2020 as a successor to their previous language model (LM) GPT-2. It is considered to be better than GPT-2. In fact, with around 175 billion trainable parameters, OpenAI GPT-3’s full version is one of the largest models trained so far.
Fake News Generation
In this blog post, we discuss the collaborative work between Microsoft’s ACE team and the Dataclair AI lab of O2 Czech Republic, where the goal is to identify fake news. Fake news is defined as a made-up story with an intention to deceive or to mislead. The general motive to spread such news is to mislead the readers, damage the reputation of any entity, or gain from sensationalism. The creation of a dataset for identifying credible news requires skilled annotators and moreover, the task of comparing proposed news articles with the original news articles itself is a daunting task as it’s highly subjective and opinionated. This is where the recent advances in natural language modelling and those in text generation capabilities can come to the rescue. We explore how new language models such as GPT-3 can help by generating new data.
We generate fake news data using GPT-3 by providing prompts that contain a few sample fake news articles in the Czech language. Doing something like this would have been unthinkable a few years ago, but the massive advancement of text generation through language models opened doors to such experiments. As the research paper describing GPT-3 shows, GPT-3 is very good at generating news articles of high quality that even humans are not capable of detecting as computer-generated:
The plot also shows how text generating models improved via having access to more parameters. GPT-3 is the furthest to the right and the plot conveys how accurately people were able to recognize generated articles from those written by humans.
Prompt Engineering
“Prompts” are a way to get the model to produce text by specifying an instruction in natural language and showing some demonstrations of how to follow the instructions well. GPT-3 has an incredible capacity to mimic writing styles. When the prompt is set up correctly, GPT-3 adheres to the example just enough to copy those underlying elements (for example: includes or excludes citations, etc.) and introduce a new twist to the generated text. It is even capable of creating its own complex arguments. Thus, it is not just a replication of pre-existing data, but a creation of new and original articles from which the model can learn.
An example of a prompt and parameters used to generate fake news are as follows in bold. The generated text is in italics.
Generate a news article based on the headline and with the same style of writing as given in the example.
Headline: Where do leftist extremists get the audacity to speak for the nation?
Text:
My fellow Czechs, we must shake off the shame that the USA, Brussels and other countries have been forced on us with the help of our own “experts” and “journalists”. The same people who are now digging into our nation with the help of a genuine community of the USA and Brussels – the Pekarová and other forces…
Parameters:
Temperature: 0.7, Max tokens: 1000, Top p: 1, Frequency penalty: 0, Presence penalty 0
From these parameters, the most important ones are temperature and max tokens. Temperature controls randomness in the text. Therefore, a temperature of 0.7 was chosen to produce less deterministic results that still follow the structure and writing style of the example. Max token value was set to 1000 tokens (~4000 characters) because this is the average length of a news article. It should be noted that when working with GPT-3, the process of finding the right parameters is about experimentation.
Admittedly, there are still challenges to deal with. One of them is the need to manually inspect if GPT-3 returns articles that are relevant and in the right credibility category. Due to the sensitivity of the topic of article credibility, data quality checks will need to be implemented. Another minor limitation is that while GPT-3 understands many articles that it has been trained on, it has problems when analysing newer topics. For example, it is unable to fully grasp the significance of COVID-19 and it usually avoids writing about it due to not having enough knowledge about the global pandemic. Thus, it generates less realistic articles when faced with such a topic.
Nevertheless, if those obstacles are kept in mind, GPT-3 can help make dataset creation faster and more reliable. This is something that the O2 CZ team plans to utilize for their disinformation recognition AI model. “Our model extracts different features (aggressivity, clickbait etc.) from the article via smaller extraction modules. Those features are then evaluated by the deep learning classification module and subsequently transformed into one number by the ensemble method. For the system to work, we need as many articles as possible for training the classification module, which we hope to obtain with the help of GPT-3,” described by Filip Trhlik, a Data Scientist at the Dataclair AI lab.

Disinformation recognition AI model diagram
In conclusion, artificially generating new data is a very exciting use case of language models and even though the data generated requires a small amount of manual inspection, it is very beneficial for downstream modelling tasks. The ability to generate a large amount of synthetic data in a short time is very promising.

Recent Comments