by Contributed | Aug 16, 2024 | Technology
This article is contributed. See the original author and article here.
Sejam bem-vindos a primeira edição da Comunidade do Azure Static Web Apps! Todo mês, nós compartilharemos os conteúdos que a Comunidade Técnica criou, seja em formato de artigos, vídeos, podcasts que falam sobre o Azure Static Web Apps.
Quer ter o seu conteúdo compartilhado no TechCommunity no #ThisMonthInAzureStaticWebApps? Veja como!
1 – Crie um artigo, vídeo, podcast ou até mesmo algum projeto Open Source que fale ou tenha relação com o Azure Static Web Apps.
2 – Compartilhe o seu conteúdo no Twitter, LinkedIn ou Instagram com a hashtag #AzureStaticWebApps
3 – Compartilhe também no nosso repositório oficial do Azure Static Web Apps no GitHub, na aba Discussions. Lá você encontrar um tópico chamado: This Month In Azure Static Web Apps. Compartilhe o link do seu conteúdo lá de acordo com o mês que você deseja que ele seja compartilhado.
4 – Pronto! Nós iremos compartilhar o seu conteúdo no TechCommunity da Microsoft no mês seguinte!

Independente do idioma que você escreva, seja em português, inglês, espanhol, francês, alemão, entre outros, nós queremos compartilhar o seu conteúdo!
Também se você estiver o Azure Static Web Apps com algum outro serviço ou Tecnologia, fique à vontade para compartilhar o seu conteúdo. Difere também da linguagem de programação que você está utilizando. Seja JavaScript, TypeScript, Python, Java, C#, Go, Rust, entre outras, nós queremos compartilhar o seu conteúdo!
Outro detalhe: você não precisa ser um especialista no Azure Static Web Apps para compartilhar o seu conteúdo. Se você está aprendendo sobre o serviço e quer compartilhar a sua jornada, fique à vontade para compartilhar o seu conteúdo!
Agora, vamos para os conteúdos do mês de Julho!
Agradecimentos!
Antes de começar a compartilhar os conteúdos, gostaríamos de agradecer a todas as pessoas que compartilharam os seus conteúdos no mês de Julho! Vocês são incríveis!
Conteúdos Compartilhados | Julho 2024
Agora vamos para os conteúdos compartilhados no mês de Julho de 2024!
Adding an API to an Azure hosted React Static Web App

O artigo explica como adicionar uma API a um aplicativo React Static Web App hospedado no Azure, configurando um ambiente de desenvolvimento com SWA CLI e VS Code, criando uma função HTTP em C#, e integrando a API ao app React para exibir dados no site.
Quer aprender a conectar seu aplicativo React a uma API no Azure? Leia o artigo completo e descubra como adicionar funcionalidades dinâmicas ao seu projeto.
Link: Adding an API to an Azure hosted React Static Web App
Hosting Next.JS Static Websites on Azure Static Web App

O artigo explica como hospedar sites estáticos criados com Next.js usando Azure Static Web Apps, abordando desde a configuração do repositório GitHub até a implantação contínua na Azure. É uma solução ideal para desenvolvedores que buscam simplicidade, segurança e escalabilidade em seus sites.
Quer aprender como hospedar seu site Next.js de forma simples e eficiente na Azure? Leia o artigo completo e descubra como aproveitar os recursos do Azure Static Web Apps!
Link: Hosting Next.JS Static Websites on Azure Static Web App
How to Deploy a React PWA to Azure Static Web Apps

Este artigo ensina como implementar e automatizar o processo de deploy de uma aplicação React PWA para o Azure Static Web Apps usando GitHub Actions e Azure DevOps, além de gerar os recursos necessários com Bicep.
Quer aprender a simplificar o deploy de suas aplicações React PWA? Leia o artigo completo e descubra como automatizar tudo usando GitHub Actions e Azure DevOps!
Link: How to Deploy a React PWA to Azure Static Web Apps
Azure Static Web App: Seamless Microsoft Entra (Azure AD) Integration with Angular
- Autor: Sparrow Note YouTube Channel | Althaf Moideen Konnola
Este vídeo ensina como integrar Microsoft Entra (Azure AD) com uma Azure Static Web App usando Angular, incluindo configuração de SSO, registro de aplicação e exibição de informações do usuário.
Quer aprender a integrar autenticação com Microsoft Entra em suas aplicações Angular? Assista agora e domine essa integração essencial para uma experiência de login unificada!
Link: Azure Static Web App: Seamless Microsoft Entra (Azure AD) Integration with Angular
Trimble Connect Workspace API 007 – Deployment
- Autor: LetsConstructIT YouTube Channel
O vídeo demonstra como implantar uma aplicação local na nuvem usando Azure Static Web Apps, tornando-a acessível na web e integrada ao Trimble Connect, incluindo a configuração de extensões personalizadas.
Quer aprender a implantar suas aplicações na nuvem de forma simples e integrada com Trimble Connect? Assista ao vídeo completo e descubra como!
Link: Trimble Connect Workspace API 007 – Deployment
Blazor WASM Publishing to Azure Static Web Apps
- Autor: Abdul Rahman | Regina Sharon

O artigo ensina como publicar aplicações Blazor WebAssembly (WASM) no Azure Static Web Apps, cobrindo desde a configuração inicial do projeto até a resolução de problemas comuns, como o erro 404 em atualizações de página. Ele também explica como personalizar o processo de build e configurar domínios personalizados.
Quer aprender a publicar suas aplicações Blazor WASM no Azure de forma simples e eficaz? Leia o artigo completo e descubra como configurar tudo passo a passo, garantindo que sua aplicação funcione perfeitamente!
Link: Blazor WASM Publishing to Azure Static Web Apps
Azure Static Web Apps Community Standup: Create a RAG App with App Spaces
- Autor: Skyler Hartle | Dheeraj Bandaru
O vídeo apresenta o App Spaces, uma nova ferramenta do Azure que simplifica a criação e o gerenciamento de aplicativos inteligentes, especialmente ao integrar Azure Static Web Apps e Azure Container Apps. Durante a sessão, é demonstrado como criar e implantar um aplicativo de Recuperação Aumentada por Geração (RAG), utilizando uma interface simples que conecta repositórios do GitHub e automatiza o processo de CI/CD.
Descubra como simplificar a criação de aplicativos inteligentes com o Azure App Spaces! Assista ao vídeo completo e aprenda a implantar rapidamente um aplicativo RAG em minutos. Não perca essa oportunidade de elevar suas habilidades de desenvolvimento na nuvem!
Link: Azure Static Web Apps Community Standup: Create a RAG App with App Spaces
Serverless Single Page Application (Vue.js) mit Azure Static Web Apps
- Autor: Florian Lenz
- Idioma: Alemão
Este artigo mostra como criar e implantar uma aplicação de página única (SPA) usando Vue.js e Azure Static Web Apps. Ele guia o leitor desde a criação do projeto até a adição de um backend serverless com Azure Functions, destacando a facilidade de uso e as vantagens do modelo serverless para aplicações full-stack.
Quer aprender a implantar sua aplicação Vue.js na nuvem com Azure Static Web Apps e aproveitar os benefícios do serverless? Leia o artigo completo e descubra como criar e gerenciar uma aplicação full-stack de forma simples e eficiente!
Link: Serverless Single Page Application (Vue.js) mit Azure Static Web Apps
Conclusão
Se você deseja ser destaque no próximo artigo do #ThisMonthInAzureStaticWebApps, compartilhe o seu conteúdo nas redes sociais com a hashtag #AzureStaticWebApps e também no nosso repositório oficial no GitHub. Estamos ansiosos para compartilhar o seu conteúdo no próximo mês!
Lembrando que você não precisa ser um especialista no Azure Static Web Apps para compartilhar o seu conteúdo. Se você está aprendendo sobre o serviço e quer compartilhar a sua jornada, fique à vontade para compartilhar o seu conteúdo!
Até a próxima edição! 
by Contributed | Aug 16, 2024 | Technology
This article is contributed. See the original author and article here.
What are Dev Containers?
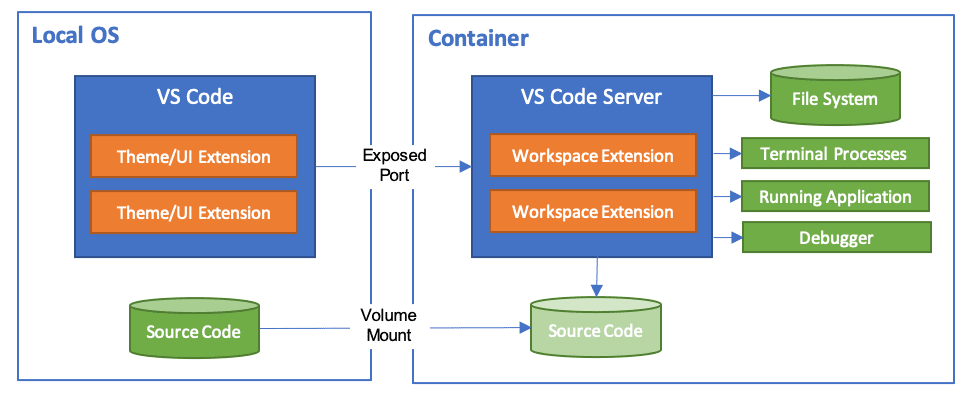
A development container essentially packages up your project’s development environment using the Development Container Specification (devcontainer.json). This specification enriches your container with metadata and content necessary to enable development from inside a container.
Workspace files are mounted from the local file system or copied or cloned into the container. Extensions are installed and run inside the container, where they have full access to the tools, platform, and file system. This means that you can seamlessly switch your entire development environment just by connecting to a different container.
Dev Container Templates are source files packaged together that encode configuration for a complete development environment, while Dev Container Features allow us to add runtimes, tools, and libraries inside a container. As a result, all this put together ensures a consistent and reproducible development environment from any tool that supports the Development Container Specification.
When you open your project in the dev container, your code will just work without downloading anything on your local machine. Furthermore, the best part is that when connected to a dev container, your developer experience is exactly the same as if you opened the project locally in VS Code.
Introducing Dev Container Templates for Azure SQL Database
We are excited to introduce new Dev Container templates specifically designed for Azure SQL Database. These templates support multiple programming languages, including .NET 8, .NET Aspire, Python, and Node.js, making it easier for developers to get started quickly and focus on building their applications.
Dev Containers streamline the development process by providing an out-of-the-box environment configured for Azure SQL Database. This eliminates the need for developers to spend time searching for and setting up VS Code extensions to interact with their database and preferred programming language. With these templates, you can dive straight into coding, boosting productivity and reducing setup friction.

Included with the templates is a pre-built demo database called Library, which serves as a practical example to help developers get started quickly. While these Dev Containers use the Azure SQL Edge container image, which offers a surface area close to Azure SQL Database, using SQL Database Projects ensures that your database code remains compatible with Azure SQL Database. With this demo project, you can easily use the dacpac artifact created by SQL Database Projects and deploy it to Azure SQL Database using the Azure SQL Action for GitHub Actions. This process streamlines your workflow and ensures seamless integration with your production environment.
Whether working locally or in the cloud, dev containers ensure consistency across development environments, making it easier to collaborate and maintain high standards across your team. With the inclusion of essential tools like SQLCMD, SqlPackage, Azure Command-Line Interface (CLI) and Azure Developer CLI (AZD), these templates offer a comprehensive solution for enhancing your development workflow with Azure SQL Database.
Benefits of Using Dev Containers
Dev Containers ensure a consistent and seamless experience, promoting smooth collaboration across teams and workflows, and facilitating an easy transition to Azure environments. Key benefits include:
- Preconfigured environments: These come with all necessary tools and dependencies.
- Consistency: Maintain uniformity across different development setups.
- Simplified setup: Reduce time spent on configuration.
- Enhanced collaboration: Improve teamwork within development teams.
- Seamless transition to Azure: Leverage the scalability and reliability of Azure SQL Database for production deployments.
- Accelerated time-to-market: Streamline development workflows and integrate seamlessly with existing toolsets, giving businesses a competitive edge.
- Cost-efficient development: Reduce dependencies on cloud resources during the development and testing phases.
By using dev containers, developers can avoid the hassle of setting up and configuring their local development environment manually.
Prerequisites
Before you begin, make sure you have the following tools installed on your local machine:
To set up your environment, follow these steps:
- First, ensure you have Git installed for version control.
- Then, install Docker, which is necessary for running containers.
- After that, download and install Visual Studio Code, as it will be your primary IDE for using Dev Containers.
- Lastly, add the Dev Containers extension to Visual Studio Code to enable seamless containerized development.
Setting up the Dev Container template for Azure SQL Database
Creating a Dev Container
Begin by either opening a local folder containing your application project or cloning an existing repository into Visual Studio Code. This initial step sets the stage for integrating your project with a development container, whether you’re starting from scratch or working on an existing application. In Visual Studio Code, open the command palette (press F1 or Ctrl+Shift+P on Windows and Cmd+Shift+P on macOS). Select the
Dev Containers: Add Dev Container Configuration Files command.

Select the Add configuration file to workspace option if you want to add the dev container configuration file to your current local repository. Alternatively, choose the Add configuration file to user data folder option. For this qiuckstart, select the Add configuration file to workspace option.

Visual Studio Code prompts you to select a Dev Container template. The available templates are based on the tools and dependencies required for the specific development environment. Select Show All Definitions to view all available templates.

Next, select the desired Dev Container template for Azure SQL Database by typing Azure SQL into the command palette. This action displays a list of available templates designed for Azure SQL Database development.

Building the Container
Upon selection, Visual Studio Code automatically generates the necessary configuration files tailored to the chosen template. These files include settings for the development environment, extensions to install, and Docker configuration details. They’re stored in a .devcontainer folder within your project directory, ensuring a consistent and reproducible development environment.

Following the configuration file generation, Visual Studio Code prompts you to transition your project into the newly created Dev Container environment. You can do it by selecting Reopen in Container. This step is crucial as it moves your development inside the container, applying the predefined environment settings for Azure SQL development.
If you haven’t already, you can also initiate this transition manually at any time using the Dev Containers extension. Use the Reopen in Container command from the command palette or select on the blue icon at the bottom left corner of Visual Studio Code and select Reopen in Container.

This action initiates the setup process, where Visual Studio Code generates the necessary configuration files and builds the development container based on the selected template. The process ensures that your development environment is precisely configured for Azure SQL Database development.
Visual Studio Code builds the container based on the selected configuration. The build process might take a few minutes the first time.


Exploring and verifying the Dev Container
After you build the dev container, start exploring and verifying the setup. Open a terminal within Visual Studio Code to check that all necessary tools are installed and working correctly.

As an optional step, you can also run predefined tasks directly from the command palette, streamlining your development workflow and allowing you to focus on writing code.


For more detailed information about specific templates, visit Azure SQL Database Dev Container templates.
Conclusion
Dev Containers for Azure SQL Database offer a powerful and efficient way to streamline your development process. By providing a consistent, portable environment, they help you focus on writing code and building features rather than configuring your setup. We encourage you to explore these templates and see how they can enhance your development workflow for Azure SQL Database.
Looking ahead, we will delve into more advanced topics like integrating Azure services with Dev Containers to further optimize your development process. Stay tuned for more insights and practical guides to help you get the most out of Azure SQL Database and Dev Containers.
More about Dev Container templates for Azure SQL Datatabase.

by Contributed | Aug 15, 2024 | Technology
This article is contributed. See the original author and article here.
New extensible blueprint templates are available to help accelerate your app development. Each of these templates is fully working and ready to deploy reusable infrastructure and proof-of-concept code through Azure Developer CLI to GitHub Codespaces or VSCode.
Explore the entire template library: browse for fully working, cloud-ready applications to deploy with Azure
If you are using app advisor, the self-guided experience that surfaces the latest resources and recommendations based on your current development stage, you will also be presented with templates that are relevant to your current stage of development.
*Note that this list of templates is subject to change as new templates become available.
by Contributed | Aug 14, 2024 | Technology
This article is contributed. See the original author and article here.
Welcome back to Grow Your Business with Copilot for Microsoft 365, a monthly series designed to empower small and midsized businesses to harness the power of AI at work.
My team works with a wide range of small and midsized businesses. And while each is unique in their own way, we’ve found that regardless of size, industry, or market, they basically want the same thing: to grow. To attract more customers. To boost revenue. To scale efficiently.
Make sure to also check out our weekly Copilot productivity series that just launched, as well as the new Copilot Success Kit, your one-stop shop for getting ready and implementing Copilot.
PKSHA Technology – Embracing AI
Staying on the cutting edge – PKSHA Technology is doing just that by using the power Copilot for Microsoft 365 to grow their business and evangelize AI to their customers so they can do the same.
PKSHA Technology is a midsized company based in Tokyo, Japan. PKSHA develops algorithmic solutions and AI technologies that help companies become more efficient and improve their processes – they believe algorithms can solve some of the world’s biggest challenges. With effective roll out techniques, PKSHA leveraged Copilot to create new hire shortcuts, improve their customer management, and shorten the process from product roadmap to feature enhancements.
 An image of PKSHA’s business sign
Onboarding Shortcuts with AI
As PKSHA experienced rapid growth and hired new employees, and like most businesses, they found pain points in the onboarding process. It was difficult to ensure new hires had access or could find the information they needed. Onboarding new employees and getting them up to speed can also be a very demanding process for your current employees.
With the help of Copilot, PKSHA employees task Copilot to search for the information they need. ultimately shortens the time for new hires between their first day on the job to making a true impact! It also frees up time for those tasked with onboarding them into role, taking advantage of the fact that much of the company internal intel is now at their fingertips with
There are many ways that Copilot can help accelerate onboarding. For example, while attending a team meeting, using Copilot to ask clarifying questions. The “personal chat” with Copilot allows you ask questions about the meeting while not interrupting the flow of the meeting. As a new hire, creating documents, proposals, or paper can be hard as you are still learning the tone, voice, and preferred format of your new company. Using Copilot in Word, you can reference other documents to get to your first draft faster. Managers are also able to use Copilot to create onboarding documents and processes much faster to help employees orientate themselves to their new organization.
 A screenshot of Copilot in Teams Meeting personal chat
Customer Management
High–touch customer service can be a very time-consuming task that requires thorough preparation and detailed follow–up communications. Prior to Copilot, PKSHA Customer Success specialist, Ms. Takeuchi, would spend hours preparing information prior to calls and afterwards transcribing notes and documenting follow-up actions. Now, she uses Copilot to quickly assemble materials in advance, organizes to-dos and shares action tasks with customers immediately after the meetings. With her administrative workload considerably rCopilot in Teams, Ms. Takeuchi is able to dedicate more time focusing on her customers and activities that matter the most, maximizing care, attention, and service quality.
 A screenshot of Copilot in Teams
Product Development
A streamlined customer feedback loop that feeds into an issues list and ultimately product enhancements… sounds like an operational dream. With Copilot, PKSHA is making that dream closer to a reality. The PKSHA team leverages Copilot in Teams and Excel for gathering customer intel and feedback. By using Copilot in Teams to summarize and organize product feedback they receive to easily surface product needs and create a centralized log of possible product improvements. This process creates a shared knowledge base that team members across their product groups can reference, instead of disparate information silos, resulting in greater coordination and faster delivery of product enhancements. In parallel, the customer success team also uses Copilot in Excel to identify trends in the customer data. These trends help the team create meaningful recommendations for their customers. With Copilot, the team overall saves up to 4 hours of time spent on data analysis.
 A screenshot of Copilot in Excel
Creating AI Champions
When introducing any new technology tools in the workplace, it’s crucial to have the right adoption plan in place. Often a pilot group is part of any successful roll out plan. The pilot approach is baked into PKSHA’s vision for their company. PKSHA utilizes new AI solutions internally first to better evaluate how they can solve client needs with those AI solutions. In order to both test and drive the internal adoption of AI, PKSHA created their Future Work Black Belt Team. Creating an AI leadership team is a best practice that Microsoft has witnessed across its Copilot customer base. Read more details about how to stand up your own AI Council here.
 A quote from Mr. Kensuke Yamamoto, Executive Office & Head of Development at PKSHA Technology: “Copilot is a tool that supports our main mission of defining and shaping the software of the future. Copilot is part of our own future way of working so we can lead our customers to the right future workplace.”
Accelerating AI innovation with Copilot
The productivity and collaboration benefits of Copilot enable the team at PKSHA to focus more on their core mission of creating better AI solutions and technologies. Just like PKSHA is all about harnessing the power of algorithms to solve some of the world’s biggest challenges, Copilot gives them the power to fuel their innovation, creativity and efficiency amidst their AI development.
We are so excited to see PKSHA and other small and medium companies harness the power of Copilot to grow! Tune in next month for another example of how Copilot helps unlock more value and opportunity. If your company has used Copilot for Microsoft 365 to grow and you’d like to share your story, we’d love to feature you! Comment below to let us know you’re interested and a member from our team will get in touch!

Want to try out some of the ways PKSHA used Copilot for Microsoft 365? Check out the following resources:
- Check out the new SMB Success Kit and accelerate your Copilot adoption today
For adoption content visit Microsoft 365 Adoption – Get Started
For the latest SMB AI insights follow Microsoft 365 blog
Angela Byers
Microsoft
Senior Director, Copilot & Growth Marketing for SMB
 An image of the SMB Copilot team at Microsoft, with Angela Byers, Elif Algedik, Kayla Patterson, Briana Taylor, and Gabe Ho
Meet the team
The monthly series, Grow Your Business with Copilot for Microsoft 365, is brought to you by the SMB Copilot marketing team at Microsoft. From entrepreneurs to coffee connoisseurs, they work passionately behind the scenes, sharing the magic of Copilot products with small and medium businesses everywhere. Always ready with a smile, a helping hand, and a clever campaign, they’re passionate about helping YOUR business grow!
by Contributed | Aug 13, 2024 | Technology
This article is contributed. See the original author and article here.
Kick off your journey with SharePoint Embedded. At the SharePoint Embedded for Enterprise Apps events, you’ll explore best practices for your projects, glimpse the future of SharePoint Embedded, and learn to integrate Copilot into document-centric apps. We’re eager for your feedback and experiences; your creations shape ours.
The SharePoint Embedded product team is coming to New York City and London in September! Come join us for an all-day event to learn how SharePoint Embedded can deliver Copilot, Collaboration, Compliance, and Core Enterprise Storage for your document centric apps.
Specifically, you’ll have the opportunity to do the following:
- Learn about SharePoint Embedded, a new way to build file and document centric apps.
- Get hands-on coding experience with this new technology and learn how to build your own custom app.
- Take a deep dive into critical features, like compliance, collaboration and copilot.
- Hear from others who have implemented SharePoint Embedded solutions.
- Get insight into the SharePoint Embedded roadmap
New York City, US
Date: Thursday, September 12th, 9AM-7PM (times are approximate, including social hour)
Where: Microsoft Offices NYC Times Square
London, UK
Date: Thursday, September 26th, 9AM-7PM (times are approximate, including social hour)
Where: Central London, UK (Exact location TBD)
RSVP Details (Please note that this event is only open to certain countries and the following will not be accepted: Russia, Belarus)
- 21+, free event, no registration fees
- First come, first served (limited seats)
- NDA required (if your company does not have an NDA on record, one will be sent)
- NDA must be signed to attend event
- Event will be IN PERSON ONLY and will not be recorded
- Bring your own device for coding portions (tablets and smartphones will not work)
To register for one or more of these events visit Microsoft SharePoint Embedded for Enterprise Apps (office.com).

Recent Comments