by Contributed | Jun 30, 2021 | Technology
This article is contributed. See the original author and article here.
With the announcement that the future of Internet Explorer on Windows 10 is in Microsoft Edge, you might be thinking, how do I start moving from Internet Explorer 11 (“IE11”) to Microsoft Edge? Whether you rely on IE11 exclusively or use it in tandem with another browser to specifically access older legacy websites and applications, Microsoft is committed to helping you prepare and move to its replacement: Microsoft Edge with Internet Explorer mode (IE mode).
Editor’s note: Welcome to the IE to Edge blog series, an ongoing series of articles designed to help you move from Internet Explorer 11 to Microsoft Edge! Each will focus on a different relevant topic to help you in your journey, from what to expect when setting up IE mode to what to expect for end users after the IE11 desktop application retires. Look out for more of these blogs as we journey towards June 15, 2022!
|
The IE11 desktop application will be retired and go out of support next year on June 15, 2022, for certain versions of Windows 10. As part of our commitment, we’ve created helpful online setup guides in the Microsoft 365 admin center to clarify the process and make it easier to move to Microsoft Edge. These guides are based on experiences from thousands of customer engagements and are the same guides we use daily with customers around the world. We’re thrilled to make these available to you directly to help accelerate your onboarding and adoption of Microsoft Edge. With just a few pieces of information, these guides provide simple automated tools with tailored step-by-step guidance:
- Microsoft Edge setup guide aka “Edge Advisor”. Use this online guide for end-to-end deployment or if there is a particular area, such as the use of policies, that you need further guidance on.
- Discover and configure sites that require IE mode. Use this online guide if you’ve deployed Microsoft Edge and are specifically looking to build your site list and configure IE mode. (Note: These steps are also included as part of the Microsoft Edge Setup Guide aka Edge Advisor.)
Additional Microsoft 365 setup guides are also available to you in the Microsoft 365 admin center.
Requirements for Microsoft 365 admin center guides
Permissions
To access the Microsoft Edge guides, you will need global reader admin permissions in the Microsoft 365 admin center.
We understand that some administrators responsible for their organization’s browsers may not have the needed permissions for these tools in the Microsoft 365 admin center. If you see the following error screen when you try to start a Microsoft Edge guide, you don’t have the required permissions. Don’t worry; we have you covered!
Tip: What to do if you can’t access the Microsoft 365 admin center:
If you are unable to obtain the global reader admin permissions, you can access the guides from an alternate tenant since the activities completed in these setup guides do not depend on making changes in your production tenant. In some cases, organizations use a test or development tenant with the correct permissions. Alternatively, you can request a new trial tenant—such as the Office 365 E5 trial—to use these guides; the trial will provide you 30-day access to the Microsoft 365 admin center.
|
Navigation
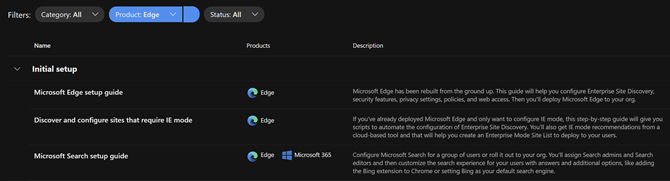
Open the setup guidance page in the Microsoft 365 admin center to find the complete inventory of setup guides. You can easily find the Microsoft Edge guides using the product filter. The top two guides are detailed in the sections below.
You can also navigate directly to the guides using the direct links listed in the intro of this post.
Microsoft Edge setup guide (Edge Advisor)
Overview
The Microsoft Edge Setup Guide is available at https://aka.ms/EdgeAdvisor. We refer to this guide as the “Edge Advisor” as it provides end-to-end deployment and adoption guidance for Microsoft Edge. The Edge Advisor starts by asking for a few pieces of information to help tailor the experience and provides guidance for customers planning deployments using Microsoft Intune, Configuration Manager, or Group Policy.

Capabilities and benefits
- Customized guidance for your selected operating systems and management tool.
- Review and understand the available Microsoft Edge channels.
- Setup conditional access with Microsoft Edge (if required).
- Review security baselines for Microsoft Edge using the Security Compliance Toolkit.
- Recommendations for additional protection and security features, such as Microsoft Endpoint Data Loss Prevention.
- Understand the many Microsoft Edge security settings and review configuration details.
- Enable or disable site discovery data collection, as well as Enterprise site list curation and creation, for Internet Explorer mode. For more details see the next section, Discover and configure sites that require IE mode (Configure IE mode guide).
- Note: The steps to configure IE mode in the Edge Advisor are the same steps outlined in the next section (Discover and configure sites that require IE mode). If you’re only looking to configure IE mode, we recommend using that guide.
- Get started configuring a subset of the most widely used Microsoft Edge policies and download a script to configure them using group policy.
- Deploy Microsoft Edge to your organization using the option that best fits your needs.
- Additional guidance to communicate the roll-out of Microsoft Edge to users and setup Microsoft Search.
Discover and configure sites that require IE mode (Configure IE mode guide)
Overview
The Configure IE mode guide, available at https://aka.ms/configureiemode, takes the site discovery and enterprise site list tasks available in the Edge Advisor and provides them as a standalone experience to help you set up IE mode in Microsoft Edge. This experience simplifies the steps outlined in the article titled “Enterprise Site Discovery Step by Step Guide” and automates some of them with a customized script for use with either Configuration Manager or Group Policy.

Capabilities and benefits
- Enable or disable site discovery data collection to build an Enterprise site list for IE mode. Collect sites more easily and efficiently with a customized script specific to your environment that can filter on specific zones (like Intranet) and/or on specific sites and their subsites (such as contoso.com and its subsites).
- Curate and create your Enterprise site list. Review sites discovered during data collection to easily see compatibility issues, group by zones, or specify how URLs open in IE mode (such as in specific doc modes or as neutral sites).

- Export your site list as an XML and receive guidance to deploy the site list for IE mode.
Additional tools for Microsoft Edge
The Edge Advisor and Configure IE mode guide are the primary guides needed to successfully roll out Microsoft Edge. Pick the guide that best fits your situation. Once deployed, we offer additional guides for more advanced needs:
What’s next for Microsoft Edge tools
The team is continuously improving the tools to better meet your requirements and support new features rolling out in Microsoft Edge. A few tools coming soon include:
- (Q3 2021) In-product education for Microsoft Edge – The ability to opt your tenant into Windows 10 lock screen messages to assist in moving users to Microsoft Edge. This will be added to the Adoption step in the Microsoft Edge setup guide (Edge Advisor).
- (Q3 2021) Enhanced Intune configuration support – A new process for starting Enterprise site discovery for IE mode on Intune-managed Windows devices and the ability to easily deploy common Microsoft Edge policies (including IE integration) via Intune directly within the guide.
Next steps
We encourage you to get started today and choose the right Microsoft Edge setup guide for your needs.
We’re always looking to improve and develop the best tools for our customers. Your feedback on these tools—or for tools that would be helpful to your organization—is highly valued, so we encourage you to leave your feedback in the comments section. Thank you and we hope these tools help you in your move to Microsoft Edge.
Frequently asked questions
I tried to launch the Microsoft Edge guide but got an error?
Ensure the account you’re using has Microsoft 365 admin center permissions, and optimally, has the global reader permission. If you do not have global reader permission, please see the Permissions section above.
Do the Microsoft Edge guides store my site details in the service?
No. The guides don’t store your site discovery or site list information in the service.
What languages are supported by the Microsoft Edge tools in the Microsoft 365 admin center?
The tools are currently available in English. Localized versions in French, German, Japanese, and Spanish are on track for July of 2021.
I’ve found a site that won’t work with Microsoft Edge. Can Microsoft provide help?
If you find a site that won’t work with IE mode, we first recommend watching the Microsoft Edge | Internet Explorer mode and compatibility video for tips. If that doesn’t help with your issue, there’s the App Assure program. The App Assure promise is this: if your web apps and sites work in IE11, supported versions of Google Chrome, or Microsoft Edge Legacy, those web apps and sites should work in Microsoft Edge. If not, contact App Assure at no additional cost for remediation support. You can either submit a request for assistance through their website or reach out via email (ACHELP@microsoft.com). To learn more about App Assure and Microsoft Edge, see Dual engine advantage: Legacy sites and Microsoft Edge.
by Contributed | Jun 30, 2021 | Technology
This article is contributed. See the original author and article here.
Customer Challenge
The customer wanted to use Azure NetApp Files (ANF) for their SAP app-tier shared storage (i.e. /sapmnt, /usr/sap/SID/SYS, etc.) but not for HANA database data. They have their primary instances in US East, and their disaster recovery environment in US West 2. Normally we would use ANF cross-region-replication (CRR) to replicate between these regions; unfortunately ANF CRR doesn’t support replication between two different subscriptions at this time – this customer is using a different subscription in each region.
Potential Solutions
There are several potential solutions for this, including NetApp CloudSync and Linux rsync; the solution we decided on is to use rsync since it is included with Linux, and we were on a very short timeframe for this project. rsync is a very versatile file copying tool that can copy between directories or volumes on a single host, between two hosts over ssh, or to a remote rsync daemon. It uses a “delta-transfer” algorithm that sends only the differences between the source files and the files in the destination.
One downside of the configuration described below is that we need a VM in each region to run and receive the rsync replication data, since ANF does not support mounting volumes located in one region from VMs in another region. The two machines need to be able to communicate over the network – in this case the two regional vnets were connected via Azure global vnet peering. If the volumes were in the same region, we would be able to mount the volumes to a single VM and use rsync for the data transfer.
We considered using one of the existing machines in the architecture (eg. the ERS machine) to do the replication, but that would increase complexity on those machines. We decided to use a dedicated virtual machine in each region to support this replication. Each VM mounts the ANF volume(s) in their own region, and use the rsync command between the VMs to do the actual data replication.
There are two ways that rsync can actually replicate the data in this scenario:
- Over the ssh protocol. This requires setting up ssh keys so that the replication user can ssh between the machines without a linux password.
- By connecting to a remote rsync daemon (i.e. Linux system process). This requires setting up & managing the rsync system service daemon.
We decided on the first option, since ssh was already set up for their configuration management system (eg. chef).
Solution Caveats
rsync is a file-level copy/replication solution (as opposed to real-time block level replication) and operates periodically – it will traverse through all of the files in the replicated directories or volume and copy the different or new files to the destination volume. Due to this process, there will clearly be some time delay between the time a file is written and when the file appears on the destination volume.
rsync is single threaded – this will limit the overall throughput between the two different volumes/VMs. This wasn’t a concern for this particular application, but it would be wise to test throughput in your own scenario. A very simple way to address this limitation would be to configure rsync to run on specific subdirectories of the volume, rather than the root directory. This would allow those rsync processes to run in parallel.
The first time rsync is run on the volume will take significantly longer than subsequent runs, due to the initial data transfer.
Solution Configuration
In our case, here are the mounts that we set up (for initial testing of the solution):
Region |
Virtual machine |
Mount on virtual machine |
|---|
US West 2 |
anf-client-west2 (primary) |
/vol-west2 |
US East |
anf-client-east (replica) |
/vol-east |
To actually copy the data, we used this command on the primary anf-client-west2 machine:
rsync -azP –delete –exclude=.snapshot –log-file=/var/log/rsync.log /vol-west2/ root@anf-client-east:/vol-east
The options we used above are these:
option |
description |
|---|
-a |
Archive mode – rsync will do a recursive copy, and preserve modification times, links, file ownership and permissions. |
-z |
Compress data over the network |
-P |
keep partially transferred files, and show the progress during transfer |
–exclude=.snapshot |
Exclude the ANF .snapshot directory |
–log-file=/var/log/rsync.log |
Create log file in /var/log/rsync.log |
To schedule rsync via chron, we put this in the root cron configuration using the sudo crontab -e command, which lets you edit the root crontab:
* * * * * rsync -azP –delete –exclude=.snapshot –log-file=/var/log/rsync.log /vol-west2/ root@anf-client-east:/vol-east
The initial asterisks tell cron to run this every minute – this may be excessive depending on requirements.
To run every 5 minutes, this would be the configuration:
*/5 * * * * rsync -azP –delete –exclude=.snapshot –log-file=/var/log/rsync.log /vol-west2/ root@anf-client-east:/vol-east
For a more complete solution, it is recommended to run rsync from a shell script that checks whether rsync is running already, for example:
#!/bin/bash

lockfile=/var/anf-sync/lockfile

mkdir -p /var/anf-sync

if test -f “$lockfile”;

then

       echo “rsync currently running, exiting”

       exit

else

       touch “$lockfile”

       rsync -azP –delete –exclude=.snapshot –log-file=/var/log/rsync.log /vol-west2/ root@anf-client-east:/vol-east

       rm “$lockfile”

fi
Of course in an actual DR event, the replication would have to be stopped, and (presumably) resumed in the other direction. This should be included in the DR runbook.
NFS Volume Consolidation
When using the ANF for NFS volumes, the customer wanted to optimize the volume size, performance and the overall cost. For this scenario, we had less than 100GB (the minimum volume size) for each SAP SID. For that reason we suggested consolidation in the manner documented here.
The ANF volume path is <IP Address>:/vol-west2. In that volume we will create a directory for each SID (in this example, QAS and NW1) , and under each of those there will be an ASCS, ERS, sapmnt and SYS directory. These directories have to be created via a VM, after the volume is created. Here are the sample directories that we created:
<IP>:/vol-west2/usrsapQAS/sapmntQAS

<IP>:/vol-west2/usrsapQAS/sapmntQASascs

<IP>:/vol-west2/usrsapQAS/sapmntQASsys

<IP>:/vol-west2/usrsapQAS/sapmntQASers
<IP>:/vol-west2/usrsapNW1/sapmntNW1

<IP>:/vol-west2/usrsapNW1/sapmntNW1ascs

<IP>:/vol-west2/usrsapNW1/sapmntNW1sys

<IP>:/vol-west2/usrsapNW1/sapmntNW1ers
These directories would be mounted either by the mount command, automounter configuration or the cluster filesystem resource configuration. There are really three differences (that I can think of) between this and having a separate volume for each mount:
- The export policy would be for the volume as a whole, so all of the VMs for all SIDs using the volume would need access. There was some concern that this reduces security across SIDs somewhat. However, the root user is the one that can mount volumes, and root should be trusted.
- If one of the SIDs were to fill up the volume, it could impact the others. It would be wise to put in monitoring or processes to grow the volume when needed.
- The performance tier/quality of service will be for the consolidated volume. Since these aren’t used all that much this should give better performance overall, but it would be possible for one SID to consume all of the IOPS/throughput, causing impacts on the others.
This is an example for the QAS instance – replace with the actual ip address for your volume, in the /etc/auto.direct file:
/sapmnt/QAS -nfsvers=3,nobind <anf-vol-ip addr>:/vol-west2/usrsapQAS/sapmntQAS

/sapmnt/QAS/SYS -nfsvers=3,nobind <anf-vol-ip addr>:/vol-west2/usrsapQAS/sapmntQASsys
Single region configuration
For scenarios that are within a single region, the configurations above will work fine – however it’s also possible to mount both the source and replica volumes from a single Azure VM, and use rsync on that VM to replicate the data between the two volumes.
Mounting Options
For mounting NFS volumes on Linux VMs, it is preferred to use either the Linux automounter, or to use cluster FS resources (when applicable). This is recommended because there is a timing issue in the Linux boot process where the /etc/fstab can sometimes be processed before the network stack is fully available. If the /etc/fstab is used to mount the NFS volumes on boot, it is possible for the boot to hang, or for the VM to boot and have the NFS mounts fail. This happens intermittenly, and it isn’t a customer specific situation.
For systems in a cluster, there are two advantages to having the volumes be cluster filesystem resources:
- The fstab and network availability issue discussed above is resolved, because cluster resources would always be started after cluster communications have been established.
- The resource agent for a cluster filesystem resource agent monitors the availability of the mounted volume.
However, for systems that are not in a cluster, the automounter will mount the desired volumes on demand, rather than at boot time.
Also, when preparing the mount point directories, it’s important to use the chattr +i <mountpoint> command – this will make the actual mount point immutable, so that any attempted writes to the mountpoint will fail if the NFS volume is not mounted on top of it.
by Contributed | Jun 30, 2021 | Technology
This article is contributed. See the original author and article here.
This article summarizes various options that can be taken to modernize SQL Server Reporting Services and then provides a detailed step-by-step guide to bringing report server databases to Azure SQL Managed Instance.
Different Options for Modernization
If you run SQL Server Reporting Services for Business Intelligence capabilities on-premises, you may want to draw benefits by modernizing it in various ways based on the requirements in your enterprise. To achieve this, you have the following options to consider:
- If you want to leverage modern cloud approaches you can modernize SSRS combining various Infrastructure and Platform services. Here you can use SQL Managed Instance as a Platform Service in the backend for certain reporting services components, i.e., your report server databases, which is also the main discussion in this blogpost.
- Migrating SSRS directly to the Power BI Service is a great option if you have the ability to look into modernizing your actual reports.
- If you are required to stay on-premises, you can still modernize your BI landscape by moving from SSRS to Power BI Report Server.
This blogpost gives a very good overview for the different options.
Before getting into details regarding how Azure SQL Managed Instance can add value to your existing SSRS deployment and how you can migrate your report server databases onto this platform service, let’s briefly discuss the other options (i.e., the second and the third option above).
Enhancing your reporting capability with Power BI and promoting yourself to a full-fledged business analytics service
For sure, the most interesting modernizing approaches are the ones which are backed up with cloud functionalities within the Microsoft universe.
Here the best option could be moving to the Power BI Service that has the capability of hosting your paginated reports that you can migrate from your SSRS instance if you are licenced for Power BI Premium or have Power BI Premium per user license.
Hosting your existing paginated reports in Power BI requires a low-effort migration process. Please see this link for a detailed explanation how migration works for the paginated reports. This way you will be able to co-locate your highly formatted, pixel-perfect reports with the content that is generated via simplified self-service data analysis on the same platform. More than this, a complex semantic model can be defined as the report data source for paginated reports using the newly introduced XMLA Read/Write endpoint in Power BI Premium. This is one of the recent major features making Power BI a superset of Azure Analysis Services and would enhance the abilities around enterprise reporting scenarios even more when used together with paginated reports.
After bringing your SSRS reports to Power BI, you can also embed paginated reports into existing applications within your organization. So your former SSRS reports which you would be modernizing to Power BI paginated reports will also be enabled for embedding. Please take a look at this link to understand how this could be achieved.
With its ever growing capabilities and high pace of innovation, Power BI could well be the best service to be of greatest use for your current SSRS user base.
The “on-premises” option for modernization
If you have to stay on-premises, a good approach could be migrating Reporting Services to “Power BI Report Server“. This may be something particularly interesting especially if it is not currently viable to go to Azure, but you still desire to enable Self Service Reporting on-premise and offer interactive dashboarding with great visualization and reporting capabilities to your users.
Keeping SSRS and still drawing benefits from cloud
If you require staying with SSRS for some commercial or technical reason, you can bring your on-premise SSRS instances onto Azure VM’s and still draw benefits from being on the cloud in many different ways.
A Virtual Machine (VM) on Azure is a scalable computing resource giving the flexibility of virtualization without having to buy and maintain the physical hardware which runs it. Since this is an IaaS (Infrastructure as a service) approach, in this setup, you will need to maintain your VM by performing tasks for configuration, patching, and installing the software (SSRS) that runs on it.
On the Azure marketplace you can find pre-configured virtual machine images for Reporting Services. You can leverage additional benefits from moving to the cloud by selecting these. This enables you to easily see your different virtual machine workloads and manage them. It can also help make your workloads more efficient and enables an easier onboarding experience to the cloud.
With this IaaS setup you can host both your “report server” – stateless engine of the SSRS, and report server databases which are responsible for storing the metadata (ReportServer) and temporary report results (ReportServerTempDB) on the same machine. This can offer a good solution in terms of cost effectiveness, however you could be missing out on a higher performance for your reports by taking the next step in the journey which involves hosting the report server databases on Azure SQL Managed Instance which is a Azure SQL managed platform service (PaaS) !
To go to this stage you need to be using SQL Server 2017 Reporting Services or SQL Server 2019 Reporting Services. By moving to cloud for the report server databases you would be seizing advantages which comes from a fully managed service. Although offering near 100% compatibility with the latest SQL Server (Enterprise Edition) database engine, SQL Managed Instance preserves a very wide variety of PaaS capabilities such as automatic patching, version updates, built-in high availability with 99,99%-availably -SLA for critical workloads. This kind of setup would drastically reduce management overhead and the total cost of ownership and even protects you from losing data and reporting content due to human errors with its built in Point In Time Restore and through automated backups.
By moving your report server databases to an Azure SQL Managed Instance and separating your report server from the report server databases, you would not only be gaining the PaaS benefits stated above, but also achieving a better performance in most cases. In addition to this, if you already have business data on Azure SQL Managed Instance Databases, having SSRS using it, means no-extra cost solution with minimum migration effort.
How to migrate report server databases of an existing SSRS instance to Azure SQL Managed Instance
Assuming you already have an SSRS environment on-premise, the focus would be on the migration scenario in this blogpost rather than a green-field SSRS deployment, whereas the steps would be similar.
As the report server databases preserve metadata and intermediary results during runtime, an online migration doesn’t make much sense for a SSRS backend data migration. An offline migration would be the simplest way to go. After this migration has been completed, with an easy configuration change, you will be able to point your SSRS instance to your newly migrated SSRS databases on Azure SQL Managed Instance with a minimal downtime.
Step 1: Provision necessary resources in the cloud:
The first thing that you need to do is the provisioning of the necessary cloud services on Azure:
You can create a SQL Managed Instance using the Azure Portal or create via Powershell. Using ARM templates for provisioning is the other option.
To provision a storage account on Azure you can again use the portal, powershell and the template options. Here the Azure CLI based creation is another alternative.
Step 2: Locate your report server databases:
After you have Azure SQL Managed Instance and the Azure Storage Account ready, connect to the machine running your SSRS instance. This could be an On-Premise server or an Azure VM.
Via SQL Server Management Studio (SSMS), you need to connect to the SQL Server instance currently hosting your report server databases. This can be the same SQL Server hosting the stateless engine of your SSRS or a separate SQL Server instance that you have used to host your report server databases.
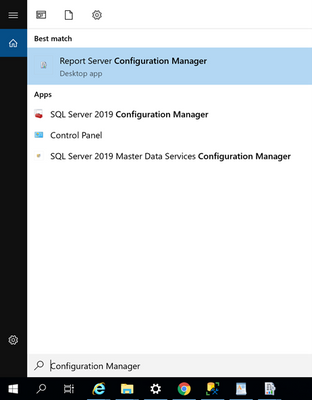
To find out where the current location of your of report server databases are, start the “Report Server Configuration Manager” on Windows from the desktop computer/server with the SSRS installation:
In “Report Server Configuration Manager” , switch to the “Databases” tab. You will see there where your current report server databases are located:

Using SSMS, connect to the SQL Server Instance and you will see the report server databases:

Step 3: Take a backup of your report server databases directly to Azure
First we need to take a backup of your databases to your storage account directly, using the SQL Server BackUp To URL functionality. This way your backup files in .bak format will be ready to be restored from your Managed Instance in the subsequent step:
(In order to gain access to your storage account, you need to generate a SAS (Shared Access Signature) token for your storage account. This can easily be done on the Azure Portal. Please take a look at this blog post to see how it works. This will be used as your key, when you want to access to the storage account from your local SQL Server during the backup process. Once you have your SAS token generated, you can carry on with the following steps.)
/*Create Credential to access Blob Storage*/
IF NOT EXISTS
(SELECT * FROM sys.credentials
WHERE name = 'https://<yourstorageaccountname>.blob.core.windows.net/<yourstorageaccountcontainername>')

CREATE CREDENTIAL [https://<yourstorageaccountname>.blob.core.windows.net/<yourstorageaccountcontainername>]
-- this name must match the container path, start with https and must not contain a trailing forward slash.
WITH IDENTITY = 'SHARED ACCESS SIGNATURE' ,
-- this is a mandatory string for the identity.
SECRET = <Your SAS token for the storage account that you can find on the Azure Portal>
-- This is the shared access signature token you need to generate and must start with ‘sv=’

/*Backup ReportServer Database*/
BACKUP DATABASE ReportServer
TO URL = 'https:// <yourstorageaccountname>.blob.core.windows.net/<yourstorageaccountcontainername>/ReportServer.bak';
GO

/*Backup ReportServerTempDB Database*/
BACKUP DATABASE ReportServerTempDB
TO URL = 'https:// <yourstorageaccountname>.blob.core.windows.net/<yourstorageaccountcontainername>/ReportServerTempDB.bak';
GO
After you see that the “BACKUP DATABASE“ operation successfully processed, you can simply check the .bak files on your storage account. You will be finding the files on your Azure Storage Account in the respective container you named above. In my case it looked like this:

Step 4: Restore the report server databases in your Azure Managed Instance
The next step should be restoring these backup files to the Azure SQL Managed Instance that you have created for hosting the report server databases.
To accomplish this, connect to your Managed Instance via SSMS with public endpoints. If you don’t want your database to have public IP’s which is likely for an enterprise-scenario, an alternative to this would be configuring a VM to connect to Managed Instance or connecting from any machine which can access the Azure SQL Managed Instance vNet.
Since at the end you already would need to allow access to this SQL Managed Instance from your SSRS machine, you may also want to enable this communication now, For this:
- If SSRS is installed on a machine in your local datacenter, you need to allow connections from the local network hosting the SQL Server on Premise to your Managed Instance. (Please note that this kind of deployment – having SSRS Databases on a Managed Instance and SSRS itself on-premise – might result with the risk of a low performance during report viewing and consumption.)
- Or if you run SSRS on Azure VM you need to allow connections from this Azure VM (or from the VNet hosting this Azure VM) to the VNet hosting the Managed Instance.
There are multiple ways to enable this connection, however this is more of a networking topic which is out of the scope for this post. Please take a look at Connectivity architecture for Managed Instance and Azure networking documentation to understand this procedure and some common workarounds for potential issues.
After you establish a connection to your Managed Instance you need to restore the Reportserver.bak and ReportserverTempDB.bak files.
You need access to your Storage Account for these steps also. So you need to create credentials with the configured Shared Access Signature here as well. This is exactly the same step we have taken in the previous section on the local SQL Server when taking the backups. Then you need to Restore your databases:
/*Create Credential to access Blob Storage*/
IF NOT EXISTS
(SELECT * FROM sys.credentials
WHERE name = 'https://<yourstorageaccountname>.blob.core.windows.net/<yourstorageaccountcontainername>')

CREATE CREDENTIAL [https://<yourstorageaccountname>.blob.core.windows.net/<yourstorageaccountcontainername>]
-- this name must match the container path, start with https and must not contain a trailing forward slash.
WITH IDENTITY = 'SHARED ACCESS SIGNATURE',
-- this is a mandatory string. Do not change it.
SECRET = <Your SAS token for the storage account that you can find on the Azure Portal>
-- This must start with ‘sv=’ and is the shared access signature token

/*Restore ReportServer Database*/
RESTORE DATABASE ReportServer FROM URL = 'https://<yourstorageaccountname>.blob.core.windows.net/<yourstorageaccountcontainername>/ReportServer.bak'

/*Restore ReportServerTempDB Database*/
RESTORE DATABASE ReportServerTempDB FROM URL = 'https://<yourstorageaccountname>.blob.core.windows.net/<yourstorageaccountcontainername>/ReportServerTempDB.bak'
After you successfully do this, refresh your connection within SSMS to see the newly restored databases. You should see both of the databases on your SQL managed instance:

Step 5: Change Report Server Databases using Report Server Configuration Manager
Now that we have the content database and the temporary database available on the SQL Managed Instance, we can make the switch for these report server databases using the “Reporting Services Configuration Manager”. For this, open “Reporting Services Configuration Manager” again, switch to the Database tab and click the “Change Database” button:

In the next screen select “Choose an existing report server database” and click next:

Provide the name for your SQL Managed Instance that you can find on the Azure portal under the Overview Tab:

Insert this name to “Server Name” field in the Report Server Database Configuration Wizard and select “SQL Server Account Authentication” since within Azure SQL Managed Instance Windows Authentication is not yet supported and SSRS does not support Azure AD Authentication:

Click on “Test Connection” to see if you can connect with the provided details.
(If you encounter a connection error, you need to check the connectivity from the current machine to your Managed Instance. Please check the network configuration as we discussed before.)
If the connection succeeds, click next. In the next screen you need to select the report server database that you have restored on your managed instance:

After your selection, credentials will be asked that report server will use to connect to the report server databases. Permission to access the ReportServer database should be granted to the account you specify. Here you need to provide “SQL Server Credentials” again and select next button. With other authentication methods, you would get an error, since the remote database will be a platform service in the cloud and Windows Authentication or Local Service Credentials won’t work in this case:

In the coming screen click “next” where you will see the summary for the connection information you provided.
If you click “next” in this screen, you will see the changes are applied in a couple of seconds and if you did everything correctly, you will see all the changes have been applied successfully.
If you click finish, you will see the report server being restarted and the current report server database will be changed in a way pointing to your Managed Instance now!

If you access your SSRS web Page on your browser using the URL provided for you SSRS environment, you will see that the whole content is still there, whereas in the backend your SSRS instance is reaching out to a cloud database for your report server databases that are now supported by the PaaS capabilities discussed above:

Hosting your business data on Managed Instance
You can take your modernizing efforts one step further and also migrate your application data or analytical workloads (such as your datawarehouses, datamarts etc.) to Managed Instance, since managed instance offers many comprehensive capabilities to host analytical and transactional workloads.
This move could potentially be even more promising if you look at all the values that you would get by using Azure SQL Managed Instance without sacrificing what you currently have with SQL Server, since you will still be dealing with the same SQL Server surface area that you are familiar with. You can even think of consolidating your databases with the report server databases on the same SQL Managed instance to create a cost-effective solution.
Summary
The most interesting modernizing approaches for SQL Server Reporting Services (SSRS) are the ones which are backed up by cloud functionality.
As mentioned at the start the best option could be moving directly to the Power BI Service that has the capability of directly hosting your paginated reports which you can easily migrate from your existing SSRS instance.
However if this is not an option for you, you can still leverage modern cloud approaches to modernize your existing SSRS architecture by combining various Infrastructure and Platform services within Azure. Here, using SQL Managed Instance as a Platform Service in the backend for your report server databases could be a great option for you. We have discussed the potential benefits of doing this, incl. how to bring the existing report server databases of SSRS to a SQL Managed Instance.
I hope you found this topic interesting and are exciting to try out the options of using modern Azure SQL Managed Instance for your SSRS backend needs.


Recent Comments