by Contributed | Jul 2, 2021 | Technology
This article is contributed. See the original author and article here.
Hi all, Will Aftring here from Windows Networking Support.
I wanted to chat about how Network Isolation interacts with Universal Windows Platform (UWP) applications and how / why you may want to alter some of these settings in respect to the network and their usage within an Active Directory (AD) integrated domain.
What is this?
As of Windows 8.1+, modern UWP applications have more granularity with determining the scope of operating system (OS) resources they have access to.
These configurations are made in the application manifest and applied to the binary during compilation. There are tools available in the OS to help diagnose issues and make small configuration changes.
How it works
Network Isolation defines network access to the application.
This includes the following:
- Outbound client-initiated requests
- The application reaching out to another resource over the network
- Inbound unsolicited requests
- A client reaching out to the application unsolicited
These network connections are broken down into the following boundaries based on their destination:
- Home/Work: A local home or work network and other machines considered to be local. In a domain environment this is defined by AD Sites and Subnets.
- Internet: Any connection that is not a part of Home/Work is considered internet. This includes proxies that would provide access to the internet.
If any traffic generated by that application that is not defined in the manifest, will be dropped by the Windows Filtering Platform (WFP).
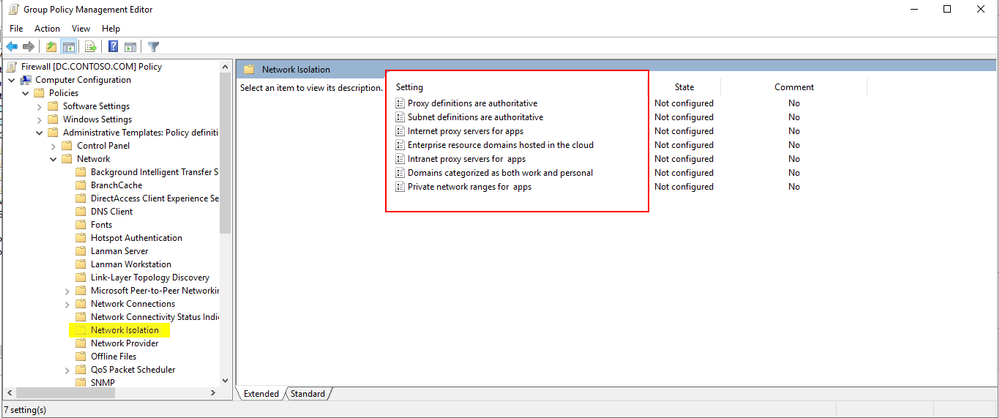
Network Isolation Group Policies
As mentioned above, any endpoint not defined in AD Sites and Subnets is considered to fall within the internet boundary.
However, there are a handful of group policies that allow for the boundaries to be tweaked.
These group polices are found here:
Computer Configuration -> Administrative Templates -> Network -> Network Isolation
For instance, through the group policy outlined below, users can explicitly add intranet proxies to the Home/Work boundry:

More details about each of the available group policies and examples of specific implementations can be found below.
Isolating Apps on Your Network: Define your Network
Benefits of redefining your AD subnets:
WFP defines its filters for sites within AD as concisely as possible. However, due to the nature of how WFP filters define their scope, having many AD subnets can create excessive numbers of WFP filters. As a result of excessive WFP filters, network transmissions may take longer. Additionally, the OS may experience high CPU utilization during the creation of these WFP filters.
A good rule of thumb is with more than 300 AD subnets defined; you may start seeing hits to performance.
A quick way to check the defined AD subnets is with the following PowerShell cmdlet:
PS C:> Get-ADReplicationSubnet -Filter "*" | Measure-Object | Select-Object Count
If the count of subnets exceeds 300, it is worth investigating redefining your AD subnets or supernetting some AD subnets in the available group policies. Configuring the supernets in group policy is an easy two-step process.
These are the two group policies that control this behavior.

First would be enabling the subnet definitions as authoritative.

Second, would be grouping the AD subnets into super-nets within Private network ranges for apps.

For example, if you have the AD subnets of 192.168.1.0/24 and 192.168.2.0/24, … 192.168.200.0/24 this could easily be included in a super-net of 192.168.0.0/16 reducing the number of filters into a single range that is defined by a single WFP filter.
This reduces the number of WFP filters allowing for a more efficient:
- Creation of WFP filters
- Processing of inbound and outbound network traffic
Windows Firewall Rules per UWP Capability
Another feature of UWP applications is that IT administrators have additional options for how they configure the Windows Firewall around these applications.
UWP specific Windows Firewall settings are made available through the local principals option for a firewall rule. Firewall settings for UWP applications can be applied based on a permission basis (Authorized Users) or on an exclusion basis (Exceptions).
Example: Allowing traffic for specific capabilities on a block rule

These settings can also be configured via group policy as seen in the following document.
Isolating Apps on Your Network: Create Custom Firewall Rules
Loopback traffic
Network communications using the loopback address cannot be used for application-to-application communication for UWP apps because it is restricted by network isolation.
As a consequence of network isolation, Windows disallows establishing a socket connection (Sockets or WinSock) between two UWP apps running on the same machine; whether that’s via the local loopback address (127.0.0.0), or by explicitly specifying the local IP address. For details about mechanisms by which UWP apps can communicate with one another, see App-to-app communication.
Source: https://docs.microsoft.com/en-us/windows/uwp/networking/sockets
However, if the application-to-application communication is occurring within the same process then the communication is permitted.
Security Products
Some security applications will adjust components of the OS to leverage the loopback adapter.
Setting any network component, (DNS server, WinHttp proxy / WinInet proxy, etc.…) to the loopback address will lead to the traffic from any UWP applications that leverage those network components to be dropped by WFP. This is by-design behavior; however, it can be worked around if necessary.
Checking for loopback drops
The easiest way to check if there are packet drops due to network isolation is through WFP auditing.
Here is an example of how to check if a UWP applications traffic is being dropped by network isolation due to loopback communication.
First, enable WFP auditing with the following command:
auditpol /set /subcategory:"Filtering Platform Packet Drop" /success:enable /failure:enable
In my scenario, the Windows Store was unable to reach the internet. I reproduced this issue and reviewed the security event log for Event ID 5152:
Log Name: Security
Source: Microsoft-Windows-Security-Auditing
Date: 6/1/2021 7:09:39 AM
Event ID: 5152
Task Category: Filtering Platform Packet Drop
Level: Information
Keywords: Audit Failure
User: N/A
Computer: W2.contoso.com
Description:
The Windows Filtering Platform has blocked a packet.
Application Information:
Process ID: 5884
Application Name: deviceharddiskvolume1windowssystem32windowspowershellv1.0powershell.exe
Network Information:
Direction: Inbound
Source Address: 127.0.0.1
Source Port: 50961
Destination Address: 127.0.0.1
Destination Port: 9000
Protocol: 6
Filter Information:
Filter Run-Time ID: 67901
Layer Name: Receive/Accept
Layer Run-Time ID: 44
From this information we can see that our packet was dropped with filter ID 67901. Let’s proceed to reviewing the filters we have in place to determine the reason for the drop. A dump of the current WFP filters can be generated by running the following command from an Admin Command Prompt:
netsh wfp show state file=wfpstate.xml
Within my wfpstate.xml the filter ID 67901 matches the following item. Based on the name of the filter responsible (AppContainerLoopback) for dropping the packet, I know that the packet is being dropped due to UWP loopback communication.
<item>
        <filterKey>{2d336b0c-dcb6-451c-bd3c-e5b22641c539}</filterKey>
        <displayData>
                 <name>AppContainerLoopback</name>
                 <description>AppContainerLoopback</description>
        </displayData>
        <flags/>
        <providerKey>{decc16ca-3f33-4346-be1e-8fb4ae0f3d62}</providerKey>
        <providerData>
                 <data>ffffffffffffffff</data>
                 <asString>........</asString>
        </providerData>
        <layerKey>FWPM_LAYER_ALE_AUTH_RECV_ACCEPT_V4</layerKey>
        <subLayerKey>{b3cdd441-af90-41ba-a745-7c6008ff2300}</subLayerKey>
        <weight>
                 <type>FWP_UINT64</type>
                 <uint64>18446744073709551614</uint64>
        </weight>
        <filterCondition numItems="2">
                 <item>
                         <fieldKey>FWPM_CONDITION_FLAGS</fieldKey>
                         <matchType>FWP_MATCH_FLAGS_ALL_SET</matchType>
                         <conditionValue>
                                  <type>FWP_UINT32</type>
                                  <uint32>1</uint32>
                         </conditionValue>
                 </item>
                 <item>
                         <fieldKey>FWPM_CONDITION_ALE_USER_ID</fieldKey>
                         <matchType>FWP_MATCH_EQUAL</matchType>
                         <conditionValue>
                                  <type>FWP_SECURITY_DESCRIPTOR_TYPE</type>
                                  <sd>O:LSD:(A;;CC;;;AC)(A;;CC;;;S-1-15-3-1)(A;;CC;;;S-1-15-3-2)(A;;CC;;;S-1-15-3-3)(A;;CC;;;S-1-15-3-4214768333-1334025770-122408079-3919188833)(A;;CC;;;WD)(A;;CC;;;AN)</sd>
                         </conditionValue>
                 </item>
        </filterCondition>
        <action>
                 <type>FWP_ACTION_BLOCK</type>
                 <filterType/>
        </action>
        <rawContext>0</rawContext>
        <reserved/>
        <filterId>67901</filterId>
        <effectiveWeight>
                 <type>FWP_UINT64</type>
                 <uint64>18446744073709551614</uint64>
        </effectiveWeight>
</item>
Working around UWP loopback communication
Note, this is intended for debugging purposes only.
In the example below, I will be adding an exemption for the Windows Store.
Let’s start by checking the current configuration of loopback communications using the CheckNetIsolation tool. The syntax, and example output is seen below.
PS C:> CheckNetIsolation.exe LoopbackExempt -s

List Loopback Exempted AppContainers

OK.
This is the output we would expect to see with no loopback exempt applications.
With that in mind, lets add my exemption for the Windows Store. First thing we need to do is find the AppID of the Windows Store. To do this we can run the PowerShell cmdlet Get-StartApps with one of the following syntaxes.
PS C:> Get-StartApps # For all applications
Name            AppID
----            -----
Blend 2019                         Blend.28500c9f
Python 3.9 (64-bit)                C:Python39python.exe
Microsoft Store                    Microsoft.WindowsStore_8wekyb3d8bbwe!App

PS C:> Get-StartApps -Name "Microsoft Store" # Or for a specific application

Name            AppID
----            -----
Microsoft Store Microsoft.WindowsStore_8wekyb3d8bbwe!App
The resulting AppID can be trimmed:
- from Microsoft.WindowsStore_8wekyb3d8bbwe!App
- to Microsoft.WindowsStore_8wekyb3d8bbwe
Now adding the exemption for the rule will can be done using CheckNetIsolation with the syntax below.
PS C:> CheckNetIsolation.exe LoopbackExempt -a -n="Microsoft.WindowsStore_8wekyb3d8bbwe"
OK.
Confirm the loopback exemption rule has been added to the exemption list, with the syntax below.
PS C:> CheckNetIsolation.exe LoopbackExempt -s

List Loopback Exempted AppContainers

[1] -----------------------------------------------------------------
    Name: microsoft.windowsstore_8wekyb3d8bbwe
    SID:  S-1-15-2-1609473798-1231923017-684268153-4268514328-882773646-2760585773-1760938157

OK.
And now there is an exemption added for the Windows Store!
If you wanted to add all current UWP applications to the loopback exemption list, you could use a PowerShell script like this. Note, this may vary depending on AppID format and use at your own risk.
(Get-StartApps).AppID | ForEach-Object {
       $UWPApp = $_.Split("!")[0]
       CheckNetIsolation.exe LoopbackExempt -a -n="$UWPApp"
}
UWP listening on the loopback for traffic
Currently, it is not supported for UWP application to listen on the loopback adapter outside of Visual Studio.
This behavior is outlined in our documentation.
Note Loopback is permitted only for development purposes. Usage by a Windows Runtime app installed outside of Visual Studio is not permitted. Further, a Windows Runtime app can use an IP loopback only as the target address for a client network request. So, a Windows Runtime app that uses a DatagramSocket or StreamSocketListener to listen on an IP loopback address is prevented from receiving any incoming packets.
Source: Windows 8 Development: How to enable loopback for network access
Determining what traffic an application is using
If the traffic an application is using is unknown, CheckNetIsolation can be used to determine how the OS is detecting the network traffic of a UWP application.
In our example, I will be investigating the Windows Store which will only be accessing resources out on the open internet and will not be receiving any unsolicited connections.
As seen in the loopback example we can pull the AppID with Get-StartApps using the syntax below.
PS C:> Get-StartApps -Name "Microsoft Store"

Name            AppID
----            -----
Microsoft Store Microsoft.WindowsStore_8wekyb3d8bbwe!App
As a reminder be sure to trim the trailing !App from the AppID.
Now using the CheckNetIsolation syntax below I can start a debug session to determine how the OS is detect the network boundary of traffic for the Windows Store.
PS C:> CheckNetIsolation.exe Debug -n="Microsoft.WindowsStore_8wekyb3d8bbwe"

Network Isolation Debug Session started.

Reproduce your scenario, then press Ctrl-C when done.
Once I’ve reproduced my issue, I can input Ctrl+C to stop the data collection and a report similar to the one below will be generated.
PS C:> CheckNetIsolation.exe Debug -n="Microsoft.WindowsStore_8wekyb3d8bbwe"

Network Isolation Debug Session started.

Reproduce your scenario, then press Ctrl-C when done.

Collecting Logs.....

Summary Report
Network Capabilities Status
----------------------------------------------------------------------
    InternetClient                Used and Declared
    InternetClientServer          Not Used and Insecure

Detailed Traffic Report
----------------------------------------------------------------------
    InternetClient                Used and Declared
 ------------------------------------------------------------------
      23.196.35.33     23.196.35.33     23.196.35.33     104.87.85.147
      104.87.85.147    23.218.218.171   104.87.85.147    104.87.85.147
      104.87.85.147    104.87.85.147    104.87.85.147    104.87.85.147
      23.220.124.10

    InternetClientServer          Not Used and Insecure
 ------------------------------------------------------------------

OK.
In my scenario, only InternetClient traffic (meaning outbound traffic to endpoints outside my work boundary) was detected by the debug scenario.
Closing Notes:
I know I covered lots of in-depth information here, I appreciate if you have made it this far. Network isolation can be tricky, but with the information above you should be able to get started diagnosing issues in your environment. For additional information please see the section below.
Additional Reading
by Contributed | Jul 2, 2021 | Technology
This article is contributed. See the original author and article here.
Welcome back to another blog post about the Azure Percept DK!
Previously
In the previous post – Azure Percept – First Look – you’ll remember that we had a first look at the percept and what it was all about. Well, in this post we’ll take a look at the Azure Percept Audio Module, which allows for the recognition of Custom Keywords and Commands (among other things).
What is the Percept Audio?
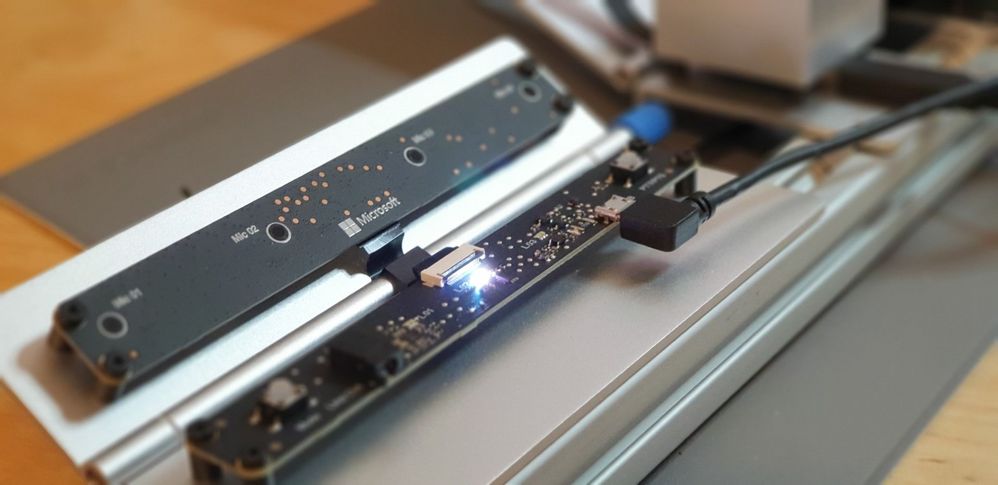
The Azure Percept Audio (sometimes called the Percept Ear) is a “System on a Module” or SoM, which is designed as the Audio Interface for Audio Processing at the edge for the Azure Percept.
Along with the Carrier Board, Azure Percept Studio, Microsoft LUIS and Speech, the system can recognise keywords and commands to control devices using voice at the edge. This works both online and offline with the aid of the Carrier Board.
Azure Percept Audio Specifications
The basic specs for the Azure Percept Audio SoM are;
- Four-microphone linear array and audio processing via XMOS Codec
- 2x buttons
- 3x LEDs
- Micro USB
- 3.5 mm audio jack
You can find the full specifications here
Who’s it for?
Like the Vision SoM, Microsoft clearly have a set of industries in mind for the Azure Percept Audio SoM;
- Hospitality
- Healthcare
- Smart Buildings
- Automotive
- Retail
- Manufacturing
With applications such as;
- In-room Virtual Concierge
- Vehicle Voice Assistant and Command/Control
- Point of Sale Services and Quality Control
- Warehouse Task Tracking
This becomes clear later when we look at the sample applications we can spin up in a minute.
Azure Percept Audio – Required Services
The Azure Percept Audio SoM makes use of a couple of Azure Services to process Audio;
LUIS (Language Understanding Intelligent Service):
LUIS is an Azure service which allows interaction with applications and devices using natural language.
Using a visual interface, we’re able to train AI models without the need for deep Machine Learning experience of any kind.
The Azure Percept uses LUIS to configure Custom Commands, allowing for a contextualised response to a given command.
Cognitive Speech:
Cognitive Speech is an Azure Service offering Text-to-speech, speech-to-text, speech translation and speaker recognition.
Supporting over 92 languages, this service can convert speech to text allowing for interactivity with apps and devices.
On the flip side, with support for over 215 different voices in 60 languages, the Speech Service can also convert Text to-Speech improving accessibility and interaction with devices and applications.
Finally, the Speech Service can also translate between 30 different languages, allowing for real-time translation using a variety of programming languages, which I think is a really cool use case.
The Percept uses this service amongst other things, to configure a wake word for the device, by default this is the word “computer“. (See Star Trek IV – The Voyage Home!).
Azure Percept Audio – Sample Applications
If we navigate to Azure Percept Studio, from the Overview Page we can select the “Demos & tutorials” tab at the top;

If we scroll to the bottom of this page, we have some links to some Speech tutorials and demos.

The first thing we’ll choose is “Try out voice assistant templates”. Clicking this link presents us with a fly out with a selection of templates to choose from;

You can see here a selection of Sample Templates that speak to where Microsoft expect the Percept Audio to be used. All of these a limited to voice commands interacting with an environment. I’ll speak later about some scenarios I’d actually like to be thought about that are outside of this use case.
For now, we’ll deploy one of these pre-backed samples and see how it works!
Azure Percept Audio – Hospitality Sample Template Setup
Choosing the “Hospitality” option, agreeing to the terms and continuing on, we’re shown the resource creation flyout.
Here we can select the subscription and resource group we’d like to deploy the various resources to.
We’re also prompted for an Application Prefix. This allows the template to create resources with unique ids.
We can then choose a region close to us. At the time of writing we can choose between West US and West Europe, but I imagine this will grow once the Percept starts getting towards GA. I was actually surprised at the choice of regions here with no East US, North Europe, and no APAC region at all.
Moving on, the last item we need to select is the “LUIS prediction pricing tier, which we can leave at “Standard”, as the free tier doesn’t support speech requests sadly.

Hitting the “Create” button, then begins the process of deploying the speech theme resources.

We’re then prompted that this process can take between 2 and 4 minutes to complete…. This only took a matter of seconds for me nicely…

Azure Percept Audio – Hospitality Sample Template Demo
Once the template has completed deploying we’re then shown a demo Hospitality environment.
We should also now have 3 blue LEDs showing on the Percept;

I found these LEDs to be super bright, such that I couldn’t stare directly at them without then being able to see three (or is it 5? Ha) dots like Picard in that episode of Next Gen. They light my whole office up at night practically!
The Percept Audio LEDs will indicate different statuses depending upon their colour and flash pattern;
LED
|
LED State
|
Ear SoM Status
|
L02 |
1x white, static on |
Power on |
L02 |
1x white, 0.5 Hz flashing |
Authentication in progress |
L01 & L02 & L03 |
3x blue, static on |
Waiting for keyword |
L01 & L02 & L03 |
LED array flashing, 20fps |
Listening or speaking |
L01 & L02 & L03 |
LED array racing, 20fps |
Thinking |
L01 & L02 & L03 |
3x red, static on |
Mute |
The LEDs are labelled as shown in the following picture, with L01 on the left of the SoM, L02 in the middle and L03 on the far right;

Returning to the Hospitality demo environment. The screen is split up into several sections.

At the top of the demo environment we have an toolbar containing;
- Create Custom Keyword
- Create Custom Command
- Get Started
- Learn More
- Feedback
- Troubleshoot
Just below that we have the current keyword and command and links to change them should we wish…. We’ll actually be looking at all of that in another blog post, so keep your eyes peeled!
On the left we have an interaction area where we can enter commands for the Percept to action.
On the right we have a visual representation of the current environment, which reflects the actions our commands invoke.
Audio Output
Before we try executing any commands, the Percept uses the Speech Service to convert it’s command responses to spoken word.
For us to be able to hear that, we’ll need to connect some speakers to the device.
The Percept has a 3.5mm audio jack output for exactly that purpose… Hooking up some relatively low powered portable speakers to the line out jack will allow us to hear the responses to our commands.

Executing Commands
We can now try executing some commands. The Custom Keyword or Wake Word for the Percept defaults to “Computer” (Where’s Scotty when you need him!), we can say that followed by one of a few commands which are applicable to this particular sample;
- Turn on/off the lights
- Turn on/off the TV.
- Turn on/off the AC.
- Open/close the blinds.
- Set temperature to X degrees. (X is the desired temperature, e.g. 75.)

I noticed, and perhaps due to my English accent, that it took a while for the Percept to recognise my pronunciation of “Computer”… I did try pronouncing it with an American Accent (and also asking it for the chemical formula for Plexiglass), but that didn’t seem to help.
Eventually it did work, and I quickly learnt how to say the word for a relatively repeatable wake up. I did notice that often, it would take quite a while to “Wake Up” the first time I issued the wake up word, and after that it would work quite quickly. I also noticed that, if I’d left it idle overnight that, in perfect IT Crowd style, I’d actually have to turn it off and back on to get it working again. When I get some time, I’ll raise some feedback with the team.
Once I’d mastered the wake word, all the other instructions worked pretty well…. You can see one of my failed attempts at the top here;

By instructing the Percept to turn on the TV, the simulation on the right would show the TV on, and so on through the commands.

The only command that didn’t work as intended was the “Set Temperature” command, which didn’t accept the actual temperature as a parameter to the command.
It turns out that this was because I was trying to set the temperature too low, you can only set it within a few degrees of the set temperature, otherwise it just doesn’t work.
My Plans
The first thing I’m going to try with this is hook it all up to a Raspberry Pi and recreate the Hospitality experience in real life. I think this would make a really cool demo for future talks… (Also, Microsoft, if you need somebody to come and create you a demo room in Seattle, just shout eh! ;) Haha).
I did ask the team about perhaps using the Percept Audio to detect things other than speech. As I mentioned in my previous post, I have a client in the Ecology and Wildlife ecosystem, and I’d love to perhaps train the Percept to recognise the sounds of wildlife maybe?
My Thoughts
Having spent time making Alexa Skills, Speech Studio is quite limited in comparison to the tools around Alexa, but it’s got everything we need at the moment to make reasonable speech based interaction apps.
I did find it frustrating that it would either not understand me, or be really slow to wake to the wake word… This makes demoing the unit a bit hit and miss and elicits the usual sniggers from attendees…. Ha.
Those points aside, I found the experience worked well, with the Sample Applications being a great example of some of the ideas Microsoft have in mind for this side of the Percept.

by Contributed | Jul 2, 2021 | Technology
This article is contributed. See the original author and article here.
Bird Detector Based on Microsoft Azure and Raspberry Pi
Jiong Shi has been a Microsoft MVP for twelve years, who is interested in Windows 10 IoT Core, Windows Embedded, Azure IoT and UWP. He is an associate professor in School of Computer and Electronic Engineering, Zhejiang Wanli University, China. He is an author of the book “Windows 10 IoT Application Developer Guide”, a blogger, and a speaker for Ignite China. Jiong is active in local developer community, speaking at technical conferences, writing articles on hackster, contributing to Windows IoT Core open-source projects, serving as a mentor and Microsoft Community Contributor. Follow him on Twitter @dearsj001

MICROSOFT ENDPOINT MANAGER: HOW TO CONFIGURE WINDOWS FIREWALL POLICIES
Silvio Di Benedetto is founder and CEO at Inside Technologies. He is a Digital Transformation helper, and Microsoft MVP for Cloud Datacenter Management. Silvio is a speaker and author, and collaborates side-by-side with some of the most important IT companies including Microsoft, Veeam, Parallels, and 5nine to provide technical sessions. Follow him on Twitter @s_net.

C#.NET: HOW TO UNZIP FOLDER
Asma Khalid is an Entrepreneur, ISV, Product Manager, Full Stack .Net Expert, Community Speaker, Contributor, and Aspiring YouTuber. Asma counts more than 7 years of hands-on experience in Leading, Developing & Managing IT-related projects and products as an IT industry professional. Asma is the first woman from Pakistan to receive the MVP award three times, and the first to receive C-sharp corner online developer community MVP award four times. See her blog here.

Teams Real Simple with Pictures: Getting Hands on with Profile+
Chris Hoard is a Microsoft Certified Trainer Regional Lead (MCT RL), Educator (MCEd) and Teams MVP. With over 10 years of cloud computing experience, he is currently building an education practice for Vuzion (Tier 2 UK CSP). His focus areas are Microsoft Teams, Microsoft 365 and entry-level Azure. Follow Chris on Twitter at @Microsoft365Pro and check out his blog here.

How to create Webinars with Microsoft Teams
Vesku Nopanen is a Principal Consultant in Office 365 and Modern Work and passionate about Microsoft Teams. He helps and coaches customers to find benefits and value when adopting new tools, methods, ways or working and practices into daily work-life equation. He focuses especially on Microsoft Teams and how it can change organizations’ work. He lives in Turku, Finland. Follow him on Twitter: @Vesanopanen
by Contributed | Jul 2, 2021 | Technology
This article is contributed. See the original author and article here.
This post was co-authored by Yinhe Wei, Runnan Li, Sheng Zhao, Qinying Liao, Yan Xia, and Nalin Mujumdar
An important element of language learning is being able to accurately pronounce words. Speech service on Azure supports Pronunciation Assessment to empower language learners and educators more. At the //Build 2021 conference, Pronunciation Assessment is announced generally available in US English, while other languages are available in preview.
The Pronunciation Assessment capability evaluates speech pronunciation and gives speakers feedback on the accuracy and fluency of the speech, allowing users to benefit from various aspects.
Comprehensive evaluation near human experts
Pronunciation Assessment, a feature of Speech in Azure Cognitive Services, provides subjective and objective feedback to language learners in computer-assisted language learning. For language learners, practicing pronunciation and getting timely feedback are essential for improving language skills. The assessment is conventionally driven by experienced teachers, which normally takes a lot of time and big efforts, making high-quality assessment expensive to learners. Pronunciation Assessment, a novel AI driven speech capability, is able to make language assessment more engaging and accessible to learners of all backgrounds.
Pronunciation Assessment provides various assessment results in different granularities, from individual phonemes to the entire text input. At the phoneme level, Pronunciation Assessment provides accuracy scores of each phoneme, helping learners to better understand the pronunciation details of their speech. At the word-level, Pronunciation Assessment can automatically detect miscues and provide accuracy score simultaneously, which provides more detailed information on omission, repetition, insertions, and mispronunciation in the given speech. At the full-text level, Pronunciation Assessment offers additional Fluency and Completeness scores: Fluency indicates how closely the speech matches a native speaker’s use of silent breaks between words, and Completeness indicates how many words are pronounced in the speech to the reference text input. An overall score aggregated from Accuracy, Fluency and Completeness is then given to indicate the overall pronunciation quality of the given speech. With these features, learners can easily know the weakness of their speech, and improve with target goals.
With Pronunciation Assessment, language learners can practice, get instant feedback, and improve their pronunciation. Online learning solution providers or educators can use the capability to evaluate pronunciation of multiple speakers in real-time.
Pearson uses Pronunciation Assessment in Longman English Plus to empower both students and teachers to improve the productivity in language learning, with a personalized placement test feature and learning material recommendations for students at different levels. As the world’s leading learning company, Pearson enables tens of millions of learners every year to maximize their success. Key technologies from Microsoft used in Longman English Plus are Pronunciation Assessment, neural text-to-speech and natural language processing. Check below video for a demo of the Longman English learning app.
BYJU chooses Speech service on Azure to build the English Language App (ELA) to their target geographies where English is used as the secondary language and is considered an essential skill to acquire. The app blends the best of pedagogy using state-of-the-art speech technology to help children gain command over language with ease in a judgement-free learning environment. With a conversation-first interface, this app enables students to learn, and practice English while working on their language skills in a fun, engaging and effective manner. BYJU’S is using the Speech to Text and Pronunciation Assessment capabilities to ensure that children master English with ease – to practice speaking and receive feedback on pronunciation with phoneme, word and sentence-level pronunciation and fluency scores. BYJU’S ELA assesses pronunciation of students through speaking games, identifies areas of improvement, and provides personalized and adaptive lessons to help students improve in their weak areas.
Mispronunciation detection and diagnosis
Mispronunciation Detection and Diagnose (MDD) is the core technique employed in Pronunciation Assessment, scoring word-level pronunciation accuracy, which provides judgement on miscues and contributes to the overall assessment. To provide precise and consistent result, Pronunciation Assessment employs the latest powerful neural networks for modelling, exploiting information from lower senone granularity to higher word granularity with the use of hierarchical architecture. This design enables Pronunciation Assessment to fully exploit the detailed pronunciation information from small patterns, making mispronunciation detection more accurate and robust. With 100,000+ hours training data on different accents, regions and ages, Pronunciation Assessment can also handle different scenarios with various users, for example, from kids to adults, from none-native speakers to native speakers, and provide trustable and consistent assessment performance.
Teams Reading Progress uses Pronunciation Assessment to help students improve reading fluency, after the pandemic negatively affected students’ reading ability. It can be used inside and outside of the classroom to save teachers’ time and improve learning outcomes for students. Learn how to get started.
“Reading Progress is built on the solid scientific foundation of oral repeated reading and close monitoring by the educator. It allows educators to provide personal attention to each student while at the same time dealing with a whole classroom full of students.”
— Tim Rasinski, Professor of Literacy Education at Kent State University
Cutting-edge free-style speech assessment
Pronunciation Assessment also supports spontaneous speech scenarios. Spontaneous speech, also known as free-style talk, is the scenario where speakers are giving speech without any prefixed reference, like in presentation and spoken language examination. Empowered with Azure Speech-to-Text, Pronunciation Assessment can automatically transcribe a given speech accurately, and provide assessment result on aforementioned granularities.
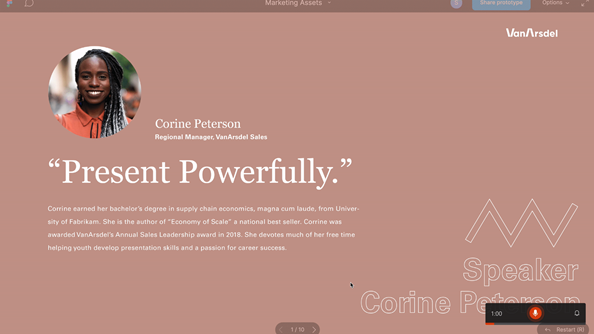
Pronunciation Assessment is used in PowerPoint coach to advise presenters on the correct pronunciation of spoken words throughout their rehearsal. When Presenter Coach perceives that you may have mispronounced a word, it will display the word(s) and provide an experience that helps you practice pronouncing the word correctly. You’ll be able to listen to a recorded pronunciation guide of the word as many times as you’d like.
Get started
To learn more and get started, you can first try out Pronunciation Assessment to evaluate a user’s fluency and pronunciation with the no-code tool provided in Speech Studio, which allows you to explore the Speech service with intuitive user interface. You need an Azure account and a Speech service resource before you can use Speech Studio. If you don’t have an account and subscription, try the Speech service for free.

Here are more resources to help you add speech to your educational applications:
Tags:

by Contributed | Jul 2, 2021 | Technology
This article is contributed. See the original author and article here.
SharePoint Framework Special Interest Group (SIG) bi-weekly community call recording from July 1st is now available from the Microsoft 365 Community YouTube channel at http://aka.ms/m365pnp-videos. You can use SharePoint Framework for building solutions for Microsoft Teams and for SharePoint Online.
Call summary:
Summer break and community call schedule updates reviewed. Register now for June trainings on Sharing-is-caring. PnP Recognition Program announced. Join the Viva Connections private preview! Update on SharePoint Framework v1.13.0 features – extensibility options with Viva Connections, Teams improvements, tooling updates, Store modernization and more. Released PnPjs for Client-side Libraries v2.6.0, CLI for Microsoft 365 v3.11.0 Beta, and PnP Modern Search v4.2.3 & v3.20.0. There were four PnP SPFx web part samples delivered in last 2 weeks. Great work!
Latest project updates include: (Bold indicates update from previous report 2 weeks ago)
PnP Project |
Current version |
Release/Status |
SharePoint Framework (SPFx) |
v1.12.1 |
v1.13.0 Preview in summer |
PnPjs Client-Side Libraries |
v2.6.0 |
v2.7.0 scheduled for July 9, v3.0.0 developments underway |
CLI for Microsoft 365 |
v3.11.0 Beta, v4.0.0 Preview |
v3.10.0 preview released |
Reusable SPFx React Controls |
v2.8.0 (SPFx v1.11), v3.2.1 (SPFx v1.12.1) |
|
Reusable SPFx React Property Controls |
v2.7.0 (SPFx v1.11), v3.2.0 (SPFx v1.12.1) |
|
PnP SPFx Generator |
v1.16.0 |
v1.17.0 on the way |
PnP Modern Search |
v4.2.3 & v3.20.0 |
July versions in progress |
The host of this call is Patrick Rodgers (Microsoft) | @mediocrebowler. Q&A takes place in chat throughout the call.
It appears fun is being had by all! Great to see everyone. Thanks for making this a great community.
Actions:
Demos:
Bringing your custom apps to Viva Connect mobile experience – three graduating levels or views of information and customizability in Viva Connections. Use SPFx to build an Adaptive Card Extension (ACE) that supports 2 views – Card View (level 1 basic information) and Quick View (level 2 more information) and a deep link to a Teams tab (level 3 full information). Future, seamlessly drill down from high level to detail – mobile and desktop experiences.
Copy PnP Search results web part settings – scenario: Many of your pages are based a template page you now need to update. After updating your template page, use this list view command set extension accessed from Pages Library, to copy the settings of the PnP search results web part present on a page to the settings of the PnP search results web part present on other selected pages.
Follow Documents in Modern Workspace with SPFx – many capabilities in 2 related samples – 1 extension, 1 web part. Both accomplish same objective: Easily identify/follow/unfollow a user’s key documents within Tenant and easily open them in Modern Pages (use extension) or Modern Pages and Microsoft Teams (use web part + extension). This solution uses the Out of Box Social functionality “Follow document“ and Microsoft Graph queries. Exhaustive feature list by sample.
SPFx web part samples: (https://aka.ms/spfx-webparts)
Thank you for your great work. Samples are often showcased in Demos.
Agenda items:
Demos:
Demo: Bringing your custom apps to Viva Connect mobile experience – Vardhaman Deshpande (Valo Intranet) | @vrdmn – 19:14
Demo: Copy PnP Search results web part settings – Anoop Tatti (Content and Code) | @anooptells – 31:24
Demo: Follow Documents in Modern Workspace with SPFx – André Lage (Datalynx AG) | @aaclage – 44:26
Resources:
Additional resources around the covered topics and links from the slides.
General Resources:
Other mentioned topics:
Upcoming calls | Recurrent invites:
PnP SharePoint Framework Special Interest Group bi-weekly calls are targeted at anyone who is interested in the JavaScript-based development towards Microsoft Teams, SharePoint Online, and also on-premises. SIG calls are used for the following objectives.
- SharePoint Framework engineering update from Microsoft
- Talk about PnP JavaScript Core libraries
- Office 365 CLI Updates
- SPFx reusable controls
- PnP SPFx Yeoman generator
- Share code samples and best practices
- Possible engineering asks for the field – input, feedback, and suggestions
- Cover any open questions on the client-side development
- Demonstrate SharePoint Framework in practice in Microsoft Teams or SharePoint context
- You can download a recurrent invite from https://aka.ms/spdev-spfx-call. Welcome and join the discussion!
“Sharing is caring”
Microsoft 365 PnP team, Microsoft – 1st of July 2021

Recent Comments