by Contributed | Sep 23, 2021 | Technology
This article is contributed. See the original author and article here.
Microsoft commissioned the Enterprise Strategy Group (ESG) to conduct an economic value study to examine the potential cost savings and business benefits that enterprises can achieve from migrating on-premises workloads to Azure Database for MySQL. ESG is an independent strategy firm that provides market intelligence and actionable insights to the global IT community. Aviv Kaufmann, Senior Economic Validation Analyst and author of the report, completed a quantitative economic analysis of Azure Database for MySQL and determined that customers reported savings and benefits in the three categories: 1) elimination of costs, 2) operational savings, and 3) improved business agility.
Note: The primary source for this blog is ESG’s report, The Economic Value of Migrating and Modernizing On-premises Instances to Azure (September 2, 2021).
Streamline application development on Azure
ESG conducted a survey to evaluate businesses cloud infrastructure services spending trends and found that as of January 2021, 68% of businesses planned to spend more on cloud services as we continue into the second straight year of a pandemic remote – work environment. More specifically, ESG’s survey found that 85% of cloud users have accelerated efforts to move applications to the cloud based on recent events over the last six months. Two of the top motivating factors for organizations to digitally transform their businesses are to become more operationally efficient and to embrace the ever-evolving technology trends that are allowing users to collaborate in new ways. (ESG Research Report: 2021 Technology Spending Intentions Survey, January 19, 2021)
Managed services are one of the many options that businesses are choosing to become operationally efficient. Migrating and modernizing to the cloud is a cost-effective way to streamline application development and improve business agility. MySQL is one of the most popular open source relational databases that organizations choose to power their web applications. ESG’s analysis noted that:
“While many developers have built the expertise required to deploy, manage, and maintain MySQL databases to power their applications, the burden of managing, updating, tuning, protecting, and ensuring high availability for MySQL instances across multiple applications takes valuable cycles away from development of core applications.”
ESG’s economic validation study focuses on the quantitative and qualitative benefits that organizations can expect when migrating on-premises MySQL instances to the fully managed Azure Database for MySQL service.
Azure Database for MySQL eliminates cost, provides operational savings, and improves business agility
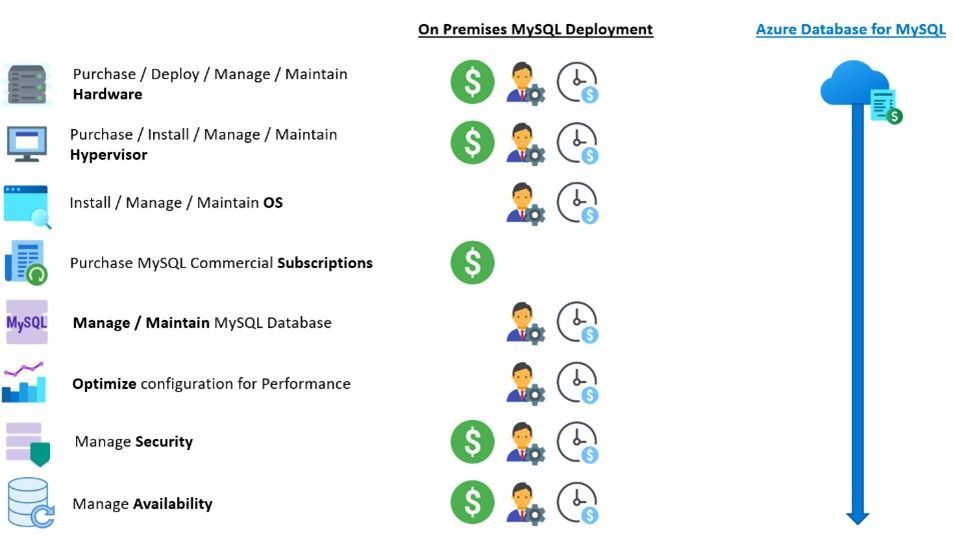
ESG interviewed three Azure Database for MySQL customers and found that they were able to significantly eliminate costs related to hardware, infrastructure, and hypervisors, and reduce their MySQL commercial subscriptions. These customers reported that the biggest benefits they’ve seen are from the operational savings achieved by DevOps teams leveraging Azure Database for MySQL. One customer noted that, “Now that we migrated to Microsoft Azure, I don’t need to worry about all the IT operational aspects, like backups and updates, and that’s a huge benefit for my team”.
ESG found that customers were excited to report the different ways that Azure Database for MySQL helped them transform their businesses by allowing them to achieve greater business agility in everyday practice. Some of the ways that DevOps and operations teams have been able to work more efficiently include providing faster time to value, accelerating migration and modernization, improving application performance, increasing flexibility and business agility, integrating Azure Services more quickly, and increasing development velocity.
ESG’s findings
As part of their analysis, ESG leveraged customer interviews, product pricing models, and public and industry knowledge of economics and technologies to create a three-year TCO/ROI model that compares the costs and benefits of migrating on-premises MySQL instances to Azure Database for MySQL. ESG’s model found that Azure Database for MySQL provided up to a 48% lower total cost over a three-year period, including a 93% reduction in the operational cost to deploy, manage, and maintain MySQL instances in an on-premises infrastructure. ESG reports that Azure Database for MySQL offloads a bulk of the work currently performed by developers, which further reduces the cost to administer, tune, secure, protect, and maintain the MySQL databases by up to 86%. This savings equates roughly to the productivity and development capacity of four full-time developers, creating an additional $15.5 million in revenue for the business.

ESG finds that as organizations continue to migrate and modernize to the cloud, they can expect to streamline operations while reducing operational costs and improving business agility with Azure Database for MySQL. Businesses are looking to Microsoft Azure to help digitally transform their applications with more efficient microservice architectures that can be dynamically hosted, scaled, protected, secured, and delivered by the many services provided by the Azure ecosystem. ESG recommends the fully managed Azure Database for MySQL service as a cost-effective solution for successfully increasing business agility, optimizing performance, and maximizing the productivity of developers and IT resources.
For additional detail, refer to ESG’s full report, The Economic Value of Migrating and Modernizing On-premises Instances to Azure Database for MySQL.
If you’re ready to learn more, explore these resources:

by Contributed | Sep 22, 2021 | Technology
This article is contributed. See the original author and article here.
Introduction
This article will show you how to use Azure Synapse (also works with Azure Data Factory) to build a pipeline that gets public data from YouTube using REST API’s and store it in parquet files in ADLS Gen2 and Azure Synapse Analytics. At the end, you should be able to connect to other social media platforms that support REST API’s.
In addition, we will have a look at different ways to analyze the data in Azure Synapse Analytics: using SQL Serverless, SQL Provisioned (SQL Pools) and Spark Clusters.
Considerations
The YouTube REST API calls used in this exercise use API Keys as credentials. Using OAuth 2.0 is not possible because we’re using an automated pipeline that runs without a UI, required for user interaction and sign-in. Managing these credentials is not covered here – please refer to each social media platform API official documentation.
The pipeline stores data in both ADLS Gen2 parquet files and Azure Synapse Analytics SQL Pool tables – this may or may not be a good implementation option. This decision is taken only to be able to demonstrate the two possibilities, between many – obviously, you should consider your own requirements.
What’s needed
Azure Key Vault – to store the API Key; optional but strongly advised.
Azure Synapse Analytics workspace – to build the pipeline (optionally Azure Data Factory can be used)
SQL Serverless – no need to be provision.
SQL Pool – as a provisioned SQL engine; one table and one procedure will be created here.
Spark Cluster – as a provisioned Spark engine to run spark notebooks.
YouTube API Key – to access the YouTube Rest API
1. Preparation
Azure key vault secret
Create a new Azure key vault, or use an existing one, and create a new secret using:
Name: YouTubeMicrosoftDemosProjectAPIKey
Value: <YOUR-YOUTUBE-API-KEY>
Screenshots of getting the API Key value and creating the new secret:

Note: you need to grant the Azure Synapse Analytics workspace Managed Identity access to your Azure Key vault. Learn more here.

In this example, only “Get” and “List” are selected on the “Secret Permissions” list.
Next, open the current version of the secret and store the “Secret Identifier” as it will be used later:

Linked service to the Storage Account
Because we will be using the “Primary” Azure Data Lake Storage Gen2 storage account for the Azure Synapse Analytics workspace, specified when creating the workspace, the linked service is already created, and its name should be in this format: “<WORKSPACE-NAME>-WorkspaceDefaultStorage”.
Note: You need to create a new linked service if you want to use a storage account other than the “Primary” or if you’re using Azure Data Factory.
Linked service to the SQL Pool
Again, there’s no need to create a linked service to a SQL Pool in the same workspace because we will be using an activity that is unique to Azure Synapse Integrate pipelines: the “SQL pool stored procedure”.
Note: If you are using Azure Data Factory, then you need to create a linked service to the SQL Pool where you want to store your data. Refer to the “ADF linked service to Azure Synapse Analytics” section in the Azure Synapse SQL Pools Auto DR article.
Create YouTube video statistics table and related stored procedure
Create a new table in the SQL Pool you want to store the data. It will be used to store some fields from the REST API responses and well as the entire payload.
CREATE TABLE [dbo].[youtube_video_likes] (
  ITEM_ID            VARCHAR(100) NOT NULL,
  VIDEO_ID           VARCHAR(100) NOT NULL,
  LIKES              INT          NOT NULL,
  FULL_JSON_RESPONSE VARCHAR(MAX) NOT NULL,
  TS_INSERT          DATETIME     NOT NULL
)
WITH (DISTRIBUTION = ROUND_ROBIN, HEAP)
GO
In addition, create a new stored procedure. This will be called to insert the data in the table.
CREATE PROC [dbo].[p_youtube_video_likes_insert] @p_item_id [VARCHAR](100), @p_video_id [varchar](100), @p_likes [INT], @p_full_json_response [VARCHAR](MAX) AS
BEGIN
    INSERT INTO [dbo].[youtube_video_likes](item_id, video_id, likes, full_json_response, ts_insert)
    SELECT @p_item_id, @p_video_id, @p_likes, @p_full_json_response, SYSDATETIME();
END
GO
2. Create Datasets
We will use the Copy activity to store the REST API responses in parquet files, so we need to create two datasets for the source and sink.
Dataset for source
Create a file and upload it into your storage account. This file is a supporting file as the data we want to store is coming from the REST API calls and not from another file. The content is the simpler JSON snippet we can have, an empty JSON.
Filename |
oneLinerEmpty.JSON |
Content |
{} |
Then, create a new dataset for this file:


Data store |
Azure Data Lake Storage Gen2 |
Format |
JSON |
Name |
oneLinerEmptyJSON |
Linked service |
the linked service for your “Primary” storage account or another one |
File path |
use the browse button to locate and select your uploaded JSON file. In this example, “filesystem001” is the container name, “socialmedia/supportingfiles” is the folder, and “oneLinerEmpty.JSON” is the file name |
Dataset for sink
Create a new dataset that will be used to store the data in parquet format. This dataset will be parameterized because we will use it to create different files. Follow the same steps as above but select the Parquet format.

Name |
parameterOutputParquet |
Linked service |
the linked service for your “Primary” storage account or another one |
File path |
leave empty as this will be parameterized |
Import schema |
None |
Now it’s time to configure this dataset. In the Parameters tab, create 2 parameters as in this image:

P_FILE_PATH |
String, no default value |
P_FILE_NAME |
String, no default value |
In the Connection tab, we will use these parameters:

“filesystem001” is the name of the container: Replace accordingly.
Now we are ready to start developing the pipeline.
3. Pipelines
Create an auxiliary pipeline
The first pipeline is the one that uses the 2 datasets we created above and will only have a Copy activity. The objective of this pipeline is to receive a parameter and write that value in a parquet file. It will be called several times from the main pipeline, to store all the REST API responses.
Create a new pipeline, name it “Store Parameter in Parquet File” and create the following parameters, all with type String and no default value:
P_FILE_PATH |
P_FILE_NAME |
P_DATA |

Add a Copy activity, name it “Store parameter P_DATA in Parquet” and configure the Source, Sink and Mapping tabs as shown in the following images.

Source dataset |
the JSON file create in the preparation step |
File path type |
File path in dataset |
Recursively |
unchecked |
Additional columns |
create a new column “VALUE_COLUMN” and use the “Add dynamic content” of the VALUE field to add a reference to the parameter P_DATA (@pipeline().parameters.P_DATA).
The goal of this additional column is to create a new column with the content of the received parameter, as if it were read from the input file. This is a way to inject whatever values we want in columns of the Copy activity.
|

Sink dataset |
parameterOutputParquet |
P_FILE_PATH |
@pipeline().parameters.P_FILE_PATH |
P_FILE_NAME |
@pipeline().parameters.P_FILE_NAME |

Map complex values to string |
checked |
Click on the “+ New mapping” to add a new mapping row. Rename the default column name “Column_1” to “VALUE_COLUMN” and map it to the same name in the right side of the mapping.
This pipeline is finished and should look like this:

Create the main pipeline
The main pipeline has these steps:
- Get YouTube API Key from the secret in Azure Key Vault
- Get the playlist ID for a given channel ID
- Get the list of videos for a given playlist ID
- For each video, get video statistics
- Store results in the SQL Pool
In addition, the responses of all 3 YouTube REST API calls will also be stored in parquet files. This will allow us later to look at the data using different analytical/processing engines.
The complete pipeline and parameters will look like this:

Start by creating a new pipeline, name it “YouTube REST API example with API Key” or whatever you want and add the following parameters and default values:
P_SOCIAL_MEDIA_PLATFORM |
YouTube |
P_YOUTUBE_CHANNEL_ID |
<YOUR-YOUTUBE-API-KEY> |
P_FILE_OUTPUT_PATH |
socialmedia/runs/ |
Add 3 Web activities, link them as shown in the previous picture and configure with the following properties. Only the non-default and important to mention properties are listed.
Web activity 1
The secure output option will hide the results from the API call, in this case it will hide the value we’re getting from the secret, as per the best practices. When we try to look at the result, it looks like this:

To access the value of the secret, we can now use this expression: activity(‘Get YouTube API Key from Key Vault’).output.value
Note: any developer can turn off the secure output option and see the value of the secret. This can happen in a development environment, where the sensitivity is not the same as in a production environment. Make sure that no sensitive information can be seen in a production environment, by including revision rules that validate that no pipelines can be promoted if proper settings for security are not met.
Web activity 2
The secure input option will hide the values sent to this activity, in this case it will hide the API Key used in the URL. If we try to see the runtime input, all we’ll see is this:

We now have the playlist ID for a channel, so we can request a list of videos for that playlist.
Web activity 3
The secure input option is also checked. Notice what we would see if this was not the case:

We want to store the responses of the 2 YouTube REST API calls in parquet format. We already have a pipeline to do that so we will now invoke it.
Add 2 Execute Pipeline activities to the canvas, link them as show in the complete pipeline design and configure as follows.
Execute Pipeline 1
Name |
Store playlistID result in Parquet |
Invoked pipeline |
Store Parameter in Parquet File, or any other name you gave to the auxiliary pipeline |
Wait on completion |
checked |
P_FILE_PATH |
@concat(
pipeline().parameters.P_FILE_OUTPUT_PATH,
pipeline().parameters.P_SOCIAL_MEDIA_PLATFORM
) |
P_FILE_NAME |
@concat(
‘getPlaylistID-‘,
utcnow(),
‘.parquet’
) |
P_DATA |
@string(activity(‘Get playlistID’).output) |
This activity will store the REST API response in a parquet file in the storage account. The file name will be similar to “getPlaylistID-2021-04-23T13:13:19.4426957Z.parquet”.
Execute Pipeline 2
Name |
Store Playlist Videos result in Parquet |
Invoked pipeline |
Store Parameter in Parquet File, or any other name you gave to the auxiliary pipeline |
Wait on completion |
checked |
P_FILE_PATH |
@concat(
pipeline().parameters.P_FILE_OUTPUT_PATH,
pipeline().parameters.P_SOCIAL_MEDIA_PLATFORM
) |
P_FILE_NAME |
@concat(
‘getPlaylistVideos-‘,
utcnow(),
‘.parquet’
) |
P_DATA |
@string(activity(‘Get Playlist Videos’).output) |
This activity will store the REST API response in a parquet file in the storage account. The file name will be similar to “getPlaylistVideos-2021-04-23T13:13:22.3769063Z.parquet”.
Now that we have a list of videos, we need to get the statistics for each one of them. To accomplish that, we add a ForEach activity to the pipeline, connect it to the output of the “Get Playlist Videos” activity and configure as:
Name |
For Each Video |
Sequential |
checked, but can also run in parallel |
Items |
@activity(‘Get Playlist Videos’).output.items |
Next, we add the remaining activities inside the loop, that will run for each video in the playlist. At the end it will look like this:

Web activity
This activity will request some statistics for a given video. Statistics include the number of views, likes, comments, and so on.
Execute pipeline activity
Name |
Store Video Stats in Parquet |
Invoked pipeline |
Store Parameter in Parquet File, or any other name you gave to the auxiliary pipeline |
Wait on completion |
checked |
P_FILE_PATH |
@concat(
pipeline().parameters.P_FILE_OUTPUT_PATH,
pipeline().parameters.P_SOCIAL_MEDIA_PLATFORM
) |
P_FILE_NAME |
@concat(
‘getVideoStats-‘,
utcnow(),
‘.parquet’
) |
P_DATA |
@string(activity(‘Get Video Stats’).output) |
This activity will store the REST API response in a parquet file in the storage account. The file name will be similar to “getVideoStats-2021-04-23T13:13:25.6924926Z.parquet”.
SQL Pool Stored Procedure
Name |
SQL pool SP – Insert data |
Azure Synapse dedicated SQL pool |
select the SQL pool where you created the table and stored procedure |
Stored procedure name |
[dbo].[p_youtube_video_likes_insert], or whatever you called it |
Stored procedure parameters (use the import button to list them):
p_item_id |
@item().id |
p_video_id |
@item().snippet.resourceId.videoId |
p_likes |
@activity(‘Get Video Stats’).output.items[0].statistics.likeCount |
p_full_json_response |
@string(activity(‘Get Video Stats’).output) |
The call to the stored procedure will make sure that some individual fields (item id, video id, count of likes) as well as the full response are stored in a table in a SQL pool. In a real scenario, we would need to create a model to hold the data, as per the requirements.
Note: if you use Azure Data Factory, the same goal can be achieved using the “Stored procedure” activity, but you would need to use a linked service to the target SQL pool.
We can now run the full pipeline and validate that several files were created in the storage account and some data inserted in the SQL pool table.
4. Look at the data
Because we stored our data in parquet files and tables in a SQL pool, we have several options to use to manipulate the data.
This table summarizes some of the options using Azure Synapse Analytics:
|
Data format and store |
Compute options |
Parquet files in ADLS Gen2 |
Tables in SQL Pools |
SQL Serverless
|
Y (*)
|
N
|
SQL Provisioned
|
Y
|
Y (*)
|
Spark Cluster
|
Y (*)
|
Y
|
Below we will look at short examples of the options marked with (*). The goal is not to go deep into technical details of JSON handling but rather have an idea of the possibilities to use.
a) SQL Serverless on Parquet files in ADLS Gen2
We can use the OPENROWSET function to read a parquet file and show its contents.
-- check file as-is
SELECT * FROM OPENROWSET(
    BULK 'https://mydatalake.dfs.core.windows.net/filesystem001/socialmedia/runs/YouTube/getVideoStats-2021-04-23T12:37:12.2853807Z.parquet',
    FORMAT='PARQUET'
) AS [result]

Since we have a JSON file, we can take advantage of the OPENJSON function to parse the elements in the first level of the file.
-- OPENJSON in action
SELECT [key], [value], [type]
FROM OPENROWSET(
    BULK 'https://mydatalake.dfs.core.windows.net/filesystem001/socialmedia/runs/YouTube/getVideoStats-2021-04-23T12:37:12.2853807Z.parquet',
    FORMAT='PARQUET'
) as [result2]
CROSS APPLY OPENJSON(VALUE_COLUMN)

You can read more about OPENROWSET and OPENJSON here:
b) SQL Provisioned on Tables in SQL Pools
OPENJSON is also available on the SQL Provisioned engine.
-- check data as-is
SELECT *, isjson(full_json_response) as 'IS_JSON'
FROM [dbo].[youtube_video_likes]
GO

SELECT *
FROM [dbo].[youtube_video_likes]
cross apply openjson(full_json_response)
where video_id = 'A212x5XXXXX'
GO

You can read more about OPENJSON for SQL Provisioned and JSON functions here:
c) Spark Cluster on Parquet files in ADLS Gen2
We can also use a Spark Cluster as a Spark processing engine to look at the data.
For this task, we create a new notebook. By default, the selected language is Python (Spark) and we can leave it like that, although we can use different languages by using Cell Magic Commands like %%pyspark or %%sql. We also need to attach the notebook to an existing Apache Spark Pool.
First, we load the data into a dataframe:
%%pyspark
df = spark.read.load('abfss://filesystem001@mydatalake.dfs.core.windows.net/socialmedia/runs/YouTube/getVideoStats-2021-04-23T12:37:12.2853807Z.parquet', format='parquet')
display(df)

Since we have the data in a dataframe, we can use pyspark to manipulate the data:
%%pyspark
from pyspark.sql.functions import from_json, col
from pyspark.sql.types import StructType, StructField, StringType, ArrayType

statistics_schema = StructType([
    StructField('likeCount', StringType(), True)
])

items_schema = StructType([
    StructField('id',      StringType(), True),
    StructField('statistics', statistics_schema, True)
])

schema = StructType([
    StructField('kind',  StringType(),            True),
    StructField('etag',  StringType(),            True),
    StructField('items', ArrayType(items_schema), True)

])

display(
    df.withColumn('kind',     from_json(col('VALUE_COLUMN'), schema).getItem('kind'))
      .withColumn('etag',     from_json(col('VALUE_COLUMN'), schema).getItem('etag'))
      .withColumn('video_id', from_json(col('VALUE_COLUMN'), schema).getItem('items')[0].getItem('id'))
      .withColumn('likes',    from_json(col('VALUE_COLUMN'), schema).getItem('items')[0].getItem('statistics').getItem('likeCount'))
      .select('kind', 'etag', 'video_id', 'likes')
)

If SQL is the preferred way, we can create a table from the dataframe and use the get_json_object function to parse the json strings:
%%pyspark
df.write.mode("overwrite").saveAsTable("default.youtube_video_likes")

%%sql
SELECT get_json_object(VALUE_COLUMN, '$.kind') as `kind`,
       get_json_object(VALUE_COLUMN, '$.etag') as `etag`,
       get_json_object(VALUE_COLUMN, '$.items[0].id') as `videoId`,
       get_json_object(VALUE_COLUMN, '$.items[0].statistics.likeCount') as `likes`
FROM default.youtube_video_likes

Summary
It is easy to build an Azure Synapse Pipeline that gets information from social media.
In the example shown in this article, on how to get some data from YouTube, we covered the ingestion, storing and consumption using different techniques, and more can be used. There is not “the correct” way to do it but rather a way that makes sense in your environment.
You can find all the code in the attachment file below, including the pipelines and datasets, SQL scripts, notebooks and supporting files, as well as on GitHub under the repository name SynapseIntegrateSocialMedia.

by Contributed | Sep 21, 2021 | Technology
This article is contributed. See the original author and article here.
Join us for our monthly community call every 4th Tuesday of the month, at either 8:00 AM or 5:00 PM PT.
This month’s call will be on September 28th, and we will be covering topics around content and features updates for Learning Pathways as well as new Microsoft Teams features.
Please note that in the September newsletter we incorrectly specified the date as the 24th, our Champion call is indeed on September 28th – sorry for the confusion!
If you have not yet joined our champion community, sign up here to get the resource links to access the calendar invites, program assets, and previous call recordings!
We look forward to seeing you there!

by Contributed | Sep 20, 2021 | Technology
This article is contributed. See the original author and article here.
Microsoft and Intel empower technologies that can build a more environmentally sustainable future and reduce the demand we place on Earth’s resources. That’s why Microsoft Azure IoT and Intel are partnering with the InnovateFPGA Design Contest, where developers can harness Azure cloud computing and Intel® FPGA technology to create solutions that reduce environmental impacts.
The design contest is looking for inventive developers from around the globe who can create cutting-edge solutions. Internet of Things (IoT) solutions are already reducing climate impact: from smart lighting that turns off when not needed to transportation systems that reduce pollution-exacerbating car congestion. New IoT solutions could address unique challenges, such as reducing the waste of resources such as water, tracking ocean life, or increasing protection of endangered species.
FPGA Cloud Connectivity Kits, provided to qualified teams in the InnovateFPGA contest, show how an Intel® Edge-Centric FPGA (field programmable gate array) can connect seamlessly with Azure IoT. In addition, development teams will have a choice to use Azure IoT Central or IoT Hub to connect their solution to the Azure cloud. Developers interested in building sustainable solutions using this technology can register their team at www.innovatefpga.com.
Working jointly to encourage innovative developers
Azure IoT and Intel already work jointly together in advanced solutions, complementing each other’s technology to address challenges in a variety of industries. The FPGA Cloud Connectivity Kit enables innovative developers to perform new tasks and solve more challenges, as real-time handling of Azure workloads is easier with a dedicated FPGA-based hardware accelerator. FPGA circuits also can be configured specifically for various workloads to provide better performance and flexibility.
Additionally, Azure IoT Central, IoT Hub, and IoT Plug and Play help builders and developers connect devices to the cloud. IoT Central offers a secure platform, centralized management to reconfigure and update devices, and a growing selection of IoT app templates for common scenarios. IoT Hub, meanwhile, enables secure and reliable communication via the cloud between IoT applications and the devices they manage. Finally, IoT Plug and Play seeks to remove technical barriers, reducing development time, cost, and complexity.
How Microsoft Azure and Intel can reduce environmental impacts
Sustainability and environmental efforts by Microsoft and Intel go beyond their support of the InnovateFPGA contest. As part of our commitment to put sustainable technologies at the heart of our innovation, we’re focused on four key areas of environmental impact to local communities: carbon, water, waste, and ecosystems. We’re striving to use 100% renewable energy by 2025, replenish more water than we consume by 2030, create zero waste annually by that same year, and achieve net-zero deforestation from new construction. Enterprises looking to understand and potentially reduce their environmental impacts can use the Sustainability Calculator.
Just as Azure cloud computing can help reduce energy use, Intel FPGA-enabled architecture used with the cloud is economical and power-efficient, making high-performance computing more sustainable. Microsoft is also researching new approaches for improving computing and cloud data handling while simultaneously using less energy and more sustainable materials.
Project 15 from Microsoft also is helping to accelerate conservation organizations and scientific teams reduce costs and complexity in deploying IoT technologies through its open-source software platform. The Global Environment Facility (GEF) Small Grants Programme, implemented by the United Nations Development Program, is collaborating with the InnovateFPGA contest to task teams to create solutions for biodiversity, sustainable agriculture, and marine conservation. The GEF has shared use cases from the Project 15 initiative on the contest website.
Submit design proposals to the InnovateFPGA Design Contest
Regional teams of university students, builders, and professional engineers with the creativity and ingenuity to design solutions for challenging environmental issues are encouraged to participate in the InnovateFPGA Design Contest. Teams must register and submit their solution proposals at the contest registration page by Sept. 30, 2021. After registering, free FPGA Cloud Connectivity Kits will be shipped to teams whose proposals are selected to advance forward.
Qualifying teams will develop solutions for sustainability until Spring 2022, where they will compete in their respective regional competition. Teams at this level will have a chance to win cash prizes and an invitation to the Grand Finale event at Intel headquarters in San Jose, California, in 2022. For more details, rules, and an FAQ page, go to www.innovatefpga.com.
by Contributed | Sep 18, 2021 | Technology
This article is contributed. See the original author and article here.
Intro
A while back, I wrote about How to use a custom connector in Power Automate showing how easy you can create a connector to a cloud service that is not already in the very long list of connectors in Power Automate. I chose to create a connector for Spotify and connected a Get_Current_Song action with an IOT button and twitter. As a result, information about the song I would be listening to would be tweeted.
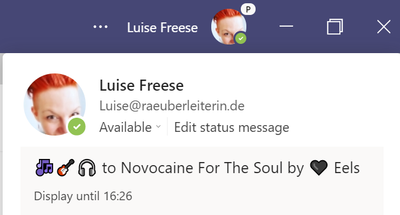
Now I stumbled upon a really great blog post by fellow MVP Loryan Strant who also used this Spotify connector to change the pinned message of your status in Microsoft Teams. To get the most value out of this post, go read Loryans post first- it is written with great clarity and also I love this guys’ taste of music :musical_notes:! Also please understand his flow first. I love the idea and creativity! The result of such a flow looks like this:
While some would debate if this flow is necessary, I feel it shows that custom connectors are a great way to extend Microsoft 365. Also: #MusicWasMyFirstLove – case closed :)
However when reading this blog post, I saw some patterns that I often see in flows and that could be improved – and as I could already learn so much from Loryan, this time I hope to return the favor :)
Loryan created 13 actions and as I seem to be just more lazy than he is, therefore I thinned out his awesome idea to just 5-6 actions: This is what it looks like:

The result is about the same – just that I display also a message if I am currently not listening to music (yes, this happens!)
Parse JSON
First thing I wanted get rid of was the Parse JSON action. While it is super powerful and lets you easily access properties of objects that you get as response, it is unnecessary sometimes: We can also write the flow without it if we take a look on how we can select properties and return their values in expressions.
To be successful with that, it is crucial to understand the JSON schema of the response we are interested in. Easiest way to achieve that:
a) copy the body of the output of that action, paste it into a code editor – I work with Visual Studio Code

b) we make sure that we select JSON as language – VS Code will then color everything nicely for us and highlight beginning and ends of objects for example
c) we have a look at the code. For the sake of better readability – this schema is about 450 lines long, I already collapsed two arrays called available markets – it’s a long list of country codes in which a particular song is available. We don’t need it here. If you aim to rebuild this, its highly recommended to copy the code from YOUR output, not from this blog post, as I shortened the code.
    {

        “timestamp”: 1631969547352,

        “progress_ms”: 85903,

        “item”: {

          “album”: {

            “album_type”: “album”,

            “artists”: [

              {

                “external_urls”: {

                  “spotify”: “https://open.spotify.com/artist/3CQIn7N5CuRDP8wEI7FiDA”

                },

                “href”: “https://api.spotify.com/v1/artists/3CQIn7N5CuRDP8wEI7FiDA”,

                “id”: “3CQIn7N5CuRDP8wEI7FiDA”,

                “name”: “Run–D.M.C.”,

                “type”: “artist”,

                “uri”: “spotify:artist:3CQIn7N5CuRDP8wEI7FiDA”

              }

            ],

            “available_markets”: [
            ],

            “external_urls”: {

              “spotify”: “https://open.spotify.com/album/7AFsTiojVaB2I58oZ1tMRg”

            },

            “href”: “https://api.spotify.com/v1/albums/7AFsTiojVaB2I58oZ1tMRg”,

            “id”: “7AFsTiojVaB2I58oZ1tMRg”,

            “images”: [

              {

                “height”: 640,

                “url”: “https://i.scdn.co/image/ab67616d0000b273894ae4df775c6b47438991af”,

                “width”: 640

              },

              {

                “height”: 300,

                “url”: “https://i.scdn.co/image/ab67616d00001e02894ae4df775c6b47438991af”,

                “width”: 300

              },

              {

                “height”: 64,

                “url”: “https://i.scdn.co/image/ab67616d00004851894ae4df775c6b47438991af”,

                “width”: 64

              }

            ],

            “name”: “Raising Hell”,

            “release_date”: “1986-05-15”,

            “release_date_precision”: “day”,

            “total_tracks”: 12,

            “type”: “album”,

            “uri”: “spotify:album:7AFsTiojVaB2I58oZ1tMRg”

          },

          “artists”: [

            {

              “external_urls”: {

                “spotify”: “https://open.spotify.com/artist/3CQIn7N5CuRDP8wEI7FiDA”

              },

              “href”: “https://api.spotify.com/v1/artists/3CQIn7N5CuRDP8wEI7FiDA”,

              “id”: “3CQIn7N5CuRDP8wEI7FiDA”,

              “name”: “Run–D.M.C.”,

              “type”: “artist”,

              “uri”: “spotify:artist:3CQIn7N5CuRDP8wEI7FiDA”

            },

            {

              “external_urls”: {

                “spotify”: “https://open.spotify.com/artist/7Ey4PD4MYsKc5I2dolUwbH”

              },

              “href”: “https://api.spotify.com/v1/artists/7Ey4PD4MYsKc5I2dolUwbH”,

              “id”: “7Ey4PD4MYsKc5I2dolUwbH”,

              “name”: “Aerosmith”,

              “type”: “artist”,

              “uri”: “spotify:artist:7Ey4PD4MYsKc5I2dolUwbH”

            }

          ],

          “available_markets”: [
          ],

          “disc_number”: 1,

          “duration_ms”: 310386,

          “explicit”: false,

          “external_ids”: {

            “isrc”: “USAR19900334”

          },

          “external_urls”: {

            “spotify”: “https://open.spotify.com/track/6qUEOWqOzu1rLPUPQ1ECpx”

          },

          “href”: “https://api.spotify.com/v1/tracks/6qUEOWqOzu1rLPUPQ1ECpx”,

          “id”: “6qUEOWqOzu1rLPUPQ1ECpx”,

          “is_local”: false,

          “name”: “Walk This Way (feat. Aerosmith)”,

          “popularity”: 69,

          “preview_url”: “https://p.scdn.co/mp3-preview/c7a8010bbddcd0d793a832de76a24d2cae5ab497?cid=2e75e650d1e74b6a994734ed4aea2ef7”,

          “track_number”: 4,

          “type”: “track”,

          “uri”: “spotify:track:6qUEOWqOzu1rLPUPQ1ECpx”

        },

        “currently_playing_type”: “track”,

        “actions”: {

          “disallows”: {

            “resuming”: true,

            “toggling_repeat_context”: true,

            “toggling_repeat_track”: true,

            “toggling_shuffle”: true

          }

        },

        “is_playing”: true

      }
b) look for the properties you are interested in – for example we want to if a song is playing right now – we will find the is_playing property, which will either return true or false, which makes it perfect to put this into our condition:

The expression is outputs(‘Get_Current_Song’)[‘body’][‘is_playing’].
Why is that? Let’s deconstruct this: From the output of the Get_Current_Song, we are interested in the [‘body’] and inside of this we want the value of the [‘is_playing’] property
Now if we are also interested in the name of the song, we would do a quick search in that file for name and get four results:
- in line 14: this
name property sits in the artists array, that consists of an album object and the name property here refers to the name of the artist of album, not to the name of the song that we are interested in.
- in line 221: this
name property also sits in the album object and refers to the name of the album.
- line 235: this
name property sits in the artists object and refers again to the name of the artist.
- finally, in line 432, we find the
name property we were looking for; it sits in the item property.
Therefore, we will access the song name with:
outputs(‘Get_Current_Song’)[‘body’]?[‘item’]?[‘name]
If we now also want to have the name of the artist, we get this with:
outputs(‘Get_Current_Song’)[‘body’]?[‘item’]?[‘album]?[‘artists][0]?[‘name’]
Wait, what? These are a lot of properties, so let’s slow down for a bit to take a closer look:
- we get the
Get_Current_Song action with outputs(‘Get_Current_Song’)
- now we go ahead and with the
? operator and select the first level property we are interested in: item
- next up is taking a look inside of the
item property: what do we want to get here? It’s the album property. We do this as before with ? and the name of the property in []: ?[‘album’]
- Inside of the
album property we want to get the artists property and yet again we do this with ? and the name of the property in []: ?[‘artists’]
- Now remember that
artists was an array? You can see this by the brackets [] in the code. We want to return the first element of this array, therefore we put a [0]. It’s a zero, because arrays in JSON are zero-based, which means that the first element of an array has the index 0, the second one has index 1, and so on.
- Now that we returned that first element in the
artists array (it’s only one, but Power Automate will yell at you if you don’t select just one element and instead return the entire array), we will go ahead and finally select the name property from it, which refers to the artist.
You see, it’s all about understanding the underlying JSON schema and see, which properties are part of which objects. If you use the Parse JSON action, you don’t need to write these expressions, but you face some disadvantages:
- you can now select from four
name properties in your dynamic content – and need to select blindly
- You have no clue WHY you get four of those as you don’t understand the data structure
- Parse JSON is yet another action which blows up your flow
unnecessary Apply-to-each loops
You know that moment when you are creating a flow and and out of a sudden Power Automates automatically adds an Apply-to-each for you and you wonder why this happened? Also, you will face some issues later on? Wherever possible it’s a good idea to avoid loops that are not necessary.
The fact that we didn’t just parse the JSON output from our Get_Current_Song action but understood the JSON schema gives us an option to avoid a loop – we did not return an array of (one) artist, that triggered Power Automate to insert an apply-to-each loop, but we only returned the first element of the artist array – this way we don’t need to loop over this one-element-array, which means that we got rid of another action!
variables and expressions
Power Automate knows some nice actions for variables – the most important one is initialize variable – in Power Automate all variables need to be initialized (with or without value) before we can use them.
Now as we already skipped successfully the Parse JSON action and could also access artist name and song name without the use of variables but in expressions, I want to minimize the other initialize variables and compose actions from Loryans flow:
Instead of several actions and calculations to
– get the timestamp when the song started – get the current time – add the duration of the currently playing song to the current time,
we could have one variable called duration with this expression:
addSeconds(utcnow(),div(sub(outputs(‘Get_Current_Song’)?[‘body’]?[‘item’]?[‘duration_ms’],outputs(‘Get_Current_Song’)?[‘body’]?[‘progress_ms’]),1000))
Explanation:
- This adds seconds to utcnow(), which is the current time.
- How many seconds? The return value from the subtraction of the duration in milliseconds
[‘duration_ms’] minus the [‘progress_ms’] current progress in milliseconds
- With the div function this value is divided by 1000 as we want seconds instead of milliseconds.
understand the API you are working with
The Get_Current_Song returns the LAST song that was played – and the is_playing property returns if the song is currently (still) playing or not. This means, that we need to distinguish between a song that played before I needed to turn off the music and a currently playing song. You might say, well, this doesn’t really matter – but if we take a closer look to understand, which data is returned when, we would need to redesign our flow: The fact that we get an output of the Get_Current_Song even if the is_playing property is false, means that we don’t get a null when our subsequent actions expect an object, a string, an array or anything else that is NOT null. Yet again, understanding what happens behind the scenes because we understand the output of an action will make it easier to create flows.

Recent Comments