
by Contributed | Sep 11, 2024 | Technology
This article is contributed. See the original author and article here.
Viva Connections is the gateway for the employee experience and provides an extensible platform through the dashboard, where employees can see a targeted list of actionable cards that can connect to Microsoft Teams apps, Viva apps and services, partner apps, and custom solutions using the SharePoint Framework (SPFx) framework, internal links, and external links.
 A Viva Connections dashboard showing some examples of third party cards.
This blog will explore a few of our diverse third-party card integrations available from can extend the capabilities of Viva Connections, allowing organizations to incorporate third party external tools, services, and data directly into their flow of work and ensure business critical investments that they have made in other services can be added directly into employee dashboards. There are countless ways to customize or build your own dashboard cards to meet the needs of employees at virtually any organization, but this blog will highlight a few pre-packaged cards from Microsoft partners that can easily be added to your app.
With the ServiceNow card, enable employees to get support, find answers, and act on tasks across HR, IT, and other departments. Once deployed, the card offers a quick view of their task list by selecting View My Tasks. The ServiceNow Adaptive Card extension also provides a quick entry point into the app by simply selecting Visit Employee Center.

With the UKG card employees can view their respective pay information and review their work schedules, shifts, and PTO, to see a clearer picture of upcoming priorities.

Achievers for Viva Connections extends the Achievers Employee Experience platform into employees’ daily workflows. Members can enjoy some of their favorite activities found on their Achievers program: view upcoming celebrations, recognitions received, the latest trending recognitions, and perform quick actions, all on one dashboard within Viva Connections.

The Qualtrics card brings experience management into Viva Connections seamlessly. It enables quick access to surveys and feedback tools, allowing organizations to gather valuable insights and act on employee, customer, and product experiences right from the dashboard. The Qualtrics card can link directly to surveys and let employees know when feedback is due, eliminating common barriers to organization-wide feedback.

With the Workday card, Viva Connections brings Workday data and actions to employees’ fingertips right in the dashboard. With this integration, users can access Workday tasks such as inbox items, time off balances, and more, simplifying HR processes and saving employees time on administrative tasks.
Features:
- Customizable Workday® Web part in SharePoint & Adaptive Card extension for Viva Connections dashboard
- Seamless Microsoft 365 integration: Get instant access to your Workday® data right within SharePoint using our Web part integration.
- Developer-friendly: Easily customize the integration to fit your organization’s unique needs.
- Streamlined workflows: Enjoy a seamless connection between Workday® and your Microsoft 365 apps for smooth data sharing and collaboration.

The Jira integration transforms how employees manage tasks, bugs, and user stories by pulling them directly into the Viva Connections card.
Features:
- Unified view: Gain a comprehensive overview of your Jira tasks, including tickets, comments, and updates, all within a single SharePoint Web part.
- Advanced search: Quickly define your own JQL queries to locate specific sets of tasks, shining a light on your path to productivity.
- Real-Time updates: Stay informed with live data synchronization, ensuring you’re always up-to-date with the latest project developments.

The Zendesk card for Viva Connections allows users to access and manage their Zendesk tickets directly, facilitating a more efficient customer support workflow.
Features:
- Display your Zendesk data right within SharePoint with a custom web part
- Enjoy a seamless experience within your Microsoft 365 environment
- Redefine productivity by viewing and creating tickets from a single place

This seamless connection allows for the direct embedding of Asana tasks into your Viva Connections dashboard, creating a unified workspace where you can manage tasks without switching between applications.
Features:
- Integrate Asana tasks directly into SharePoint, providing a centralized view of your projects
- Utilize advanced search capabilities within Asana’s data to generate dynamic views for your SharePoint web part
- Ensure a cohesive workflow across the Microsoft 365 suite, enhancing productivity and collaboration
- Turn Viva Connections into a project management superhub by adding Asana cards

Many of the third-party cards highlighted in this blog are available through the Microsoft partner Adenin. Check out more about their Viva Connections cards in our recent partner showcase blog.
How to access and install third-party cards
There are a few simple steps to . Anyone can look up the available applications but only IT administrators can install them.
- All users can find applications via Microsoft AppSource or the SharePoint store. Installation requires administration permissions in SharePoint.
- Select “Get it Now” to request the application is added to the App Catalogue site in your SharePoint environment.
- Work with the IT Admin to Deploy the app and add it to your Viva Connections dashboard.
- Once Viva Connections is deployed for the organization, all employee users can access the app on their Viva Connections .
- Learn how to build your own dashboard cards to meet your business needs.
Learn more about third-party and adaptive cards
With dozens of third-party partner apps and M365 Viva apps to choose from, the opportunities for customization and enhanced productivity are vast. To start leveraging these powerful integrations, visit the SharePoint store and Microsoft AppSource today.

To learn more about the extensibility capabilities within the Viva Connections dashboard. View this course on Microsoft Learn.
For further guidance and resources, check out our comprehensive documentation as well as our latest blog featuring a guide of Viva Connections first-party .

by Contributed | Sep 10, 2024 | Technology
This article is contributed. See the original author and article here.
If you work in smartcard federated authentication environments, here’s a much-anticipated security feature for you. Starting with the September 10, 2024 Windows security update, you can use strong name-based mapping on Windows Server 2019 and newer. This feature helps you with the hardening changes for certificate-based authentication on Windows domain controllers.
What are weak and strong mappings in Active Directory?
All certificate names must be correctly mapped onto the intended user account in Active Directory (AD). If there’s a likelihood that they aren’t, we call these mappings weak. Weak mappings give rise to security vulnerabilities and demand hardening measures such as Certificate-based authentication changes on Windows domain controllers.
Following up on our May 2022 round of updates to address these vulnerabilities, we’re introducing a new feature called strong name-based mapping. You can now distinguish between “strong” and “weak” mappings within existing Alternative Security Identities (AltSecIDs) based on likelihood. With the new feature, you can allow some weak name-based mappings to be treated as strong name-based mappings. You just need to properly configure both the public key infrastructure (PKI) and the AD deployment.
Key features and benefits of strong name-based mapping
Strong name-based mapping has two main benefits:
- Compliance with strong certificate mapping enforcement. Strong name-based mapping allows certain weak certificate mappings, such as Issuer/Subject AltSecID and User Principal Names (UPN) mappings, to be treated as strong mappings. This type of strong mapping is compatible with the enforcement mode of certificate-based authentication changes on Windows domain controllers.
- Compatibility with government PKI deployments. Strong name-based mappings work by asking PKI deployments to attest certain security guarantees of certificates via object identifiers (OIDs) stamped on the certificate. It’s a common practice among government PKI and AD deployments.
Security requirements for PKI deployments for strong name-based mapping
Warning
Unless you have a strong need for this type of deployment AND have a deep knowledge of how PKI deployments and AD authentication interact together, we DO NOT recommend deploying strong name-based mapping. We instead recommend that you following the guidance in KB5014754: Certificate-based authentication changes on Windows domain controllers.
Fundamentally, strong name-based mapping deployment is your promise to Microsoft that your PKI is not susceptible to the attacks addressed by May 2022 and later updates. Namely, you take responsibility for the vulnerabilities that can arise from any unintentional mapping of the names in a certificate to multiple AD accounts.
To prevent unintentional and unsafe mappings, we recommend that you take steps to strengthen your PKI and AD deployments. Some of these steps include:
- Names used in either the Subject Name and/or the Subject Alternative Name of certificates MUST NOT contain names that are queried and/or built from AD.
- Names used in either the Subject Name and/or the Subject Alternative Name of certificates MUST be both immutable and globally unique to the entire PKI deployment.
- AD and PKI administrators must ensure that certificate issuance for logons is not automatic. Instead, ensure that strong manual checks are in place to prevent a certificate with an incorrect or clashing name from being issued.
Failing to secure your PKI and AD deployments can degrade the security of your environment.
If your PKI meets or exceeds these security requirements, you MUST add an OID in the Issuance Policy of the certificate to denote this compliance. This OID (or multiple OIDs) will be used further below in the strong name-based mapping configuration.
Setup instructions
To enable strong name-based mapping on Windows Server 2019 and later, you need to take the following steps:
- Enable the Group Policy (GPO) Setting on the Domain Controllers:
Computer Configuration > Administrative Template > System > KDC > “Allow name-based strong mappings for certificates”.
- Configure the GPO with the necessary tuples (more details below).
This configuration relies on adding tuples to the GPO when strong name-based mapping is enabled. These tuples tell the Domain Controller which certificates meet the above security requirements by specifying both the Issuer certificate authority (CA) thumbprint and the OID(s) that denote that the PKI deployment is secured against the May 2022 vulnerabilities. Furthermore, the tuples also configure which “weak” name-based mappings can be upgraded to “strong” name-based mappings.
The tuple is in the following format:
;;
- Issuer CA Certificate Thumbprint: This is the certificate thumbprint of the Issuing CA. There can only be one Issuer CA Thumbprint in this field. If multiple Issuer CA Thumbprints are placed, it can prevent proper processing of the GPO policy.
- OID(s): This is a comma-separated list of OIDs that the PKI deployment has stamped on the certificate to attest that the security requirements against name collisions have been met. There can be multiple OIDs denoted in this field.
- IssuerSubject/UpnSuffix: This is a comma-separated list to denote what type of weak mapping should be treated as strong:
- IssuerSubject: This string behaves as a tag to denote that the Issuer/SubjectName AltSecID can be upgraded from “weak” to “strong.” There can only be one IssuerSubject tag in this field.
- UPNSuffix: This string denotes that certificate mappings can be upgraded form “weak” to “strong” wherever the UPN suffix of the SubjectName (that is, everything that comes after the @ symbol) matches the suffix in the tuple exactly. There can be multiple UPN suffixes in this field.
The logic of the tuple is the following. For certificates whose Issuer is X that has any of the OID(s) Y, upgrade any of the weak mappings C to “strong.” This logic is summarized in the diagram.
Flow chart illustrating the logic of strong name-based mapping configuration. The chart starts with a decision diamond asking if the certificate’s Issuer Certificate Thumbprint matches the specified thumbprint. If yes, it proceeds to check if the certificate has any of the specified OIDs. If both conditions are met, it allows a strong mapping for the certificate based on either Issuer/SubjectName AltSecID or UPNSuffix, depending on the configuration.
Two important configuration details are required for UPN Suffix mapping to work:
- Certificates must have the UPN of the user in the SAN.
- Mapping via UPNs has not been disabled via UseSubjectAltName.
How to use and understand policy tuples: a walkthrough
Policy tuple example 1
Use this policy tuple to allow a strong mapping via Issuer/SubjectName AltSecID.
fe40a3146d935dc248504d2dcd960d15c4542e6e; 2.16.840.1.101.3.2.1.3.45;IssuerSubject
- For certificates whose Issuer Certificate Thumbprint is fe40a3146d935dc248504d2dcd960d15c4542e6e, and
- The certificate has the OID 2.16.840.1.101.3.2.1.3.45,
- Allow a strong mapping if the certificate is mapped via Issuer/SubjectName AltSecID.
This tuple would allow a certificate logon which passes checks (1) and (2) issued to the user Bob, if the AD object for Bob has the Issuer/SubjectName AltSecID correctly configured for the certificate.
Policy tuple example 2
Use this policy tuple to allow a strong mapping via a specified UPNSuffix.
fe40a3146d935dc248504d2dcd960d15c4542e6e; 2.16.840.1.101.3.2.1.3.45;UPNSuffix=corp.contoso.com
- For certificates whose Issuer Certificate Thumbprint is fe40a3146d935dc248504d2dcd960d15c4542e6e, and
- The certificate has the OID 2.16.840.1.101.3.2.1.3.45,
- Allow a strong mapping if the certificate is mapped via UPNSuffix, which should be “corp.contoso.com.”
This tuple would allow a certificate logon which passes checks (1) and (2) issued to the user Bob, if the AD object for Bob has the Issuer/SubjectName AltSecID correctly configured for the certificate.
Policy tuple example 3
Use this policy tuple to allow a strong mapping via any of the approved specifications.
fe40a3146d935dc248504d2dcd960d15c4542e6e; 2.16.840.1.101.3.2.1.3.45, 2.16.840.1.101.3.2.1.3.44;UPNSuffix=corp.contoso.com,UPNSuffix=my.corp.contoso.com,IssuerSubject
- For certificates whose Issuer Certificate Thumbprint is fe40a3146d935dc248504d2dcd960d15c4542e6e, and
- The certificate has ANY of the following OIDs:
- 2.16.840.1.101.3.2.1.3.45
- 2.16.840.1.101.3.2.1.3.44
- Allow a strong name-based mapping if the certificate is mapped via either of the following:
- The user account in AD has a valid Issuer/SubjectName AltSecID mapping
- UPNSuffix, where the suffix is “corp.contoso.com”
- UPNSuffix, where the suffix is “my.corp.contoso.com”
Event Log changes
Two Event Log updates are here to help you as an AD administrator better troubleshoot strong name-based mapping scenarios. These are available to you with the September 10, 2024 and later updates.
Updates to current event logs
The current event logs now include policy OIDs found on the certificate used for authentication. This modifies the Key Distribution Center (KDC) events introduced by the May 10, 2022 and later updates.
New event logs
Additionally, a new event is available to log when the strong name-based mapping GPO encounters an issue processing the policy tuples. Track these events through Event ID 311.
Event Log
|
Microsoft-Windows-Kerberos-Key-Distribution-Center/Operational
|
Event Type
|
Error
|
Event Source
|
Kerberos-Key-Distribution-Center
|
Event ID
|
311
|
Event Text
|
The Key Distribution Center (KDC) encountered invalid certificate strong name match policy.
Faulting line:
|
Ready to improve Windows Server security?
We’re excited to bring this feature to your government scenario. Consider strong name-based mappings on Active Directory and PKI deployments in Windows Server 2019 or later if you meet the security requirements and recommendations. If you have any questions or need assistance, our support team is here to help.
Continue the conversation. Find best practices. Bookmark the Public Sector Tech Community, then follow us on the Public Sector Blog for updates.
by Contributed | Sep 9, 2024 | Technology
This article is contributed. See the original author and article here.
The new semester is just beginning, and over the past few months, we’ve enhanced Copilot with exciting new features to support your quiz creation. With the capabilities like generating detailed answer explanations for each question, rewriting questions, and smart suggestions for fine tuning the quiz. Copilot is now more powerful than ever. Let’s explore how these updates can help you create quizzes more effectively and efficiently this semester.
Please note that a Copilot for Microsoft 365 license is required to access the following features.
Generate quiz draft based on prompt/pasted content
You can specify your intentions, such as the quiz subject, audience, types of questions, and more to generate a quiz. Besides, Copilot can also generate a quiz from pasted content, such as a paragraph in textbook. For example, as a middle school teacher, you could instruct Copilot to create a physics quiz for 9th grade students or simply copy and paste content from a textbook to generate the quiz.
Generate quiz draft based on prompt
Quiz draft with answer explanations
After the quiz draft is generated, if you select “Including answer explanations,” each question will come with detailed explanations to clarify the reasoning behind the correct answers. You can review the solutions for each question and keep the draft to use. As shown below, when we are generating a math quiz for grade 9 students, Copilot shows us the step-by-step solutions to calculate the correct answer.
 Step-by-step answer explanation
Further instructions to refine the draft
You have the flexibility to add/remove questions and refine the draft further by providing additional details to Copilot. For instance, if you forgot to include trigonometric questions in a math quiz, you could keep asking to add two questions on that topic.
 Further instructions to refine the draft
Rewrite questions and answer explanations
Once you keep the draft to use, if you need to do further modifications on questions, options or the answer explanation, you can easily rewrite it with Copilot’s assistance. For example, you can make the question easier or add more details to the answer explanation for better clarity. You can also manually customize the answer explanations as needed.
 Rewrite answer explanations
Generate answer explanation for newly created questions
After adjusting the generated questions, if you still need to add new ones, Copilot can help by generating answer explanations based on the correct answers you mark, saving you time on manual input.
 Generate answer explanation for newly created questions
Copilot smart suggestions
Before sending out the quiz, Copilot will offer suggestions to enhance its quality. You can add a fun theme to boost students’ motivation and enthusiasm, adjust settings such as time duration and practice mode, and choose appropriate distribution channels like sharing via URL or presenting live. With just one click, you can apply these suggestions to create a more engaging and effective quiz.
 Copilot smart suggestions
Immediate results and answer explanation for responders
When respondents submit the quiz, they can view the results immediately and review the answer explanations to understand which areas they already mastered or where they could improve.
 Check result with answer explanations after submitting
Hope you find these new features useful for the new semester. Discover more about Copilot for Microsoft 365 here.
by Contributed | Sep 7, 2024 | Technology
This article is contributed. See the original author and article here.
Question Description:
A customer has designed a database schema for a Terabyte-level Azure SQL database, but the original design lacks a unique key. As the data volume increases, performance issues become more pronounced.
- To address these performance issues, Azure SQL uses a hidden index with uniqueifier identifiers, which have a maximum limit of 2,147,483,648.
- When the number of data rows in a table exceeds 2.1 billion, any insert or update operations will result in the following error:
Msg 666, Level 16, State 2, Line 25
This error can lead to partial or complete database outages, severely impacting business operations.
It isn’t a good idea to create a clustered index on a uniqueidentifier column and generate your GUIDs with NEWID(). The reason for this is that NEWID() generates GUIDs in non-sequential order and SQL Server orders a clustered index sequentially. It will work – SQL Server will let you build a clustered index around a uniqueidentifier column, however it will cause the SQL Server to do unnecessary work and cause performance slowdowns. The reason for this is that to insert data into the middle of a clustered index (out of sequential order) causes SQL Server to make room for the data by rearranging the cluster.
Mitigation Strategies:
1. Quick Workaround:
- Make index creation online and resumable by specifying ONLINE=ON and RESUMABLE=ON. This allows the operation to use smaller transactions, making it possible to resume from the failure point if it fails for any reason.
2. Permanent Fix:
- Rebuild the clustered index with a unique key by adding a new column. The steps are as followed:
- I: Create the index with the new definition offline.
- II: Use the DROP_EXISTING option for online index creation. This keeps both indexes up-to-date, and once the new index is built, it will replace the existing one.
- III: Use the resumable option to break the creation into smaller transactions, reducing transaction log bloat. Note that there is some performance impact.
- IV: Manually create a new copy of the table, copying all cold data, then rename the table. This involves scanning the source table, adding a small additional load to the system. Use a shorter outage and a merge statement for the new data.
- V: Create a partitioned view that is a union of the old and new tables with different index schemes. Ensure that insert statements supply values for every field in the table. This method can be complex and may require taking the database offline, with the rebuilding process taking anywhere from a few hours to several days.
Best Practice:
Planning early and carefully designing the clustered index is crucial to avoid these issues.
References
- uniqueidentifier
- How to design clustered index
- Create a clustered index
by Contributed | Sep 7, 2024 | Technology
This article is contributed. See the original author and article here.
As you may be aware, Azure Automation Agent-based User Hybrid Runbook Worker (Windows and Linux) was retired on 31 August 2024, and support has been discontinued.
For guidance on migrating, please refer to this article: Migrate an existing agent-based hybrid workers to extension-based-workers in Azure Automation | Microsoft Learn
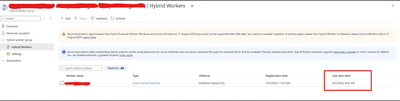
Nonetheless, users might want to verify whether their runbooks and jobs are utilizing the extension or agent-based system when they transition. It’s worth noting that versions V1 and V2 of the same hybrid worker machine can be registered simultaneously with Azure Automation but will have different names.
If the V1 agent wasn’t uninstalled before the V2 extension was installed, this would lead Azure to detect both versions on the same machine.
The “last seen time” suggests V1 and V2 are communicating with Azure Automation if both exist.
It’s also worth noting that some automation tasks are still being performed by the V1 worker, which accounts for its continued activity. Runbook jobs can be executed on any machine within the Hybrid Worker Group. Currently, this group includes both V1 and V2 versions, so the tasks are distributed between them.
The installation of V2 does not mean that the Hybrid Worker Group will disregard V1 and exclusively use V2.
Happy Learning!

Recent Comments