by Contributed | Feb 27, 2022 | Technology
This article is contributed. See the original author and article here.
Introduction
Azure Form Recognizer is an amazing Azure AI Service to extract and analyze form fields documents. One benefit of using Form Recognizer is the ability to create your own custom model based on documents specific to your business needs.
To create custom models, Azure provides Form Recognizer Studio, a web application that makes creation and training of custom model simple without the needs of an AI expert.
One common challenge most customers have when dealing with more than a handful of models is to apply the same DevOps processes, they are familiar with when promoting code changes from one environment to another to their AI models.
This article demonstrates the use of Form Recognizer’s REST APIs to implement a CI/CD pipeline for model management.
The complete implementation is available on Github.
Why DevOps matters
When creating a custom model based on documents that map your business needs, your programmers and data scientists will go through multiple iterations of training, resulting in multiple different models in the development environment. Once they have a model that works well for the specific scenario, this model will then need to be promoted to other environments.
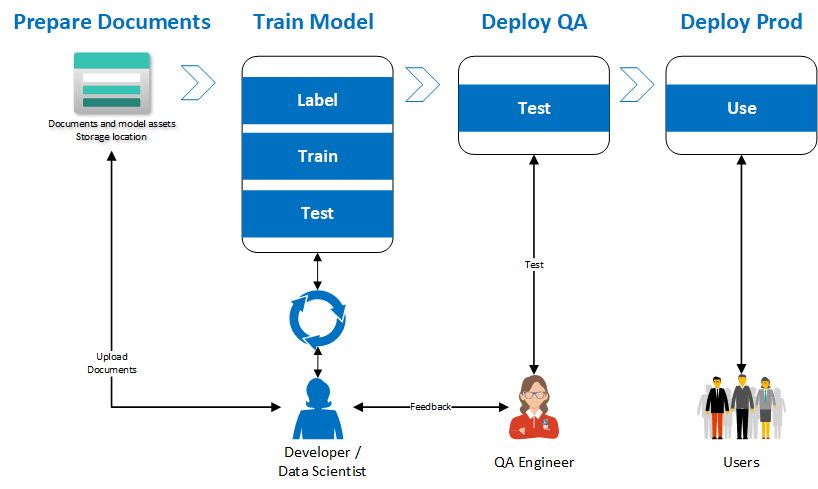
While it is possible to copy the training dataset and train a model in all of the other environments, that process is cumbersome and can result in missed labels resulting in lower accuracy models. A more effective approach is to treat the model like a source code artifact and use a DevOps pipeline to orchestrate the movement of the model across the different environments ensuring traceability and compliance. The diagram below explains the proposed implementation flow to achieve this result.
Our implementation
For our use case, let’s assume we have three environments: each is in a respective resource group. This approach would work even if the resource groups are in three different subscriptions.

The model is trained in the development environment, where , data scientists and/or developers will use the Form Recognizer Studio to label the documents in a storage account. The following steps describe that process in greater detail.
Start by moving the training dataset to a specific container in Azure Blob Storage.

In the Form Recognizer Studio, start by creating a custom project and connecting the Studio to work with the dataset, you just created.

When you train your model, be sure to save the model ID you provided or find the model from the list of models within the project. This model ID will be needed when it’s time to migrate the model to other environments.

Form Recognizer provides a model copy operation that starts with generating a model copy authorization for the target resource, in this case the QA environment. This copy automation is provided to the Form Recognizer development resource to then execute the copy action.
To orchestrate this set of actions, a simple GitHub action was created. The API can be integrated into your CI/CD pipeline using REST or any of the language specific SDKs. In this case, we created an Azure Function that uses the .NET SDK for Form Recognizer. This Azure Function provides multiple endpoints that are leveraged in the GitHub Action.

The following diagram describes the GitHub Actions Orchestration.

- The developer moves all the documents needed to train the custom model into Azure Storage account.
- The developer uses the Form Recognizer Studio to train the custom model in the development environment. Once the model is trained and the developer is satisfied with the model quality, the model ID is saved for use with the GitHub action.
- The developer initiates the GitHub action by providing the model ID from the previous step as an input parameter.

- The first step is to validate that the model ID exists in the DEV environment.

- If the model exists in the DEV environment, it will be copied to the QA environment
- Now, a QA engineer can validate the model produces the expected results.
- Once the QA tests are successful, an approver needs to approve the next job to promote the model to the production environment.
- The model is now copied to the production environment and is available for use.


Once the model is in production, you can use it within your applications. The following example demonstrates how the model is being used to analyze documents.

Here are the GitHub Action used in this sample, it consists of 3 jobs that invoke the Azure Function using a PowerShell script. As stated earlier, the Azure Function implementation is optional, this could be accomplished via HTTP requests directly to the Form Recognizer resources from your pipelines.

Here is the simple PowerShell script.

Conclusion
In this blog post, we explain the importance of implementing a DevOps practice around your custom models in Azure Form Recognizer. We provide an implementation and illustrate how easy it is to implement with the REST API.
by Contributed | Feb 23, 2022 | Technology
This article is contributed. See the original author and article here.
Note: Thank you to @Yaniv Shasha , @Sreedhar_Ande , @JulianGonzalez , and @Ben Nick for helping deliver this preview.
We are excited to announce a new suite of features entering into public preview for Microsoft Sentinel. This suite of features will contain:
- Basic ingestion tier: new pricing tier for Azure Log Analytics that allows for logs to be ingested at a lower cost. This data is only retained in the workspace for 8 days total.
- Archive tier: Azure Log Analytics has expanded its retention capability from 2 years to 7 years. With that, this new tier for data will allow for the data to be retained up to 7 years in a low-cost archived state.
- Search jobs: search tasks that run limited KQL in order to find and return all relevant logs to what is searched. These jobs search data across the analytics tier, basic tier. and archived data.
- Data restoration: new feature that allows users to pick a data table and a time range in order to restore data to the workspace via restore table.
Basic Ingestion Tier:
The basic log ingestion tier will allow users to pick and choose which data tables should be enrolled in the tier and ingest data for less cost. This tier is meant for data sources that are high in volume, low in priority, and are required for ingestion. Rather than pay full price for these logs, they can be configured for basic ingestion pricing and move to archive after the 8 days. As mentioned above, the data ingested will only be retained in the workspace for 8 days and will support basic KQL queries. The following will be supported at launch:
- where
- extend
- project – including all its variants (project-away, project-rename, etc.)
- parse and parse-where
Note: this data will not be available for analytic rules or log alerts.
During public preview, basic logs will support the following log types:
- Custom logs enrolled in version 2
- ContainerLogs and ContainerLogsv2
- AppTraces
Note: More sources will be supported over time.
Archive Tier:
The archive tier will allow users to configure individual tables to be retained for up to 7 years. This introduces a few new retention policies to keep track of:
- retentionInDays: the number of days that data is kept within the Microsoft Sentinel workspace.
- totalRetentionInDays: the total number of days that data should be retained within Azure Log Analytics.
- archiveRetention: the number of days that the data should be kept in archive. This is set by taking the totalRetentionInDays and subtracting the workspace retention.
Data tables that are configured for archival will automatically roll over into the archive tier after they expire from the workspace. Additionally, if data is configured for archival and the workspace retention (say 180 days) is lowered (say 90 days), the data between the original and new retention settings will automatically be rolled over into archive in order to avoid data loss.
Configuring Basic and Archive Tiers:
In order to configure tables to be in the basic ingestion tier, the table must be supported and configured for custom logs version 2. For steps to configure this, please follow this document. Archive does not require this but it is still recommended.
Currently there are 3 ways to configure tables for basic and archive:
- REST API call
- PowerShell script
- Microsoft Sentinel workbook (uses the API calls)
REST API
The API supports GET, PUT and PATCH methods. It is recommended to use PUT when configuring a table for the first time. PATCH can be used after that. The URI for the call is:
https://management.azure.com/subscriptions/<subscriptionId>/resourcegroups/<resourceGroupName>/providers/Microsoft.OperationalInsights/workspaces/<workspaceName>/tables/<tableName>?api-version=2021-12-01-preview
This URI works for both basic and archive. The main difference will be the body of the request:
Analytics tier to Basic tier
{
    "properties": {
        "plan": "Basic"
    }
}
Basic tier to Analytics tier
{
    "properties": {
        "plan": "Analytics"
    }
}
Archive
{
    "properties": {
        "retentionInDays": null,
        "totalRetentionInDays": 730
    }
}
Note: null is used when telling the API to not change the current retention setting on the workspace.
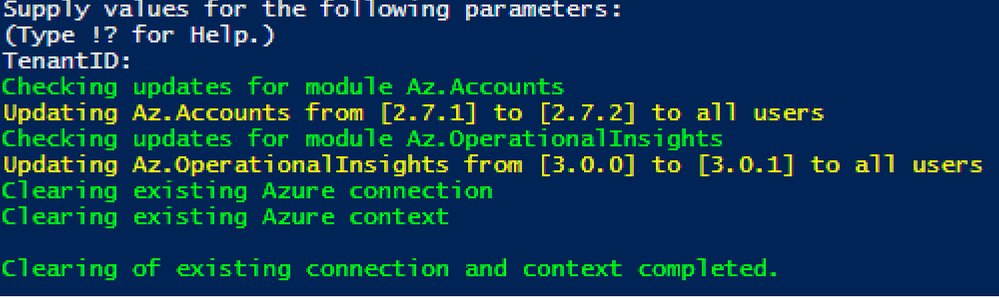
PowerShell
A PowerShell script was developed to allow users to monitor and configure multiple tables at once for both basic ingestion and archive. The scripts can be found here and here.
To configure tables with the script, a user just needs to:
- Run the script.
- Authenticate to Azure.
- Select the subscription/workspace that Microsoft Sentinel resides in.
- Select one or more tables to configure for basic or archive.
- Enter the desired change.


Workbook
A workbook has been created that can be deployed to a Microsoft Sentinel environment. This workbook allows for users to view current configurations and configure individual tables for basic ingestion and archive. The workbook uses the same REST API calls as listed above but does not require authentication tokens as it will use the permissions of the current user. The user must have write permissions on the Microsoft Sentinel workspace.
To configure tables with the workbook, a user needs to:
- Go to the Microsoft Sentinel GitHub Repo to fetch the JSON for the workbook.
- Click ‘raw’ and copy the JSON.
- Go to Microsoft Sentinel in the Azure portal.
- Go to Workbooks.
- Click ‘add workbook’.
- Clicl ‘edit’.
- Click ‘advanced editor’.
- Paste the copied JSON.
- Click save and name the workbook.
- Choose which tab to operate in (Archive or Basic)
- Click on a table that should be configured.
- Review the current configuration.
- Set the changes to be made in the JSON body.
- Click run update.
The workbook will run the API call and will provide a message if it was successful or not. The changes made can be seen after refreshing the workbook.


Both the PowerShell script and the Workbook can be found in the Microsoft Sentinel GitHub repository.
Search Jobs:
Search jobs allow users to specify a data table, a time period, and a key item to search for the in the data. As of now, Search jobs use simple KQL, which will support more complex KQL over time. In terms of what separates Search jobs from regular queries, as of today a standard query using KQL will return a maximum of 30,000 results and will time out at 10 minutes of running. For users with large amounts of data, this can be an issue. This is where search jobs come into play. Search jobs run independently from usual queries, allowing them to return up to 1,000,000 results and up to 24 hours. When a Search job is completed, the results found are placed in a temporary table. This allows users to go back to reference the data without losing it and being able to transform the data as needed.
Search jobs will run on data that is within the analytics tier, basic tier, and also archive. This makes it a great option for bringing up historical data in a pinch when needed. An example of this would be in the event of a widespread compromise that has been found that stems back over 3 months. With Search, users are able to run a query on any IoC found in the compromise in order to see if they have been hit. Another example would be if a machine is compromised and is a common player in several raised incidents. Search will allow users to bring up historical data from the past int the event that the attack initially took place outside of the workspace’s retention.
When results are brought in, the table name will be structured as so:
- Table searched
- Number ID
- SRCH suffix
Example: SecurityEvents_12345_SRCH
Data Restoration:
Similar to Search, data restoration allows users to pick a table and a time period in order to move data out of archive and back into the analytics tier for a period of time. This allows users to retrieve a bulk of data instead of just results for a single item. This can be useful during an investigation where a compromise took place months ago that contains multiple entities and a user would like to bring relevant events from the incident time back for the investigation. The user would be able to check all involved entities by bringing back the bulk of the data vs. running a search job on each entity within the incident.
When results are brought in, the results are placed into a temporary table similar to how Search does it. The table will take a similar naming scheme as well:
- Table restored
- Number ID
- RST suffix
Example: SecurityEvent_12345_RST
Performing a Search and Restoration Job:
Search
Users can perform Seach jobs by doing the following:
- Go to the Microsoft Sentinel dashboard in the Azure Portal.
- Go to the Search blade.
- Specify a data table to search and a time period it should review.
- In the search bar, enter a key term to search for within the data.
Once this has been performed, a new Search job will be created. The user can leave and come back without impacting the progress of the job. Once it is done, it will show up under saved searches for future reference.
Note: Currently Search will use the following KQL to perform the Search: TableName | where * has ‘KEY TERM ENTERED’


Restore
Restore is a similar process to Search. To perform a restoration job, users need to do the following:
- Go to the Microsoft Sentinel dashboard in the Azure Portal.
- Go to the Search blade.
- Click on ‘restore’.
- Choose a data table and the time period to restore.
- Click ‘restore’ to start the process.

Pricing
Pricing details can be found here:
While Search, Basic, Archive, and Restore are in public preview, there will not be any cost generated. This means that users can begin using these features today without the worry of cost. As listed on the Azure Monitor pricing document, billing will not begin until April 1st, 2022.
Search
Search will generate cost only when Search jobs are performed. The cost will be generated per GB scanned (data within the workspace retention does not add to the amount of GB scanned). Currently the price will be $0.005 per GB scanned.
Restore
Restore will generate cost only when a Restore job is performed. The cost will be generated per GB restored/per day that the table is kept within the workspace. Currently the cost will be $.10 per GB restored per day that it is active. To avoid the recurring cost, remove Restore tables once they are no longer needed.
Basic
Basic log ingestion will work similar to how the current model works. It will generate cost per GB ingested into Azure Log Analytics and also Microsoft Sentinel if it is on the workspace. The new billing addition for basic log ingestion will be a query charge for GB scanned for the query. Data ingested into the Basic tier will not count towards commitment tiers. Currently the price will be $.50 per GB ingested in Azure Log Analytics and $.50 per GB ingested into Microsoft Sentinel.
Archive
Archive will generate a cost per GB/month stored. Currently the price will be $.02 per GB per month.
Learn More:
Documentation is now available for each of these features. Please refer to the links below:
Additionally, helpful documents can be found in the portal by going to ‘Guides and Feedback’.

Manage and transform your data with this suite of new features today!


Recent Comments