by Contributed | May 30, 2022 | Technology
This article is contributed. See the original author and article here.
Build collaborative app that connect people, data, and processes to help over 270M Teams users thrive with hybrid work. Rapidly build powerful apps, bots, flows with a single integrated development stack that seamlessly blends low and pro code with Power Platform. This session will focus on the opportunities and practices for building collaborative apps. Join Microsoft Cloud Advocates, MVPs, and product engineers as we go deeper into the tech announced at Microsoft Build and share what we’ve learned. Join our session at: MSFT Build: Unpacking the Tech: Innovate with collaborative apps and low code
Who is it aimed at?
• Developers of all stripes
• Entrepreneurs, industry leaders, and IT Pros looking to for the latest
• Students or learning professionals interested in learning more about the newest tech
Why should you attend?
Learn about the latest tech announced at Microsoft Build
• Get a pulse at where the tech industry and Microsoft are headed
• Share your thoughts on what you liked at Microsoft Build (and what you’d like to see more of)
• Network with other professionals in our community
Microsoft Build: Unpack the Tech at the Reactors.
Everyone loves unboxing or unpacking that new phone or laptop or tech gadget. Like we’re unwrapping something new, unexpected, and meaningful…a gift to get excited about. Recently at Microsoft Build, we announced so many new products and opportunities! But if you’re a developer or an entrepreneur or industry leader, perhaps it can be difficult to decide what really matters to you. How to separate what’s experimental from what’s production-ready for your org? Where should you begin? What will make a real difference in your day-to-day work? Let’s unpack the tech of Microsoft Build and find out!
Speaker Bio
Hadeel Shubair (Cloud Advocate)
Hadeel is a Regional Cloud Advocate and Data Analytics Engineer for Microsoft, Middle East/Africa region. She holds a Master’s degree in Data Analytics and is passionate about learning and sharing her knowledge on tech topics including Data Analytics, AI, & ML. Before joining Microsoft, Hadeel held several appointments and roles including Google Women in Tech scholar through which she delivered several sessions to the community to motivate and empower young talents. Hadeel also served as part of the Data & Communications team overlooking the organization of the World Government Summit. On the other side, while at University, Hadeel chaired the Women in Engineering club, and was the Chief Editor of the Engineering Newsletter. As a Cloud Advocate for the Microsoft Reactor, Hadeel’s main goal is to take you on a journey to understand & learn more about Data and AI concepts and applications. She’s passionate about technology, education, & growing the Data & AI community across the region.
Someleze Diko (Cloud Advocate)
Someleze is a young individual that is passionate about upskilling people from different communities using the different technologies at his disposal through being involved with initiatives that upskill and empower people. Today, he is an M365 and Power Platform Cloud Advocate at Microsoft focusing on upskilling students and communities through the Microsoft Power Platform. Before becoming a Cloud Advocate, Someleze was a Gold Microsoft Learn Student Ambassador in which he worked closely with other ambassadors to learn, upskill and empower students in different communities through hosting sessions that cover different Microsoft Technologies. He also served as a United Nations Peace Ambassador along side his team from Artpeace.
Gomolemo Mohapi (Cloud Advocate)
Gomolemo is a young South African who is determined to make a long-lasting impact on the world through technology. In university, he took it upon himself to create multiple written programming tutorials for his peers which significantly assisted those who were struggling to grasp programming concepts. Thereafter, Gomolemo joined the Microsoft Learn Student Ambassador program where he gained advanced technical skills and eventually expanded to host workshops, hackathons and speaking at various conferences. Gomolemo eventually fell in love with the Power Platform, because it was a low-code platform which gave way for him to empower and upskill not just those with a technical background, but anyone from any industry who was looking to learn how to build applications. He has since co-authored a Power Platform Udacity course and is now a Cloud Advocate at Microsoft focused on Power Apps and Fusion Development.
Join us for the session.
by Contributed | May 29, 2022 | Technology
This article is contributed. See the original author and article here.
We are excited to announce that Azure Video Indexer customers using paid ARM based accounts can now monitor their Audit logs (with Azure Monitor). This will allow you to gain deeper insights on the operations of your Azure Video Indexer resources and consume this data in flexible ways. This will allow users to analyze data, troubleshoot issues, set alerts for failed operations, and monitor the usage and identities accessing the Azure Video Indexer resource.
In November 2021, Azure Video Indexer introduced a new account type to public preview – ARM Based accounts. This enables users to better secure and monitor their accounts as well as many other benefits – see here to learn more. ARM Based accounts allow users to utilize many robust Azure native capabilities for Azure Video Indexer control plane while also enabling powerful integrations such as with Azure Monitor.
In this blog, we will help you get started by showing how to:
- Set up Diagnostic Settings configuration using Azure portal.
- Use Azure Log Analytics to monitor Azure Video Indexer Audit logs.
- Use Kusto(KQL) queries to monitor Azure Video Indexer resources.
Set up Diagnostic Setting logs for the Azure Video Indexer account
To enable Diagnostic logs through the Azure Portal, take the following steps:
- Go to the Azure portal
- Use the search bar to look for “Azure Video indexer”
- Select the relevant Video Indexer account
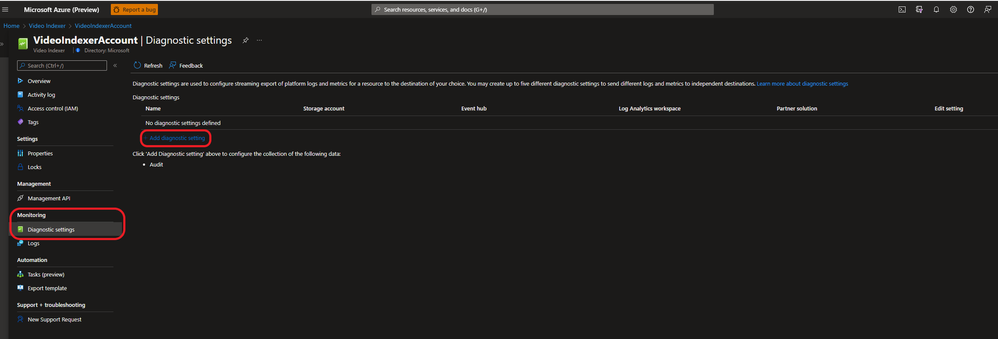
Under Monitoring choose Diagnostic settings.
Choose “Diagnostic settings” under the monitoring section in the Azure Video Indexer account.
Using Diagnostic settings, logs can be exported to several destinations: Event hub, storage account, third party solution or Azure Log Analytics. The following instructions are specific to exporting, configuring, and querying the logs using Azure Log Analytics.
- Enter a new name for the diagnostic settings connection you are going to create.
- Select Audit from the categories and the Log Analytics workspace from the destination list.
- Then choose the right subscription and ‘Target Log Analytics’ workspace and click the ‘Save’ button.
 Set a connection to an Azure Log Analytics workspace
Congratulations, in a few minutes and depending on the actions you would perform on the account you should see logs using the ‘Logs’.png") button through the Video Indexer resource or through the Log Analytics Workspace.
button through the Video Indexer resource or through the Log Analytics Workspace.
Using Azure Log Analytics to monitor Azure Video Indexer Audit logs
There are two ways to view and analyze logs produced by Azure Video Indexer:
- Azure Video Indexer resource view – this includes only the logs of the specific Video Indexer instance.
From Azure Video Indexer resource view – select the “Logs” icon in this view.
- Log Analytics Workspace – this includes logs of all Video Indexer instances sending logs to the Log Analytics workspace. As multiple Video Indexer instances can send logs to a single Log Analytics workspace, this option is ideal when working with multiple Video Indexer instances and looking to view and query them in one workspace.
From the Azure Portal, search for the Log Analytics Workspace you selected as the target destination when configuring the “diagnostic settings” (pervious section) and choose the ”Logs” .
.
VIAudit
| where AccountId == "<YOUR ACCOUNT ID>"
| where  Status == "Failure"
| project TimeGenerated, OperationName,CorrelationId, _ResourceId
Useful Kusto(KQL) queries for monitoring Azure Video Indexer resources
Querying of audit logs is done through the Video Indexer resource or log Analytics Workspace using Kusto query language.
In order to query Azure Video Indexer Audit table efficiently, in Log Analytics or in the resource view, we recommend exploring the table’s structure here.
To get started easily, we would like to share some basic KQL queries:
Example 1:
Use the following query to look for failed operations and their cause.
As the examples show, in the last 24 hours, this account had four failures when attempting to upload a video. From the error message you can see the two different reasons for the failure. The first one is an access token that was expired, the second was due to an access token with wrong scope of permission.

Query sample:
// Project failures with detailed error message.
VIAudit
| where  Status == "Failure"
| parse Description with "ErrorType: " ErrorType ". Message: " ErrorMessage ". Trace" *
| project TimeGenerated, OperationName, ErrorMessage, ErrorType, CorrelationId, _ResourceId
Example 2:
Search for the top 10 operations of the account:
For the selected time range, 28% of the operations were searching for videos with in the account.

Query sample:
VIAudit
| summarize count() by OperationName
| top 10 by count_
| render piechart
Example 3:
Query searching for top ten active user for an account.

Query sample:
// Trend of top 10 active Upn's
VIAudit
| where TimeGenerated > ago(30d)
| summarize count() by Upn
| top 10 by count_ desc
| project Upn
| join (VIAudit
| where TimeGenerated > ago(30d)
| summarize count() by Upn, bin(TimeGenerated, 1d)) on Upn
| project TimeGenerated, Upn, count_
| render timechart
For more information on how to get started monitoring your Azure Video Indexer resource visit our public documentation.
For asks around monitoring Azure Video Indexer leave comments on this blog or visit our user voice page.
Join us and share your feedback
For those of you who are new to our technology, we encourage you to get started today with these helpful resources:
by Contributed | May 28, 2022 | Technology
This article is contributed. See the original author and article here.
Contributions made to this blog post by Kyle Burns, Microsoft Cloud Solution Architect and Able Wang, former Principal Cloud Advocate and DevOps Lead at Microsoft, his contributions and skills will be forever appreciated.
During this blog series I will be taking you on a DevOps journey to frame up the way an organization would foster a strong DevOps culture. I’ve referenced this fantastic blog written by Niels (Nells) Talens on the “AgileThings” website. Source: AgileThings. This blog is built upon the article and visualization and will walk you through an organization’s DevOps journey. The primary benefit of DevOps is that it gives the organization the confidence to change at the speed of business.
Overview of DevOps
At Microsoft, DevOps means one thing. “It is the union of People, Process and Products to enable continuous delivery of Value to our end users”. -Donovan Brown, Partner PM Azure Incubation Team. On the people side, this means breaking down walls between DEV teams, QA teams and Ops teams. Instead of three separate teams, have one team with everyone focused on one goal, to continually deliver value to our end users. Teams have become far more cross functional and own the end-to-end customer experience. The developer’s role is to implement a user story, write full coverage unit tests for that user story and either work with QA to write UI automation or writing the UI automation themselves to test the User Story. This way, developers can iterate fast enough and catch regression bugs without the need for months of regression testing, that’s such a manual process.
We’re also working hand in hand with the Ops folks to figure out what is the best way to deploy our applications consistently and quickly. For processing, there needs to be a process in place which will let teams iterate fast enough, produce code of high enough quality, and a way to deliver the application to the end users quickly and consistently. Agile processes (done correctly) work great. And finally, for fantastic end-to-end products and tooling, the answer is Azure DevOps & GitHub, a better together story.
DevOps Nirvana, what does this mean? Webster defines it as a state of perfect happiness. Although a complete DevOps end-to-end setup might not be perfect, it can be extremely close. By adopting the principles of agile, automation, continuous integration and continuous delivery, you will reach your goal of a healthy DevOps culture. This blog series will provide some key concepts which demonstrate Microsoft’s vision of using DevOps, GitHub, and Azure to achieve true DevOps Nirvana. :smiling_face_with_smiling_eyes:
What problems does DevOps address?
- DevOps addresses the risk associated with changes.
- This risk arises from missed requirements, new bugs, failed deployments, etc.
- DevOps focuses on streamlining deployments to minimize the effort required to deploy software.
- As applications complexity increases, we see deployments measured not in man hours but in man days.
- Deploy more frequently, with reduction of pain associated with performing each deployment.
- This also helps to ensure consistency so that QA looks like Dev and Production looks like QA.
- DevOps minimizes hand-offs between teams.
- This is not only through leveraging technology, but also by changing the cultures of the teams involved.
Benefits of DevOps
- Significantly higher throughput.
- High functioning DevOps organizations have drastically higher throughput. In these organizations code makes it from Commit to Production 2,555 times faster.
- Significantly higher employee loyalty.
- Employees of these organizations are 2.2 times as likely to recommend their current employer to a friend as a “great place to work”.
- Significant increase in quality.
- Unplanned work is reduced by 22%, leading to a 29% increase in new work completed by their development and DevOps team.
- Significant reduction in Security Issue mitigation.
- A 50% reduction in the time spent addressing security issues.
At its core, DevOps is about working to change how Dev, QA, and Ops work together. Ultimately tearing down walls and working together for a common purpose, thus continual delivery of value.
Overview of Application
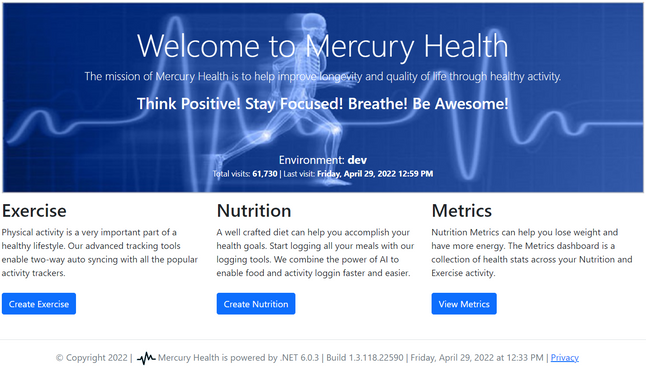
In early 2016, Abel Wang and I met in-person and worked to create an app and demo that was simple enough to setup, yet powerful enough to demonstrate some core concepts of DevOps best practices on Azure. During this time, Mercury Health was born, named after Greek Mythology by Jeff Fattic. This app is basically a simple health tracking application. It tracks the exercises that you do and food that you eat throughout the day. Then based on the calories in and calories out, it calculates BMI and draws some cool graphs to let you know if you’re healthy or not. I re-wrote and enhanced the app using .Net 6 to utilize some key concepts and Azure services such as App Service Plans, App Service, Key Vault, SQL DB, Configuration Store, Feature Flags, Application Insights, Log Analytics Workspace, Playwright UI Automation, Availability Testing, API Management, and Azure Load Testing for performance and scalability testing. The source code repo of choice is GitHub that uses the built-in tools, DependaBot, CodeQL, Advanced Security, and GitHub Actions for CI/CD.
Mercury Health Home Page
App Core Components
Azure Key Vault

For many applications, just keeping the secrets out of source control isn’t enough. Azure Key Vault helps solve the secrets management problem. Azure Key Vault can be used to securely store and tightly control access to tokens, passwords, certificates, API keys, and other secrets, such as database connection strings.
System Assigned Managed Identity

Managed Identity is an enterprise application within Azure Active Directory and used by any Azure resource to authenticate to any service that supports Azure AD. This app uses Managed Identity for App Service, Azure Functions and API Management. The keys are generated at infrastructure deployment time and inserted into Key Vault and added to the application setting using a special @microsoft.KeyVault reference syntax.
App Dynamic Configuration

Azure App Configuration is a managed service that helps you centralize an application and feature settings simply and securely. Dynamic configuration handles changes dynamically without causing an application to restart.
Feature Flag Toggles

Feature flags is a software engineering technique that turns select functionality on and off during runtime. Feature flags are used to control exposure and really nothing more than if statements in code. The important thing is all the code is built, tested, and deployed together all the time. This allows you to have code in production that isn’t turned on.
Application Health Checks

Developers can think ahead and save themselves and others from future frustration. Health Checks validates that the web server and application code run in a way that can later have automation put around it to prove “is the web service or database itself up?”. Regardless of the technology stack, start your projects with a health monitoring HTTP endpoint. Start real-time monitoring of your application with health probes for containers, physical servers, or other application dependencies.
The Mercury Health Dev Team
The mission of Mercury Health is to help improve longevity and quality of life through healthy activity. The Mercury Health development team has embraced a DevOps approach and is using continuous integration for builds and unit tests. If everything passes they use continuous deployment that deploys to various environments. They use UI Automation tests are run to ensure usability and key functionally works as designed. Lastly, Load and Performance tests are run from various locations around the world at the expected peak load to ensure there are no challenges around performance or stability when operating at full capacity.
Modern Application Development Pattern
The development team follows the modern application pattern for building and deploying code using resilient DevOps practices.

The DevOps Journey

As we learned from blog post “AgileThings” you can break the journey down into 8 components. For this blog post series, I plan on diving into core sections Agile Development, Agile Testing, CI, CD, Automated Testing, and DevOps Automation.
Agile Development

Building on top of the most basic of Agile principles and processes are Agile development-focused concepts. Ensuring builds are automated, pairing up developers, working off user stories, employing the usage of feature toggles and continuing to break down systems into the smallest and most manageable pieces possible are all characteristics of a healthy development team; and therefore, would support the continuation of a DevOps journey.
Agile Testing

In order to continue the DevOps journey past basic Agile practices and development, a healthy testing environment must exist. As most of you probably know, in Agile, each sprint or iteration should result in code that is completely shippable. This doesn’t mean the code must go to production and be enabled after each and every sprint, but the code should be in a state that would support such a scenario.
This step focuses on manual testing while automated testing will build upon this step next. To have completely shippable code, the definition of done cannot be anything close to the old saying “it works on my machine.” Rather, code must be completely tested, and the larger team must be confident in a production release or migration activity at the end of that sprint. Therefore, many behavior driven testing activities must be perfected within the realm of manual agile testing. Specification testing (aka black-box testing), scenario testing, and specification by example are just 3 examples of manual agile testing activities.
Automated Testing

Assuming development and manual testing activities are in place correctly and are operationalized, the next step in the journey involves maturing the testing approach and automating as much as possible. Development processes such as test-driven development should be explored and perhaps implemented. In TDD, developers first write tests (that fail) which define a feature, function, or enhancement. The developers then write the minimum amount of code to pass that test and then refactor as needed. This scenario is repeated, causing many tests to be written without having to go back and add them at the end. These tests can then be automated as part of the normal build processes.
Behavior driven development is derived from and is just an extension of TDD that shares the same benefits. Many companies use BDD approaches with a common “Given-When-Then” acceptance criteria syntax which then allows acceptance criteria to be automatically converted into automated tests.
Regardless of which development processes are in place, the focus on this step is about automating the testing process.
Unit Testing – “it works on my machine”
Why is Unit Testing so important? Even if you’ve never heard the question asked, you’ve probably been in a situation where your team ignored unit tests or treated them as an afterthought. They’re often the first thing to go when time runs short. When I ask that question of app dev teams, more times than not I hear “there’s not enough time”.
When the Mercury Health app is built, all unit tests are run. Unit testing is part of the solution, not proving that the app works, but it’s a detector of unintended change. Code coverage metrics should correlate directly with the level of confidence teams have that the changes made or valid. Keep in mind, it’s still important that functional testing works to ensure the app does what it’s supposed to do.
If you ever wonder, how do you maintain quality in a DevOps world, unit tests are the answer! I don’t think it’s possible to be successful practicing good DevOps, if you don’t implement good unit tests. So how do you maintain quality during the dev inner loop? You don’t have time to do full end to end functional testing at the end of your development efforts, this could take months to do. You need to push code out now, every two weeks, every week, maybe even multiple times a day and having a battery of good unit tests is how you maintain that quality.
Continuous Integration

Once testing has been largely automated, continuous integration can be achieved. Martin Fowler defines CI as “a development practice that requires developers to integrate code into a shared repository several times a day”. Software that runs only on a developer’s machine isn’t providing value to customers of the software.
Each check-in or commit needs to be verified by an automated build, allowing teams to detect problems early. By integrating regularly, you can detect errors quickly, and locate them more easily. I would like to expand on that definition to point out that merely building only ensures the integrated code compiles. Therefore, to produce a healthy DevOps culture, execution of automated tests that validate the integrated code is required. This is why we place CI as the step after automating the testing processes.
Unit Testing – “it works in shared dev environment”
Azure DevOps is used at Microsoft daily and consists of 133K+ code check-ins, 340K+ builds, and 157K+ releases per day. On the Azure DevOps team, they transitioned from long running functional tests and shifted to using unit tests exclusively that run with each pull request. For instance, every time a developer checks-in code, it goes through a pull request and an integration build is run to make sure all the code works together. It has to compile and it must run through all of the L0 and L1 tests.
ADO Unit Tests in the pipeline for past 14 days

How many tests do we run? Every developer check-in must pass all 91,581 unit tests/per PR and running all of them run takes about 20 minutes. That’s how we maintain quality at Microsoft with Azure DevOps. How important is unit testing? Absolutely vital!!!
Green means Green and Red means Red. Only all-green builds get to be released.

Conclusion
Having Agile principles and processes across development-focused concepts is a key success factor to a healthy DevOps culture. Once Agile processes are in place, a consistent testing environment must exist. Manual testing to ensure each scenario is supported and working. Unit Tests supporting critical steps to make sure the product is completely tested and shippable. Continuous Integration setup and automated for detecting errors quickly. Execution of automated tests that validate the integrated code is required. Every developer goes through a pull request, a build, and MUST pass every L0 & L1 tests by running 91K+/per PR successfully.
Stay tuned for Part 2 in this series where I’ll focus on the importance of having good Continuous Delivery, a natural extension of Continuous Integration. The goal of Continuous Delivery is to put business stakeholders or customers – NOT IT – in control of an ongoing cycle of software releases. Also included will be deep dive on using Infrastructure as Code to automate deployments for consistent environment setup. In code, you define the infrastructure that needs to be deployed and now it’s versioned as part of the project in the source code repo. Then, I’ll cover the importance of Automated UI Testing, Load and Performance Testing, and Application Monitoring. Finally, Part 3 in this series, I’ll walkthrough step-by-step how to setup and how to demo the Mercury Health app. In the meantime, check out the GitHub Repo on Mercury Health.
As the Mercury Health team says, remember to think positively, stay focused, breathe, and be awesome!
-Randy
by Contributed | May 27, 2022 | Technology
This article is contributed. See the original author and article here.
At MS Build 2022, Azure Video Indexer service is becoming the primary video analytics offering Applied AI services, a GA service for analyzing stored videos (e.g. media libraries), with a single endpoint, more than 35 video and audio AIs – mainly based on Azure Cognitive Services.
“Hi, My name is Azure Video Indexer”
Azure Video Indexer (VI), formerly known as Azure Video Analyzer for Media, was recently renamed back to VI, avoiding confusion for our media customers. VI is officially the primary applied AI service for videos. See Applied AI Azure page (in the bottom)._ VI has a new product page in ACOM and a new pricing page in ACOM; You can explore the available regions in regions availability Azure page and to learn about VI APIs in Azure Video Indexer developer portal. Our web experience has a fresh landing page, and the product documentation was also up to date with recent changes. In Azure portal, the resource provider name from now on is “Video Indexer.” As of May 1st, our new updated repository of Azure Video Indexer widget was renamed. Use https://www.npmjs.com/package/@azure/video-indexer-widgets instead.
Oh, and we are here to stay with this name.
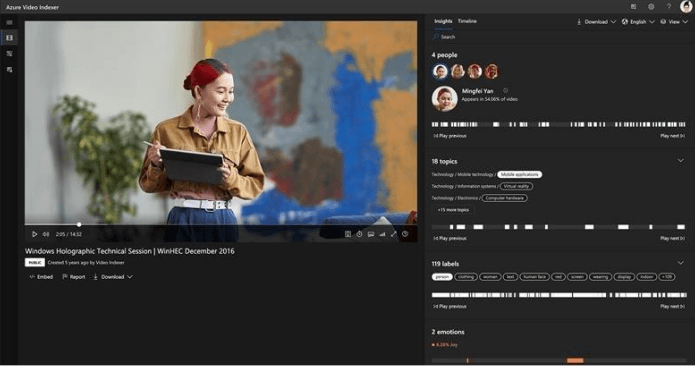
Figure #1, Azure Video Indexer Web experience
Our focus recently as a GA service, was supportability and quality of service.
We are thrilled to announce the following enhancements:
Better quality of AIs
Line breaking in transcripts improvements
Improved line break logic to better split transcript into sentences. New editing capabilities are now available through the Azure Video Indexer portal, such as adding a new line and editing the line’s timestamp. For more information, see Insert or remove transcript lines. We have invested in quality improvements of our audio pipeline so we expect much better results starting May 1st.
Video Insights improvements
Object Character Reader (OCR) quality is improved by 60%. Face Detection quality is improved by 20%. Label accuracy is improved by 30% over a wide variety of videos. These improvements are available immediately in all regions and do not require any changes by the customer.
Closed Captioning files now support including speakers’ attributes
Azure Video Indexer enables you to include speakers’ characteristic based on a closed captioning file that you choose to download. To include the speakers’ attributes, select Downloads -> Closed Captions -> choose the closed captioning downloadable file format (SRT, VTT, TTML, TXT, or CSV) and check Include speakers checkbox.
Better Security and Supportability
Service tag
Azure Video Indexer is now part of Network Service Tags. Video Indexer often needs to access other Azure resources (for example, Storage). If you secure your inbound traffic to your resources with a Network Security Group you can now select Video Indexer as part of the built-in Service Tags. This will simplify security management as we populate the Service Tag with our public IPs.
Azure Monitor integration
Azure Video Indexer now supports Diagnostics settings for Audit events. Logs of Audit events can now be exported through diagnostics settings to Azure Log Analytics, Storage, Event Hubs, or a third-party solution.
The additions enable easier access to analyze the data, monitor resource operation, and create automatically flows to act on an event. For more information, see Monitor Azure Video Indexer.
Celebrity recognition feature toggle
You can now enable or disable the celebrity recognition model on the account level (on classic account only). To turn on or off the model, go to the account settings > and toggle on/off the model. Once you disable the model, Video Indexer insights will not include the output of celebrity model and will not run the celebrity model pipeline in your account.
You can explore the list of our recent features for NAB, 2022 in this blog post.
New: Call to join our limited program: Run video and audio AIs in the browser
At //Build 2022, in the 2nd day, Microsoft CTO Kevin Scott, shared how new advances in AI and other tech and software innovations are empowering developers and creators to do more, be more productive and creative, and enrich the lives of everyone on the planet in the The Future of AI Development Tools.
Imagine how the experience would look like if any social network company who gives a channel for content creators to upload a video or audio files or to allow live video or audio streaming, would also allow a secure way to enrich and improve the content in the browser, before everybody is able to see it. Social networks would easily be able to e.g. moderate the content, suggest hashtags for the video content and allow dubbing for the content which is created making it more trusted and accessible.
So, how can we ease the pain for a web developers, without asking them to explore multiple open sources, in a secured manner powered by Azure?
Today we are announcing an exciting new limited-access program (private preview) we have incubated, which will be released first for internal use extending to all Microsoft owned companies. It’s temporary name is “On device AI” (ODAI) – innovative technology in the domain for content creation and social networks, that runs artificial intelligence in the browser in a low-code-low-cost manner
With ODAI extension, web developers working for social networks such as LinkedIn, can use Azure packaging service to generate a customized-encrypted package, with vision and/or speech AI pipeline of choice, in a secured manner, optimized for the social network business needs. The deployable package content runs seamlessly in the browser using generic existing web standards spanning from laptops to smartphones and tables, and allows to benefit from the client hardware to significantly reduce the provider costs, in this case the social network.
As mentioned, it’s a private preview program. If you wanna learn more, contact visupport@microsoft.com

Figure #2, auto generate tags extracted from topics in the video, using in browser AI new technology for content creators and social networks
Join Azure Video Indexer Today! Explore, Learn, Share
For those of you who are new to our technology, we encourage you to get started today with these helpful resources:

by Contributed | May 26, 2022 | Technology
This article is contributed. See the original author and article here.
We are excited to highlight the Zero to Hero guide, our very own journey to help developers and engineers get started on Azure. We have a large collection of resources to help you ramp up in the cloud, and these guides curate all our best-in-class content in one place, making it easier to find and navigate. Technology is changing fast. With these guides you will ramp-up and level up your skill set to keep the upper hand in this competitive market. Our Zero to Hero guides ensure that you have a solid foundation as you begin to explore Azure.
The Zero to Hero guide will show you how to achieve expertise and prepare for certification in the following areas: data engineering, data science, and artificial intelligence. Within 4 weeks, regardless of where you are in your journey, we can propel you to the next level.
Each week you’ll watch videos, learn from step-by-step training, and try skills for yourself with self-guided exercises. Don’t forget to also sign up for the associated 30 days learning challenges to earn 50 percent off Microsoft certification.
Download the guides below and start learning today!
- Zero to Hero with Azure Data Engineering
- Zero to Hero with Azure Machine Learning
- Zero to Hero with Azure Artificial Intelligence
Are you a developer who builds apps with low-code techniques? Are you a solution architect defining the design and implementation of technology solutions in Azure? We have guides for you too!
Azure Skills Navigator for System Administrators and Solution Architects
Azure Skills Navigator for Developers

Recent Comments