by Contributed | Jul 21, 2022 | Technology
This article is contributed. See the original author and article here.
The risk landscape for organizations has changed significantly in the past few years. Traditional ways of identifying and mitigating risks simply do not work. They focus primarily on external threats when risks from within the organization are just as prevalent and harmful. Additionally, regulations change frequently, and it is difficult for security and compliance leaders to keep up on these changes.
The Uncovering Hidden Risks podcast will explore the need for enterprises to quickly move to a more holistic approach to data protection and reduce their overall risk. The show will cover an array of topics, across data governance, risk management, and compliance. It will address industry trends and customer pain points.
In each episode Erica Toelle, Sr. Product Marketing Manager for Microsoft Purview, partners with a Microsoft guest host to interview a guest leader in the data governance and compliance industry. These experts have a unique and deep understanding of the challenges organizations face, and the people, processes, and technology used to address them.
We are excited to have you listen in to our conversations as we discuss a range of interesting topics, ranging from trends, best practices, and real-life strategies for developing a holistic data governance and risk management program.
The Uncovering Hidden Risks podcast will launch on Wednesday, July 27th! Subscribe now to get the first two episodes!
You can catch our podcast trailer and subscribe on https://www.uncoveringhiddenrisks.com
Or you can listen and subscribe on the following platforms:
Here is a preview of our first two episodes, launching on Wednesday, July 27th:
Episode 1: Transitioning to a holistic approach to data protection
Guest Bret Arsenault, CVP, CISO at Microsoft joins us on this week’s episode of Uncovering Hidden Risks to discuss how a holistic approach to data protection can deliver better results across your organization and the three steps that can get you there. Erica Toelle and Talhah Mir host this week’s episode to chat with Bret about current trends in the data protection space, what data protection issues are top of mind, and how teams should start on their data protection strategy.
Episode 2: Three Ways to Prepare for the Future of Data Governance and Collaboration
Guest Jeff Teper, Corporate Vice President of Microsoft 365 Collaboration, including Teams, SharePoint, and OneDrive, joins Erica Toelle and Chris McNulty on this week’s episode of Uncovering Hidden Risks. Jeff leads product, design, and engineering teams for Microsoft 365, including Teams, SharePoint, OneDrive, Viva, and more which empower people and organizations worldwide to collaborate at work, home, and school. Erica and Chris speak with Jeff about empowering users to do more through collaboration technology, a zero-trust model for collaboration, and how we can make powerful things simple.
We look forward to exploring with you!

by Contributed | Jul 20, 2022 | Technology
This article is contributed. See the original author and article here.
One of the key aspects that companies want to improve is their sales cycle. Organizations look for innovations that can provide real-time solutions to address their business problems. Keeping up with changing customer demands and rising competition is crucial in this technological era. This is especially crucial for industries like manufacturing, oil and gas, retail, etc.
At Softweb Solutions, we understand the criticality of this situation, especially in this pandemic era, more than ever. We have worked with interactive, immersive technologies that have changed the paradigm of the manufacturing sector. Among these, mixed reality (MR) paves its path to the next-level business development experiences.
When we talk about MR, we ought to mention Microsoft’s HoloLens which has revolutionized the way industries design and practice sales processes. Being a Microsoft partner for over a decade, Softweb Solutions always looks forward to leveraging Microsoft’s tools and services to foster business growth of our clients. With MR solutions that assist in faster quote generation, better product cataloging, remote training and real-time assistance, Softweb Solutions has a proven track record of offering services to promote business growth of our clients.
We have been working with MR since Microsoft introduced it in 2017, catering to clients from a vast range of industries with immersive solutions. Let’s have a walk-through of one such instance where we provided MR solutions using HoloLens 2.
Transforming sales process with Softweb Solutions’ HoloLens 2 app
Tinsley Equipment Company LLC. is an organization based in Texas, USA that offers bulk material handle equipment for a range of industries across Americas. Given the size of the equipment and the need to show the products at the jobsite for retrofit and green field applications, the MR platform made a perfect fit. To stand apart from their competition, the Tinsley Equipment team wanted to provide their customers with a real-time quote for the equipment under consideration. They wanted to push the pricing discussion up sooner in the sales cycle for the team to immediately work with customers on options and alternatives that takes several weeks or months.
“This MR solution has aided our customers to better understand crucial equipment details that drive price differences to either move forward with the project or table it until another time. This is a great service to save time and has helped Tinsley to develop a reputation of transparency and honesty that, we are told, many customers haven’t seen in some time,” said Warren Ferguson of Tinsley Equipment Company.
Warren Ferguson brought the MR concept to Softweb Solutions who followed their thorough analysis process to get in-depth insights on Tinsley’s business processes, how they operate and the problems that they were looking to solve. The Softweb team worked for several months to develop and scale the application. With features that help Tinsley to gain maximum benefits out of the solution, it has become a mainstream tool for the company.
At Softweb Solutions, our MR capabilities offer limitless possibilities to companies like Tinsley who are focused on providing value to their clients. Moving on from traditional simulation techniques, our AR product visualization solution enhances the sales experience by offering an immersive 360-degree perspective of the subject or the equipment. We provided accurate 3D visualizations for interactive product catalog displays that allowed the technical and sales team to collaborate efficiently.
With Softweb Solutions’ AR CPQ solution, Tinsley can shorten time to competency. The technician wears the HoloLens headset which allows them to view the equipment details and get accurate measurements.
Some of the key features of the MR solution include:
- Product management
- Manage product details remotely and distribute them as asset bundle files for remote deployment
- Quotation management
- Select products from the lists
- Add additional information
- Preview and generate quotes
- View quotes
- CRM integration for single-point management
- Dynamic product configuration
- Guide customers on product standards and customization opportunities
- Innovative customer experience by enabling them to choose their product specifications
- 3D holograms
- Showcase multiple products from the asset library
- Give an immersive view of how the product(s) will look and fit at the customer’s location
- Real-time quotations
- Generate proposals through an integrated CRM/product management system
- Reduce time-to-quote
- Increases quote accuracy
- Showcase augmented products
- Create a rich, immersive and interactive user experience
- Allow your customers to connect with your products with a 1:1 or 1:8 scale
The HoloLens 2 app allows the technicians to get spatial information with precision. They can present a variety of their products in the form of 3D holograms according to their customers’ configuration using our Augmented CPQ solution. With our AR CPQ app, the sales team can get the details of the equipment in real-time. They can quickly provide a viable quote and close the deal. This results in 2X faster deal closure and up to 25% increase in productivity.
The transformational capabilities of our MR solution for improved sales performance
By utilizing elements from both augmented reality (AR) and virtual reality (VR), MR offers a unique immersive experience that allows the sales team to present their products in an interactive manner. The engineering team can get a detailed understanding and correct measurements of the equipment with 3D holograms. Moreover, by using our virtual product configurator solution, you can save time, process information faster and get data with greater accuracy. However, the advantages of MR are not limited to sales and quotations. Depending on your use case, the technology can be used to address your business requirements. To learn more about how Softweb Solutions can help you to transform your business, you can visit our website.

by Contributed | Jul 19, 2022 | Technology
This article is contributed. See the original author and article here.
What is changing?
When customers enable Container Insights, Azure Monitor deploys a containerized collection agent. This agent is being renamed from OMSAgent to Azure Monitor Agent. There are no feature updates or functional changes to the agent in this release.
Why are the changes being made?
The current OMSAgent name is a legacy name from the OMS product and does not reflect the branding for Azure Monitor and Container Insights products. The Azure Monitor Agent is being standardized as the single collection agent for Azure Monitor. The name change brings the agent’s name in line with these updates.
When are the changes going live?
The changes will roll out region by region starting from early September with AKS service update, expected to be these changes rolled out to all regions by the end of October. Exact dates and a version number of Container Insights image version with changes will be shared closer to the release date with an update to this blog post.
AKS customers will receive the changes as part of an AKS service update. Arc and Hybrid customers will have to update the Extension and HELM chart versions manually. See detailed instructions below.
What are the exact changes?
The agent used by Container Insights has been renamed. So, customers will see a new pod name in their clusters. Alongside that, several other related resources have also been renamed. See the “List of renamed resources” and “List of renamed labels ” tables below for complete details.
What is the impact? What do I need to do?
Log analytics queries
All log queries with string the omsagent in them will not work and results will only be returned for dates before the change. To mitigate, update the queries to have query clause to cover “omsagent” or “ama-logs” in existing queries. See examples below.
Original query
|
Updated query
|
KubePodInventory
| where Namespace == “kube-system”
| where Name contains “omsagent”
|
KubePodInventory
| where Namespace == “kube-system”
| where Name contains “omsagent” or Name contains “ama-logs”
|
Original query
|
Updated query
|
ContainerLog
| where Name contains “omsagent”
|
ContainerLog
| where Name contains “omsagent” or Name contains “ama-logs”
|
Alert Rules
Alert Rules with the string the omsagent will not work.
- Query alerts with the string “omsagent”
- Metric alerts which reference omsagent in a dimension
You can find alert rules using
Option 1 – In the Alerts section of Azure Monitor in the Azure portal
Option 2 – Programmatically using Azure Resource Graph queries
Go to the “Azure Resource Graph Explorer” in the portal and run the below query:
alertsmanagementresources
| where properties contains “omsagent”
The above steps should help you find the affected rules. To update the rules, simply edit them in the portal (as below).

User scripts
Any user scripts explicitly referencing the pod names will not work.
Resource name in all UIs
Customers will see the updated controller names in the Container Insights UI as well as the command line.
Screenshot 1 – Container Insights Portal UI


Screenshot 2 – Command Line

Screenshot 3 – Workbooks

Instructions for consuming the update
Instructions for AKS customers
No action needed from customers. Customers will receive this as part of an AKS service update.
Instructions for Arc K8s customers
Note: The extension version with the above changes is version 3.0.0
- Get the Azure Log Analytics Workspace Resource Id which configured on the existing Azure Monitor for containers extension
az k8s-extension show –name azuremonitor-containers –cluster-name <cluster-name> –resource-group <resource-group> –cluster-type connectedClusters -n azuremonitor-containers
- Delete the existing Azure Monitor for Containers extension either through Azure Portal or Azure CLI
- Create Azure Monitor for containers extension either through Azure Portal or Azure CLI. Make sure to use the same Azure Log Analytics Workspace ResourceId which is obtained in Step #1, to ensure the data being ingested to the same Log analytics workspace as before
Instructions for Hybrid customers
Note: The Helm chart version with the above changes is version 3.0.0
- Get the Azure Log Analytics workspace which is being used for the Azure Monitor for containers HELM chart. You can obtain through
helm get values <azure-monitor-for-containers-release-name> -A
- Delete the Azure Monitor for containers HELM chart – https://docs.microsoft.com/en-us/azure/azure-monitor/containers/container-insights-optout-hybrid#how-to-stop-monitoring-using-helm
- Install the HELM chart as per the Instructions – https://docs.microsoft.com/en-us/azure/azure-monitor/containers/container-insights-hybrid-setup#install-the-helm-chart . Make sure to same Azure Log Analytics Workspace to ensure the data being ingested to the same Log Analytics workspace as before.
List of renamed resources
Note: The xxxx below is a placeholder for random hash values appended to the resource name. In practice, a name like “ama-logs-xxxxx” will appear as “ama-logs-cfkst” or similar.
Resource Type
|
Old name
|
New name
|
Configmap
|
configmap/omsagent-rs-config
|
configmap/ama-logs-rs-config
|
Pod
|
pod/omsagent-xxxxx
|
pod/ama-logs-xxxxx
|
Pod
|
pod/omsagent-rs-xxxxxxxxxx- xxxxx
|
pod/ama-logs-rs- xxxxxxxxxx-xxxxx
|
Pod
|
pod/omsagent-win-xxxxx
|
pod/ama-logs-windows- xxxxx
|
Secret
|
secret/omsagent-secret
|
secret/ama-logs-secret
|
Secret
|
secret/omsagent-token-xxxxx
|
secret/ama-logs-token-xxxxx
|
ServiceAccount
|
serviceaccount/omsagent
|
serviceaccount/ama-logs
|
ControllerRevision
|
controllerrevision.apps/omsagent-xxxxxxxxxx
|
controllerrevision.apps/ama-logs-xxxxxxxxxx
|
ControllerRevision
|
controllerrevision.apps/omsagent-win-xxxxxxxxxx
|
controllerrevision.apps/ama-logs-windows-xxxxxxxxxx
|
Daemonset
|
daemonset.apps/omsagent
|
daemonset.apps/ama-logs
|
Daemonset
|
daemonset.apps/omsagent-win
|
daemonset.apps/ama-logs-windows
|
Deployment
|
deployment.apps/omsagent-rs
|
deployment.apps/ama-logs-rs
|
Replicaset
|
replicaset.apps/omsagent-rs-xxxxxxxxxx
|
replicaset.apps/ama-logs-rs-xxxxxxxxxx
|
List of renamed labels
component=oms-agent
|
component=ama-logs-agent
|
component=oms-agent-win
|
component=ama-logs-agent-windows
|

by Contributed | Jul 19, 2022 | Azure, Business, Hybrid Work, Microsoft 365, Technology, Viva Goals
This article is contributed. See the original author and article here.
Now that hybrid work is just work, the challenge for organizations is to balance employee demands for flexibility with business needs. This month we made improvements to help employees work smarter and more efficiently, with integrated technology that brings people together across every role and function so they can connect and collaborate effectively in the flow of work.
The post From enabling hybrid work to creating collaborative experiences—here’s what’s new in Microsoft 365 appeared first on Microsoft 365 Blog.
Brought to you by Dr. Ware, Microsoft Office 365 Silver Partner, Charleston SC.
by Contributed | Jul 18, 2022 | Technology
This article is contributed. See the original author and article here.
Hybrid work environments have introduced new vulnerable access points to organizations’ data and credentials, requiring improvements in credential security to help prevent the risk of cyber-attacks. In addition, the associated costs of security incidents that involve remote work are over $1 million more expensive on average than incidents that don’t involve remote work.1 Sixty-one percent of data breaches involve credentials, making them the most compromised data type in breaches.2 Cyber attackers often leverage compromised credentials to access personal data like medical history and banking information, which they can later sell on the “dark web.”
At Microsoft, our goal is to provide a built-in, intelligent, unified, and extensible solution to protect sensitive data across your digital estate – in Microsoft 365 cloud services, on-premises, third-party SaaS applications, and more. With Microsoft Purview Information Protection, we are building a unified set of capabilities for data classification, labeling, and protection not only in Office Apps, but also in other popular productivity services where information resides (e.g., SharePoint Online, Exchange Online, and Microsoft Teams), as well as endpoint devices.
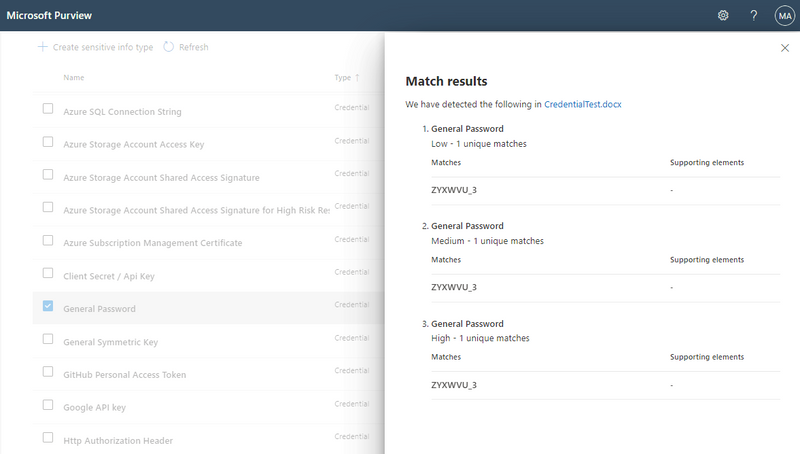
There are currently over 250 pre-built Sensitive Information Types available (e.g., PII identifiers, social security, credit card, bank account numbers, etc.). We are pleased to announce that we are now starting public preview* of 42 new Sensitive Information Types (SITs) enabling organizations to identify, classify, and protect credentials found in documents across OneDrive, SharePoint, Teams, Office Web Apps, Outlook, Exchange Online, Defender for Cloud Apps, and Windows devices. These credential SITs can be included in information protection auto-labeling and data loss prevention policies to help organizations discover a wide range of digital authentication credential types (aka “secrets”), such as user credentials (username and passwords), default passwords, and Azure cloud resources (e.g., Storage Account Keys, SQL Server Connection Strings, and SAS). Also included are new SITs for Amazon S3 Client Secret Access Key, X.509 Certificate Private Key, GitHub Personal Access Token, ASP.NET Machine Key, Slack Access Token, Google API, Ansible Vault, and more. Note that many of these SITs are credentials that provide access to cloud development and other resources, which have been the target of sophisticated attacks on DevOps pipelines within organizations.
List of all 42 new SITs:
Amazon S3 Client Secret Access Key
|
Azure Subscription Management Certificate
|
Azure SQL Connection String
|
Azure Service Bus Shared Access Signature
|
Azure Redis Cache Connection String Password
|
Azure IoT Shared Access Key
|
Azure Storage Account Shared Access Signature
|
Azure Storage Account Shared Access Signature for High-Risk Resources
|
Azure Logic App Shared Access Signature
|
Azure Storage Account Access Key
|
Azure COSMOS DB Account Access Key
|
Azure App Service Deployment Password
|
Azure DevOps Personal Access Token
|
Azure DevOps App Secret
|
Azure Function Master / API Key
|
Azure Shared Access Key / Web Hook Token
|
Azure AD Client Access Token
|
Azure AD User Credentials
|
Azure AD Client Secret
|
Azure Bot Service App Secret
|
Azure Databricks Personal Access Token
|
Azure Container Registry Access Key
|
Azure Batch Shared Access Key
|
Azure SignalR Access Key
|
Azure EventGrid Access Key
|
Azure Machine Learning Web Service API Key
|
Azure Cognitive Search API Key
|
Azure Cognitive Service Key
|
Azure Maps Subscription Key
|
Azure Bot Framework Secret Key
|
X.509 Certificate Private Key
|
User Login Credentials
|
ASP.NET Machine Key
|
General Password
|
Http Authorization Header
|
Client Secret / API Key
|
General Symmetric Key
|
GitHub Personal Access Token
|
Google API key
|
Microsoft Bing Maps Key
|
Slack Access Token
|
SIT that includes all 41 previous SITs
|
New credential SITs key capabilities
- Within the Microsoft Purview compliance portal, these new credential SITs can be added to auto-labeling and DLP policies to quickly and accurately detect and classify complex digital authentication credentials
- System administrators can test the accuracy of individual SITs against sample data
- These new credential SITs will be visible in Content Explorer and Activity Explorer, enabling users to:
- Locate documents that contain sensitive credentials within their environment
- Identify activity involving the use of credential data within their environment
Public preview also includes:
Support for: |
Microsoft Purview solutions |
Sensitivity labels |
Information Protection |
Auto-labeling** |
Data Loss Prevention (DLP) policies |
Exact Data Match SITs |
Insider Risk Management |
|
Data Lifecycle Management |
|
Records Management |
|
eDiscovery |
|
Microsoft Priva |
*Note: Rollout has begun as of July 18th and is expected to be fully completed within a 24-hour window (July 19th).
**Note: Office client-side labeling is currently not supported, but it will be available sometime in CY22H2. Please stay tuned for additional updates on this capability.
In-Product Screenshot(s)
Figure 1: Detection of general passwords using Credential SIT. Note that an E5 or A5 license is required for accessing Credential SITs, which will be in public preview within the next few weeks for commercial cloud customers and government clouds (GCC, GCC-High, Department of Defense).
Learn more about Microsoft Purview Information Protection and Credential SITs here. We are constantly extending our product capabilities to help organizations more easily classify and protect sensitive data.
Get Started
We are happy to share that there is now an easier way for you to try Microsoft Purview solutions directly in the Microsoft Purview compliance portal with a trial. By enabling the trial in the Purview compliance portal, you can quickly access the new Credential SITs and Easy Trials, and start using all capabilities of Microsoft Purview, including Insider Risk Management, Records Management, Audit, eDiscovery, Communication Compliance, Information Protection, Data Lifecycle Management, Data Loss Prevention, and Compliance Manager. Visit your Microsoft Purview compliance portal for more details or check out the Microsoft Purview solutions trial (an active M365 E3 subscription is required as a prerequisite).
With Information Protection Easy Trials, users can apply default labels and get label recommendations on items containing sensitive data such as credit card numbers and activate features with a single click. System admins can review items containing credit card numbers and decide whether to automatically apply a label to them. Also, get further information on how to set up recommended information protection features and how to create auto-labeling policies.
We look forward to hearing your feedback!
1 IBM Security and Ponemon Institute, “Cost of a Data Breach Report 2021,” July 2021
2 Verizon “2021 Data Breach Investigations Report”, May 2021

Recent Comments