by Contributed | Sep 5, 2022 | Technology
This article is contributed. See the original author and article here.
Introduction
For-each loop is a common construct in many languages, allowing collections of items to be processed the same way. Within Logic Apps, for-each loops offer a way to process each item of a collection in parallel – using a fan-out / fan-in approach that, in theory, speeds up the execution of a workflow.
But for-each loop in Logic Apps, in both Consumption and Standard skus, has been a performance pain point because of how they are executed under the hood. To provide resiliency and distributed execution at scale, performance end up being sacrificed, as a lot of execution metadata must be stored and retrieved from Azure Storage, which adds network and I/O latency, plus extra compute cost, thanks to serialization/deserialization.
With stateless workflows, an opportunity to improve the performance of for-each loop arises. As stateless workflows run in-memory and are treated as atomic items, the resiliency and distribution requirements can be removed – this removes a dependency on Azure Storage to store the state of each action, which removes both I/O and networking latency, while also removing most of the serialization/deserialization costs.
The original for-each loop code was shared between stateful and stateless workflows. But as performance on stateless was not scaling we rethought the way we execute for-each loop in the context of a Stateless workflow. Those changes almost doubled the performance of for-each loop within the context of stateless, as we were able to achieve a 91% speedup in our benchmark scenario.
Benchmark
In order to compare the performance of a stateless workflow before and after the code changes, we used a familiar scenario – which we used for our previous performance benchmark blogpost, modifying it slightly to process a batch of messages using a for-each loop instead of the split-on technique we used previously. You can find the modified workflow definitions here.
We deployed the same workflow to two Logic Apps – one which used the previous binaries and another running the optimized binaries – and used a payload of 100 messages in an array delivered by a single POST request. The for-each loop turned this into 100 iterations, executing with a concurrency limit of 10. We then measured the time it took for each Logic App to complete all 100 iterations. The total execution time can be found below:
Batch Execution (100 messages)
|
Total execution time (seconds)
|
Previous binaries
|
30.91
|
Optimized binaries
|
16.24
|
As per results above we confirmed that the optimized app took 47.6% less time to execute, which means 90.7% execution speedup.
Analysis
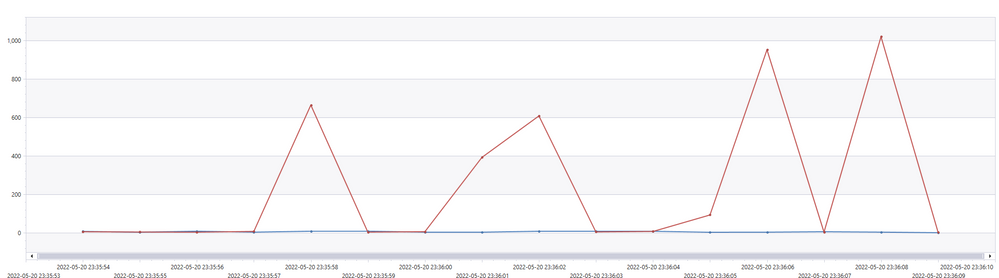
Two interesting graphs are that of execution delay and jobs per second.
Execution delay is the time difference between when a job was scheduled to be executed and when it was actually executed. Lower is better.
Red = unoptimized
Blue = optimized
From the graph, we see that the unoptimized execution experienced spikes in executing delay. This was due to a synchronization mechanism that we used to wait for a distributed batches of for-each repetition to complete. We were able to optimize that delay away.
Jobs per second is another metric that we looked at because under the hood, all workflows are translated into a sequence of jobs. Higher is better.

Red = unoptimized
Blue = optimized
We can see that the optimized version remains higher and steadier, meaning that compute resources were more efficiently utilized.
What about Stateful workflows?
As Stateful workflows still run in a distributed manner like Consumption workflows, this optimization is not directly applicable. To maximize the performance of a for-each loop in Stateful, the most important factor is to make sure the app is scaling out enough to handle the workload.
by Contributed | Sep 4, 2022 | Technology
This article is contributed. See the original author and article here.
Return of the join in Power BI with Kusto
Summary
If you are not interested in all the details:
- You can add to the source statement in Power Query for dimension tables the clause: IsDimension=true
- You can use both dimensions and fact tables in Direct Query mode, and create relationships between them after you add this setting
- You can see an example in the attached PBI file
Before
The experience of many users, trying out Power BI with Kusto/ADX data was not always great.
Kusto’s main claim to fame is great performance with very large tables.
Trying to use such tables in PBI using Direct Query was not always fast and sometimes failed with errors about not enough memory to perform the query.
The reason behind this problem in many cases was the use of joins between tables.
Joins in Kusto
You can read about joins here.
One of the important recommendations is when joining a large table (Fact) with a much smaller table (Dimension), is to mention the small table first:
Customers | join kind=rightouter FactSales on CustomerKey
It is also recommended in such cases to add a hint:
Customers | join hint.strategy=broadcast kind=rightouter FactSales on CustomerKey
The hint allows the join to be fully distributed using much less memory.
Joins in PBI
When you create a relationship between two tables from Kusto, and both tables use Direct Query, PBI will generate a join between the two tables.
The join will be structured in this way:
FactSales | join Customers on CustomerKey
This is exactly the opposite of the recommended way mentioned above.
Depending on the size of the fact table, such a join can be slow, use a lot of memory or fail completely.
Recommended strategies until now
In blogs and presentations, we recommended few workarounds.
I’m mentioning it here because I would like to encourage you to revisit your working PBI reports and reimplement the joins based on the new behavior that was just released.
Import the dimension tables
If the dimension tables are imported, no joins will be used.
Any filters based on a dimension table will be implemented as a where based on the column that is the base of the relationship. In many cases this where statement will be very long:
| where CustomerKey in (123,456,678,…) .
If you filter on the gender F and there are 10,00 customers with F in the gender column, the list will include 10,000 keys.
This is not optimal an in extreme cases it may fail.
Join the table in a Kusto function and use the function in PBI
This solution will have good performance, but it requires more understanding of KQL and is different from the way normal PBI tables behave
Join the tables on ingestion using an update policy
Same as the previous method but requires even a deeper understanding of Kusto.
New behavior
Starting from the September version of PBI desktop, the Kusto connector was updated, and you can use relationships between dimension tables and fact table like with any other source with a few changes:
- In every table that is considered a dimension add IsDimension=true to source step so it will look like

- The data volume of the dimension tables (The columns you will use) should not exceed 10 megabytes.
- Relationships between two tables from Kusto will be identified by PBI as M:M. You can leave it as M:M but be sure to set the filtering direction to single from the dimension to the fact.
- When the relationship is M:M, the join kind will be inner. If you want a rightouter join (because you are not sure you have full integrity) you need to force the relationship to be 1:1. You can edit the model using Tabular editor (V2 is enough)
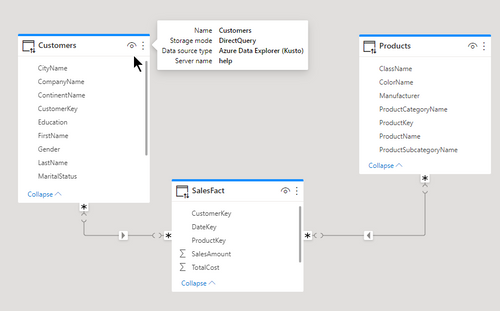
Before and after
In the attached example you can see two dimension tables with relationships to a fact table. The relationships are M:M and you can see the generated KQL in the text box.
The query as shown takes 0.5 seconds of CPU and uses 8MB of memory
The same query without the new setting takes 1.5 seconds of CPU and 478MB of memory.
by Contributed | Sep 2, 2022 | Technology
This article is contributed. See the original author and article here.
The first problem we hear from customers moving to Azure Data Factory (ADF), who have been using SQL Server Integration Services (SSIS) to get their Project Online OData, is that the authentication and authorization is not straightforward. There isn’t a simple choice to login to Project Online, so you have to make a call to get a token which can then be used in the REST calls to OData. The following post steps through the process. I’m not going deep into the details of ADF and won’t cover all the steps of making an App Registration – there are plenty of resources out there, and this concentrates on the authentication then pulls in some Project level data. It gets more complicated obviously when you also want tasks and assignments, but the same approaches used with SSIS will work just as well in ADF.
TL;DR – if you know all about ADF and Project Online and App Registrations and just want the auth piece – jump to the M365Login section – just about halfway down, or just take a look at https://github.com/LunchWithaLens/adf which has definitions for the whole pipeline.
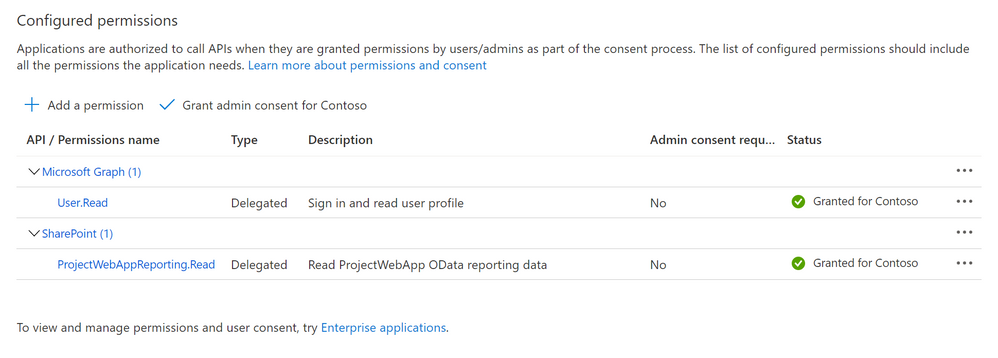
What you will need:
- An App Registration in Azure Active Directory that allows you to read the Project reporting data. You will need your Tenant ID and also the Client ID and registered secret of the App Registration
The require App Registration Settings
- A user account that just needs Access to Project Server reporting service. You will need the account name and password. The authentication will use the Resource Owner Password Credential (ROPC). This method of authentication is not recommended when other approaches are available (see Microsoft identity platform and OAuth 2.0 Resource Owner Password Credentials ) but as there is no “app-only” authentication options for Project Online this is one such occasion when this is the only way. To ensure this is as secure as possible we will be storing the username and password in Azure Key Vault (AKV).
 Minimum user settings for the account (although they don’t need Team Member)
In this example they are also a team member, but that is not necessary.
- An Azure Data Factory resource in Azure
- Somewhere to write the data. In this example I cover both saving out as Json to blob storage in Azure, as well as saving to SQL Server (in this case hosted in Azure. You will need connection strings for whatever storage you are using
- If using SQL Server you will need stored procedures that will do the data handling – more details later
Once you have all these pieces in place, we can continue with ADF to:
- Add Linked Services
- Add Datasets
- Build a pipeline
Linked Services
We need 4 linked services
- An Azure Key Vault where we will be storing our account details and App Registration secret
- A REST linked service – basically our OData endpoint
- Azure Blob Storage (not necessary – but I found it useful in debugging before I added it all into SQL Server)
- SQL Server
To keep this blog relatively short, I’m not going into all the details of setting up AKV, just that using a managed identity makes it fairly easy to use in AFD.
The REST linked literally just needs the base URL configured – and this will be the URL for your PWA instance’s OData feed, along with any select options to limit the returned fields. As an example, I used:
https://<tenantname>.sharepoint.com/sites/pwa/_api/ProjectData/Projects?$select=ProjectId,ProjectActualCost,ProjectActualDuration,ProjectActualFinishDate,ProjectActualStartDate,ProjectActualWork,ProjectCost,ProjectCreatedDate,ProjectCurrency,ProjectDescription,ProjectDuration,ProjectFinishDate,ProjectIdentifier,ProjectLastPublishedDate,ProjectModifiedDate,ProjectName,ProjectPercentCompleted,ProjectPercentWorkCompleted,ProjectStartDate,ProjectStatusDate,ProjectWork
This limited the columns returned to just those I needed. The authentication type was left as anonymous as I was handling this latter with a bearer token.
The Azure Blog storage isn’t a necessity – if you want to use one then easy to configure but I won’t go into the full details here. Ping me in the comments if you can’t find good resources to help.
Finally the SQL Server, and mine was a database I was already using for something else to which I just added a couple of tables and sprocs. In an earlier attempt I’d configured a more expensive SQL Server instance than I’d realised – and blown through my monthly allowance… The SQL Server linked service allows easy connectivity to an AKV to get the connection string – for a secure configuration.
Datasets
The datasets match up to 3 of the linked services. My “RestResource1” to link to my REST, my “ProjectTable” to match up to my SQL database and a specific table, and my “json1” that I use to connect to my blob storage to save a file. Again, configuring these I leave as an exercise for the reader :) , but the GitHub repo has definitions for all of these so you can see how they hang together. The pipeline will help them make more sense too – which comes next.
The Pipeline
To help visualize where we are headed, first we can look at the final short pipeline:
 The full end-to-end pipeline
The first column of activities is reading the required data from AKV. The names should make it obvious what the data is, the username and password, the ClientId and secret for the app registration, then finally the scope for the authentication call. This isn’t strictly a ‘secret’ but I put in in the AKV as it helps when demonstrating (or recording) the solution to be able to show the values. Exposing the scope is no big deal and avoids having to redact stuff in any recording I do.
The only part defined for these activities are the settings – and the scope one is a good example:
 Example KeyVault settings
The most interesting step, and maybe the only one you are interested in, is the one I called M365Login – and that is just my name – there isn’t a special activity, it is just a web activity. The settings for this one are as follows:
 Web call settings to get token
The URL is of the form https://login.microsoftonline.com/<tenantid>/oauth2/v2.0/token and the method is POST and the headers configured as shown above with Content-Type application/x-www-form-urlencoded, Accept */* and Connection keep-alive. The Body is the key part – and is using the concatenation function and brings in the values from the previous calls to AKV. The full form looks something like the following, where I have used specific names for my AKV activities – yours may vary.
@concat(‘grant_type=password&client_id=’,activity(‘AKVPjoClientId’).output.value,‘&client_secret=’,activity(‘AKVPjoODataSecret’).output.value,‘&scope=’,activity(‘AKVPjoScope’).output.value,‘&username=’,activity(‘AKVUserName’).output.value,‘&password=’,activity(‘AKVUserPassword’).output.value)
Basically it is using the output.value property of the previous steps to complete the “grant_type” body needed for an ROPC call.
I then use a Set variable action to take the response and keep the token for later use.
 Variable setting for token
The full string used in the Value is @activity(‘M365Login’).output.access_token
Now I have my token I can use that to make my REST call to Project Online’s OData endpoint using a Copy data activity. First I use a Stored procedure activity to clear out my staging table. Take a look at the GitHub for more details, but it is just a ‘delete from’ call.
The copy data activity has a source and sink (destination) and I use one to read and then write to blob storage, then another to read and write to SQL. I’ll concentrate on the second, which has Source settings configured like this:
 Source data settings
The source dataset is my REST dataset, I add the header Authorization with a Value of
@concat(‘Bearer ‘,variables(‘token’))
which gets the token from my variable called token, and I have also set the Pagination rulesRFC5988 with a Value True (although that isn’t in the above screenshot.
The Sink settings are as follows:
 Sink data settings
with the sink dataset as my SQL dataset ‘ProjectsTable’. The magic happens on the Mappings tab – and I had created a table that matched the columns I was returning from REST – so just a 1:1 mapping. You can get more adventurous here if you need to do anything fancy:
 Data mapping from OData to my SQL table
Once that is complete, we have a populated Project staging table with the current projects read from OData. The final steps are then just 3 stored procedure steps that remove deleted projects from the live project table (by deleting if they do not now exist in staging). also deleting any projects that have been updated (the modified date is newer in the staging table) and then finally copying in the updated and new plans from staging to the live table.
As mentioned, this is just the basics and only looks at Projects – but the main focus here was the authentication steps of getting the token with ROPC, then using the token in the REST call.
I appreciate I have glossed over a lot of the detail here so happy to fill in some of the gaps if required in the comments section or another blog if needed. However, if you know ADF and already use SSIS – the authentication piece was probably all you came for.

by Contributed | Sep 2, 2022 | Technology
This article is contributed. See the original author and article here.
Hey there, MTC! We’re dancin’ in September, so let’s boogie on down to this week’s recap!
MTC Moments of the Week
Our first MTC Member of the Week for the new month goes to @Harun24HR! Thank you for your contributions to help other MTC’ers in the Excel community!
We didn’t have any new community events this week, *but* September 1st did mark the start of the Azure Quantum Summer 2022 Hackathon in collaboration with IEEE QCE22! If you’re interested in quantum computing, check out this virtual hackathon happening through Wednesday, September 7, and get the chance to win a Surface Go 3 and other cool prizes!
And over on the blogs, you can read all about the roll out of To Do in Outlook for Windows in @avijityadav‘s new post. Check it out and let us know what you think in the comments!

Unanswered Questions – Can you help them out?
Every week, users come to the MTC seeking guidance or technical support for their Microsoft solutions, and we want to help highlight a few of these each week in the hopes of getting these questions answered by our amazing community!
In the OneDrive for Business community, @Julian12 is seeking guidance for a user who’s seeing previously-removed SharePoint libraries reappear and start syncing.
Meanwhile, in the Windows 11 community, @CindyAMO is asking for help resolving an error with the gdi32full.dll file that’s preventing Windows from updating.
Next Week in Events – Mark Your Calendars!
September 6 – Game Creation on Azure with Teradici
September 8 – Unpacking endpoint management: Managing Windows 365 Cloud PCs with Endpoint Manager
And for today’s fun fact… in the month of August, MTC members spent a combined total of 1,060,750 minutes online. That’s almost 2 years!!
And with that, have a great weekend, everyone! 

by Contributed | Sep 1, 2022 | Technology
This article is contributed. See the original author and article here.
Microsoft Defender for Cloud Apps |
 |
Webinar Sep 14 9AM PST: Manage your SaaS Security Posture with Microsoft. In the current evolution of SaaS apps, there are many different SaaS configurations and posture options. Misconfigurations are one of them and is a potential risk for your organization that can lead to a breach or sensitive data leakage. Learn how to easily manage your SaaS Security Posture with Microsoft and prevent this potential risk. Register here. |
 |
Protecting apps that use non-standard ports with session controls. This feature allows Microsoft Defender for Cloud Apps to enforce session policies for applications that use port numbers other than 443. |
|
Feature parity between commercial and government offerings. We have expanded our support for GCC customers who can now benefit from the SecOps experience features within Defender for Cloud Apps all from the Microsoft 365 Defender portal. |
 |
Azure AD “Security Reader” role alignment. As of August 28 2022, users who were assigned an Azure AD Security Reader role won’t be able to manage the Microsoft Defender for Cloud Apps alerts. To continue to manage alerts, the user’s role should be updated to an Azure AD Security Operator. Currently the Azure AD “Security Reader” role may manage Defender for Coud Apps alerts while the same role may only view alerts from all other workloads. The purpose of this change is to align the AAD “Security Reader” role assignments to provide clarity for the customers, prevent confusion of the same role use. |
 |
Hunt for Azure subscriptions using Defender for Cloud Apps. This blog describes how attackers can compromise Azure subscriptions and use them for malicious activities. In addition, it shows how Microsoft Defender for Cloud Apps data can help hunt for these activities and how to mitigate the risk of compromised subscriptions. |
|
Protect sensitive SharePoint sites with Defender for Cloud Apps. This blog walks through the configuration of Azure AD, Purview, SharePoint Online and Defender for Cloud Apps to block downloads of a file that has sensitive content. This will also provide an example of how you can configure it in your own environment. |
|
Microsoft Defender for Endpoint |
|
Microsoft Defender for Identity |
|
Webinar Sep 6 9AM PST: Microsoft Defender for Identity | Identity Targeted Attacks – A Researcher’s Point of View. Attendees will get a peek behind the curtain and see how our research teams deal with newly disclosed identity vulnerabilities, and how that information is turned into an alert in Defender for Identity. Register here. |
|
Microsoft Defender for IoT |
|
Webinar Sep 14 8AM PST: The Last Piece of the XDR Puzzle – Augmenting IT SecOps with IoT Security. Security teams invest heavily in bringing security-related telemetry and data into a single place, with the vision of “one XDR to rule them all”. But many overlook a huge bulk of the network that remains obscure – IoT and unmanaged devices. Join us in reviewing how Microsoft Defender for IoT integrates with M365D to complete the XDR story with IoT visibility, assessment, and security. Register here. |
|
Microsoft Defender for Office 365 |
|
Exciting Feature Updates to Attack Simulation Training. We have been hearing from a lot of our enterprise customers that payload technique variety is key to any long-term end user behavior change program. To help facilitate we are pleased to announce two new payload techniques. |
|
Improving the reporting experience in Microsoft Defender for Office 365. These new reporting features and improvements will help refine SecOps professional’s workflows when assessing Office 365 security effectiveness. |
|
Announcing the release of step-by-step guides! These guides are there to help you with common tasks across the product in a flash, with the minimum information & clicks needed, reducing the time needed by your admins to secure your enterprise. |
|
Introducing tenant blocks via admin submissions. You can now block suspicious entities when submitting emails, URLs, or attachments for Microsoft to review. |
|
Mastering Configuration in Defender for Office 365 – Part Three. This blog is the final installment of a three-part series detailing the journey we’re on to simplify configuration of threat protection capabilities in Office 365 to enable best-in class protection for our customers. |
|
Automatic Redirection to Microsoft 365 Defender is coming! All security-related functionality will be automatically redirected from the Office 365 Security & Compliance Center (https://protection.office.com) to the Microsoft 365 Defender portal. Additional details on our docs page. |
|
Introducing new actions from the Email Entity page! With these changes, you’ll no longer have to move to a different page to take response actions.
|
|
|
|
Microsoft Secure Score |
|
Microsoft Secure Score is adding new improvement actions for Information Protection and anti-spam policies.
We’re updating Microsoft Secure Score improvement actions to ensure a more accurate representation of your organization’s security posture. This update will include new recommendations as Microsoft Secure Score improvement actions for Microsoft Information Protection and for anti-spam policies in Defender for Office 365.
|
|


Recent Comments