by Contributed | Oct 5, 2022 | Technology
This article is contributed. See the original author and article here.
Kim Akers – CVP, MCAPS Enablement and Operations
Over the past few years, across every industry, we have seen organizations quickly adjust to challenges and pursue new business opportunities as the pandemic reshaped our world. From health care, to manufacturing, retail and beyond, organizations have had to not only focus on building their own digital capability but hiring talent with proven potential.
As more and more organizations seek to fill the nearly 150 million jobs being created by this transformation, it has become acutely clear: talent is everywhere but the opportunity is not. In fact, Covid-19 put a giant spotlight on just how many people have been overlooked for far too long—people of color, women, people with less education. People with disabilities.
It’s never been more important to ensure everyone can prove they have the tech skills to take on that new assignment, get that new job or achieve the impossible.
With this in mind, and in honor of National Disability Employment Awareness Month, I’m excited to share more detail on how we’re helping to reshape the certification industry to be more inclusive for people with disabilities.
Understanding disabilities
For decades, “disability” has focused on mobility, vision, or hearing issues. Yet, 70 percent of disabilities don’t have visible indicators. Examples of non-apparent disabilities include:
- Learning: Includes difficulty focusing, concentrating, or understanding
- Mental health: Includes anxiety, bipolar disorder, PTSD, and/or depression
- Neurodiversity: Includes dyslexia, seizures, autism, or other cognitive differences
I am part of that 70% and my experience with dyslexia and dysgraphia helps me have empathy for the variety of challenges faced by the disability community. Especially knowing that having a seen, or unseen, disability can have a tremendous impact on someone’s career and opportunities—especially in an Industry with years of tradition stacked against them.
Take for instance Kevin’s story.
Kevin is a sales director whose job required him to complete a certification. He was diagnosed with ADHD as a child but thought it had subsided as he grew up. The symptoms re-emerged in adulthood, impacting his life at work.
For example, Kevin spent more than 500 hours studying and preparing for a certification test. He didn’t know how to get the accommodations required for success; the process was too complex. He failed the exam several times. This had a cascade effect. Not passing meant he missed his mandatory training goal, resulting in reduced compensation, contributing to increased anxiety at work and at home.
“The more we can help people to learn on their terms, the more we can help people take the time that they need and to have the resources they need to succeed,” Kevin says, noting that he passed the exam after receiving proper accommodations.
It is painful to read stories like Kevin’s. No one should be left behind because they need additional accommodation while taking a test or anything else. Yet that’s what happens every day.
Removing barriers to success, trying new approaches
I believe it’s time to shake things up.
We have been listening, researching, and learning how to be more inclusive—this includes reviewing and updating our certification exam accommodations. And just three months ago, we rolled out the first of many exam improvements: testers no longer have to ask before moving around or looking away from the computer during a test. They must simply stay in view of the camera. That will make a big difference for many test takers.
We also know seeking an accommodation has historically been complicated and may even require the need to share sensitive, personal information. So, we’ve also made changes like:
- Making the accommodation application process simpler
- Removing the documentation requirement for most requests; and when it is required, expanding the list of acceptable documentation and reducing the burden placed on applicants
- Ensuring proctors understand how to provide accommodations
- Establishing a Microsoft Certification Accommodations HyperCare support team to support learners who need extra help (msftexamaccom@microsoft.com)
For a complete list of accommodations requirements, please visit: Accommodations and associated documentation requirements.
Change begins within
Certifications are a proven method for employees and job candidates to stand out in an increasingly competitive industry. I’m thrilled to see the steps taken to ensure our Microsoft Certification program is accessible to all.
After all, living with a disability shouldn’t hinder opportunity. Simply put, organizations must go beyond compliance when it comes to accommodations. That includes both offering them and ensuring proctors are properly trained. I’m thrilled that Microsoft is leading the way.
Stay tuned, more changes are in the works. I can’t wait to share them with you.
Related announcements
Improvements to the Exam Accommodation Process
by Contributed | Oct 4, 2022 | Technology
This article is contributed. See the original author and article here.
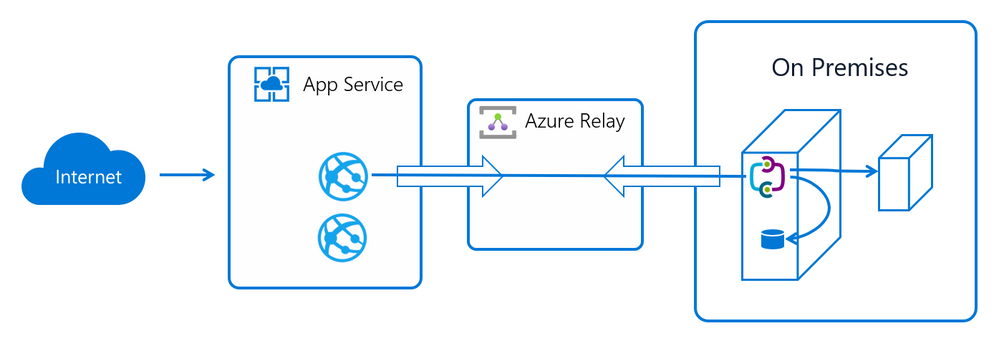
App Service Hybrid connection offers a quick and uncomplicated way to reach your on-premises services in scenarios where there aren’t other networking solutions like VPN or ExpressRoute available. Normally, you don’t even need to open any firewall ports in your on-premises environments because it only requires outbound HTTP connection over port 443 towards Azure to work. Behind the scenes, it is a TCP relay proxy over websockets. It only works to reach services that run on TCP protocols and not UDP.
Therefore, it might be a good fit if you are planning to migrate your application(s) to Azure App Service but this app has dependencies to on-premises databases or APIs and your networking team is not yet ready to set up a VPN/ExpressRoute connection between these environments. The migration work can be unblocked using Hybrid connections towards these external dependencies with no code changes within your app.
However, what to expect in terms of performance? Apart from the pure networking latency of having an App Service connecting back to on-premises service… will the Hybrid connection itself introduce extra latency on top of network? What about the different scenarios:
- Reaching on-premises HTTP APIs;
- Reaching on-premises databases;
- Downloading on-premises large files over HTTP
In this article we will run benchmarks on all given scenarios above and compare them with and without Hybrid connection. It is not the goal here how to configure such a connection, because that tutorial is very well described here.
The test setup
An App Service Hybrid connection relies on a service called Azure Relay to work (and Azure Relay is based on Azure Service Bus platform). This is how the architecture looks like:
Now, let me explain how the setup in this test is done when comparing to the diagram above:
- App Service: a small PremiumV2 .NET Core 6 app running in Brazil South;
- Azure Relay: if you don’t have an already created Azure Relay created, the App Service Hybrid connection will ask you to do so. Here, I created one in Brazil South region;
- On Premises: to simulate an on-premises environment, here I have a physical computer with a fast and modern hardware (Ryzen 5 5600H, 16GB ram, 512gb SSD) connected to a 600mbps stable fiber connection. This system has an average 12ms (milliseconds) latency to Azure and vice-versa. It also has one SQL Express 2019 database, a .NET 6 API to simulate on-premises services for these tests and the HCM (Hybrid Connection Manager) that is required for this setup.
Now, we want to compare the Hybrid connection overhead over the raw network connection. So, for each test that will follow in this article, we will configure the App Service to hit the services via Hybrid connection endpoints and then run the same test but going directly to the public IP of the “on-premises” server, skipping the relay completely.
Here’s the configuration in the Portal:

Scenario 1: HTTP requests
Let’s assume you got on-premises HTTP services to reach from an App Service via Hybrid connection. In the configuration picture above, that endpoint name is “andre-api” which points to a on-premises DNS name of “testerelay” on port 5001. That is the .NET API running in the on-premises computer. This API has a REST endpoint that returns random strings of around ~8kb in size.
From the App Service side, it runs another .NET API that calls the previous endpoint in three different ways:
- Single request: App Service calls the on-premises API once
- Sequentially: App Service calls the on-premises API 50 times in a row. When the previous request finishes, the next goes ahead and so on… until we reach 50 requests;
- Parallel: App Service calls the on-premises API 50 times at the same time. This is accomplished by making use of .NET tasks
The intention here is to verify how well the relay handles a typical real-world scenario where you get many parallel requests at a given time. All requests here are using HTTP2 protocol.
Check out the results table:
|
Average response time per HTTP request
|
Difference
|
Direct
|
Hybrid connection
|
Single request
|
13ms
|
24ms
|
+84%
|
Sequential (50)
|
13ms
|
34ms
|
+161%
|
Parallel (50)
|
50ms
|
60ms
|
+20%
|
Important note
Having the App Service .NET API calls the relay forcing the HttpClient to use HTTP2 by default made a huge difference for the positive side in the tests results. HTTP 1.1 was much worse especially in the parallel requests test;
Conclusion for HTTP tests
If we look at the difference numbers in % it seems to be a huge overhead added by the Hybrid Connection, but looking at absolute numbers, it is not. In the more realistic test of this setup – the Parallel HTTP simulation – we get only 10ms added compared to a direct connection, which is negligible for most applications. Another point to keep in mind here is that we are comparing the Hybrid connection to a direct connection back to on-premises. In reality we would have a VPN or other appliance which might add some extra delay there too.
Scenario 2: database connections
Another very common use case is the need to fetch data from a on-premises database that could not be migrated to Azure at the same time as the application. Here we will make the App Service .NET API call the on-premises SQL Server using the relay connection and then directly. The query returns from the database around ~8kb of data per call. Like the HTTP tests, there will be three different scenarios:
- Single request: AppService queries the database once
- Sequentially: App Service queries the database 50 times in a row. When the previous query finishes, the next goes ahead and so on… until we reach 50 queries;
- Parallel: App Service queries the on-premises database 50 times at the same time. This is accomplished by making use of .NET tasks
|
Average response time per SQL query
|
Difference
|
Direct
|
Hybrid connection
|
Single query
|
13ms
|
13ms
|
0%
|
Sequential (50)
|
13ms
|
27ms
|
+107%
|
Parallel (50)
|
13ms
|
30ms
|
+130%
|
Conclusion for database tests
Compared to the HTTP tests, the database queries have less overhead because of the TCP nature of the connections. While the direct connection had no extra overhead even when querying 50 in parallel, the Hybrid counterpart added some but not significantly – again, looking from absolute numbers perspective and not purely in percentage.
Scenario 3: large file downloads
Now let’s benchmark something less usual: what about using the Hybrid connection to stream a 1GB file (a Linux ISO file) from on-premises REST API via HTTP? Here I’m expecting more overhead because the underlying websockets protocol that Azure Relay is using is not really meant for these cases. But anyway, here are the results:
REST API HTTP download speed
|
Difference
|
Direct
|
Hybrid connection
|
27 MB/s
|
20 MB/s
|
35%
|
Conclusion for file download test
I was expecting a much worse result, but the Hybrid connection surprised for the better here. I wouldn’t recommend this connection for streaming large files but this test shows that this is possible if it is really needed.
Overall conclusion
These benchmarks did not cover all the possibilities for a Hybrid connection but certainly give us an idea what to expect. Generally speaking, it is a solid alternative and I would recommend for scenarios where a VPN or ExpressRoute connection is not possible. The biggest advantage for sure is ease of use – setting up your own environment to run similar tests will take just a couple of hours top.
If you wish that I run additional benchmarks and scenarios, please let me know in the comments!
by Contributed | Oct 3, 2022 | Technology
This article is contributed. See the original author and article here.
Attempting to impersonate someone is an activity as old as humanity, and has been used to great comedic effect by comedians and jesters throughout the ages.
Sadly, the crime of identity theft (in which a criminal uses someone’s identity details for fraudulent purposes) is very much not a joke. Not only because it can destroy someone’s finances and credit, but can even lead to false arrests and other life-altering consequences for the person whose identity is being abused.
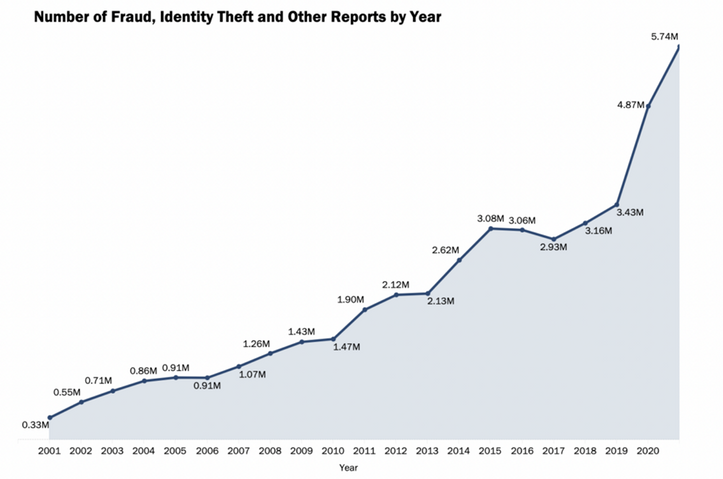
Even less funny than that, is that the number of these crimes is currently at an all-time high. According to identitytheft.org1 the number of identity theft incidents are up 70% compared to 2020, with the yearly number of reported identity theft incidents clocking in at 5.7 million in 2021 for the US alone.
Figure 1 – Source: FTC annual data book 2021 (ftc.gov/data)
Figure 1 – Source: FTC annual data book 2021 (ftc.gov/data)
And along with the number of incidents, the median cost of these identity theft incidents is also on the rise, reaching an estimated $500 USD per incident based on the 2021 data2. This is in direct correlation with the ever-increasing number of devices and services people use in their daily lives, and the strong shift to conducting life online (from work, shopping, and entertainment), which have all served to increase exposure to this type of crime.
All of this means that, on average, someone’s identity is stolen every 22 seconds in the US, and 33% of Americans will become a victim of identity theft at some point in their lives. In fact, 1 in 4 have been victimized by identity theft before they turn 183. In all, this is most certainly not a laughing matter, especially when you consider that this type of crime costs the US economy 5.8 billion USD per year4.
Hopefully, after hearing the above numbers, you’re wondering what can be done to stop this. Or, at the very least, what you can do to prevent yourself and your family from becoming identity theft victims.
The answer to that question is both simple and very hard; It starts with implementing all the common security advice you’ve probably heard thousands of times before: Use strong passwords, do not reuse credentials, enable multi-factor authentication, do not post personal data on social media, monitor your credit cards, bank accounts, and credit history for anything out of the ordinary, etc.
But the problem with this is that securing your identity is not just solely your responsibility. What makes it hard is that every company, government body, institution, etc. that holds your information is also participating in this game of staying ahead of the identity thieves. And, when we remember that data loss incidents by those entities have been on a steady rise for years with no signs of stopping, it’s an almost statistical certainty that someone, somewhere, will expose your data at some point.
As a result, all too often people that follow the commonly espoused advice about account and identity security to the letter still become a victim of identity theft, through no fault of their own.
Introducing identity theft monitoring
Which brings us to the core topic of this article; Microsoft is excited to announce that identity theft monitoring is available today to Microsoft 365 subscribers (for both Personal and Family subscription plans) in the United States.
 Figure 2 – Microsoft Defender with identity theft monitoring enabled
This solution addresses one of the biggest challenges in preventing identity theft: visibility. We’ve partnered with Experian® to leverage their powerful identity monitoring technology to detect, track, and alert you whenever we find any identifying information on the internet, the dark web, and less common sources like file sharing, chat rooms, and many other places.
By showing exactly what details are compromised and/or publicly available, Microsoft empowers you to take control of your personal identity security and make informed decisions. Once you know what’s out there, you can take action by resetting passwords for compromised services, enabling multi-factor authentication for services that support it, placing a credit freeze to avoid malicious actors affecting your credit, contacting your bank or card provider to report potential fraud on your account, etc.
Identity theft monitoring can currently track and report up to 64 different types of identity details per breach, from usernames and passwords to credit card numbers and even Social Security Numbers. And it does so intelligently; whenever a match is found on any monitored information, it will also alert you to any of your other personal information that was found in that same breach.
For example, when identity theft monitoring is tracking your email address, it will report all associated data it finds in a breach where your email was found. So, if you had a credit card on file with the breached company or service, it will not just report that it found your email, but also the credit card that was registered on your account there. Even if you never added your credit card number to your monitored identity details!
And, if the cause of the breach is known, identity theft monitoring will even tell you what happened to cause your data to be lost.
But knowing your identity has been compromised is only half the battle. While most people we surveyed were perfectly familiar with how to reset a password, many indicated that they wouldn’t know where to start if more sensitive information like their Social Security Number or driver’s license got exposed. Furthermore, many shared their struggles with looking up instructions online due to conflicting information and insufficient clarification of nuances like the difference between placing a credit freeze and a credit lock.
Identity theft monitoring helps answer these questions with contextual recommendations for each individual breach, as well as in-depth guides on how to perform more complex tasks. And, because we want to empower you to make informed decisions about your identity security, it will also inform you of the risks associated with each identity type. This way you can take the action that works best for your situation and risk tolerance.
That’s all well and good, but what if you need further help? Or if someone is actively trying to take over your identity, right now? For those cases Defender includes access to a 24/7 support team of restoration specialists that can guide you through the appropriate next steps for any situation regarding your identity and can even take action for you if time is of the essence.
This means, regardless of the situation, you are never left wondering what the appropriate next steps to resolving your identity breach are or having to fend for yourself in trying to get everything sorted.
This extends to the damages caused by identity theft too. Identity theft monitoring subscribers are insured for the costs associated with restoring their identity (document fees, legal fees, etc.) up to $1M USD and stolen funds caused by the identity theft up to $100k USD5.
So even if the worst should happen, Defender users who have identity theft monitoring enabled can rest (a little bit) easier, knowing that they have access to insurance that will help them in recovering their identities and the associated fallout.
And, as mentioned in the beginning, identity theft monitoring extends to family members in your Microsoft 365 family. These features and benefits can be set up and managed by the family organizer for all members of the family6. Once set up, family organizers will then receive alerts for all managed family members7 through the Defender app on any device they’re signed in on, as well as via email. This helps the organizer stay on top of not just their own identity security, but their families’ as well.
 Figure 3 – Managing breaches for multiple family members
And of course, all of that can be easily managed from the central dashboard provided by the Defender app.
Getting started
To get started with identity theft monitoring today, visit https://mydefender.microsoft.com, sign-in with the personal Microsoft account (@gmail, @outlook, etc.) linked to your Microsoft 365 subscription, find the identity theft monitoring card on the dashboard, and select “Get started.” You can also download the app from the Microsoft, Google, and Apple app stores or download the MacOS app here (if you haven’t already)!
For more details and answers to frequently asked questions, visit: Getting started with identity theft monitoring in Microsoft Defender
References
1,2,4. 2022 Identity Theft Facts and Statistics – https://identitytheft.org/statistics/
3. Experian® Identity theft statistics https://www.experian.com/blogs/ask-experian/identity-theft-statistics/
5. The identity theft insurance is underwritten and administered by American Bankers Insurance Company of Florida, an Assurant company. Please refer to the actual policies for terms, conditions, and exclusions of coverage. Coverage may not be available in all jurisdictions. Review the Summary of Benefits.
6. All family members need an active Microsoft 365 subscription, and any user over the age of 13 need to explicitly consent to being monitored and managed by the family organizer.
7. Requires alert sharing to be enabled. Users over the age of 13 need to explicitly consent to sharing their alerts with a family organizer.

by Contributed | Oct 2, 2022 | Technology
This article is contributed. See the original author and article here.
A warm welcome!
In #30DaysOfDataScience we will go from understanding the Python language to working with real life data and finally creating Machine Learning models both on Azure and in Python. The main role is understanding our data and using the knowledge to make decisions such as fraud detection, customer segmentation and product pricing.
Register for the Program set to kick off on the 17th October to 17th November 2022.
The program journey.

The program is set to start on the 17th of October, before then you need to register as part of the program then start learning on Microsoft Learn using the Cloud Skills Challenge modules.
We will hold discussions on GitHub and over the 30-day period we will host live sessions to help you navigate your journey. Register and join us for this epic adventure.
What to expect after 30 days.
- Successfully build 3 end to end Data Science projects i.e. fraud detection model, customer segmentation and product pricing model.
- Badge of completion to be posted on LinkedIn
Next Steps
Register for the Program set to kick off on the 17th October to 17th November 2022.
See you at the finish line!

Recent Comments