by Contributed | Oct 28, 2022 | Technology
This article is contributed. See the original author and article here.
Adoption and usage of data governance tools are critical and lack of user engagement can be a serious blocker for the whole organization in its data governance journey. When it comes to solution adoption, fortunately Microsoft Purview comes with the built-in ability to analyze it.
This functionality is very useful to answer the following questions:
- Are users actively using Microsoft Purview?
- How is usage changing over time?
- What is activity type e.g., data curation or search data?
- Which assets are the most viewed ones in an organization?
- What are we missing in the catalog?
How to track the adoption?
Adoption tracking is part of Data estate insights functionality in Microsoft Purview. To be able to use it, the user needs to have appropriate permissions assigned. There is a dedicated Insights Reader role that can be assigned to any Data Map user, by the Data Curator of the root collection. More information about required permissions can be found in Permissions for Data Estate Insights in Microsoft Purview – Microsoft Purview | Microsoft Docs.
Let’s start with some basics
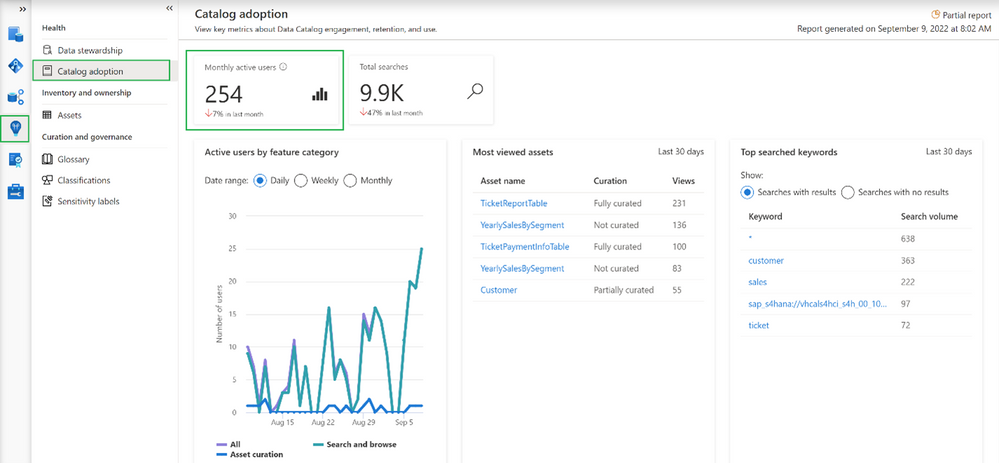
Going into the Insights area and choosing Catalog adoption, we can find information about monthly active users.
In our case, we can see that currently we have 254 distinct users and the number dropped 7% in the last month. Microsoft Purview counts active users as a user who took at least one intentional action across all feature categories in the Data Catalog within a 28-day period. It’s also possible to determine how active our users are in total as Microsoft Purview aggregates number of total searches performed by users

Note
Data estate insights functionality in Microsoft Purview shows information based on user permissions, which means data seen in Insights is limited to collections to which the user has permission to access. In this case, the user used to see insights has access to all collections, meaning the information visible in the catalog adoption is the overall number of users in the organization.
Even more information about catalog users
More adoption data means more insights into how the catalog is used.

This option shows the breakdown of active users by feature category. Feature category was divided into:
- All (which covers all kinds of users)
- Search and browse (which indicates users who are reading data from the catalog by searching them or directly browsing the catalog assets)
- Asset curation (activities related to data curation like assigning data owner, description, applying classification, etc.)
Information on the chart can be shown in Daily/Weekly/Monthly time range.
Increase catalog adoption by giving users more precise information…
Among the information that you get as part of adoption reports is information about which assets are the most viewed in the organization. If you are wondering why it is important to have a look at the following summary:

The most viewed asset (231 views) “TicketReportTable” is fully curated (more about curation in the 2nd part of the article) which means the asset has an assigned owner, description, and at least one classification. On the other hand, the 2nd most viewed asset (136 views in last 30 days) “YearlySalesBySegment” is not curated at all. This can lead to situations where users are accessing catalogs and get poor-quality information. As a result, users may step back from using data catalog and adoption will be dropping. Based on such insights you can intensively work on asset curation and only provide users with high-quality information about data in your organization.
Adoption insights available in Microsoft Purview also give the ability to identify the most searched keywords.

It is interesting that one of the most searched assets is only partially curated. Based on this information it is possible to help data stewards and owners set priorities and identify the most important areas in an organization. On the other hand, it’s also possible to get information about keywords that were searched by users but yielded no results.

In this example, it looks like users are looking for information related to “sales” and couldn’t find it. This is an important tip for a data governance team and shows the next possible areas to investigate.
Summary
Now you should have a better understanding of how to identify the progress of Microsoft Purview adoption, You should also have learned how to improve it by converting provided insights into actions, like a better data curation process or by adding new assets to your catalog, which are searched by users.
by Contributed | Oct 27, 2022 | Technology
This article is contributed. See the original author and article here.
Key takeaways:
- As some companies pulled back in the early days of the COVID-19 pandemic, Crayon doubled down broadly on training—including resources from Microsoft Learn—and is now in position to better serve its IT customers as organizations resume business at higher levels.
- Access to Microsoft Learn resources and the expectation of earning certifications help the company maintain minimal employee turnover.
- Crayon management says access to training and certification helps fulfill its commitment to addressing social concerns, including gender, culture, neurodiversity, equity, and inclusion.
Norway’s Crayon confronted the challenge of the COVID-19 era by doubling down on training and certification for its employees. Like many organizations, the global IT consultancy had to find ways for its teams to be productive while working remotely. Unlike others, though, Crayon saw distributed working as an opportunity to position the company for a return to normalcy. The company’s leadership projected that its corporate IT customers would have greater needs as the transition to the cloud accelerated. Crayon anticipated those needs by preparing employees with the Microsoft training and certifications required to support their customers’ ambitions.
Microsoft Learn resources naturally aligned with Crayon’s commitment to training, which is broad and long-standing. “We started out with having focus on certification and training from day one,” recalls Crayon Chief Operating Officer (COO) Bente Liberg, who joined the 3,300-person company 20 years ago as its sixth employee. She cites the strategic importance of training—internally and externally. “Our strategy has always been to help customers implement. We train them so that they can use the things they buy from us, and our commitment to training starts with how we educate our own people.”
Because Crayon both provides services and creates solutions that it sells to customers, the company has a need for its employees to step out of the revenue stream and invest in learning. Bente notes, “It starts with our GMs—actually, all of our country managers have a development KPI for the company. And for them to be able to deliver on that KPI, they need to develop skill sets in the company.”
This is true at the line level, too, and for recruitment. “That was actually something positive for hiring and also for retention,” Bente continues. “We heard from candidates: ‘Oh, can I [do] training?’ Yes, not only you can do training, you have to do training. ‘Can I take [a] certification?’ Yes. You have to take certifications.”
Crayon Chief Executive Officer (CEO) Melissa Mulholland made training and Microsoft Certification available broadly across the company—and not just for consultants. In the company’s India team, for example, “We actually had everybody, including finance—everybody—go and pass [Exam] AZ-900, the [Azure] fundamentals exam, because if they have a better understanding, that will make them better at their job.” Beyond fundamentals, more than one-third of the company’s 8,000 certifications cover in-depth topics, she reports.

From the perspective of a potential recruit or a new employee, this focus on training and certification is a professional opportunity. Senior Power BI Developer Allen Deniega recalls what drew him to the company earlier this year, noting that he has already completed two certifications since he joined Crayon. “The whole culture of helping others and promoting professional development—those two really made me come to Crayon,” he recalls. He started investigating training opportunities on his second day and made particular use of the Microsoft Official Practice Tests, often taking the same one multiple times. “Apart from giving you an idea of the structure and the format of the exam and the actual feel of the exam, it allows you to identify your gaps every time.”
Melissa believes that the learning culture not only makes Crayon more competitive and better able to differentiate its depth of knowledge to customers, but it also helps reduce turnover as employees see their career paths clearly. “It directly corresponds with talent retention, and we have very high retention in our organization. Globally speaking, from an annual standpoint, [turnover is] less than 10 percent, and I really believe that’s driven by this culture of learning and development.”

She also believes that training and certification are key to helping the company fulfill its social commitments. In 2021, Crayon created its first environmental, social, and governance (ESG) report.[1] For Crayon, Melissa explains, “Certifications [are] an excellent way to bring in more diverse skill sets and, for example, giving women who want to be in technical roles the ability to.” She says certifications provide a pathway for individuals who may not have had access to professional opportunities because of gender, culture, color, or neurodiversity. Through the training program, in partnership with Microsoft, she says, “If you have the passion and will, and you have the demonstrated certifications behind that, I’m willing to give people chances to prove themselves in roles, and I think that’s an important mindset that we have in the company that very much aligns to our ESG focus.”
Microsoft and Microsoft Learn have been steady partners for Crayon in these achievements, Melissa points out. “I am so grateful for Microsoft, I think really having our back, at being able to guide us,” she says. “You experience growth when you push yourself to learn and adapt, and it’ll open up not only career opportunities, but it’ll also give you more information to be able to do your job better. Never get in the ‘comfort zone.’”
[1] An ESG report focuses on an organization’s environmental, social, and governance impacts and priorities. The United Nations has published a comprehensive set of these sorts of priorities, called Sustainable Development Goals (SDGs), which many organizations use to guide their own ESG goals and reporting.
by Contributed | Oct 26, 2022 | Technology
This article is contributed. See the original author and article here.
Production deployments of Kubernetes continue to soar as customers increasingly containerize their applications. With the growth in application modernization customers are looking to rapidly scale their Kubernetes deployments by building very large clusters or adopting a multi-cluster strategy. They expect instantaneous connectivity when spinning up and scaling out application instances. Specialized applications, such as gaming apps, expect superior data path throughput for rich application experience. The increased east-west traffic flows necessitate fine-grained monitoring and tracing for troubleshooting. Network Security is another important aspect as customers wish to implement common L4 and L7 security controls for their cloud-native applications and need solutions that are more tailored for Kubernetes and containers.
These requirements call for a robust platform that scales seamlessly to provide networking for millions of containers, a rich set of security controls and hooks into rich traffic metrics and logs for network visibility, without compromising on the performance.
Azure Container Network Interface (CNI) Powered by Cilium is the next-generation networking platform that meets all these requirements by combining two powerful technologies, viz. Azure CNI that provides a scalable and flexible Pod networking control plane integrated with the Azure Virtual Network stack and Cilium open-source project, a pioneer in providing eBPF-powered data plane for networking, security, and observability in Kubernetes.
We are proud to announce the availability of Azure CNI Powered by Cilium natively in Azure Kubernetes Service to provide scalable and high-performance Pod networking and Kubernetes Network Policies.
About Cilium eBPF
eBPF is a revolutionary technology that allows the insertion of sandboxed programs into the Linux kernel to greatly enhance the traffic processing capabilities in the operating system runtime. eBPF programs today enable a rich set of networking, security, observability, and application tracing use cases at very high performance.
Cilium offers the next generation dataplane for Kubernetes that builds on top of eBPF technology to address these use cases for cloud native workloads. Cilium provides rich functionalities such as high-performance data path for Kubernetes services, efficient load-balancing, extensive network security features and rich monitoring. Besides the traditional Kubernetes network-level security Cilium also enables security based on application protocol context, DNS FQDNs, and service identity.
About Azure CNI
Azure CNI provides network provisioning for Kubernetes Pods in AKS. It functions in one of the following two modes which is configured at the time of AKS cluster creation.
VNET Mode: In VNET mode Azure CNI assigns IPs to Pods from a Vnet subnet making Pods first-class citizens in a Vnet. Pods have direct connectivity to each other and to other resources in the VNET and on-premises. You can choose to dynamically assign IP addresses to Pods from a separate Pod subnet that is different from the cluster subnet. This provides better utilization of VNET IP space, and the ability to configure separate Vnet policies for Pods
Overlay Mode: In Overlay mode only the cluster nodes are deployed into a VNET whereas Pods are assigned IP addresses from a private address space that is logically different from the VNET hosting the nodes. This mode significantly reduces the amount of Vnet IP addresses consumed by AKS clusters allowing limitless cluster scale. The Pod address space can be re-used on multiple clusters in the same VNET, greatly simplifying IP address planning. Overlay addressing does not require provisioning of custom routes or usage of encapsulation for Pod-Pod connectivity offering data path performance at par with connectivity between VMs in a VNET.
What does Azure CNI Powered by Cilium provide?
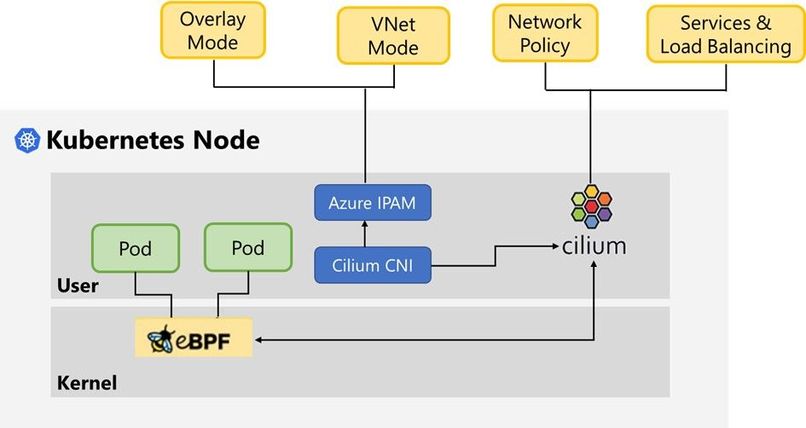
Azure CNI powered by Cilium integrates the scalable and flexible Azure IPAM control plane with the robust dataplane offered by Cilium OSS to create a modern container networking stack that meets the demands of cloud native workloads.
Azure CNI Powered by Cilium
Azure CNI Powered by Cilium offers the following benefits today and provides the ideal platform for future innovations.
Scalable and performant Networking
The Cilium powered CNI supports both Vnet and Overlay modes. The socket-based load-balancing for Kubernetes services in Cilium replaces the inefficient load-balancing based on IPTable rules in KubeProxy to provide superior data path performance at par with direct connectivity to service backend Pod. The performance is deterministic irrespective of the number of services deployed in the cluster.
Kubernetes Network
The Cilium powered CNI comes with built-in support for the basic Kubernetes Network Policies. There is no need to install a separate solution on top. The solution offers significant improvement in scale and performance by eliminating usage of IPTables for network filtering.
Using Azure CNI powered by Cilium
Azure CNI powered by Cilium is currently in preview in AKS. For detailed usage instructions refer to – https://aka.ms/aks/cillium-dataplane.
by Contributed | Oct 25, 2022 | Technology
This article is contributed. See the original author and article here.
You’ve done all the work to build confidence in your data with great data quality, availability and reliability. But how do you know if your data has been tampered with or otherwise experienced an unplanned change? Now SQL Server and Azure SQL Database can answer that question for you. In this episode of Data Exposed: MVP Edition with Anna Hoffman and Karen Lopez, you’ll go through a couple of quick demos about Ledger Databases and Tables to see if you can trust your data.
Resources:
Ledger overview
Configure a ledger database
Implement a secure environment for a database service
Azure SQL Security Playlist
by Contributed | Oct 24, 2022 | Technology
This article is contributed. See the original author and article here.
As part of Cybersecurity Awareness Month, explore the solutions that Microsoft Dynamics 365 Fraud Protection provides to help keep your organization’s data protected. Use the resources on Microsoft Learn to discover methods of supporting data security within your organization, whether you’re a functional consultant, a business user, a data analyst, or a developer. Learn how Fraud Protection helps safeguard customer accounts and build customer trust. Sandra Feinberg, Microsoft Principal Program Manager, offers insight on the subject. She observes that any enterprise using a Dynamics 365 Fraud Protection solution should consider that its high-quality data can be used not only to thwart fraud but also to make good decisions about customers while decreasing false positives. As she explains, “It’s not just about stopping bad transactions, but it’s uplifting those good transactions.”
What is Dynamics 365 Fraud Protection?
Dynamics 365 Fraud Protection helps you know your customers, decrease fraud costs, and improve the customer experience. Adaptive AI is an exciting technology that Fraud Prevention uses to learn fraud patterns as they continuously evolve and to prevent payment and account-creation fraud. For example, who is making the purchase? Is it a person? Sandra notes that businesses use this technology to help protect their accounts, saying, “Adaptive AI learns and adapts to patterns of legitimate and fraudulent account activities.” Importantly, she also points out, “Fraud protection is not just about knowing who the bad guys are, it’s about using the data to know who the good guys are, as well.”
To get an in-depth look at the innovative and advanced capabilities that Fraud Protection uses to help safeguard your data, explore the recently updated documentation, starting with Overview of Dynamics 365 Fraud Protection. For a deeper dive into Fraud Protection, work through these modules on Microsoft Learn:
If your organization already uses Dynamics 365 Commerce to deliver unified buying experiences for customers, the good news is that it’s easily integrated with Dynamics 365 Fraud Protection. Additionally, DFP is purpose built for Enterprise Retail, Gaming, Financial Institutions and Payment Service Providers. We are focused on building up our retail customer base to scale into new geographies.
To learn more about these integrations, read Dynamics 365 Fraud Protection integration with Dynamics 365 Commerce.
Explore a collection to discover more cybersecurity content
The documentation and other resources, such as learning paths and modules, on Microsoft Learn are helpful for gaining a basic understanding of Fraud Protection and other security offerings. Check out the Cybersecurity Awareness: Fraud Protection collection, which offers a variety of articles and training opportunities that can help you and your team learn about Fraud Protection capabilities.
Earn a Microsoft Certification
If Fraud Prevention is part of your Dynamics 365 toolkit, you can explore many pathways for validating your technical skills and earning recognition with globally recognized, industry-endorsed Microsoft Certifications. If you’re a seasoned data analyst, functional consultant, or solution architect, or if you work for a Microsoft Partner in one of these roles, a certification can help you advance in your career and build customer trust.
Keep building your Fraud Protection knowledge
To help keep your organization and customers secure, Sandra reiterates, “It’s really important to understand fraud and payments.” She recommends taking a Fraud 101 class, saying, “The broad Dynamics 365 Fraud Protection customer acquisition team will do those classes for our account teams.”
To learn more, discover blog posts, videos, events, and webinars—plus connect with peers and experts—join the Dynamics 365 Fraud Protection community.

Recent Comments