
by Contributed | Dec 20, 2022 | Technology
This article is contributed. See the original author and article here.
What is an MVP?
Microsoft Most Valuable Professionals, or MVPs, are technology experts who passionately share their knowledge and are always willing to help others within the community. They have exhibited great examples that showcase their passion, community spirit, and leadership through which they’ve earned the MVP award. You can also read what it takes to be an MVP to get more insights.
Meet our Security MVPs
Joe Stocker
Joe Stocker is the founder and CEO of Patriot Consulting, a leading Microsoft Security partner in the United States. Patriot Consulting has completed more than 1,200 cybersecurity projects since 2015, including migrating customers from different Security providers to Microsoft Defender for Office 365. Joe is the author of “Securing Microsoft 365”, writes a technology blog at www.TheCloudTechnologist.com and hosts a podcast on Spotify and iTunes called “Cybersecurity 101 with Joe and Larry”.
Joe, can you share some of your top contributions to Security – Microsoft Defender for Office 365 (MDO)?
- Microsoft Ignite 2022 Conference Speaker “Defending against 2nd wave phishing” (watch).
- Published book “Securing Microsoft 365 (2nd Edition)” (read).
- Pro Bono consulting for Microsoft Defending Democracy and Microsoft Tech for Social Impact, (TSI) where I provide free “office hours” for governments and non-profit organizations, helping them securely configure Microsoft Defender products. My blog was recently cited by CISA (US GOV) in their minimum security configurations for M365 (Section 2.5.2 Resources, “Everything you wanted to know about Security and Audit Logging in Office 365”).
What advice related to security would you share with today’s email users?
Add device authentication as a factor of authentication to guard against phishing emails using MFA fatigue attacks.
Why do you recommend Microsoft Defender for Office 365 (MDO) to customers?
There are ten reasons why I recommend Microsoft email security to my clients:
- Automatic signal sharing with Microsoft Defender for Endpoint
- Protect malicious links in SharePoint, OneDrive, Teams, Office on the Web, and Microsoft 365 Apps for Enterprise
- Safe Documents
- Lateral Phishing Protection
- Native Link Rendering
- Anti-Phishing (to prevent Business Email Compromise)
- Automatic Investigation and Response
- Threat Explorer
- Threat Hunting & XDR Integration
- Performance
How has your experience been with the Microsoft Defender for Office 365 (MDO) product and/or Product Engineering team?
I’ve been working with the MDO Product team for several years and they have always been receptive to feedback and have incorporated several of my suggestions into the product. What impresses me the most is how open they are to sharing the roadmap with MVPs and asking for feedback.
Siegfried Jagott

Siegfried Jagott is a CEO and Principal Consultant for Intellity GmbH and a Microsoft Valuable Professional (MVP) for M365 Apps and Services since the year 2013. He is an award-winning author of Microsoft Exchange Server 2010 Best Practices book published by Microsoft Press and has been writing and technical reviewing for several Microsoft Official Curriculum (MOC) courses on various topics such as MOC 20345 Administering Microsoft Exchange Server 2019.
Siegfried, can you share some of your top contributions to Security – Microsoft Defender for Office 365 (MDO)?
- Two sessions on Exchange Online Protection/Microsoft Defender for Office 365 for Microsoft Exchange Community Technical Airlift 2022
- Messaging Security: Deep dive into EOP, MDO and other Messaging Security Features (MEC009WS) (watch).
- Use Advanced Message Tracking to identify Junk Mail or Spoofing (MEC030WS) (watch).
- Early adopter testing on various product features.
- Working with customers on adopting Security features, and with Microsoft on improving the product.
What advice related to security would you share with today’s email users?
Understand your Exchange Online Protection/Microsoft Defender for Office 365 settings, so you can adjust them when needed. Trust the pre-defined configuration, but always review thoroughly as you can make it even better.
Why do you recommend Microsoft Defender for Office 365 (MDO) to customers?
I recommend Microsoft Defender for Office 365 to customers as it’s part of the M365 suite and the Microsoft AI is so much better than an on-premises Anti-Virus or Antispam toolbox. MDO does not need any administrative intervention as it’s always running the most current version, includes one-of the best malware protections in the industry and Microsoft has a lot of people of Researchers & Threat Hunters constantly monitoring for trends and attacks to improve MDO immediately when issues arise. For me it’s important that I can sleep at night, and that’s what MDO provides to my customers in means of protection from viruses, malware or any other malicious code.
How has your experience been with the Microsoft Defender for Office 365 (MDO) Product and/or Product Engineering team?
When preparing for my “Messaging Security: Deep Dive into Exchange Online Protection, Microsoft Defender for Office” session for MEC 2022, I received a lot of support by the Proud Group members that contributed to my slide deck. For example, I was supported by a long time known Product Manager in the Customer Experience team with details on Advanced Hunting and examples I further developed during this process. The MDO MVP Program lead Product Manager also supported me in finding the right people that could clarify detailed in-depth questions that I had for example on priority account labels or Advanced Hunting.
Viktor Hedberg

Viktor Hedberg works as a Security Consultant at a company in Sweden called Truesec. He helps customers with hardening their hybrid Infrastructure, ranging from Active Directory to cloud-based services such as M365. As a speaker on different events and conferences, he frequently highlights the features that help organizations stay safe, including M365 Defender.
Viktor, can you share some of your top contributions to Security – Microsoft Defender for Office 365 (MDO)?
- Co-authoring a book on “Mastering Microsoft 365 Defender” with another MVP, Ru Campbell.
- Hosting user group and conference sessions on implementing RBAC in Microsoft 365 Defender using PAGs and PIM (watch).
- Posting Advanced Hunting queries on public GitHub repo (view).
What advice related to security would you share with today’s email users?
Always be vigilant when receiving emails that break normal patterns. We have seen ransomware gangs using Qakbot to hijack email threads to start attacking environments, as well as normal phishing however evolving with more and more advanced fake web sites. Contact the original sender if possible and don’t click any links just because it ”seems” safe.
Why do you recommend Microsoft Defender for Office 365 (MDO) to customers?
I think MDO, especially coupled with the other features in M365 Defender brings you complete coverage of most of the attack surfaces present in any given organization these days. Of course, no product suite is perfect, and there will always be black spots in your monitoring, but having a product like MDO helps eliminate these. Safe attachments, safe links and impersonation protection are features I know for a fact have actively stopped threat actors from gaining a foothold in the environment and injecting bad code. I always recommend customers to use ALL features in the Defender suite to help them stay safe. You’d also need a security operations center monitoring alerts 24/7 365 days.
How has your experience been with the Microsoft Defender for Office (MDO) 365 Product and/or Product Engineering team?
My favorite part about engagements as an MVP is the NDA (non-disclosure agreement) stuff Microsoft has, which gives me the opportunity to directly impact the future development of the features, bringing in real-world examples to help Microsoft keep the customers safe as well.
Pierre Thoor

Pierre Thoor works as a Trusted Microsoft Cloud Cybersecurity Advisor at Onevinn in Sweden. He helps customers of all sizes with everything from architect Azure environments, doing cost analysis, recommend licenses, to enabling different Microsoft security products and features such as the favorites – M365 Defender and Sentinel. He’s also an active speaker on different events and has a passion to simplify and give the audience a chance to learn something new. He’s planning to release his third podcast with fellow MVPs Mattias Borg and Stefan Schörling, and it will all be focused on cybersecurity and Microsoft.
Pierre, can you share some of your top contributions to Security – Microsoft Defender for Office 365 (MDO)?
- Helping customers adopt MDO and other M365 Defender products in very early stages.
- In the newly upcoming blog series “Strengthen your email protection with Defender for Office 365” (upcoming late December 2022), I will show how to get started with a free trial and what the best practices would be, and how it can be extended to other Microsoft products helping customers to visualize what’s happening in their environment.
- Engaged with Microsoft in improving the products.
What advice related to security would you share with today’s email users?
We have seen a big increase in email attacks around the world, and I think the best advice is to start training your co-workers and employees to be more aware of the potential risk. But also in a technical sense, implement security measures to protect your organization – and don’t forget to visualize the data to make it more impactful for management.
Why do you recommend Microsoft Defender for Office 365 (MDO) to customers?
Email attacks, or phishing attacks, are increasing daily and they are getting better and better. I can just imagine how good it will be now that we have seen OpenAI ChatGTP doing the work for us, so therefore I always recommend my customers to start protecting the email flow. MDO Safe Links and Safe Attachments protection features have drastically improved with new enhancements over time, and I do see a completely new product today where MDO has the speed and more intelligence to be able to detect and protect.
How has your experience been with the Microsoft Defender for Office 365 Product (MDO) and/or Product Engineering team?
The most fantastic part of Microsoft today is that we as a customer, partner, or just interested in Microsoft technologies can influence the product development. I have been part of the Customer Connection Program for two years now and the speed regarding product development is fantastic and I really do believe the product groups are listening very closely to the feedback they get from the community. It is quite amazing to be a small part of new products and features within the Microsoft Security arena. My favorite part about engagements with Microsoft is a private NDA (non-disclosure agreement) community that Microsoft Defender for Office 365 Team has for MVPs where I can have direct contact with the product group, and they are so fast in their responses! I cannot wait to see what the year 2023 and the future will bring.
Thank you, MVPs!
Microsoft cannot be successful without such an incredibly valuable and engaged group of experts! Thank you all MVPs for being together with us on our product journey towards empowering the world to be more secure each day!
Learn more from the Security MVP experts
Checkout this amazing upcoming episode on the Virtual Ninja Training Show to hear experiences from some of the Security MVPs. (The recording will be available post event at aka.ms/ninjashow). Read the blog Getting started as a Security MVP to learn more. Submit this form if you’re an active contributor within the Security realm or would like to start at it, and we can point you in the right direction to getting your knighthood (MVP award)!
See examples of some global events where MVPs were involved:
Thanks for reading about Microsoft’s Most Valuable Professionals (MVPs).
Do you have questions or feedback about Microsoft Defender for Office 365? Engage with the community and Microsoft experts in the Defender for Office 365 forum.
by Contributed | Dec 19, 2022 | Technology
This article is contributed. See the original author and article here.
Microsoft has been working with the EESSI consortium for the past two years and provided Azure Credits to support the hosting of EESSI’s geographically distributed CernVM-FS servers on Azure and for the building, testing and benchmarking of the EESSI software layer across different types of CPU generations. As the year draws to a close, this article provides a brief summary of progress to date, specifically in relation to accessing EESSI using Azure HPC-on-demand, and looks at what’s planned for 2023.
What is EESSI?
The European Environment for Scientific Software Installations (EESSI) is a collaboration between different European partners in the HPC community: the goal of which is to build a common stack of scientific software installations which provides a uniform experience for users whilst minimising duplicate work across HPC sites for HPC System Administrators.
Designed to work on laptops, personal workstations, HPC clusters and in the cloud, the EESSI software stack was inspired by the Compute Canada software stack (now coordinated by Digital Research Alliance of Canada), a unified software environment for Canada’s national advanced computing centres serving the needs of over 10,000 researchers across the country and providing a shared stack of scientific software applications in over 4,000 different combinations.[1]
What is Azure HPC OnDemand?
The Azure HPC OnDemand Platform (azhop) delivers an end to end deployment mechanism for a complete HPC cluster solution in Azure which makes use of industry standard tools to provision and configure the environment Azure HPC OnDemand Platform | Welcome to the Azure HPC OnDemand Platform’s homepage.
How does EESSI Work?
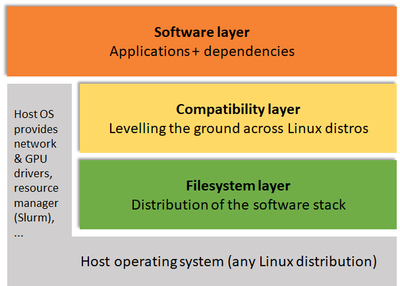
EESSI comprises a number of layers as shown in the high-level architecture overview (Figure 1): a filesystem later based on CernVM-FS which provides a scalable, reliable and low-maintenance software distribution service across clients, a compatibility layer required for ensuring compatibility of the software stack with the multiple different client operating systems and the software layer, installed using EasyBuild and which provides the scientific software installations and their dependencies[2].
Figure 1: EESSI High-level architecture overview
While EESSI is still in pilot phase the focus is very much focused on automation, procedures, testing and collaboration; recent developments and continued efforts by the consortium partners to secure dedicated workforce to ensure EESSI can become production ready is a definite goal of the collaboration and will start as soon as 2023.
Why Azure?
Azure is currently the only public cloud provider which provides a fleet of HPC Virtual Machines with InfiniBand RDMA so ensuring EESSI runs well on these VMs is essential.
The partnership is collaborative and mutually-beneficial: EESSI can help Microsoft to bridge the gap between on-premise and cloud by helping to make optimised bursting in the cloud possible using the same software stack.
The addition of applications that are useful to Azure customers will also help EESSI in the development/provision of a stable, optimised stack of scientific software, also helping to verify regression of the Azure HPC fleet and serving as a development layer upon which to build proprietary applications.
Verifying EESSI on Azure with RDMA
Ensuring that EESSI is freely available through open projects like Azure HPC on Demand (azhop) has been a key focus over the past few months. As part of this, WRF3 was selected as an important application to verify EESSI on Azure with RDMA and a successful evaluation was recently conducted which leveraged EESSI for WRF simulations at scale on Azure HPC to determine if EESSI could help to lower the adoption curve for customers running HPC on Azure and also to learn and hopefully improve Azure for HPC end-users.
Key differences between Azure and an on-premise HPC Cluster
The total Microsoft Azure estate comprises more than 60 geographically distributed datacentres: of those datacentres, the larger ‘Hero’ datacentres contain a considerable fleet of HPC and InfiniBand-enabled nodes.
Azure is currently the only public cloud provider to provide InfiniBand network, but unlike an on-premise HPC cluster, this InfiniBand network is purely focused on compute, not storage. Furthermore, Azure InfiniBand connectivity is not heterogeneous and connectivity is limited to single stamps, meaning that if multiple stamps are needed then some additional steps are required in order to ensure IB connectivity:
- Either by making sure only a single zone is being used, forcing the VMs to be landing on the same physical cluster which will allow the IB connectivity
- Or by using VM Scale Sets (VMSS) which will provide IB connectivity by default[3].
Running WRF3 to verify EESSI on Azure with RDMA
The aim of the exercise undertaken was to make sure EESSI could be fully compatible with the Azure HPC infrastructure and that the IB would work with no (or at least minimal) additional input required from the end user.
For the exercise, it was decided to use the WRF CONUS 2.5km Benchmark to ensure scaling over many nodes, see Figure 2 below. The total time and compute time were separated to make sure that the RDMA and scaling were performed correctly, and the parallel efficiency and scalability was then calculated using only the compute time (directly related to RDMA).

Figure 2: WRF3 Scaling on Zen3
Using a simple setup with no OpenMP or hybrid parallelism and undertaken in the most vanilla way possible, WRF demonstrated linear behaviour up to 16 nodes. There is certainly room for optimization but importantly this exercise demonstrated that out of the box with no specific changes or modifications this did indeed perform.
So what’s next?
Several next steps are planned for the evaluation from the Microsoft side, including simplifying the CPU detection, to allow more consistent determination of e.g. Zen3 (and upcoming Zen4), ARM64 and more CPU architectures. Extending the software suite with (benchmark) datasets and example submit scripts to allow consistent regression testing and easy onboarding for new users. And adding new software like WRF4 to investigate the potential for further scaling beyond 16 nodes.
Strategies to better optimize EESSI and using ReFrame for automated regression testing will also be areas requiring further investigation in the future.
With funding secured via the MultiXscale EuroHPC JU Centre of Excellence which will start in 2023, it is expected by all that the EESSI Consortium will secure the dedicated human resource to ensure EESSI itself can soon become production ready, continuing to help advance the industry and help in the design, delivery and deployment of new installation technologies: ultimately enabling the impact of end users and helping to further scientific outcomes.
[1] Providing a Unified Software Environment for Canada’s National Advanced Computing Centres (linklings.net)
[2] EESSI Architecture – EESSI (eessi-hpc.org)
[3] Using Azure CycleCloud for orchestration can also be used to combine multiple VMSS in a single running HPC cluster, allowing the total number of VMs to be scaled above the total number that can be in a single stamp.
by Contributed | Dec 17, 2022 | Technology
This article is contributed. See the original author and article here.
Many of us have always wanted to build our own bot, but writing code in a programming language like Python or JavaScript can be intimidating. However, it is possible to build a bot without writing a single line of code, using a tool called Azure Logic Apps.
Now, what are Azure Logic Apps?
Azure Logic Apps is a cloud platform that allows you to create and run automated workflows with minimal coding required. It is fully managed by Microsoft Azure, meaning you don’t have to worry about hosting, scaling, or maintaining your solution. The platform also provides hundreds of pre-built connectors, making it easy to connect and integrate apps, data, services, and systems.
If you want to learn more about Azure logic apps go through this link:- https://learn.microsoft.com/azure/logic-apps/
In just a few minutes, you can create your own bot using Azure Logic Apps, without the need for any coding knowledge. So don’t be afraid to try it and build your own bot today!
Pre-requisites: To use Azure Logic Apps, you should have an Azure for Students subscription.
There are two ways to obtain an Azure for Students account:
Student email address: If you are a student with a university email address, you can set up a free Azure for Students subscription with Azure for Student here.
Using GitHub: If you don’t have a student email address, you can still set up an Azure for Students account and receive free credits by using the GitHub Student Developer Pack. You can find more information on activating your Azure for Students account via Github here.“
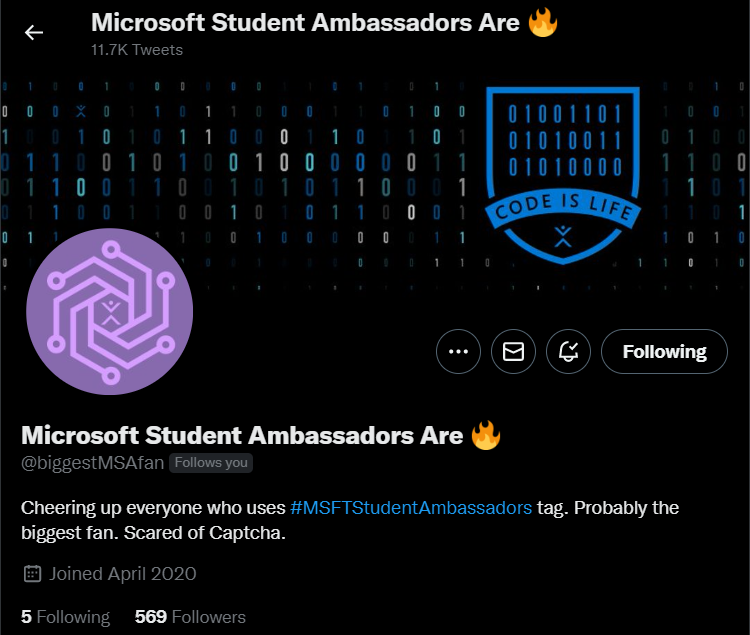
Welcome to our guide on building a Twitter bot using Azure Logic Apps! In this tutorial, we’ll walk you through the steps to create and deploy your very own bot that can automatically retweet tweets based on certain keywords or hashtags.
Step 1: Go to https://portal.azure.com and sign in to your account.
Step 2: In the search bar, type in “Logic Apps” and click on the search result. You will get the following result:

Step 3: Click on the “+” button to create a new workflow.
Step 4: Select Visual Studio Enterprise Subscription and Consumption as your plan type and enter a name for your Logic App.

Step 5: Click on “Review+ Create” and then “Create” to deploy your Logic App

Step 6: Once your Logic App has finished deploying, click on “Go to resource” to access the triggers and actions available.


Now, there will be different kinds of triggers available there, we have to make a Twitter bot.
Step 7: Click on the “When a new tweet is posted” button and sign in to your Twitter account.

Now you have to sign in with your Twitter account here.

Step 8: Enter the text or hashtag you want your bot to search for, and select “Retweet” as the action to perform.

Step 9: Type in the tweet ID and click “save”.
Step 10: Click on the “run trigger” button and wait for the process to complete.
“Enter the text or hashtag that you want your bot to search for on Twitter. For example, you could search for the hashtag #Azure. You can also use the “@” symbol to mention a specific username, and your bot will trigger whenever that username is mentioned in a tweet.”
Congratulations, you have now built your first Twitter bot using Azure Logic Apps! I hope this guide was helpful and that you enjoyed creating your own bot. If you have any questions or need further assistance, don’t hesitate to reach out.
by Contributed | Dec 17, 2022 | Technology
This article is contributed. See the original author and article here.
As a meeting organizer or participant, take Microsoft Teams to the next level with advanced capabilities for personalization, deeper AI integration, and better meeting protection with Microsoft Teams Premium. For Teams admins, see the easy steps to enable Teams Premium, as well as your configuration options.
Jeremy Chapman, Director of Microsoft 365, gives a hands-on tour for customized, intelligent, and secure meetings.
Let your brand shine.

Personalize meetings in Teams with custom logos, backgrounds, and themes. See how with Microsoft Teams Premium.
Present and follow meetings in your preferred language.

Captions are translated live from 40 different spoken languages in real-time. Watch the Teams Premium demo.
Watermarked screenshots.

Prevent data loss of shared content in your Teams meetings with always visible watermarks. A new enhanced security capability Microsoft Teams Premium — Now in Preview.
Watch our video here.
QUICK LINKS:
00:00 — Introduction
00:25 — Custom branding & Meeting Templates
01:38 — Translated captions and intelligent recap
03:08 — Enhanced security- watermarking
04:12 — Virtual appointments
05:05 — Webinars
06:12 — Admin experience
08:51 — Wrap up
Link References:
Check out Microsoft Teams Premium at https://aka.ms/TeamsPremiumMechanics
Build and customize Together modes with the Developer Portal at https://dev.teams.microsoft.com
Unfamiliar with Microsoft Mechanics?
As Microsoft’s official video series for IT, you can watch and share valuable content and demos of current and upcoming tech from the people who build it at Microsoft.
Keep getting this insider knowledge, join us on social:
Video Transcript:
Jeremy Chapman (00:02):
Coming up, we’ll go hands on with a closer look at Microsoft Team’s Premium, which if you’re a meeting organizer or participant, gives you advanced capabilities to take your Microsoft Team’s experience to the next level with more personalization, deeper AI integration, better meeting protection, and much more. And for Teams admins, we’ll show you the easy steps to enable Microsoft Teams Premium as well as your configuration options.
(00:26):
Let’s start with personalization first, using custom meeting branding with Teams Premium, you can now personalize the meeting lobby using custom backgrounds and custom themes with specific accent colors. This way your brand shines through for both internal and external participants. Using this, along with custom Together Modes for group meetings, you can tailor the end meeting experience even further. Of course, if you frequently set up meetings where you need to customize meeting options, we want you to be able to set those meeting customizations up with a lot less effort. Today, for example, you might be presenting financial information where you’ll want to limit who can bypass the lobby, take over as presenter, or disable attendee microphones, their cameras, and meeting chat. Or maybe you have a different set of options for remote job interviews or customer discussions.
(01:15):
Now the pain of configuring those meetings individually will go away with Microsoft Teams Premium. This lets you set up standard meeting templates with everything preconfigured in advance for you as a meeting organizer, when you create a new meeting, all you need to do is choose the meeting template you want from the new meeting dropdown, and the corresponding options will be pre-selected for you.
(01:38):
Now with your meetings personalized, let’s move on to a few capabilities that you can use during your meetings to infuse intelligence into the experience. Teams meetings include powerful AI to generate live captions during online meetings for all users. And now with Teams Premium, you can translate those live captions in real-time into 40 different spoken languages. This allows your participants to follow meetings in their preferred language, and it also adds flexibility so that presenters are free to present in their preferred language, as well. Let’s listen to this presenter speaking Mandarin Chinese, where teams provides English translation in the captions to the English speaking audience.
Speaker 2 (02:21):
(Now if I use Chinese, you can understand what I’m saying. That’s how we use AI to bring people together, no matter where they are or what language they speak.)
Jeremy Chapman (02:28):
And by the way, each participant can choose their own language to follow the captions. It’s specific to them, removing language barriers between presenters and participants.
(02:37):
Next, let me give you an early look at intelligent recap, coming soon to Teams Premium. Intelligent recap acts like a virtual assistant taking notes to help make the meetings you attend and even the ones you miss more productive. It augments your meeting notes by using AI to interpret meeting transcripts, and suggest action items along with their corresponding owners while citing timing from when the suggested action occurred. Now these are just a few examples of what will be a growing list of intelligence-infused experiences with Teams Premium.
(03:08):
The next area where Teams Premium makes a difference is in the area of enhanced security. For example, you can leverage your existing content data sensitivity labels in Microsoft Purview to keep sensitive data protected in Teams calls. As you create or edit your meetings, you just need to select the right sensitivity label, which in turn enforces the corresponding security policy like you’re seeing here, for example, in a Teams meeting where watermarks have been applied to shared content and camera feeds. Notice how it displays your user account information as the logged in user. Watermarking is a brand new capability available with Teams Premium, and it’s one of the best ways to prevent accidental or intentional data loss while content is being shared or included in the presenter’s camera feed. And it doesn’t just apply to printing or snipping your screen, because your email address is always visible in the watermark. It acts as a powerful deterrent, even if you were to take a photo of your monitor. And you can of course combine watermarking with policies to block meeting recordings to protect your content even further.
(04:12):
So those are just a few Microsoft Teams Premium experiences for your everyday meetings. That said, Teams Premium brings new capabilities to other meeting types, as well. Starting with virtual appointments, you get advanced capabilities to manage the end-to-end appointment experience as you connect with customers, clients, and patients. Microsoft Teams Premium sends text reminders and brings custom-branded virtual appointments through to mobile devices, all without the need to download the Teams app. The experience is far more streamlined, because you can now set up and manage scheduled or on demand virtual appointments all in one location. There’s also built-in appointment queuing to help manage your appointments in real time. And you can view usage trends, the history of virtual appointment experiences, and effectiveness like no shows, as well as wait times with end-to-end analytics.
(05:02):
Next for larger Teams meeting experiences such as webinars, Teams Premium gives you new host and event management controls to better connect with your audience. It adds registration waitlists, and manual approvals, which allows additional people to register and be automatically added to the waitlist. And as new spots open, the registrants are automatically added to the list of those pending approvals that you can review and optionally approve them. You can also send automated reminder emails to confirm registrants ahead of the event with a custom branded header, webinar details, and a link to join. And now using the new virtual green room, you can connect with hosts and presenters ahead of your event. This is a dedicated space, separate from attendees, where you can converse, monitor chat, manage Q&A, and review content before the event starts. Additionally, you can more easily manage exactly what attendees see, so that they only see shared content and participants that you bring on screen, avoiding potential unplanned distractions. So there’s a lot more that’s possible with Team’s Premium, which gives you one solution for any type of meeting with more capabilities to come.
(06:12):
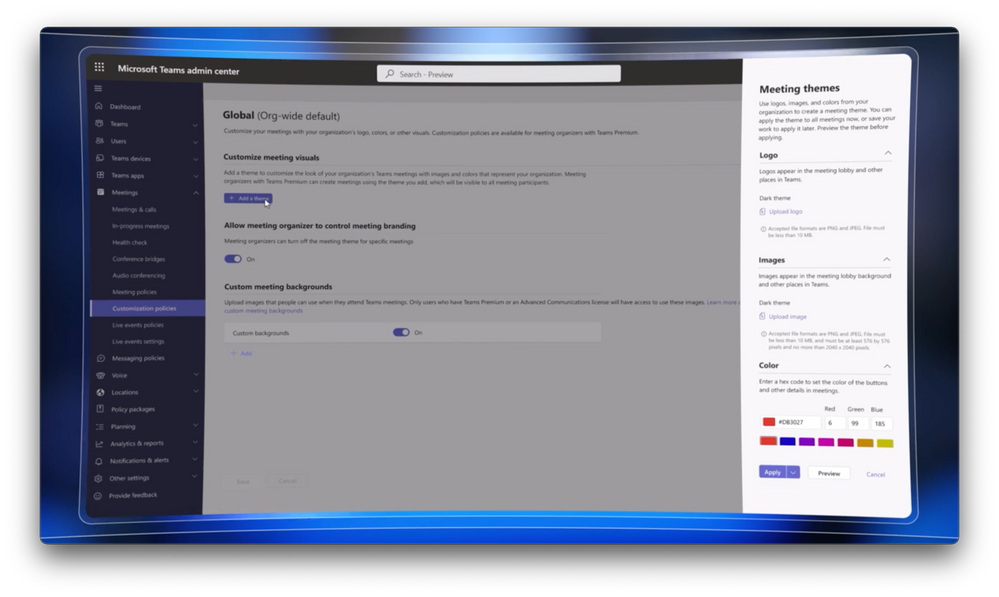
Now, if you’re a Teams admin, all the experiences that I’ve shown are easy to control and configure in the admin center. First, in order to use these capabilities, meeting organizers will need to be provisioned with a Teams Premium license, as you can see here. Even for a capability like live translation of captions, so long as the meeting organizer is licensed, attendees can also use live translation of captions during the meeting with or without a Team’s Premium license. The one exception here is with intelligent recap, where each meeting participant, as well as the organizer, will need a Teams Premium license. Next, for meeting branding and meeting policies, you’ll add themes for your meetings. A theme is used to customize the look of your organization’s Teams meetings and lobby. You can configure your meeting theme with your branded logo image, background image, and a hex code to set the accent colors for buttons and other details.
(07:08):
Then Together Modes can be built and creatively customized using the developer portal@dev.teams.microsoft.com. I’ll move to Together Mode that I’ve already started, and you’ll notice that the background and foreground image layers have been defined and you can place the participants. I’ll add a participant here and change the total number to three. Then, I can place them where I want. So I’ll resize this to 200%, send the image backward behind the foreground, and from there, I just need to save it. Now these can be created by end users or Teams admins. Then for end user submissions, IT admins can approve themes as apps for broader discovery.
(07:47):
Moving on to meeting templates. Those are configured using two steps. First by creating templates, then assigning them to users and groups. In the new meeting templates view, you’ll find a handful of default templates for standard meetings, virtual appointments, and webinars.
(08:02):
And you can create custom meeting templates, first by giving them a name, then a description. Then, you have security controls like auto-applied sensitivity labels, lobby bypass, and announcing dial-in callers. You can also configure audio and video options to control the use of participant microphones or cameras, configure participation settings so that you can manage the use of reactions, chat, and what attendees can see, and determine whether you want to allow recording and transcription. And finally, whether real-time messaging protocol feeds are allowed into meetings. And once you’ve configured a few meeting templates, you can assign them to users in groups via policy. Here in policies, I’ll edit this one for a client call, and I’ll assign the users that I want, these two here. Then I just need to apply, and it will be available for both users.
(08:51):
So that was a quick overview of Microsoft Teams Premium for more personalized, intelligent, and secure meetings with more capabilities to come to learn more, check out aka.ms/TeamsPremiumMechanics, and be sure to keep checking back to Microsoft Mechanics latest updates. Subscribe to get notifications, and as always, thanks for watching.
by Contributed | Dec 16, 2022 | Technology
This article is contributed. See the original author and article here.
In this episode of Data Exposed with Carlos Robles and Anna Hoffman, we will discuss the recent public preview release of the Azure SQL Database offline migrations using the Azure SQL Migration extension for Azure Data Studio.
The new migration capability in the Azure SQL Migration extension provides an end-to-end experience to modernize SQL Server to Azure SQL Database. The extension allows you to perform a migration readiness check with actions to remediate possible migration blockers, export the assessment results, and get right-sized Azure recommendations. These recommendations include an all-new elastic recommendation model to meet your database performance needs.
Watch on Data Exposed
Resources:
Tutorial: Migrate SQL Server to an Azure SQL Database offline using Azure Data Studio with DMS (Preview)
Introducing Azure SQL Database offline migrations for the Azure SQL migration extension
SQL Server database migration – PoC Environment Setup
Migrate databases with Azure SQL migration extension for Azure Data Studio
View/share our latest episodes on Microsoft Learn and YouTube!

Recent Comments