
by Contributed | Apr 6, 2023 | Business, Microsoft 365, Technology
This article is contributed. See the original author and article here.
From the home office to the boardroom to the frontline, how we work continues to change and evolve. There’s more permanence in the flexibility people have come to expect in how they work.
The post Windows 365 offers flexibility from the office or home to the frontline appeared first on Microsoft 365 Blog.
Brought to you by Dr. Ware, Microsoft Office 365 Silver Partner, Charleston SC.
by Contributed | Apr 5, 2023 | Technology
This article is contributed. See the original author and article here.
Series Overview
Orchestration allows conditional logic and enables users to take different paths based upon outcomes of a previous activity. Building upon the concepts of conditional paths, ADF and Synapse Pipelines allow users to build versatile and resilient workflows that can handle unexpected errors that work smoothly in auto-pilot mode.
This is an ongoing series that gradually levels up and helps you build even more complicated logic to handle more scenarios. We will walk through examples for some common use cases, and help you to build functional and useful workflows.
Please review the first installment in the series: Part 1: Error Handling and Best Effort Step and Part 2: OR
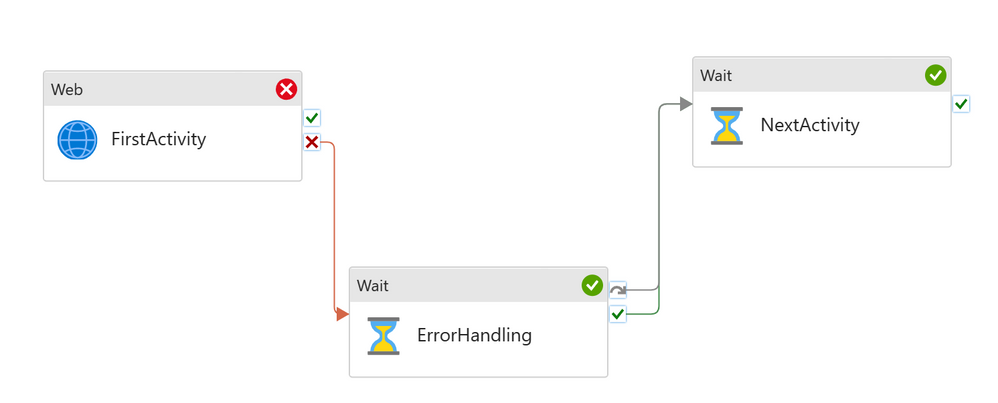
Error Handling and Try Catch
Error handling is a very common scenario in data engineering pipelines. From time to time, activities will fail, but we don’t want to fail the whole pipeline due to a single activity failure.
We call this logic: Try-Catch, and we have streamlined the implementation for this common use case.
- Add first activity
Add error handling to the UponFailure path
- Add second activity, but don’t connect to the first activity
Connect both UponFailure and UponSkip paths from the error handling activity to the second activity.
To learn more, read Pipeline failure and error message – Azure Data Factory | Microsoft Learn.
We hope that you have found this blog to be helpful! If you have any questions or feedback, please post them in the comments below.
by Contributed | Apr 4, 2023 | Technology
This article is contributed. See the original author and article here.
To increase our developer experience landscape and to allow customers to interact and extend Microsoft Purview functionality using software technologies and tools in their organization, we are happy to announce that REST APIs and SDKs for workflow data plane in public preview. Software engineers or developers in your organization can now leverage these APIs/SDKs to programmatically create or update a workflow, submit a workflow, approve or reject an action, update or re-assign an approval or task action, list or cancel workflow runs, and more.
In order to use any Microsoft Purview data plane APIs you need to first create a service principal and assign it to the right Microsoft Purview role before invoking the APIs. This is needed to establish trust between the service principal and the Microsoft Purview account. For example, to create a new self-service data access request workflow and bind the same to root collection, you need to provide ‘Workflow Admin’ role to the service principal at the root collection level.
This tutorial covers details on how to create service principal, set up authentication using the service principal, get token and use the token to call Microsoft Purview data plane APIs.
To get started with workflow data plane APIs and SDK’s please see the below links:
- Workflow data plane APIs, see here.
- Workflow data plane C# SDK, see here.
- Workflow data plane Java SDK, see here.
- Workflow data plane Python SDK, see here.
- Workflow data plane Java script SDK, see here.
by Contributed | Apr 3, 2023 | Technology
This article is contributed. See the original author and article here.
In this issue:
Welcome to Logic Apps Aviators Newsletter – April 2023, the official monthly newsletter for Microsoft’s Logic Apps Aviators community. Catch up on Microsoft news from us and our community.
News from our product group:

|
Logic Apps Aviators Day
On June 22, 2023 (Pacific Time) the Logic Apps Product Group will host a full day of learning where you will be the start! The Logic Apps Aviators is a free event driven Microsoft, for anyone who wants to learn more about Logic Apps and how it can help to solve real life integration problems. In this full-day event, we will deep-dive into many aspects of Logic Apps with sessions from both Microsoft team and community. And we are looking for sessions of all types, from beginning to advance, from patterns and practices to real life scenarios.
|
 |
Logic Apps Live – Community Standup (March 2023)
In this recording we will discuss the new Application Insights (Preview), IBM Host File (Built-in connector), Logic Apps Designer and Connectors 101 presentation.
|

|
Application Insights Enhancements for Azure Logic Apps (Standard) – Preview
We have recently published an update to how we emit telemetry for Application Insights in Azure Logic Apps (Standard). This new update is currently in Public Preview and is an opt-in feature for customers. It can be enabled without introducing risk to your telemetry. For customers who choose not to opt in, they will continue to emit telemetry using the existing method.
|

|
Improve Logic Apps (Standard) Workflows Observability with Application Insights
InfoQ.com, a popular technology publication, recently picked up coverage about our Application Insights (Preview).
|

|
Extending Logic Apps App Insight integration with Azure Workbooks
In this blog post we are going to show how we can use Azure workbooks together with recent improvements to application insight integration to build similar rich and interactive dashboards for standard Logic Apps.
|

|
Integrate Azure Open AI in Teams Channel via Logic App
Now in Azure, we can deploy Open AI with chatgpt-35-turbo model as an Azure resource, so this blog introduces how to integrate the Azure Open AI in Teams channel without using a bot.
|

|
Using Logic App Standard to connect to SAP
Learn how to setup SAP connections in Azure Logic Apps (Standard).
|
 |
Deploying Logic App Standard resource using Bicep templates and DevOps pipeline
In this blog, we will explore the creation of Logic app infrastructure components using Azure Biceps template. Bicep is a domain-specific language (DSL) that uses a declarative syntax to deploy Azure resources. In a Bicep file, you define the infrastructure you want to deploy to Azure, and then use that file throughout the development lifecycle to deploy your infrastructure repeatedly.
|

|
Attaching a file to a DevOps Work Item
How to create the actions to Attach a file to a Work Item in DevOps, by using the Azure Connector.
|
News from our community:
Logic Apps and DocuSign integration
Post by Sandro Pereira
DocuSign is used by individuals, businesses, and organizations of all sizes across many industries, including finance, real estate, healthcare, and more. The platform streamlines the document signing process and eliminates the need for physical documents and manual signatures, which can be time-consuming and costly.
Get notified on expiring Intune LOB apps
Post by Peter Klapwijk
Set up a Logic Apps workflow to get notified when an iOS LOB app is about to expire. An expired iOS LOB app can’t be deployed to our users anymore, so we need to make sure the apps are renewed before they expire.
Network Security for Integration Projects
Video by Paul Baars
Paul Baars talks about network security for integration between on-premises systems with the Azure Serverless cloud.
Modernizing Consumption Logic Apps with Bicep Infrastructure as Code (IaC)
Video by Mitchell Abel
Bicep has made creating the resources a lot simpler and less verbose. And the separation of Infrastructure and Code with Logic Apps Standard has made the day-to-day way of working, especially when the integration developer is responsible for their own DevOps, a great deal easier once everything is set up.
Azure Logic Apps: KQL for having an overview of your scheduled workflows
Post by Stefano Demiliani
This post answers some questions Stefano had from customers, including:
- Is it possible to have an overview of all the workflows I have (and their state) across subscriptions?
- Can I know the connectors they’re using?
- For timer-based workflows (recurrencies) can I have an overview of the scheduling?
Remove Azure Logic App Orphan Metric Alerts
Post by Mark Brimble
A quick tip showing how to remove orphan metric alerts from deleted Logic Apps consumption.
by Contributed | Apr 3, 2023 | Business, Forrester Research, Hybrid Work, Microsoft 365, Technology
This article is contributed. See the original author and article here.
Foster more effective communication, connection, and collaboration in your organization. Learn about the value of Microsoft Teams Phone in a new study conducted by Forrester Consulting.
The post 3 ways to improve productivity and reduce costs with Microsoft Teams Phone appeared first on Microsoft 365 Blog.
Brought to you by Dr. Ware, Microsoft Office 365 Silver Partner, Charleston SC.

Recent Comments