by Contributed | Apr 29, 2023 | Technology
This article is contributed. See the original author and article here.
As you may have heard; Windows LAPS feature is released to Public Preview in the last week of April. It has support for two main scenarios for backing up local administrator password such as storing passwords in Azure AD and Windows Server AD. It also has interoperability with legacy LAPS solution. This article on the other hand; will focus on native cloud deployment for Windows 10/11 clients that does not have legacy LAPS client installed, managed through Intune and either Hybrid Azure AD Joined or Azure AD Joined.
In this blog post, I’ll walk you through basic policy configuration and core Windows LAPS functionalities such as accessing local administrator passwords from different consoles and manually triggering password rotation.
Pre-requisites for enabling Windows LAPS may change in the future, so it is always a good idea to check online documentation first; but the tasks we will cover in this post are as follows:
- Enabling local administrator password feature on tenant level
- Creating a Windows LAPS Policy
- Monitoring policy application
- Accessing local administrator passwords that are backed up
- Rotating local administrator passwords manually
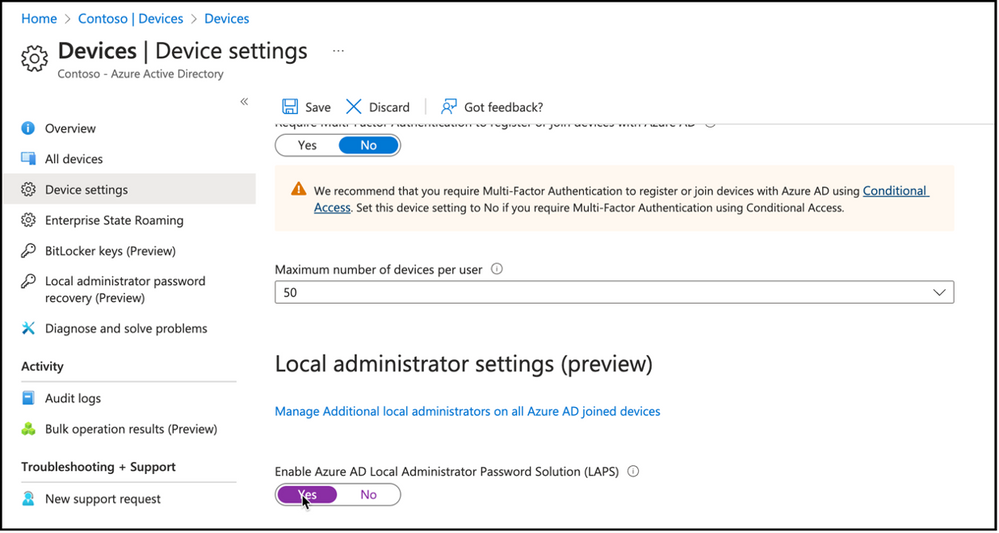
Enable Azure AD Local Administrator Password Feature
Enabling Local administrator password settings in tenant level can be done in Azure AD portal, Devices node, Device settings view. Option to enable Azure AD Local Administrator Password Solution (LAPS) will be available for configuration.
Snippet from Azure Active Directory Devices Node, Device Settings View
After enabling feature on the tenant level, we can proceed with policy creation.
Creating Local Admin Password Policy
Local Admin Password Solution policies can be configured from Endpoint Security Node, Account Protection view. Clicking on “Create Policy” button will present policy creation wizard.
 Snippet from Endpoint Security, Account Protection View
First option will be selecting platform for the policy, and the second option will be policy type itself. As you notice, there are different account protection policy options such as Local User Group Membership or Account Protection as well as Local Admin Password Solution (Windows LAPS). Selecting Local admin password solution (Windows LAPS) from profile list will start policy creation wizard.
 Snippet from Endpoint Security, Account Protection Node, Policy Creation View
As always, first step is naming policy as well as giving a description.
 Snippet from Policy Creation – Naming Account Protection Policy
Next step is building the policy itself. As you see there are several options regarding Administrator account, password options as well as the directory to backup the local administrator password. Let’s take a deeper look at these options and prepare our Windows LAPS policy.
 Snippet from Policy Creation, Configuration Settings View
Backup Directory:
First setting in creating Windows LAPS policy is defining the directory service that will be used to backup the local admin password on the endpoints. It is possible to use Windows Server Active Directory or Azure Active Directory as a means to store local admin passwords. You can also use “Disabled” option to remove existing configuration.
 Snippet from Policy Creation, Backup Directory Options
There will be additional settings depending on the backup directory selected. Some of these will include Active Directory specific settings such as “AD Encrypted Password History Size”, “AD Password Encryption Principal” and “AD Password Encryption Enabled” if backup to Active Directory is selected.
 Snippet from Policy Creation, Backup Directory Setting – Active Directory only
Only additional setting to configure will be Password Age Days when Azure AD selected as the directory service for backing up the local administrator password. Password Age Days option defaults to 30 days unless it is configured and it is possible to configure this option between 7 days & 365 days while backing up to Azure AD, and 1 day & 365 days while backing up to Active Directory.
 Snippet from Policy Creation, Backup Directory Setting – Azure AD
Administrator Account Name: Another setting to configure is the Administrator account name to manage. Policy will use Built-In Administrator SID if not configured. Renaming built-in administrator account will not impact SID monitoring, so you can configure this option to define, if there is another local administrator account present on the endpoint to manage its password.
 Snippet from Policy Creation, Administrator Account Name Setting
Password Complexity: Next setting that will require our attention will be Password Complexity. This is where we define how complex local administrator passwords will be on the endpoints. As you can see there are different options to use Large letters, small letters, numbers and special characters in the local administrator password.
 Snippet from Policy Creation, Password Complexity Options
Password Length: Another important item to configure is the password length setting which will define the length of local administrator password created based on the complexity requirements defined earlier. It defaults to 14 characters unless defined, and has a minimum of 8 and maximum of 64 character limitation.
 Snippet from Policy Creation, Password Length Setting
Post Authentication Actions: Post Authentication Actions will define what will happen to the password, user or device after logging on with the stored local admin credentials. Password will be reset at a minimum, managed account will be logged off or device will be rebooted after the expiry of grace period to make sure password rotation took place. Fort his configuration I will define my policy to reset the password and logoff the managed account upon expiry of the grace period.
 Snippet from Policy Creation, Post Authentication Actions Setting
Post Authentication Reset Delay: Post authentication reset delay value will define the time in hours to execute the actions following authenticating with the managed identity as defined earlier. This setting defaults to 24 hours if not configured; and can be set between 0 (disables post authentication actions) and 24 hours.
 Snippet from Policy Creation, Post Authentication Reset Delay Settings
Just like all the other device configurations that can be deployed by intune, next step in the policy wizard would be assigning a set of devices for policy application. In my environment i’ve used built in All devices group.
 Snippet from Policy Creation, Group Assignment
Monitoring Policy Application
It is possible to monitor Windows LAPS policy application via Intune just like any other policy. One way would be pivoting from policy itself. It is possible to view check-in status per logged on user in the policy details.
 Snippet from Windows LAPS Policy Properties, Check-In Status
It is also possible to pivot from a device; checking device configuration view from device properties and validating the policy application to the endpoint.
 Snippet from Device Properties, Device Configuration View
When drilled through the device configuration applied, we can see per-setting level status as well. You may see the settings are successfully applied to our device in the following snippet.
 Snippet from Device Configuration, Profile Settings View
Accessing Local Admin Passwords
Once the policy is applied on the endpoint, Windows LAPS will create a random local administrator password for the managed credential in the endpoint and will store this as an attribute that is accessible through either Azure AD, or Microsoft Intune. On the other hand, there are some requirements for accessing the local admin password.
Someone who needs to view local admin passwords should be granted with the following rights in Azure AD as stated in the RBAC document here.
- microsoft.directory/deviceLocalCredentials/password/read
- microsoft.directory/deviceLocalCredentials/standard/read
An admin / operator user who has correct rights / roles assigned, can access to the local admin password recovery view either following Azure Local administrator password recovery view within Devices Node, ins Azure Active Directory console, or they can use “local admin password” view inside device properties within Microsoft Intune.
For Azure Active Directory, admin / operator can drill on the properties of the endpoint that its local administrator password is looked for; click on Local administrator password recovery link from the left hand side menu. This will bring information about the local administrator password such as when the last password rotation was and when the next password rotation will be, as well as an option to Show local administrator password.
 Snippet from Azure Active Directory, Device Properties, Local Administrator Password Recovery View
When clicked on Show local administrator password task, a window will pop-up from the right side of the screen and will Show details about the managed identity such as Account name, SID information, password rotation details as well as local admin password hidden in asterisk with a “Show” button.
 Snippet from Azure Active Directory, Local Administrator Password Retrieval
Clicking on Show button will reveal the current local administrator password for the endpoint. Admin / Operator user can then use Copy button to copy the local administrator password to clipboard and use it to do the tasks that require administrator privileges.
 Snippet from Azure Active Directory, Local Administrator Password Retrieval
Once the password is used to authentication to the target system, actions defined in post authentication actions policy setting will be executed after a time period defined in post authentication actions delay policy setting. These actions may include rotating password, logging off the managed identity or rebooting the device.
It is also possible to manually trigger local administrator password rotation. Task for Windows LAPS password rotation can be found in the actions menu item for the given endpoint.
 Snippet from Microsoft Intune Device Properties, Rotate Local Administrator Password Task
Once clicked, admin / operator user will get a confirmation message stating that old password will no longer be applicable and a new password will be generated after rebooting the device.
 Snippet from Microsoft Intune, Local Administrator Password Rotation Confirmation
It is also possible to access local administrator password via Microsoft Intune device properties. Let’s check how and confirm that password for local administrator has changed with rotate local admin password task.
 Snippet from Microsoft Intune, Local Administrator Password Rotation
Device properties for a given device has an option for Local admin password. Which has the information about last rotation time for local administrator password, next rotation time for local administration password as well as Show local administrator password task just like the one in Azure Active Directory. Clicking on Show local administrator password task will reveal a similar pop-up from right hand side, that is usable to copy the existing local administrator password for the device.
Wrap Up:
Windows LAPS feature is released to Public Preview while this post is written. It has native support for cloud scenarios such as Hybrid Azure AD Joined devices and Azure AD Joined devices as well as interoperability with legacy LAPS solution. Customers may use Intune to create and deploy Windows LAPS policies and may utilize Azure AD or Microsoft Intune portals to view local administrator password for a given device. It is also possible to utilize Graph API to do certain tasks which can be a subject of another post.
by Contributed | Apr 28, 2023 | Technology
This article is contributed. See the original author and article here.
IT/DevOps personnel need access to database and system metadata so that they can keep critical database systems healthy, performing to expectations and secure. Microsoft Purview DevOps policies, a subset of Microsoft Purview access policies, are specifically designed to provide IT/DevOps personnel with the access they need so that they perform their crucial job, while at the same time helping reduce the insider threat.
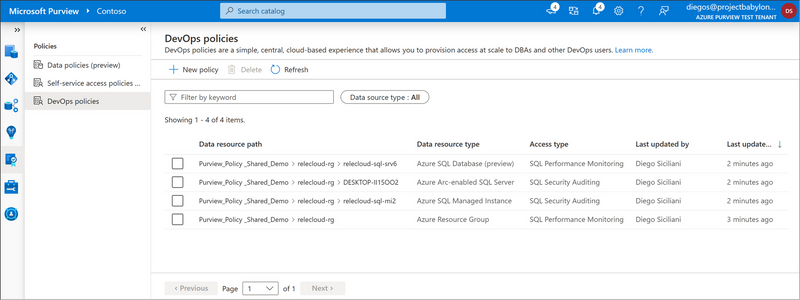
Microsoft Purview DevOps policies is a central, cloud-based experience. This is what the experience looks like:
Figure 1: Screenshot of DevOps policies
In prior blogs, we announced the launch into General Availability (GA) of Microsoft Purview DevOps policies, first for SQL Server 2022, and subsequently for Azure SQL Database. Today, we are pleased to introduce the expansion of permissions related to role “SQL Performance Monitor”. This is one of two roles that can be provisioned as part of the Microsoft Purview DevOps policies.
Up to this point, this role gave a user (or group) access to hundreds to DMVs/DMFs. These DMVs/DMFs allow the user to review system parameters, identify performance bottlenecks, currently running queries, blocking issues, memory usage, file and index usage, active user connections, internal tasks, procedure execution stats and use of the Query Store, among others.
With the expansion, Microsoft Purview can now be used to grant access to all the typical commands that a persona tasked with performance monitoring and analysis requires. The additional permission assignments enable the user (or group) that is assigned role SQL Performance Monitor to see data from most catalog views, which contain information about user objects and configurations. Furthermore, the user will now be able to run several DBCC commands that are used for system analysis and can even create and change Extended Event-sessions for system tracing for deeper analysis.
This capability will be rolled-out to all Azure regions that support Azure SQL and Microsoft Purview over the next few weeks.
Role definition detail
The following table lists the actions that are now part of the role definition for SQL Performance Monitor. The first four (in blue) were already part of the role and the ones that follow were recently added.
Microsoft Purview policy role definition
|
Data source specific actions
|
|
|
SQL Performance Monitor
|
Microsoft.Sql/Sqlservers/Connect
|
|
Microsoft.Sql/Sqlservers/Databases/Connect
|
|
Microsoft.Sql/Sqlservers/Databases/SystemViewsAndFunctions/DatabasePerformanceState/Rows/Select
|
|
Microsoft.Sql/Sqlservers/SystemViewsAndFunctions/ServerPerformanceState/Rows/Select
|
|
Microsoft.Sql/Sqlservers/Databases/SystemViewsAndFunctions/DatabaseGeneralMetadata/Rows/Select
|
|
Microsoft.Sql/Sqlservers/SystemViewsAndFunctions/ServerGeneralMetadata/Rows/Select
|
|
Microsoft.Sql/Sqlservers/Databases/DBCCs/ViewDatabasePerformanceState/Execute
|
|
Microsoft.Sql/Sqlservers/DBCCs/ViewServerPerformanceState/Execute
|
|
Microsoft.Sql/Sqlservers/Databases/ExtendedEventSessions/Create
|
|
Microsoft.Sql/Sqlservers/Databases/ExtendedEventSessions/Options/Alter
|
|
Microsoft.Sql/Sqlservers/Databases/ExtendedEventSessions/Events/Add
|
|
Microsoft.Sql/Sqlservers/Databases/ExtendedEventSessions/Events/Drop
|
|
Microsoft.Sql/Sqlservers/Databases/ExtendedEventSessions/State/Enable
|
|
Microsoft.Sql/Sqlservers/Databases/ExtendedEventSessions/State/Disable
|
|
Microsoft.Sql/Sqlservers/Databases/ExtendedEventSessions/Drop
|
|
Microsoft.Sql/Sqlservers/Databases/ExtendedEventSessions/Target/Add
|
|
Microsoft.Sql/Sqlservers/Databases/ExtendedEventSessions/Target/Drop
|
|
Microsoft.Sql/Sqlservers/ExtendedEventSessions/Create
|
|
Microsoft.Sql/Sqlservers/ExtendedEventSessions/Options/Alter
|
|
Microsoft.Sql/Sqlservers/ExtendedEventSessions/Events/Add
|
|
Microsoft.Sql/Sqlservers/ExtendedEventSessions/Events/Drop
|
|
Microsoft.Sql/Sqlservers/ExtendedEventSessions/State/Enable
|
|
Microsoft.Sql/Sqlservers/ExtendedEventSessions/State/Disable
|
|
Microsoft.Sql/Sqlservers/ExtendedEventSessions/Drop
|
|
Microsoft.Sql/Sqlservers/ExtendedEventSessions/Target/Add
|
|
Microsoft.Sql/Sqlservers/ExtendedEventSessions/Target/Drop
|
Conclusion
With that, we expect the SQL Performance Monitor role to cover all the typical scenarios where you need to provision access for dedicated support personnel to Azure SQL or SQL Server 2022 (Azure Arc-enabled), all from a simple, central and scalable experience.
Of course. we are always interested in which other scenarios you would like to see enabled via Microsoft Purview.
Recommended next steps
- DevOps policies for Azure SQL MI (Private Preview): Click here to test-drive this new experience at no additional charge. Note, your Microsoft Purview account and Azure SQL MI will be allow-listed after you enroll.
- DevOps policies for Azure SQL Database (GA) and SQL Server 2022 (GA):
by Contributed | Apr 27, 2023 | Technology
This article is contributed. See the original author and article here.
We realize that a clear Windows client roadmap update helps consumers and organizations with planning their Windows release activities.
Today we’ll provide a brief update on the latest version of Windows 10, as well as share more on the time frame for the next Long-Term Servicing Channel (LTSC) release of Windows 11.
Windows 10 support lifecycle
As documented on the Windows 10 Enterprise and Education and Windows 10 Home and Pro lifecycle pages, Windows 10 will reach end of support on October 14, 2025. The current version, 22H2, will be the final version of Windows 10, and all editions will remain in support with monthly security update releases though that date. Existing LTSC releases will continue to receive updates beyond that date based on their specific lifecycles.
Recommendation
- We highly encourage you to transition to Windows 11 now as there won’t be any additional Windows 10 feature updates.
- If you and/or your organization must remain on Windows 10 for now, please update to Windows 10, version 22H2 to continue receiving monthly security update releases through October 14, 2025. See how you can quickly do this via a servicing enablement package in How to get the Windows 10 2022 Update.
The final end of support date for Windows 10 does not change with this announcement; these dates can be found on the Windows 10 Lifecycle page.
Windows 11 LTSC
It’s important for organizations to have adequate time to plan for adopting Windows 11. Today we’re announcing that the next Windows LTSC releases will be available in the second half of 2024:
- Windows 11 Enterprise LTSC
- Windows 11 IoT Enterprise LTSC
We’ll provide more details as we get closer to availability.
Recommendation
If you’re waiting for a Windows 11 LTSC release, you can begin planning and testing your applications and hardware on the current GA channel release, Windows 11, version 22H2. Check out App confidence: Optimize app validation with Test Base for more tips on how to test your applications.
Stay informed
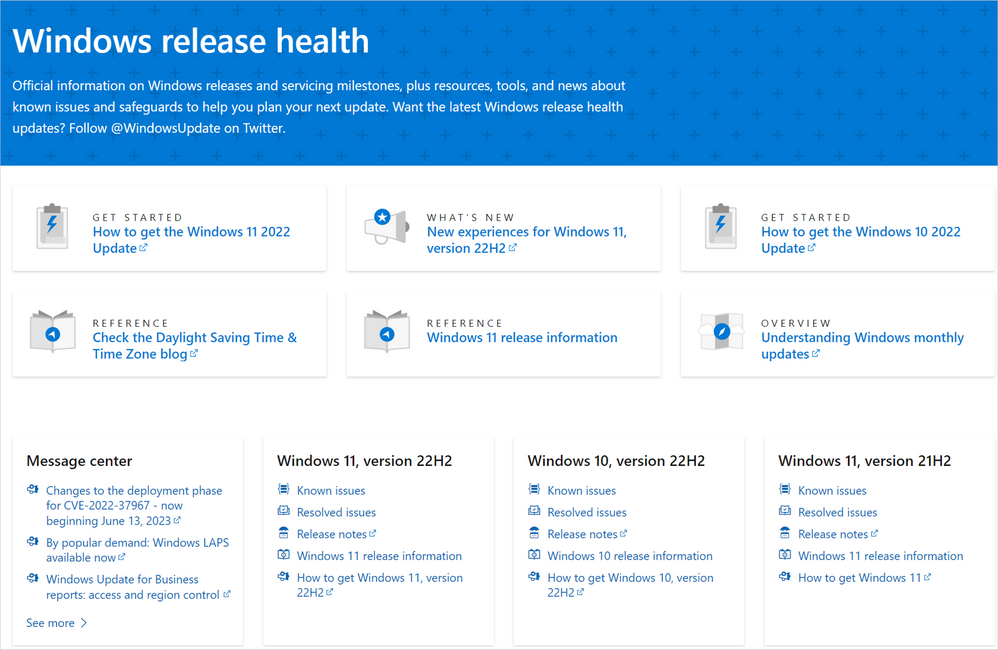
In the future, we will add more information here and to the Windows release health page, which offers information about the General Availability Channel and LTSC under release information for appropriate versions.
The Windows release health page lists release information for different versions of Windows.
Continue the conversation. Find best practices. Bookmark the Windows Tech Community and follow us @MSWindowsITPro on Twitter. Looking for support? Visit Windows on Microsoft Q&A.
by Contributed | Apr 26, 2023 | Technology
This article is contributed. See the original author and article here.
With Azure Database for MySQL – Flexible Server, you can configure high availability with automatic failover within a region. The high availability solution is designed to ensure that committed data is never lost because of failures and that the database won’t be a single point of failure in your software architecture.
Note: For more information, see Azure Database for MySQL – Flexible Server – High Availability Concepts.
Within a region, there are three potential options to consider, as shown in the following table:
Option (Mode)
|
Committed SLA
|
Non-HA
|
99.9%
|
Same Zone HA
|
99.95%
|
Zone Redundant HA (ZHRA)*
|
99.99%
|
*ZRHA is only available in regions that support availability zones. For the latest list of Azure regions, in the Azure Database for MySQL documentation, see Azure regions.
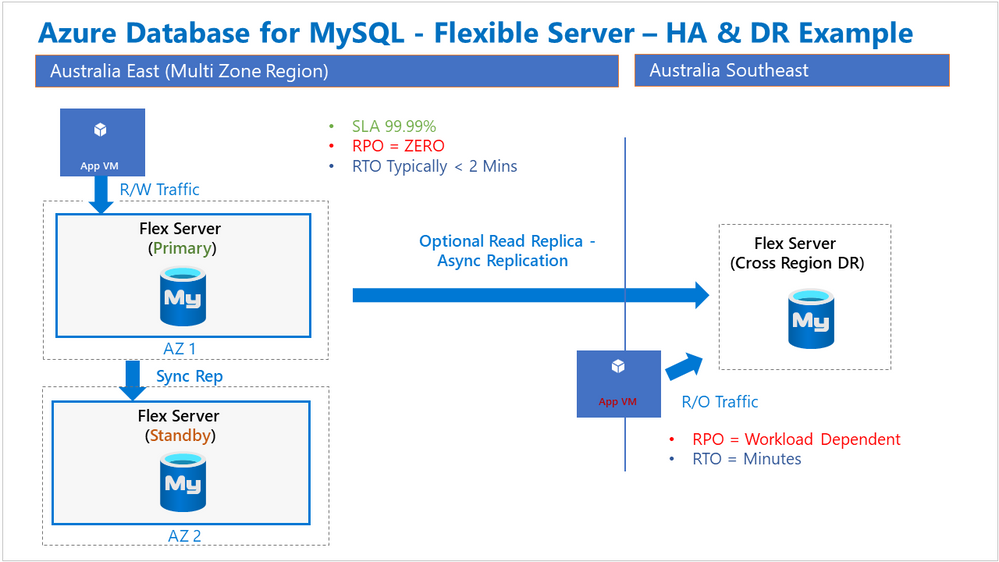
In addition to the ‘in-region’ modes listed above, there’s also an option to design for protection of database services across Azure regions. One common pattern we’ve seen with several customers is the need for maximum in-region availability along with a cross region disaster recovery capability. This manifests itself as ZRHA in the primary region and a Read Replica in another region, preferably the paired region, as illustrated in the following diagram:
With ZRHA, failover between the Primary and Standby servers is automatically managed by the Azure platform, and importantly, the service endpoint name does not change. On the other hand, the manual process associated with a regional failover does introduce a change to the service endpoint name. Some customers have expressed an interest in being able to perform a regional failover without later having to update the associated application connection strings.
In this post, I’ll explain how to address this requirement and provide a regional failover that requires no application connection string changes.
For our purposes, we’ll use the following simplified architecture diagram as a starting point:

In this illustration, there’s a single Primary server located in Australia East and a Replica is hosted in Australia Southeast. With this setup, it’s important to understand some implementation details, especially around networking and guidance:
- Each server is deployed using the Private Access option.
- Each server is registered to the same Azure Private DNS Zone, in this case, myflex.private.mysql.database.azure.com.
- Each server is on separate a VNet, and the two VNets are peered with each other.
- Each VNet is linked to the Private DNS zone.
The server name, IP address, server type, and region for the two servers I created are shown in the following table:
Server / Service name
|
IP address
|
Role
|
Region
|
primary01.mysql.database.azure.com
|
10.0.2.4
|
Primary
|
Australia East
|
replica01.mysql.database.azure.com
|
192.168.100.4
|
Replica
|
Australia Southeast
|
Note: For more information about Azure Database for MySQL connectivity and networking, see the article Connectivity and networking concepts for Azure Database for MySQL – Flexible Server.
When configured properly, the Private DNS Zone (should appear as shown in the following image:

It’s possible to resolve these DNS names from within either VNet. For example, the Linux shell shows the following detail for a Linux VM, which happens to be on the Australia East VNet, and it can resolve the both the service name and the private DNS zone name of each of the servers.
Note: This Linux VM is being used simply to host the ‘nslookup’ and ‘mysql’ binaries that we are using in this article:

In addition to name resolution and courtesy of our VNet peering, I can also connect to both databases using either the service name or the private DNS name. Running the command-line application ‘mysql’, I’ll connect to the primary server using both DNS names as shown in the following image:

And next, I’ll use ‘mysql’ again to connect to both DNS names for the replica server:

To recap, we have set up a primary server in one region and replica service in another region using the Private Access networking, standard VNET peering, and Private DNS Zone features. I then verified that I could connect to both databases using the service name, or the name allocated by the Private DNS zone. The remaining question, however, is how to failover to the replica database, for example in a DR drill, and allow my application to connect to the promoted replica without making any changes to the application configuration? The answer, it turns out, is pretty simple…
In addition to typical DNS record types of ‘A’ Address and ‘PTR’ Pointer, ‘CNAME’ is another useful record type that I can use as an “alias” to effectively point to another DNS entry. Next, I’ll demonstrate how to configure a ‘CNAME’ record to point to either of the databases in our set up.
For this example, I’ll create a CNAME record with value ‘prod’ that points at the ‘A’ record for the Primary server. Inside the Private DNS Zone you can add a new record by choosing ‘+ Record Set’. Then you can add a CNAME record like so:

While the default TTL is 1 hour, I’ve reduced this to 30 seconds to limit DNS clients and applications from caching an answer for too long, which can have a significant impart during or after a failover. After I’ve added the CNAME record, the DNS zone looks like this:

Notice that the new ‘prod’ name points to the ‘A’ record for the primary server.
Now, I’ll verify that I can use the CNAME record to connect to the primary database:

Cool! That’s just DNS doing its thing with the CNAME record type.
It is also possible to edit the CNAME DNS record to point it to the replica:

After saving the updated CNAME, when I connect to ‘prod’, it is now connecting to the replica, which is in READ-ONLY mode. I can verify this by trying a write operation, such as creating a table:

Sure enough, the CNAME ‘prod’ now points to the replica, as expected.
Given what I’ve shown so far, it’s clear the using the flexibility of Azure Private DNS and CNAME records is ideal for this use case.
The last step in this process is to perform the failover and complete the testing.
In the Azure portal, navigate to the Replication blade of either the Replica server or the Standby server, and then ‘Promote’ the Replica:

After selecting Promote, the following window appears:

When the newly promoted Replica server is available, I want to verify two things, that the:
- CNAME record points to the Replica (now Primary)
- Database is writeable

From an application perspective (the application is the mysql client in this article), we haven’t had to make any changes to connect to our database regardless of which region is hosting the workload. This method can be easily integrated within DR procedures or failover testing. Making use of the Azure CLI to semi-automate these changes is also possible and could possibly reduce the likelihood of human errors associated with changing DNS records. However, DNS changes are, in general, less risky than making application configuration changes.
If you have any feedback or questions about the information provided above, please leave a comment below or email us at AskAzureDBforMySQL@service.microsoft.com. Thank you!


Recent Comments