by Contributed | Jun 2, 2023 | Technology
This article is contributed. See the original author and article here.
MariaDB is the open-source relational database management system created by MySQL’s original developers. MariaDB is designed to be highly compatible with MySQL. It supports the same SQL syntax, data types, and connectors as MySQL, allowing for a seamless transition for applications or databases that previously used MySQL.
Recently we’ve had many customers asking for guidance on moving from MariaDB to MySQL. To address this request, this blog post focuses on moving from Azure Database for MariaDB version 10.3 to Azure Database for MySQL version 5.7 using the MySQL Shell (MySQLSh) client. However, the same process, with minor changes, can help migrate other compatible MariaDB-MySQL version pairs.
Preparation
Before beginning, it’s important to assess any application changes or workarounds that are required to ensure a smoother migration. In real-world scenarios there are often challenges, so testing an application with the target MySQL 5.7 becomes crucial before starting the migration. To understand the potential incompatibilities between MariaDB and MySQL, refer to the following documents.
Prerequisites
Before starting this process, ensure that that the following prerequisites are in place:
- A source instance of Azure Database for MariaDB running version 10.3.
- A target instance of Azure Database for MySQL running version 5.7.
- Network connectivity established (either via private or public network) between the source and target so that they can communicate with each other.
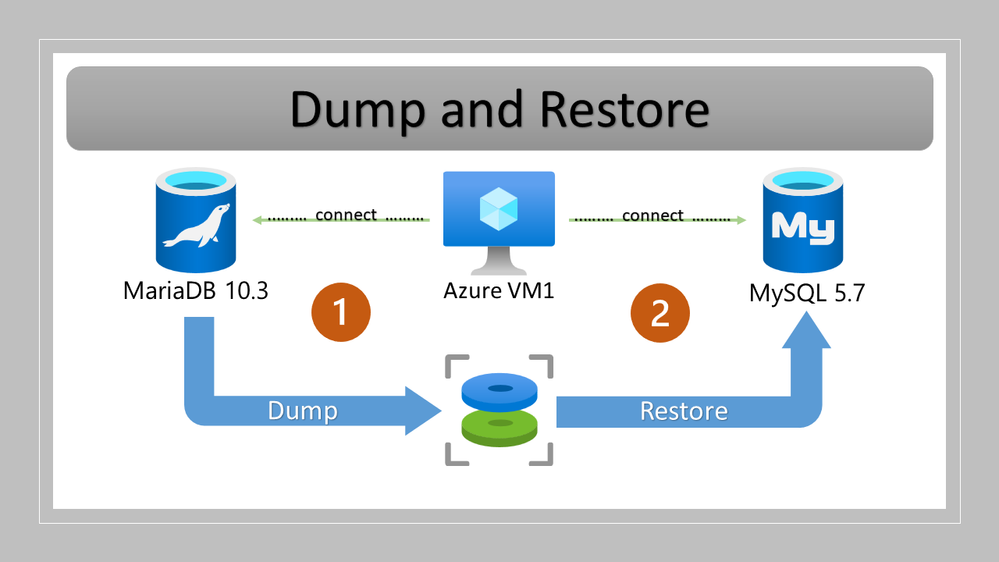
Migration overview
The process of migrating from Azure Database for MariaDB to Azure Database for MySQL involves:
- Backing up your Azure Database for MariaDB instance using MySQLSh.
- Restoring the backup to your Azure Database for MySQL instances using MySQLSh.
- Configuring and starting replication on your Azure Database for MariaDB instance, sending data to your Azure Database for MySQL instance.
- Performing cutover when the replication lag reaches zero.


Note: For reference, the name and size of the initial database is shown in the following graphic.

Procedure
To back up your Azure Database for MariaDB instance using MySQLSh, perform the following steps.
- Connect to mysqlsh prompt by running the following command:
Syntax
mysqlsh –uri %40@:
Example command
mysqlsh –uri azureuser%40rahulsaha-mariadb@rahulsaha-mariadb.mariadb.database.azure.com:3306
- To take a full backup (which will also include the master binlog file number and position) of the source server, at the mysqlsh prompt, run the following command:
Syntax
util.dumpInstance(“, {threads: 16, showProgress: true, users:false})
Example command
util.dumpInstance(“/backup/mysqlsh/mariadb_backup”, {threads: 16, showProgress: true, users:false})
Example output

- To restore the backup to Azure Database for MySQL using MySQLSh, run the following command.
util.loadDump(“/backup/mysqlsh/mariadb_backup”, {threads: 16, showProgress: true})
Example output

Next, I need to set up replication from Azure Database for MariaDB to Azure Database for MySQL. However, before setting up replication, it’s important to ensure that the firewall of both Azure Database for MariaDB and Azure Database for MySQL servers are configured such that they are allowed to communicate with each other.
- To configure network settings on the source Azure Database for MariaDB server, ensure that the IP addresses of the VM used to perform the migration and the target Azure Database for MySQL server are whitelisted in the firewall on the source Azure Database for MariaDB server, as shown below.

- To configure network settings on the target Azure Database for MySQL server, ensure that the IP addresses of the VM used to perform the migration and the source Azure Database for MariaDB server are whitelisted in the firewall on the target Azure Database for MySQL server, as shown below.

- To configure the replication, use the stored procedure mysql.az_replication_change_master, as shown below.
CALL mysql.az_replication_change_master(‘rahulsaha-mariadb.mariadb.database.azure.com’, ‘replica_user@rahulsaha-mariadb’, ‘StrongPass’, 3306, ‘mysql-bin.000003’, 385, ”);
Example output

- To start the replication, use the stored procedure mysql.az_replication_start, as shown below.
call mysql.az_replication_start;
Example output

- Monitor the replication by running the command below until the Second behind master value displays as 0.
mysql> show slave statusG
Example output

- Finally, point the application to the target Azure Database for MySQL server by updating the connections string(s) as necessary.
Limitations
- MySQLShell doesn’t support backing up users. While creating the backup, be sure not to include users by using the following command:
MySQL rahulsaha-mariadb.mariadb.database.azure.com:3306 ssl JS > util.dumpInstance(“/backup/mysqlsh/mariadb_backup”, {threads: 16, showProgress: true, users:false})
Example output

- Restore error – Lock wait timeout exceeded. Locking can happen between transactions when loading data to MySQL, which may result in throwing the following error:
MySQL Error 1205 (HY000): Lock wait timeout exceeded; try restarting transaction:…
Example output

If you get this error, you can work around it by increasing the value of the “innodb_lock_wait_timeout” parameter in the Azure portal (as shown below), and then continuing the migration.

Then, verify the change from the MySQL client by running the following command:
SHOW VARIABLES LIKE ‘innodb_lock_wait_timeout’;
Example output

Conclusion
Migrating from Azure Database for MariaDB to Azure Database for MySQL using dump and restore tools, together with replication to minimize the downtime needed for cutover, is not a difficult process. However, be sure to thoroughly test and benchmark things to help minimize the potential for encountering issues during and post migration, as every database, application architecture can be incredibly unique.
If you have any feedback or questions about the information supplied above, please leave a comment below or email us at AskAzureDBforMariaDB@service.microsoft.com. Thank you!
by Contributed | Jun 2, 2023 | Technology
This article is contributed. See the original author and article here.
Across Microsoft solutions, it is possible to search for work/organizational content in many different entry points, such as Office.com, Sharepoint.com and Microsoft Bing – Work tab.
Office.com and Sharepoint.com are great places to start a search across all your personal and content accessible to you within your organization, including shared documents, offering capabilities that can help you navigate content in a way that suits you the best.
This post will guide you through some of the most frequent work search tasks and demonstrate how you can achieve them with different methods. You will learn how to optimize your search experience and access the information you need efficiently.
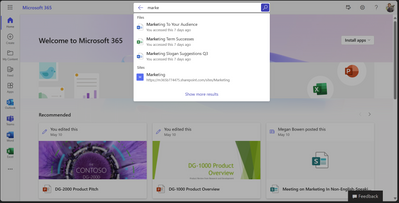
It all starts with the Search box.
The Search box can help you find your recent content quickly and easily. It shows you suggestions of Files, People, and Apps that you interact with frequently.
How does starting your search in Office.com or Sharepoint.com looks like
You can also use keywords like “ppt” or “doc” to refine the results you are seeing in the Search box suggestions.


Retrieve Word documents by using ‘doc’ keyword.

Retrieve PowerPoint documents by using ‘ppt’ keyword.
You can also get People results in Search box suggestions based on their phone number or department.

People search suggestions based on phone number.

People search suggestions based on department name.
Navigating to Search Results Page
If you don’t see what you are looking for in Search box suggestions, press enter or click ‘Show more results’ to go to the results page to explore more content. You can use different tabs or filters to refine the results you are seeing.

As an example, you can use People tab and different keywords to search for people based on their department or job title.

Search for People based on department name.

Search for People based on job title.
Or go to Messages tab to find an Email or a Teams message with specific keywords.

Email and Teams messages search.
Easily navigate through your own content
Navigating through your own content daily can be challenging. Sometimes you may want to search for a specific document you created or edited, or a message/email you sent. This can be easily done by typing your name in the Search box and clicking on the Search box suggestion. This opens up a Person Centric Search view shown below.
It is worth noting that Messages tab is currently available in Office.com and is yet to come to Sharepoint.com

Navigating to People Centric Search view by clicking on suggestions in the Search Box
You can further narrow down your own content by typing additional keywords in the search box next to the name pill or using filter and tab refiners.


Using keyword + File Type filter to further refine your search
Search for people and content they shared.
You can search for your colleagues’ content or understand their position in the organizational chart by looking them up and clicking on their name from the search box suggestion.

Browse through content your colleagues have shared with you.

Understand your company organization and who your colleagues report to.
This feature only shows public content and content that has been explicitly shared with you by the person you are looking up. Hence in some cases, you may not get any results.

You can only browse through content explicitly shared with you.
Getting to work search results in Microsoft Bing
We are currently working to bring the same set of search capabilities across Office.com, Sharepoint.com and Bing.com/work.
To access work search in Bing.com, you need to be signed into Bing with your organizational account. This will enable you to see top work search results in the All-Tab. You can further explore work content by clicking some of the work result suggestions or going straight to Work tab.

Work result suggestions in All-Tab

Work search results in Work-Tab
On images below, we are showing how some of the searches mentioned in this article may look like in Bing.com/work.

Email and Teams messages search

People search by name.

Understand your company organization and who your colleagues report to.

You can only browse through content explicitly shared with you.

by Contributed | Jun 1, 2023 | Technology
This article is contributed. See the original author and article here.
As you might have seen, many new features have become available in Communities (beta) in Teams free on Windows 11, bringing it close to parity with mobile. You can now create and join communities on Windows 11, and invite others to your communities, too.
There’s also a significant change in Teams free meetings where previously all meeting participants joined meetings through lobby. We have now added a new option for invited participants to get directly to the meeting, in other words bypassing the lobby. This will be the default setting for all new Teams free meetings, making meeting joins more seamless for the invited participants, and keeping your meetings safe by having everybody else still joining through the lobby.
New features in Teams (free) on desktop and web
Create a community (Windows 11)
You can now conveniently create a new community from scratch in Teams free on Windows 11, very similarly as on mobile. You just need to fill in the community details like name, description, and community picture, and adjust community guidelines as needed. After community creation you can then invite new members or change further community details using mobile.
Invite members to your community (Windows 11)
It’s easy to invite others to your communities in Teams free on Windows 11 now. You can invite contacts already using Teams free or even those who have not yet got started using their email address or phone number. Learn how to invite and remove community members

Create community events and view community calendars (Windows 11)
Community events are a core feature in communities and now it’s possible to create those and view community calendars in Teams free on Windows 11, too. Communities created on Windows 11 are visible on mobile and vice versa making it easy to join the meeting when it’s time. Learn more about community calendars and events
Notify community members about new content via email (Windows 11)
When creating a new community post, you can now notify community members about the new post via email. This new option available when posting in a community helps you to reach your community members quickly even when they are not in Teams. These emails link back to the original post making it convenient to read the new content. Learn how to post to a community

Use Microsoft Designer for community announcements (Windows 11)
Community announcements stand out from other community content and when posting a community announcement on Windows 11, you can now use Microsoft Designer to quickly create a gorgeous banner image for the announcement. Learn how to use Designer for announcement banners
New features in Teams (free) on mobile
Notify community members about new content via email
When creating a new community post, you can now notify community members about the new post via email. This new option available when posting in a community helps you to reach your community members quickly even when they are not in Teams. These emails link back to the original post making it convenient to read the new content. Learn how to post to a community

Block users from your community
In the event of a bad actor going rogue in your community, as the community owner you can now block them from the community. The same user will not be able to join the community again. We hope you won’t be needing this feature, but it’s now available should it be needed. You can remove a community member and block them from joining the community again by selecting them from the member list and selecting ‘Remove from community’. This will give you options to ‘Remove’ and ‘Remove & Block’. Learn how to remove and block users from your community

Bulk invite community members using mobile camera (iOS)
It’s now very easy to quickly get your community growing with the new bulk invite option on iOS. With this feature you can use your mobile camera on iOS to grab a picture of a list of email addresses and phone numbers which then will be validated and matched against the current member list of the community. You can update the list as needed and when ready, send invites to up to 50 persons in one go. Learn how to bulk invite community members on iOS

How to send feedback and suggestions?
We are always happy to receive feedback and suggestions to make our product even better. To participate in our feedback program and help us in our endeavor, please follow the steps below:
You can also sign up for a user panel, to get opportunities to connect directly with the product team, and help make Teams (free) better. Learn more

by Contributed | Jun 1, 2023 | AI, Business, Microsoft 365, Technology
This article is contributed. See the original author and article here.
Today we’re announcing new updates to the free version of Microsoft Teams that will allow you to create communities from scratch, share and invite members, create and host events, moderate content with critical trust and safety features, and get notified about all important activities.
The post Build more connections with new communities in Microsoft Teams and GroupMe features appeared first on Microsoft 365 Blog.
Brought to you by Dr. Ware, Microsoft Office 365 Silver Partner, Charleston SC.
by Contributed | May 31, 2023 | Technology
This article is contributed. See the original author and article here.
Many organizations, for example, schools during a significant weather event, need to rapidly communicate ad hoc updates via SMS or Email. With Azure Communication Services and Azure OpenAI Services, we can simplify this experience to help you automatically generate templated messages for different communication channels and audiences. If this problem seems familiar, we have built a pre-built solution that can help you. See our manual for step-by-step instructions.
The solution uses the example of a a school administrator who needs to send a weather related alert and focuses on three main parts:
- Provide a secure app for school administrators using Power Apps. School administrators can configure the message they want to send to their contacts.
- Support multiple channels (SMS, Email) using Power Automate and Azure Communication Services. They can cover a variety of channels to ensure the recipients see the message in a timely manner.
- Auto-generate templates for each medium based on the message description using Power Automate and Azure OpenAI Services. Craft professional messages for a variety of mediums easily. You will not need to re-write the message for each medium.
Architecture overview
In our solution, to create and send messages to the contacts, we will leverage Power Apps and Power Automate to build the applications and flows. The Power App will enable the school administrator to configure the message they want to send out to contacts. It will be linked to a Dataverse table with contact information. The Power App will trigger a Power Automate flow which will use Azure OpenAI Services to create communication templates for each channel and Azure Communication Services to send SMS and Emails to the parents using contact information.

Check out our pre-built solution or the step-by-step instructions to get started building your own application for SMS and email messages today.
If you would like to see more samples like this or would like to learn more about the process of building solutions with Azure Communication Services and Azure OpenAI Services, drop us a comment below.

Recent Comments