by Scott Muniz | Aug 19, 2020 | Azure, Microsoft, Technology, Uncategorized
This article is contributed. See the original author and article here.
The cloud revolution solved one of the basic problems of infrastructure: ensuring scalability easily and simply. With Microsoft Azure services, you can now expand computing capacity on demand. While getting access to extra infrastructure is easier than ever before, the same cannot be said for the deployment tools that take advantage of this infrastructure. That’s where an Azure Marketplace partner like Codefresh can help software developers.
Kostis Kapelonis, Developer Advocate at Codefresh, explains how his company’s continuous integration/continuous delivery (CI/CD) solution in the Azure Marketplace helps companies stay competitive by delivering new features to production in a fully automated manner and at a steady pace. Adding new features quickly can help any company adapt and pivot to market needs, offering its customers the best service possible without lengthy delays. Especially in the case of important security updates, the speed at which a company can upgrade systems to a new version is paramount.
Codefresh CI/CD has native support for Azure and a heavy focus on cloud services such as Docker containers and Kubernetes clusters. It enables developers to take advantage of Azure services and minimize the time from feature inception to deployment.

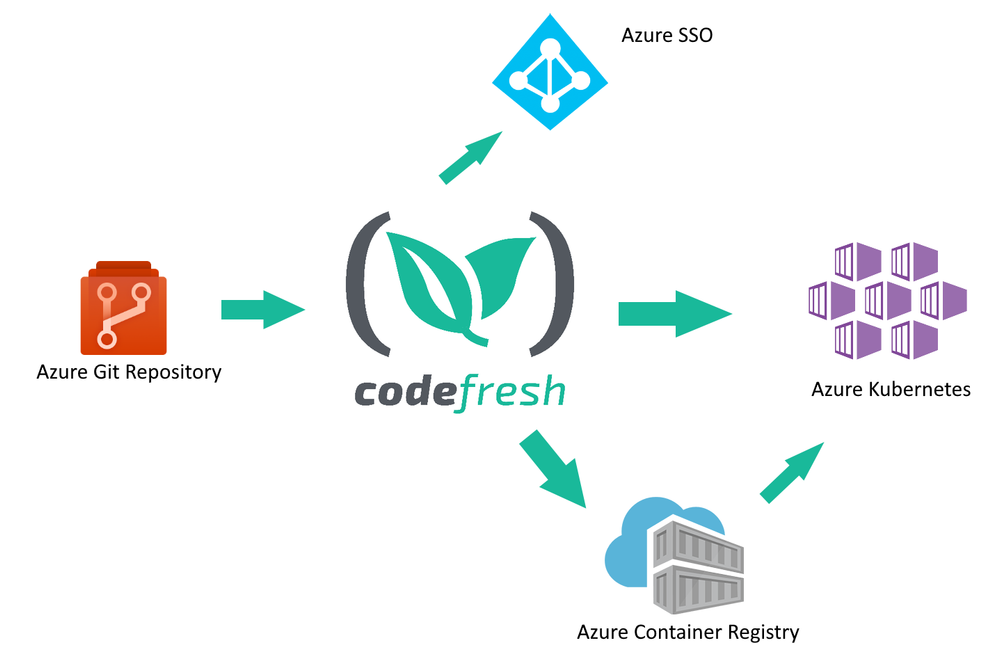
Codefresh acts as a central hub for several related Azure services:
• Developers use Azure Git repositories to create new features for their company
• Codefresh continuously builds and tests the source code from the repository
• New releases of a software product are packaged in one or more Docker containers and stored in Azure Container Registry
• The final release is deployed to Azure Kubernetes
Codefresh can also take advantage of Azure SSO/AD installations to help enterprise companies provide a unified way of credential usage among employees.
How to store Docker images in the Azure Container Registry
One of the most basic functions of a CI/CD system is the creation of software artifacts comprising a software application. Especially for cloud services, Docker images have become the de facto standard for application packaging and deployment.
Using the Azure Container Registry in Codefresh is a straightforward process. First, you connect your Azure Registry in your Codefresh account using the Integration UI screen.
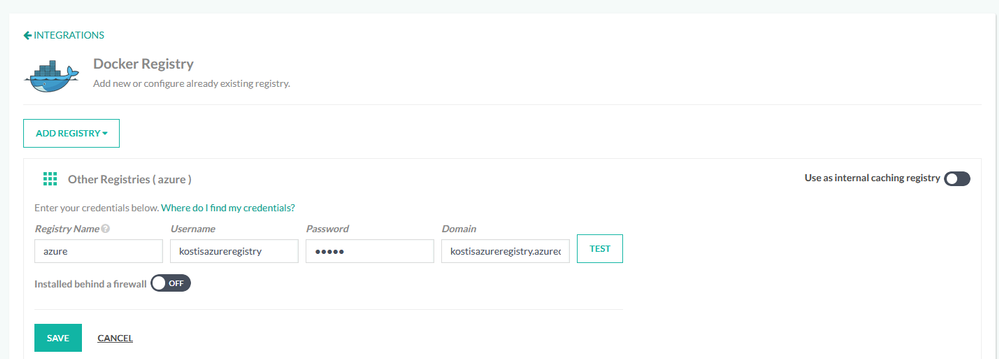
Then you can use the registry in any deployment pipeline, simply by referencing it by name. A starting workflow is one that has only two steps:
• Checking out source code from Azure Git
• Building a Docker image and storing it in the Azure Container Registry.
This can be easily accomplished in Codefresh with a pipeline of two steps (a git-clone step and a build step).
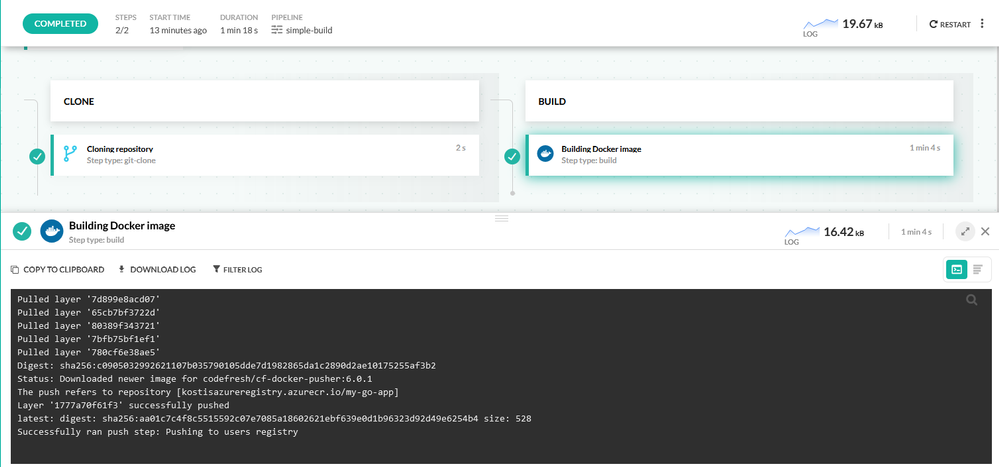
Each pipeline in Codefresh is defined with declarative YAML format. Here is the respective pipeline definition:
version: “1.0”
stages:
– “clone”
– “build”
steps:
clone:
title: “Cloning repository”
type: “git-clone”
repo: “kostis-codefresh/trivial-go-web”
revision: “master”
stage: “clone”
build:
title: “Building Docker image”
type: “build”
image_name: “my-go-app”
working_directory: “${{clone}}”
tag: “latest”
dockerfile: “Dockerfile”
registry: azure
stage: “build”
This pipeline has a clone step that checks out the source code and a build step that creates the Docker image and also pushes it to ACR.
Notice the “registry” property in the build steps that define our Azure registry as the target of the Docker push action.
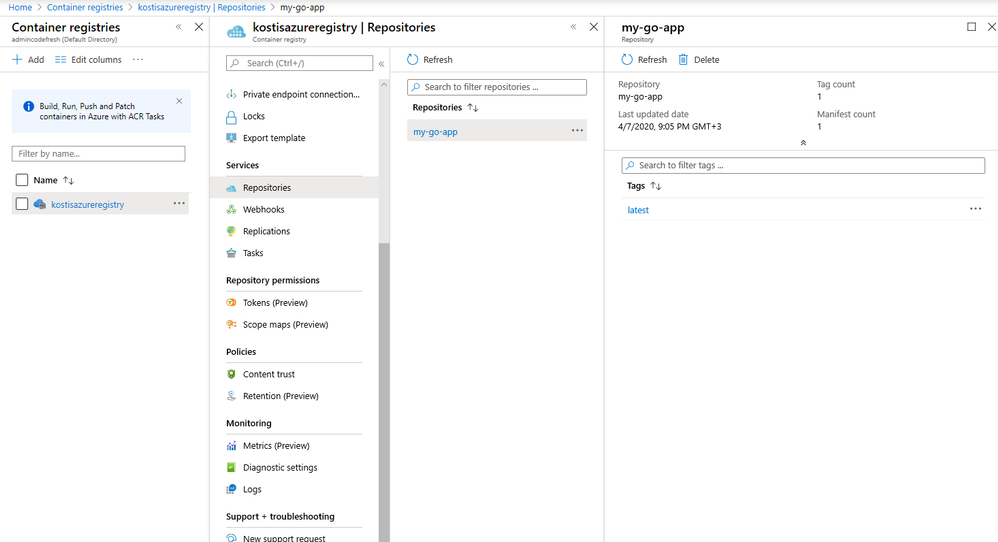
After the pipeline has run, the Docker image is stored in the Azure Container Registry.
How to deploy applications to Azure in an automated manner
Creating a Docker image is only one part of the software delivery process. The other part is to deploy the image artifact into production. Codefresh also has native integration for Azure Kubernetes Service (AKS).
First, you need to connect your Azure cluster in your Codefresh account.
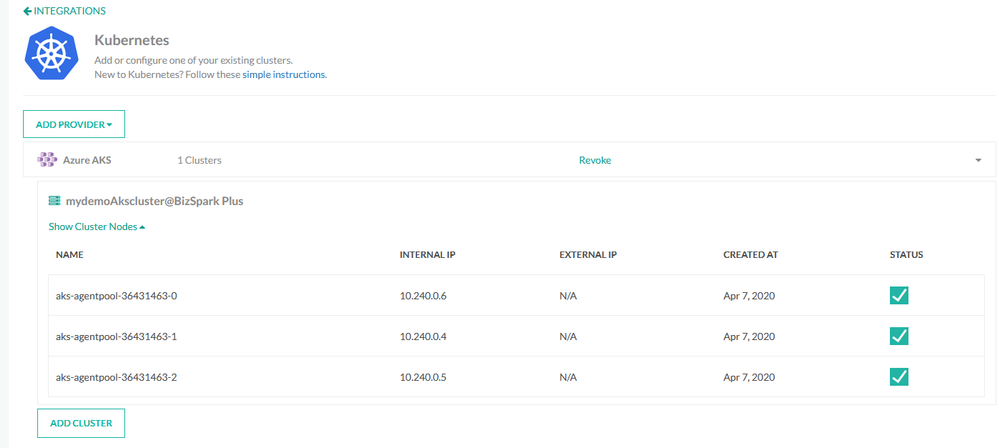
Once the cluster is connected, you can easily deploy any application in an ad hoc manner using the deployment GUI of Codefresh.
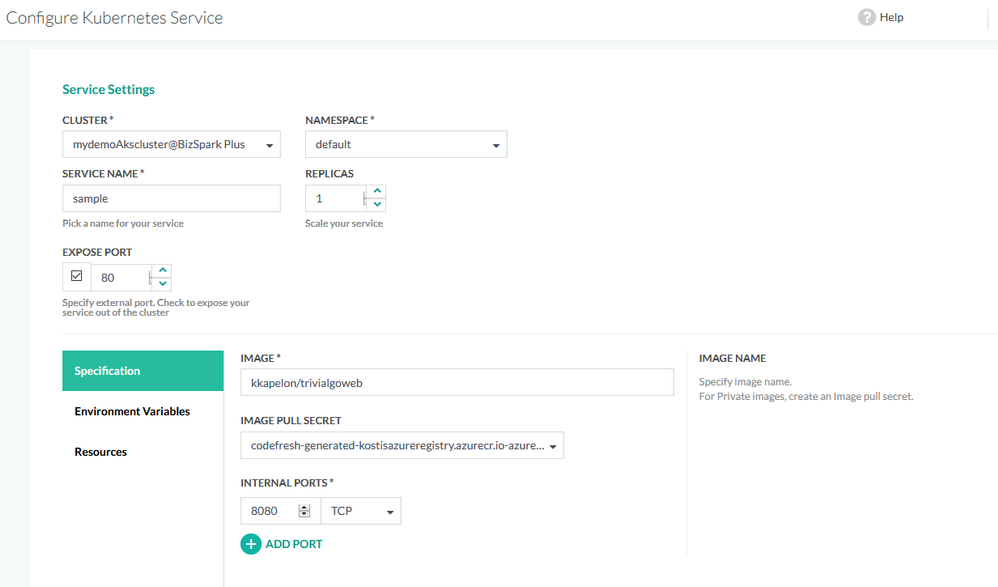
Manual application deployments are a welcome solution for test environments and quick prototypes, but for production deployments, a delivery pipeline is the better choice, as it completely automates the software delivery process.
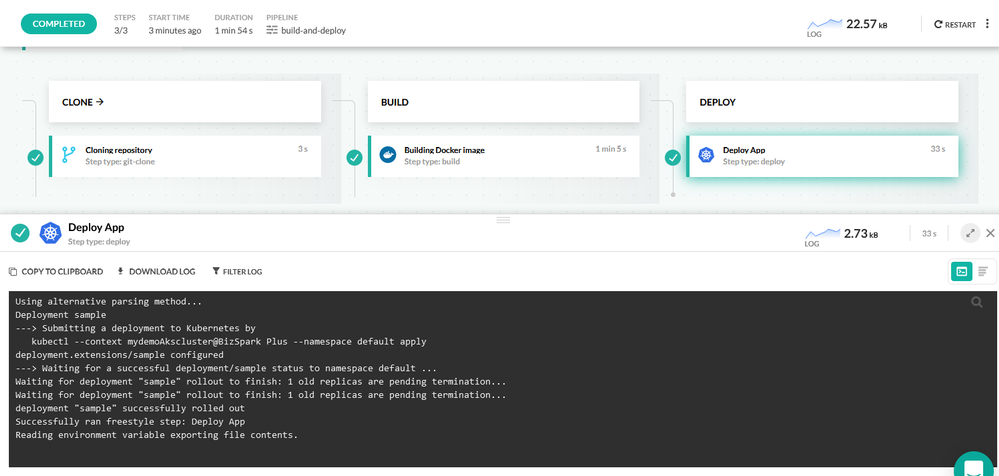
This delivery pipeline includes an extra deploy step that instructs the Azure Kubernetes cluster to pull the Docker image in the cluster and create an application deployment.
Here is the full pipeline definition:
version: “1.0”
stages:
– “clone”
– “build”
steps:
clone:
title: “Cloning repository”
type: “git-clone”
repo: “kostis-codefresh/trivial-go-web”
revision: “master”
stage: “clone”
build:
title: “Building Docker image”
type: “build”
image_name: “my-go-app”
working_directory: “${{clone}}”
tag: “latest”
dockerfile: “Dockerfile”
registry: azure
stage: “build”
deploy_to_aks:
title: Deploy App
type: deploy
stage: deploy
kind: kubernetes
cluster: ‘mydemoAkscluster@BizSpark Plus’
namespace: default
service: sample
candidate:
image: ‘${{build_image}}’
registry: azure
Again, notice the “registry” and “cluster” properties that explain how the Docker image deployed to the Azure Kubernetes cluster will also come from the Azure registry.
After the pipeline has finished running, you can verify the application deployment from the Codefresh Kubernetes dashboard and get more details such as health status or the number of replicas the application is using:

Conclusion
Codefresh makes the creation of Docker images and their deployment to Azure a very easy process. With built-in integration for AKS, ACR, Azure SSO, and Azure Git repositories, it is an extremely fast way for companies to take advantage of Azure scalability for any software product in any sector.
Create a free Codefresh account today and start deploying applications to Azure now.

by Scott Muniz | Aug 19, 2020 | Azure, Microsoft, Technology, Uncategorized
This article is contributed. See the original author and article here.
This installment is part of a broader series to keep you up to date with the latest features in Azure Sentinel. The installments will be bite-sized to enable you to easily digest the new content.
Every second counts. Some security incidents are unstoppable, but when prevention isn’t possible, the right investigation and response is everything. To help SOC analysts’ quickly reason over copious amount of security volume, we are delighted to introduce a set of enhancements that enrich and improve the investigation experience in Azure Sentinel.
Enable Line Numbers to Aid Quicker Debugging of Your Azure Sentinel KQL Queries
The Azure Monitor team released a new capability that enhances that way your SOC analyst reason and monitor the critical security data ingested into Azure Sentinel. To help enable quicker debugging for KQL queries in the Log Analytics workspace, analysts have the ability to enable line numbers to their KQL queries to quickly identify the line in which an error exist.
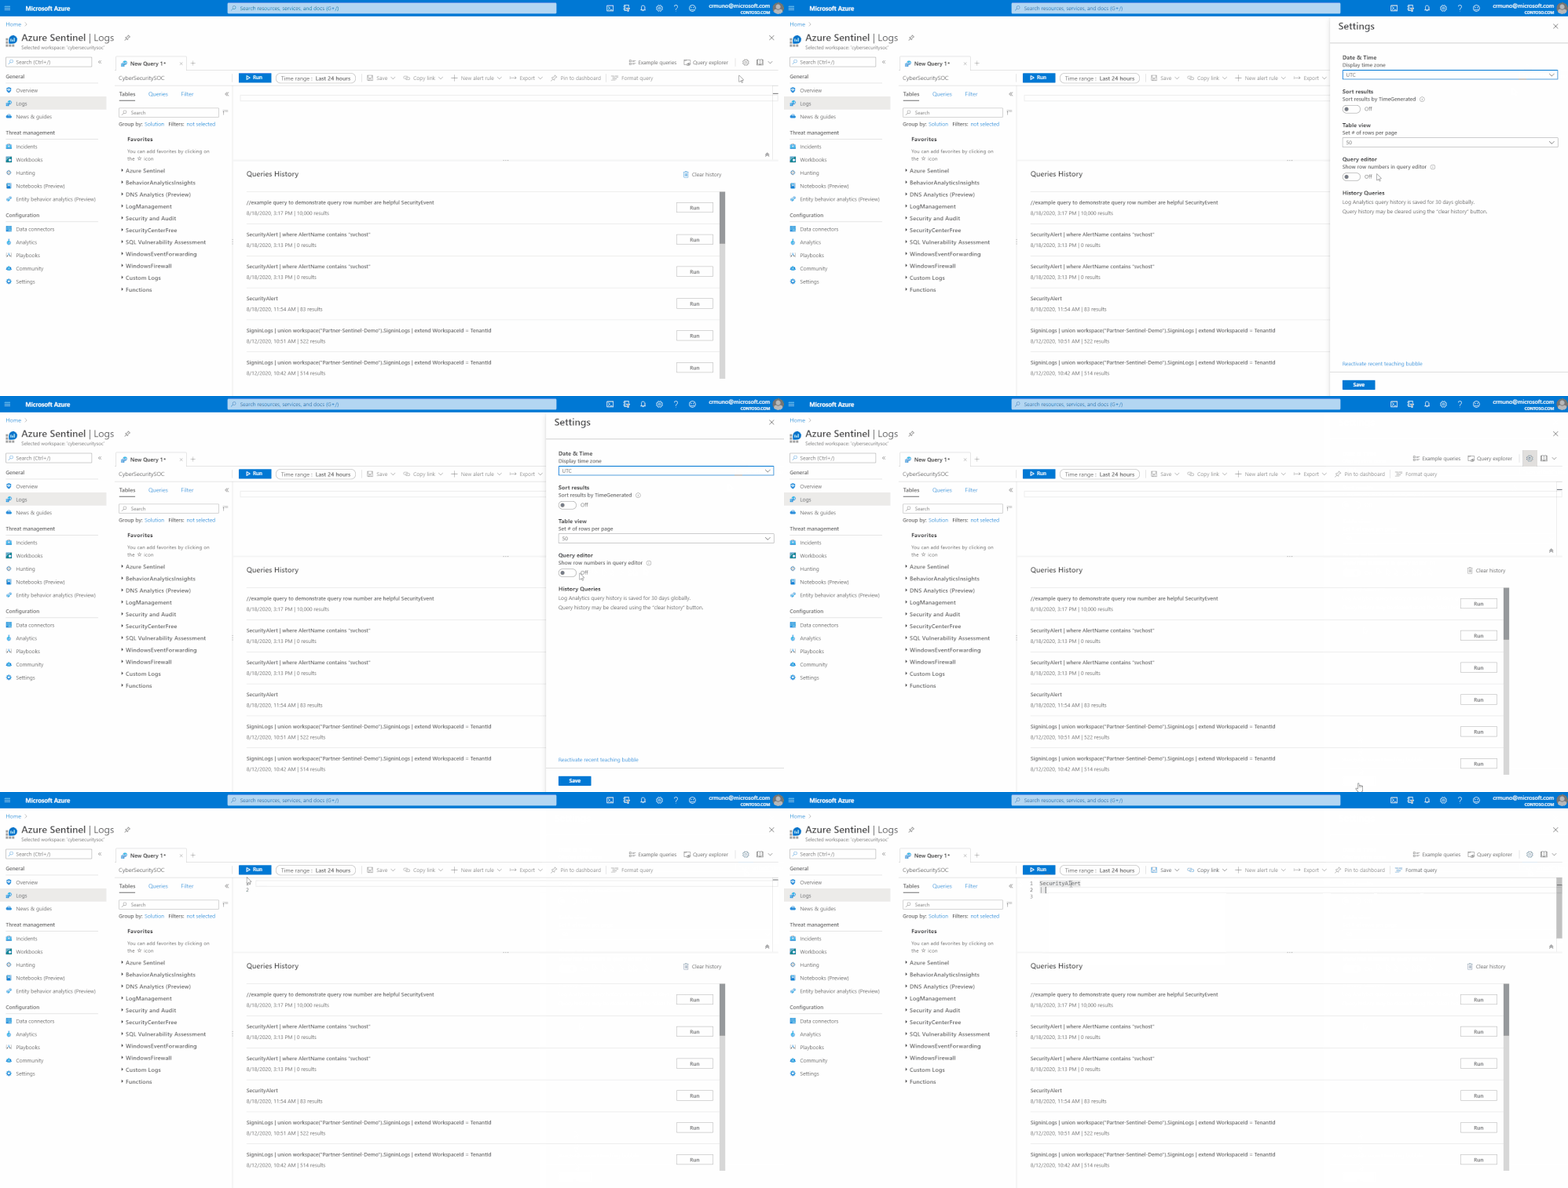
With this enhancement, when creating a Log Analytics query, each row in the query editor is indicated by a number:

This makes it easier to find the part of the query you need, when composing a new query.. The new line numbers work in tandem with our new error messages.
If there’s an error in the query the analysts composed, our newly designed error messages will indicate the row where an issue was found. Row numbers in query editor makes it faster and easier to find the issue and provides guidance to get rectify the error.
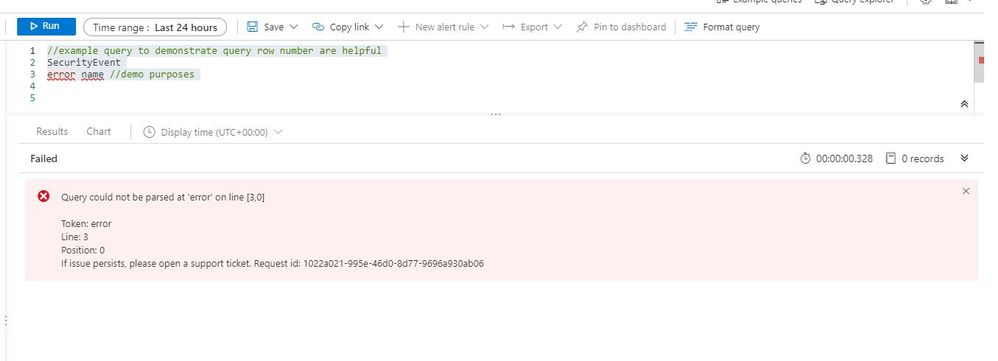
How to enable:
Open the Settings panel by clicking on the Settings cog icon and select the switch to turn row numbers off and on.
Azure Sentinel in the logs screen schema
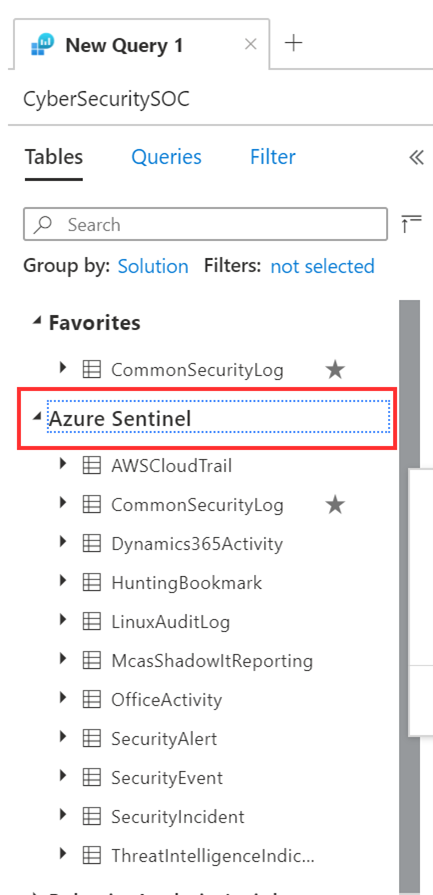
Small, but never the less important, finally it is “Azure Sentinel”, rather than “SecurityInsights” on the schema pane of the log screen in Sentinel and in Log Analytics. This will help your SOC analysts easily identify all the data tables under the Azure Sentinel solution.
Get started today!
We encourage you to leverage the new enhancements aid in debugging and improving the investigation experience in Azure Sentinel.
Try it out, and let us know what you think!
by Scott Muniz | Aug 19, 2020 | Azure, Microsoft, Technology, Uncategorized
This article is contributed. See the original author and article here.
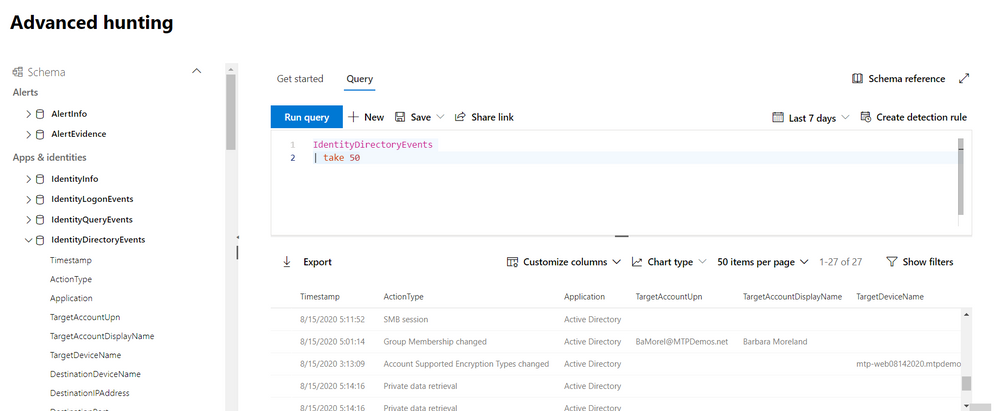
We’re thrilled to share that you can now hunt for threats using events on your domain controller with advanced hunting in Microsoft Threat Protection.
The new IdentityDirectoryEvents table—available in public preview—incorporates data from the Azure Advanced Threat Protection (Azure ATP) sensor, including various identity-related activities, such as account password changes or remote creation of scheduled tasks on the domain controller.

In general, the table captures three categories of events on your domain controller:
- Remote code execution
- Changes to attributes of Active Directory objects, including groups, users, and devices
- Other activities performed against the directory, such as replication or SMB session enumeration
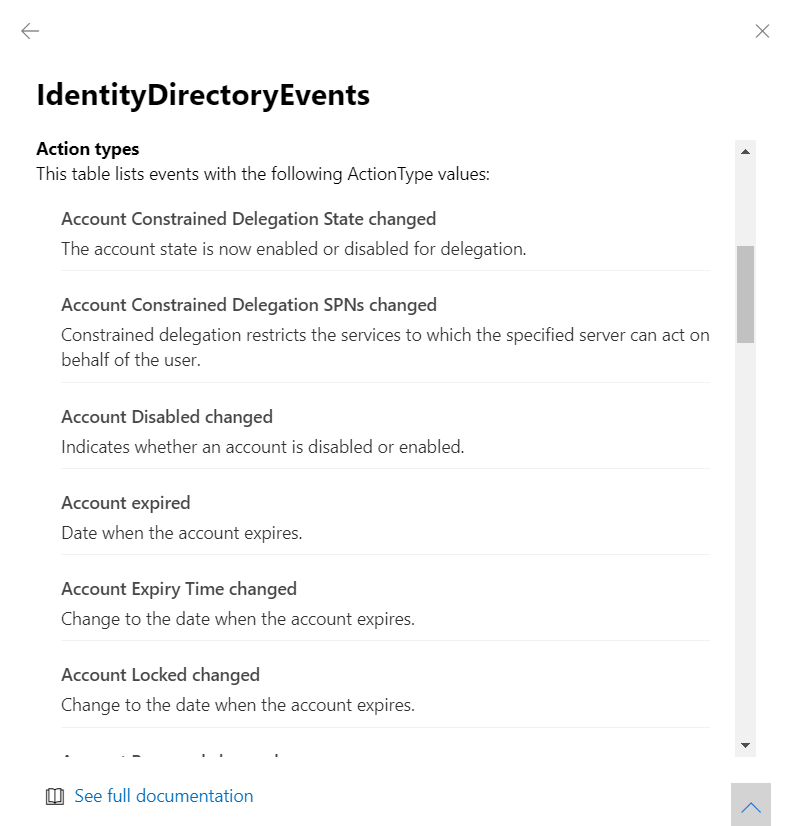
You can get the full list of supported events or action types in the in-portal reference.
Here are some samples queries you can use:
//Track domain controller replication
IdentityDirectoryEvents
| where ActionType == "Directory Services replication"
| limit 100
Run query
//Track service creation activities on domain controllers
IdentityDirectoryEvents
| where ActionType == "Service creation"
| extend ServiceName = AdditionalFields["ServiceName"]
| extend ServiceCommand = AdditionalFields["ServiceCommand"]
| project Timestamp, ActionType, Protocol, DC = TargetDeviceName, ServiceName, ServiceCommand, AccountDisplayName, AccountSid, AdditionalFields
| limit 100
Run query
//Find the latest password change event for a specific account
let userAccount = '<insert your user account>';
let deviceAccount = '<insert your device account>';
IdentityDirectoryEvents
| where ActionType == "Account Password changed"
| where TargetAccountDisplayName == userAccount
//If you are looking for last password change of a device account comment the above row and remove comment from the below row
//| where TargetDeviceName == deviceAccount
| summarize LastPasswordChangeTime = max(Timestamp) by TargetAccountDisplayName // or change to TargetDeviceName for device account
Run query
As always, please let us know what you think and how we can tweak this enhancement further!
To learn more about advanced hunting in Microsoft Threat Protection and these new enhancements, go to the following links:
by Scott Muniz | Aug 19, 2020 | Azure, Microsoft, Technology, Uncategorized
This article is contributed. See the original author and article here.
If you are managing a Hybrid Cloud environment, you can now get a new Azure Cloud Shell extension in Windows Admin Center. Azure Cloud Shell is an interactive, authenticated, browser-accessible shell for managing Azure resources. It provides the flexibility of choosing the shell experience that best suits the way you work, either Bash or PowerShell. We are able to use Cloud Shell directly from the Azure portal, shell.azure.com, in Visual Studio Code, in the new Windows Terminal, or even in the Azure mobile app. Now with the new solution/extension, administrators can also run Cloud Shell directly within WAC.
How to run Azure Cloud Shell in Windows Admin Center
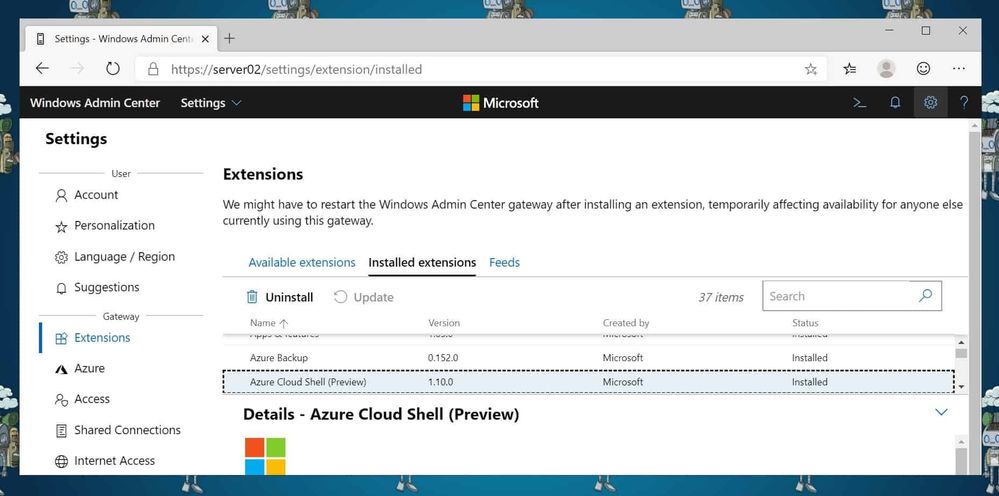
First, you will need to enable and install the new Azure Cloud Shell solution. For that open Windows Admin Center, go to Settings and in the menu click on Extensions.
 Extensions
Under available extensions, you will find the new Azure Cloud Shell (Preview) extension. Click on Install, the WAC portal will refresh automatically.
After the page has refreshed, the Cloud Shell option will show up in the top menu.
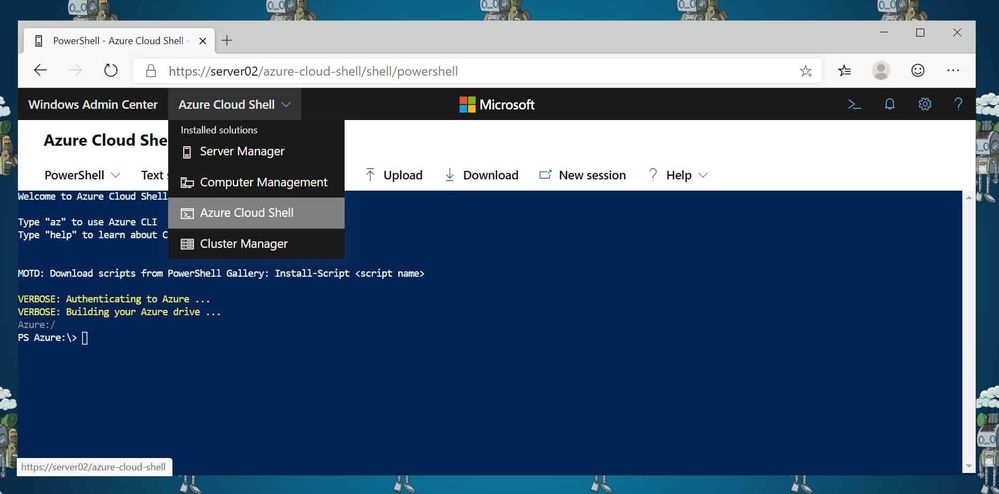 Start Cloud Shell in Windows Admin Center
If you start Azure Cloud Shell for the first time, you will need to login to Azure.
After that, you can run the PowerShell or Bash experience, depending on what you prefer. You also have access to the clouddrive which comes with Cloud Shell.
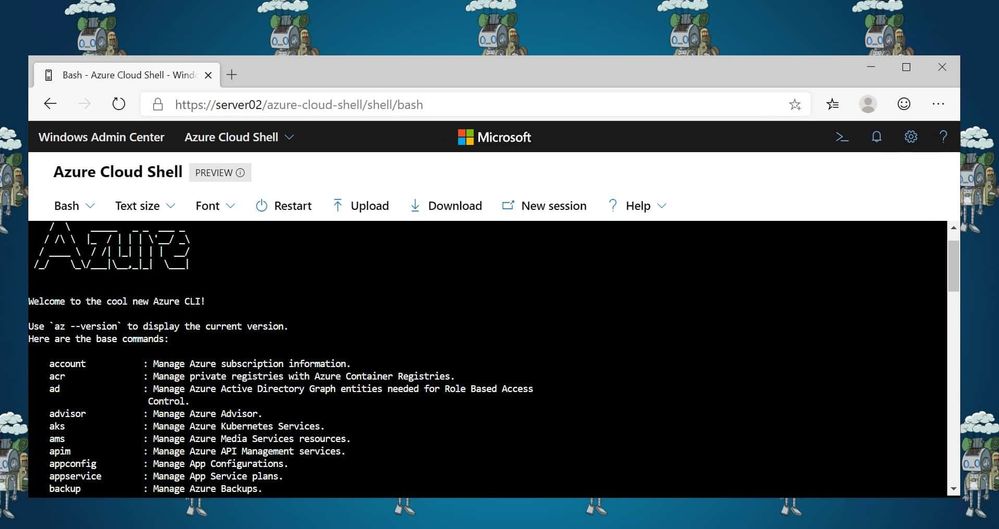 Azure Cloud Shell in Windows Admin Center
In that, you can run tools like the Azure CLI, Azure PowerShell and much more. If you want to learn more about Azure Cloud Shell, check out my blog post, Mastering Azure with Cloud Shell. Windows Admin Center is a free download to use with your Windows Servers, you can download Windows Admin Center here. If you want to know more about the Hybrid capabilities, check out my blog post on ITOpsTalk.com.
I hope this gives you an overview of how you can run Azure Cloud Shell in Windows Admin Center. Let me know if you have any questions in the comments.
by Scott Muniz | Aug 19, 2020 | Azure, Microsoft, Technology, Uncategorized
This article is contributed. See the original author and article here.
A fully automated DevOps deployment of CMS WordPress on Azure App Services in a Linux Multi-Container. Setup with services like: App Service, Azure MySQL, Redis Cache (in a container), Azure CDN, Azure Storage and Key Vault (to store the mysqluser password).
The Github repository: https://github.com/pascalvanderheiden/multi-container-wordpress-azure
The multi-container setup is used to host WordPress and Redis Cache in one App Service. This DevOps project is inspired on this tutorial: https://docs.microsoft.com/en-us/azure/app-service/containers/tutorial-multi-container-app
The Docker Compose YML’s are based on these samples: https://github.com/Azure-Samples/multicontainerwordpress
Step by Step installation
Step 1: In the Azure Portal create a Service Principal
In the Azure Cloud Shell (https://shell.azure.com:(
- az ad sp create-for-rbac –name [your-service-principal-name]
Copy the JSON Output! We’ll be needing this information to create the service connection in Azure DevOps.
Step 2: Generate your Azure DevOps Project for Continuous Integration & Deployment with the Azure DevOps Generator
Step 3: In Azure DevOps, create a service connection
- Login with your account Azure DevOps. Go to the Project Settings of the DevOps Project you’ve created in step 2.
- Go to Service Connections*.
- Create a service connection, choose Azure Resource Manager, next.
- Select Service Principal Authentication. Choose the correct Subscription first, then click the link at the bottom: “use the full version of the service connection dialog.”.
- Enter a name for your Service Principal and copy the appId from step 1 in “Service principal client ID” and the password from step 1 in “Service principal key”. And Verify the connection.
- Tick “Allow all pipelines to use this connection.”. OK.
Step 4: In Azure DevOps, update the Variables Group
- Go to Pipelines, Library. Click on the Variable group “Shared Resources”.
- Tick “Allow access to all pipelines.
- Update the variables to match your naming conventions needs. You can leave the Storage Account and CDN empty if you don’t want to use these services. Keep in mind to pick unique naming for exposed services.
- The variable “KVMYSQLPWD” is NOT the MySQL password, but the naming tag in Key Vault for the MySQL password. Leave that as it is: “mysqladminpwd”.
- The variable “MYSQLUSER” cannot be longer than 16 characters.
- Don’t forget to save.
Step 5: In Azure DevOps, update the Build pipeline and Run it
- Go to Pipelines, Pipelines.
- Select “Build Multi-container WordPress on Azure-CI”, Edit.
- In Tasks, select the Tasks which have the explaination mark “Some settings need attention”, and update Azure Subscription to your Service Principal Connection.
- In Variables, update the variables to match your naming conventions needs. In my case I give the App Service Plan and the Resource Group of the Web App a more “generic” name. I want to re-use the App Service Plan for more websites, therefor all websites need to be deployed in the same Resource Group as the App Service plan. Keep in mind to pick unique naming for exposed services.
- Save & queue.
- Click the Agent Job to check the progress. Check if everything is create correctly, because of the unique naming for some services. And because it’s fun :)
- Keep in mind that the CLI scripts will check if the resource is already created, before creating. You can deploy using ARM Templates as well. I choose a bash script, because you are free to use whatever you prefer, right?!
Step 6: In Azure DevOps, add the Key Vault secret to the variables.
- Go to Pipelines, Library. Add Variable group. Give it a name, something like “Key Vault Secrets”.
- Tick “Allow access to all pipelines.
- Tick “Link secrets from an Azure key vault as variables”.
- Update the Azure Subscription to your Service Principal Connection.
- Select the Key vault name. If your build pipeline ran succesfully, you can select your Key vault. Add variables, and it will popup with the secret we’ve created earlier “mysqladminpwd”. Select it, OK. And Save.
Step 7: In Azure DevOps, update the Release pipeline and Run it.
- Go to Pipelines, Releases. Note. Because I’ve enabled continuous deployment in my template, there is a failed release there already. You can ignore that, because we are going to fix the release in the step.
- Select “Release Multi-container WordPress on Azure-CD”, Edit.
- In Tasks, select the Tasks which have the explaination mark “Some settings need attention”, and update Azure Subscription to your Service Principal Connection.
- In Variables, update the variables to match the naming you used in the Build pipeline. The WPDBHOST you can leave empty, because it will be updated in the pipeline.
- In Variables groups, link the “Key Vault Secrets” variable group, by clicking the Link button.
- The TARGET_YML will need to point to the yaml configuration files in repo. This will determine how the App Service is configured. In the DevOps project the TARGET_YML is default set to “docker-compose-mc-wordpress-storage.yml”, which is the most complete config. For inspiration and learning I’ve included 4 configs:
- compose-wordpress.yml (sample multi-container setup with redis, using local (not persistent) storage)
- docker-compose-wordpress.yml (sample multi-container setup with MySQL, using local (not persistent) storage)
- docker-compose-mc-wordpress-storage.yml (multi-container setup with redis, using Azure Storage for wp-content folder)
- docker-compose-mc-wordpress.yml (multi-container setup with redis, using Azure App Service as persistent storage)
- The first 2 yaml’s are more inspirational, the last 2 I would use for my deployment, because persistent storage is a must! Keep in mind that it would be illogical to use the last yaml file, and configure Azure Storage. Just leave the variable empty to skip this installation.
- Save & Create Release.
Step 8: Go to your websites
You need to run the website url one time, to trigger the compose script to download the WordPress image to the persistent storage location. This will take a 2-3 minutes to download.
Redis Object Cache Plugin in WordPress
- In WordPress, the plugin “Redis Object Cache” is already pre-installed on the this image.
- Go to Plugins and Enable the plugin.
CDN Plugin in WordPress
- In WordPress, install the plugin “CDN Enabler”. Or, when you have the wp-content folder mounted in Azure Storage, decompress the plugin from the wordpress-plugins folder in this repo and copy it into the “Plugins” folder using Azure Storage Explorer.
- Go to Plugins and Enable the plugin. Change the settings of the plugin and point it to the CDN Endpoint you’ve created earlier.
- Go to Azure, to your CDN Endpoint, and trigger a purge all to refresh. I’ve included a bash script in the deploy folder to trigger the purge in bash.


Recent Comments