This article is contributed. See the original author and article here.
According to Microsoft Threat Intelligence Report, one of the most common attacks against IaaS VMs in Azure is the RDP brute-force attack. This attack usually take places for VMs that are exposing the RDP port (TCP 3389). Although RDP is the primary source, there are also brute-force against SSH (TCP 22).. Nowadays with COVID-19, with more employees working from home more often, threat actors are taking advantage of the increase of management ports open, which includes RDP and SSH. Users with weak passwords and without MFA enabled, are more susceptible to be compromised by and RDP brute force attack.. Keep in mind that compromising a server via RDP brute force is just the initial foothold, once the threat actors gain access to target machine, it will continue conducting malicious activities which may include coin mining and even ransomware type of attack.
One way to reduce the likelihood that your machine will be compromised via RDP brute-force is by reducing the exposure, in other words, limiting the amount of time that a port is open by securing your management ports using Just-in-time access, capability available in ASC Standard Tier.
This blog explain how to leverage automation to block traffic of specific IP to a VM in the NSG as a response to a Brute-force alert detected by Azure Security Center.
How does the automation work?
When Azure Security Center detects a Brute-force attack, it triggers an alert to bring you awareness that a brute force attack took place. The automation uses this alert as a trigger to block the traffic of the IP by creating a security rule in the NSG attached to the VM to deny inbound traffic from the IP addresses attached to the alert. In the alerts of this type, you can find the attacking IP address appearing in the ‘entities’ field of the alert.
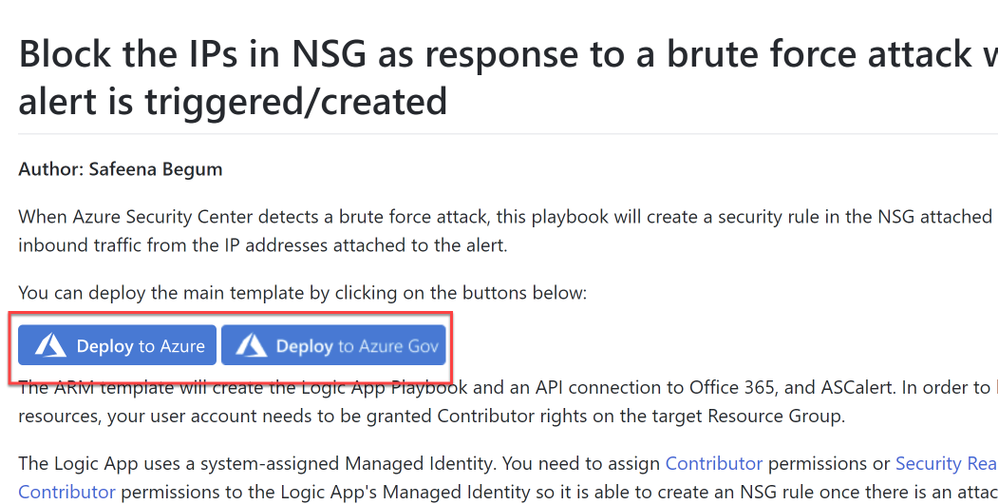
The Logic App uses a system-assigned Managed Identity. You need to assign Contributor permissions or Security Reader and Network Contributor permissions to the Logic App’s Managed Identity so it is able to create an NSG rule once there is an attack detected. You need to assign these roles on all subscriptions or management groups you want to monitor and manage resources in using this playbook. Note: You can assign permissions only if your account has been assigned Owner or User Access Administrator roles, and make sure all selected subscriptions registered to Azure Security Center.
Refer to the Readme file in our GitHub Repository for detailed procedure.
Deployment process and details
Navigate to Azure Security Center GitHub repository and select “Deploy to Azure” or “Deploy to Azure Gov”, as shown in Image 1:
Image 1: Git Hub repository
Once you have clicked on ‘Deploy’ option in the screen above, you should automatically be redirected to the Azure portal Custom deployment page where you can fill in the details of requirement as shown in Image 2, as shown below:
Image 2: Azure portal, Custom Deployment
The ARM template will create the Logic App Playbook and an API connection to Office 365, and ASCalert.
You need to authorize the Office 365 API connection so it can access the sender mailbox and send the email notification from there.
Once you review and create from Image 2, you would notice below resources created from the ARM template (Refer Image 3)
Image 3: Summary of the resources created from the ARM template
Define when the Logicapp should automatically run:
Workflow automation feature of Azure Security Center can trigger Logic Apps on security alerts and recommendations. For example, you might want Security Center to email a specific user when an alert occurs. When you add the workflow automation and trigger conditions as show in Image 4, the triggers will initiate this automatic workflow. In this example, you want the Logic App to run when a security alert that contains “bruteforce” is generated.
When a Bruteforce attack is detected by Azure Security Center as shown in Image 5, this would automatically apply the automation and blocks the traffic of the IP by creating a security rule in the NSG attached to the VM to deny inbound traffic from the IP addresses attached to the alert as shown in Image 6
Image 5: Brute force attack alert
Image 6: IP blocked by ASC
You would receive an email notification on the alert details as shown in Image 7:
Image 7: Email notification from the logicapp
This logic app as well as many other can be found here:
Most organizations lack the time and expertise required to respond to these alerts so many go unaddressed. Having this type of automation can address the threat immediately. I hope you enjoy reading this article and implementing, testing it as much as I enjoyed writing it.
Reviewer
Special thanks to:
Yuri Diogenes, @Yuri Diogenes, Senior Program Manager (CxE ASC Team)
This article is contributed. See the original author and article here.
In part one of this three-part series, Vasiya Krishnan introduces Azure SQL Edge and its features that make it the optimized database engine for IoT Scenarios. In part two, Vasiya will review customer examples and use cases, and in part three, she’ll conclude with a demo that demonstrates how to use Azure SQL Edge to build smarter renewable resources.
This article is contributed. See the original author and article here.
As an IT admin you plan to ship new devices to end users which can join the on-premises AD (Active Directory) by leveraging Autopilot with Intune for device management.
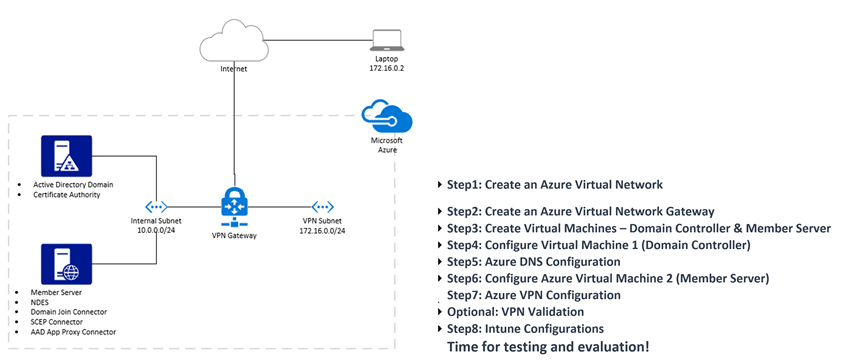
This post is a walkthrough of evaluating the Autopilot Hybrid join over VPN scenario in a lab environment hosted in Azure.
Infrastructure
I have added steps to build the configurations and dependencies along the post, this can get complicated due to the number of components involved. Here is an agenda for this post along with a high-level network configuration of the setup:
Click Create a resource and look for Virtual Machine under Compute to create one each by repeating the steps twice one for the Domain Controller and the other for the Member Server.
Choose your appropriate Azure Subscription.
Select the Resource Group from previous exercise.
Specify a Name of the VM
Region is auto populated based on the region you selected from step2.
Leave the default availability option. (No infrastructure redundancy required.)
From the Image drop-down choose a Windows Server OS
Leave the Azure spot instance default to No
Choose a size as appropriate. (I am leaving the default suggested by Azure)
Specify a Username and a password.
Leave the default inbound ports for RDP.
Leave default licensing.
Click Review + Create.
The wizard automatically chooses the Networking from the same resource group we selected. Feel free to make any changes as desired.
Click Create to complete the process.
Once both the VM’s are successfully created, move to the next steps in configuring them.
Create Certificate Templates for SCEP Profiles by following the instructions from this blog post for setting up NDES for SCEP certificate deployments. We will reference this blog post at various phases during the setup.
Client Authentication Certificate – For NDES Server (VM2) you can even merge this with the Web Server Certificate by adding Client Auth. Capabilities instead of creating a new template.
On the second VM we will install a list of roles and features for our solution. One of the primary reasons for building this VM2 is the fact that you cannot co-locate both NDES and CA on the same server.
Browse the Virtual NetworkGateway resource you created earlier we called it Contoso-VPN
Click the User VPN Configuration from the menu and click Configure now.
Specify an Address pool for the VPN clients to connect.
Under Tunnel type specify IKEv2
For Authentication type, leave Azure certificate.
Under Root Certificates specify a name (example Root) and for Public Certificate Data:
Make sure that you exported the root certificate as a Base-64 encoded X.509 (.cer) file. You need to export the certificate in this format so you can open the certificate with text editor.
Open the certificate with a text editor, such as Notepad. When copying the certificate data, make sure that you copy the text as one continuous line without carriage returns or line feeds. You may need to modify your view in the text editor to ‘Show Symbol/Show all characters’ to see the carriage returns and line feeds. Copy only the following section as one continuous line:
Save the configuration.
Note: This may take 10 minutes or up to complete.
Click Download VPN Client and save for later use.
Optional: VPN Validation
To reduce the complexity, it is a good idea to validate the VPN connection outside Intune configuration.
Build a Windows 10 VM or use a physical machine (meeting OS Prerequisites) which is not joined to the Domain we created above.
Copy the VPN client we downloaded in the previous exercise.
Instead of executing the installer of the VPN client, we will manually create the VPN configuration from the Generic folder with the file name called VPNSettings.xml
Use the following PowerShell cmdlet to manually create the VPN connection. Replace the highlighted values.
Import a Client-Auth cert for this device with Common Name = Computer Name
For this step you may want to generate a Certificate Template with Computer Authentication capability with Name supply in request and the option to export the private key.
Connect VPN and try to ping/rdp/network-share or even join the machine to Domain.
Step8: Intune Configurations
Now that your base infrastructure configuration is complete, you can proceed with the Intune configuration.
Create Autopilot Deployment Profile for Hybrid VPN Join and assign to the above AAD-Group, preferably to All Devices.
Capture hardware hash import device and assign profile. Get-WindowsAutoPilotInfo. The sample below will capture the hash, upload in Intune, add to a group and assign to the deployment profile.
Specify the Subject name format as CN={{FullyQualifiedDomainName}}
Create a VPN Configuration Profile and assign to the same AAD-Group. Refer the configuration settings from the VPN Client you downloaded under the folder named Generic with the file name called VPNSettings.xml
Specify a Connection Name
Under Servers Description, specify a Name.
For Ip Address or FQDN, specify the VPNServer info from VPNSettings.xml
Set Default server to True.
Enable Register IP address with internal DNS
Choose the Connection type as IKEv2
Choose Always On to Enable
Set the Authentication method to Machine Certificates.
Under Authentication certificate choose the SCEP Certificate profile you created before.
Enable Device Tunnel
Leave the following sections to defaults:
Apps and Traffic Rules
Conditional Access
Customize the DNS Settings by adding:
Add the Domain name as your DNS Suffix.
Add Name Resolution Policy table (NRPT) rule by specifying:
Domain
DNS Server IP
Leave the Proxy settings to defaults.
Under Split Tunneling:
Enable the configuration.
Under Destination prefix and Prefix size specify the subnet address under <Routes> by referring the VPNSettings.xml
Deploy to the AAD-Device group and proceed with testing/validation on a device.
This article is contributed. See the original author and article here.
My customer wanted to lock down their Azure SQL access very, very tightly. The server should have no public endpoints whatsoever, and the only access to it should be from a specific set of trusted IP addresses. This is a common requirement, especially for customers in heavily-regulated industries such as finance and healthcare.
Instead of relying on the firewall built in to Azure SQL Server, which is specific that that instance, they preferred to rely on the Conditional Access Policy (CAP) capabilities within Azure Active Directory (AAD). This would allow them to ensure that authentication requests for all Azure resources could be validated and controlled from a single place, that being, AAD.
This article will describe the challenges of setting up this environment and provide at least one architecture to solve it. I’ll show how to have an Azure VM running SQL Server Management Studio (SSMS) that authenticates against AAD and accesses Azure SQL via a Private Endpoint. None of these services will have internet access.
Note that “Locations” in AAD entail IP ranges in CIDR format. Fully qualified domain names (FQDN) are not allowed.
One thing to remember: all network traffic that flows from one Azure service to another, whether it’s in the same region or different, flows across the private Microsoft network. For example, if a VM in one region accesses an Azure SQL Server in another region via the latter’s public IP, that traffic occurs across private Microsoft fiber, even though a “public Internet IP” is used on the Azure SQL instance.
Locking Down Azure SQL
Even though traffic between an Azure VM and Azure SQL on a public IP will stay within the Microsoft network backbone, that public IP is not guaranteed to be static. Customers are therefore encouraged to access Azure SQL Server via its FQDN only, not via the underlying IP address.
Since Locations in AAD require IPs and not FQDNs, we cannot specify our Azure SQL Server instance as a Trusted Location in AAD. We will have to use the Private Endpoint capabilities of Azure SQL Server to tie it down to a Virtual Network (VNet).
I created one VNet (10.0.0.0/16) with two subnets:
SQLServer (10.0.0.0/24)
VMs (10.0.1.0/24)
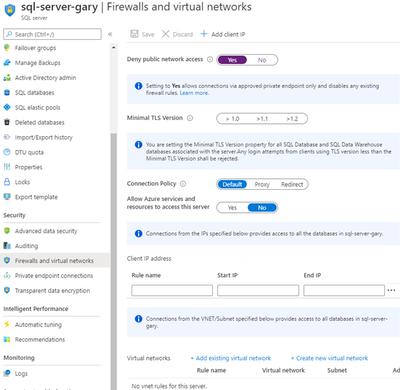
I then configured a Private Endpoint to be present in the SQLServer subnet. Lastly, I set “Deny public network access” to “Yes.”
One thing to note: DNS with Private Link can be tricky. I did it the easy way: by letting Private Link automatically create an Azure Private DNS Zone that was associated with the VNet. That way the SSMS VM could find the SQL Server on its private endpoint via its FQDN: “sql-server-gary.database.windows.net.” Donotuse its internal FQDN of “sql-server-gary.privatelink.database.windows.net.”
This was easy. Just disassociate the public IP from the IP configuration of the VM’s network interface. To access, I just created a jump box in the same subnet (VMs). Our SSMS VM now has access only to the internal VNet.
In addition, I added a “deny internet” outbound rule on the SMSS VM’s Network Security Group (NSG) near the top of the priority list. Before it I added a rule to allow Azure Active Directory outbound flow.
Please note that the rules in this NSG are only used as examples for this specific use case. Your application will undoubtedly have additional requirements that you should consider. The goal should be to deny all traffic except that which is mandatory, and then only between the necessary components.
Locking Down AAD
In addition to controlling access via user sign on with multi-factor authentication (MFA), the customer wanted to make sure that no rogue agent was able to access from a public IP. Therefore, they created a CAP with the following configuration:
1. All users included.
2. All locations included.
3. Trusted locations excluded.
4. Azure SQL Database included.
5. Block access.
I added the VNet’s CIDR (10.0.0.0/16) as a Trusted Location in AAD. Of course, I could have chosen “All Cloud Services” instead of just “Azure SQL Database” to provide protection to even more resources.
Allowing Access from VNet to AAD
Lastly, it’s necessary to allow requests for authentication tokens to flow from our VNet to AAD.
Azure uses an internal IP for this. Unfortunately, this IP is not static, and can change at any time.
To make the IP static we will take advantage of theNAT Gatewayservice. This will fix the range of IPs used for outbound traffic. I associated the NAT Gateway with both of my subnets: SQLServer and VMs.
The “IP prefix” CIDR range should be added as a Trusted Location in AAD. This will allow the token request from our VNet to AAD to flow.
Conclusion
Here is a diagram to tie it all together. In this case I don’t have a jump box in Azure, but rather access is made from an on-premises computer via a private ExpressRoute connection.
This approach is attractive for several reasons:
It adds another layer of protection to your cloud security. Redundancy is often desirable.
Controlling access at the Azure Active Directory layer, where authentication tokens are provided, provides a single place to add new trusted locations, as opposed to doing so for each individual service.
This article is contributed. See the original author and article here.
Initial Update: Thursday, 27 August 2020 11:54 UTC
We are aware of issues within Log Search Alerts and are actively investigating. Some customers may experience issues with missed or delayed Log Search Alerts.
Work Around: None
Next Update: Before 08/27 16:00 UTC
We are working hard to resolve this issue and apologize for any inconvenience. -Subhash


Recent Comments