by Scott Muniz | Jul 1, 2020 | Azure, Microsoft, Technology, Uncategorized
This article is contributed. See the original author and article here.
While building an Azure Functions application, setting an IoC container for dependency injection has many benefits by comparing to just using the static classes and methods. Azure Functions leverages the built-in IoC container featured by ASP.NET Core that is easy to use, without having to rely on any third-party libraries. Throughout this post, I’m going to discuss five different ways to pick up a dependency injected from multiple instances sharing with the same interface.
Implementing Interface and Classes
Let’s assume that we’re writing one IFeedReader interface and three different classes, BlogFeedReader, PodcastFeedReader and YouTubeFeedReader implementing the interface. There’s nothing fancy.
public interface IFeedReader
{
    string Name { get; }
    string GetSingleFeedTitle();
}

public class BlogFeedReader : IFeedReader
{
    public BlogFeedReader()
    {
        this.Name = "Blog";
    }

    public string Name { get; }

    public string GetSingleFeedTitle()
    {
        return "This is blog item 1";
    }
}

public class PodcastFeedReader : IFeedReader
{
    public PodcastFeedReader()
    {
        this.Name = "Podcast";
    }

    public string Name { get; }

    public string GetSingleFeedTitle()
    {
        return "This is audio item 1";
    }
}

public class YouTubeFeedReader : IFeedReader
{
    public YouTubeFeedReader()
    {
        this.Name = "YouTube";
    }

    public string Name { get; }

    public string GetSingleFeedTitle()
    {
        return "This is video item 1";
    }
}
IoC Container Registration #1 – Collection
Let’s register all the classes declared above into the Configure() method in Startup.cs.
public override void Configure(IFunctionsHostBuilder builder)
{
    builder.Services.AddTransient<IFeedReader, BlogFeedReader>();
    builder.Services.AddTransient<IFeedReader, PodcastFeedReader>();
    builder.Services.AddTransient<IFeedReader, YouTubeFeedReader>();
}
By doing so, all three classes have been registered as IFeedReader instances. However, from the consumer perspective, it doesn’t know which instance is appropriate to use. In this case, using a collection as IEnumerable<IFeedReader> is useful. In other words, inject a dependency of IEnumerable<IFeedReader> to the FeedReaderHttpTrigger class and filter one instance from the collection.
public class FeedReaderHttpTrigger
{
    private readonly IFeedReader _reader;

    public FeedReaderHttpTrigger(IEnumerable<IFeedReader> readers)
    {
        this._reader = readers.SingleOrDefault(p => p.Name == "Blog");
    }

    [FunctionName(nameof(FeedReaderHttpTrigger.GetFeedItemAsync))]
    public async Task<IActionResult> GetFeedItemAsync(
        [HttpTrigger(AuthorizationLevel.Function, "post", Route = "feeds/item")] HttpRequest req,
        ILogger log)
    {
        var title = this._reader.GetSingleFeedTitle();

        return new OkObjectResult(title);
    }
}
It’s one way to use the collection as a dependency. The other way to use the collection is to use a loop. It’s useful when we implement either a Visitor Pattern or Iterator Pattern.
public class FeedReaderHttpTrigger
{
    private readonly IEnumerable<IFeedReader> _readers;

    public FeedReaderHttpTrigger(IEnumerable<IFeedReader> readers)
    {
        this._readers = readers;
    }

    [FunctionName(nameof(FeedReaderHttpTrigger.GetFeedItemAsync))]
    public async Task<IActionResult> GetFeedItemAsync(
        [HttpTrigger(AuthorizationLevel.Function, "post", Route = "feeds/item")] HttpRequest req,
        ILogger log)
    {
        var title = default(string);
        foreach (reader in this._readers)
        {
            if (reader.Name != "Blog")
            {
                continue;
            }

            title = reader.GetSingleFeedTitle();
        }

        return new OkObjectResult(title);
    }
}
IoC Container Registration #2 – Resolver
It’s similar to the first approach. This time, let’s use a resolver instance to get the dependency we want. First of all, declare both IFeedReaderResolver and FeedReaderResolver. Keep an eye on the instance of IServiceProvider as a dependency. It’s used for the built-in IoC container of ASP.NET Core, which can access to all registered dependencies.
In addition to that, this time, we don’t need the Name property any longer as we use conventions to get the required instance.
public interface IFeedReaderResolver
{
    IFeedReader Resolve(string name);
}

public class FeedReaderResolver : IFeedReaderResolver
{
    private readonly IServiceProvider _provider;

    public FeedReaderResolver(IServiceProvider provider)
    {
        this._provider = provider;
    }

    public IFeedReader Resolve(string name)
    {
        var type = Assembly.GetAssembly(typeof(FeedReaderResolver))
                           .GetType($"{name}FeedReader");
        var instance = this._provider.GetService(type);

        return instance as IFeedReader;
    }
}
After that, update Configure() on Startup.cs again. Unlike the previous approach, we registered xxxFeedReader instances, not IFeedReader. It’s fine, though. The resolver sorts this out for FeedReaderHttpTrigger.
public override void Configure(IFunctionsHostBuilder builder)
{
    builder.Services.AddTransient<BlogFeedReader>();
    builder.Services.AddTransient<PodcastFeedReader>();
    builder.Services.AddTransient<YouTubeFeedReader>();

    builder.Services.AddTransient<IFeedReaderResolver, FeedReaderResolver>();
}
Update the FeedReaderHttpTrigger class like below.
public class FeedReaderHttpTrigger
{
    private readonly IFeedReader _reader;

    public FeedReaderHttpTrigger(IFeedReaderResolver resolver)
    {
        this._reader = resolver.Resolve("Blog");
    }

    [FunctionName(nameof(FeedReaderHttpTrigger.GetFeedItemAsync))]
    public async Task<IActionResult> GetFeedItemAsync(
        [HttpTrigger(AuthorizationLevel.Function, "post", Route = "feeds/item")] HttpRequest req,
        ILogger log)
    {
        var title = this._reader.GetSingleFeedTitle();

        return new OkObjectResult(title);
    }
}
IoC Container Registration #3 – Resolver + Factory Method Pattern
Let’s slightly modify the resolver that uses the factory method pattern. After this modification, it removes the dependency on the IServiceProvider instance. Instead, it creates the required instance by using the Activator.CreateInstance() method.
public class FeedReaderResolver : IFeedReaderResolver
{
    public IFeedReader Resolve(string name)
    {
        var type = Assembly.GetAssembly(typeof(FeedReaderResolver))
                           .GetType($"{name}FeedReader");
        var instance = Activator.CreateInstance(type);

        return instance as IFeedReader;
    }
}
If we implement the resolver class in this way, we don’t need to register all xxxFeedReader classes to the IoC container, but IFeedReaderResolver would be sufficient. By the way, make sure that all xxxFeedReader instances cannot be used as a singleton if we take this approach.
public override void Configure(IFunctionsHostBuilder builder)
{
    builder.Services.AddTransient<IFeedReaderResolver, FeedReaderResolver>();
}
IoC Container Registration #4 – Explicit Delegates
We can replace the resolver with an explicit delegates. Let’s have a look at the code below. Within Startup.cs, declare a delegate just outside the Startup class.
public delegate IFeedReader FeedReaderDelegate(string name);
Then, update Configure() like below. As we only declared the delegate, its actual implementation goes here. The implementation logic is not that different from the previous approach.
public override void Configure(IFunctionsHostBuilder builder)
{
    builder.Services.AddTransient<BlogFeedReader>();
    builder.Services.AddTransient<PodcastFeedReader>();
    builder.Services.AddTransient<YouTubeFeedReader>();

    builder.Services.AddTransient<FeedReaderDelegate>(provider => name =>
    {
        var type = Assembly.GetAssembly(typeof(FeedReaderResolver))
                           .GetType($"FeedReaders.{name}FeedReader");
        var instance = provider.GetService(type);

        return instance as IFeedReader;
    });
}
Update the FeedReaderHttpTrigger class. As FeedReaderDelegate returns the IFeedReader instance, another method call should be performed through the method chaining.
public class FeedReaderHttpTrigger
{
    private readonly FeedReaderDelegate _delegate;

    public FeedReaderHttpTrigger(FeedReaderDelegate @delegate)
    {
        this._delegate = @delegate;
    }

    [FunctionName(nameof(FeedReaderHttpTrigger.GetFeedItemAsync))]
    public async Task<IActionResult> GetFeedItemAsync(
        [HttpTrigger(AuthorizationLevel.Function, "post", Route = "feeds/item")] HttpRequest req,
        ILogger log)
    {
        var title = this._delegate("Blog").GetSingleFeedTitle();

        return new OkObjectResult(title);
    }
}
IoC Container Registration #5 – Implicit Delegates with Lambda Function
Instead of using the explicit delegate, the Lambda function can also be used as the implicit delegate. Let’s modify the Configure() method like below. As there is no declaration of the delegate, define the Lambda function.
public override void Configure(IFunctionsHostBuilder builder)
{
    builder.Services.AddTransient<BlogFeedReader>();
    builder.Services.AddTransient<PodcastFeedReader>();
    builder.Services.AddTransient<YouTubeFeedReader>();

    builder.Services.AddTransient<Func<string, IFeedReader>>(provider => name =>
    {
        var type = Assembly.GetAssembly(typeof(FeedReaderResolver))
                           .GetType($"FeedReaders.{name}FeedReader");
        var instance = provider.GetService(type);

        return instance as IFeedReader;
    });
}
As the injected object is the Lambda function, FeedReaderHttpTrigger should accept the Lambda function as a dependency. While it’s closely similar to the previous example, it uses the Lambda function this time for dependency injection.
public class FeedReaderHttpTrigger
{
    private readonly Func<string, IFeedReader> _func;

    public FeedReaderHttpTrigger(Func<string, IFeedReader> func)
    {
        this._func = func;
    }

    [FunctionName(nameof(FeedReaderHttpTrigger.GetFeedItemAsync))]
    public async Task<IActionResult> GetFeedItemAsync(
        [HttpTrigger(AuthorizationLevel.Function, "post", Route = "feeds/item")] HttpRequest req,
        ILogger log)
    {
        var title = this._func("Blog").GetSingleFeedTitle();

        return new OkObjectResult(title);
    }
}
—
So far, we have discussed five different ways to resolve injected dependencies using the same interface, while building an Azure Functions application. Those five approaches are very similar to each other. Then, which one to choose? Well, there’s no one approach better than the other four, but I guess it would depend purely on the developer’s preference.
This post has been cross-posted to DevKimchi.
by Scott Muniz | Jul 1, 2020 | Azure, Microsoft, Technology, Uncategorized
This article is contributed. See the original author and article here.
A new Azure Sentinel notebook experience will soon be released which provides several management, security, customization, and productivity benefits. Examples of these benefits includes, but is not limited to, a new intuitive UI with Intellisense, compute provisioning via ARM template support, Azure Virtual Network (VNET) support as well as a full range of compute configuration options.
While the existing Azure Notebooks website and service will be retired by September 29th (see link for the announcement), the existing Azure Sentinel notebook experience will not be impacted or interrupted as a result of the planned retirement.
Continue to check back for additional announcements as we transition to the new Azure Sentinel notebook experience. For questions or concerns, let us know!

by Scott Muniz | Jul 1, 2020 | Azure, Microsoft, Technology, Uncategorized
This article is contributed. See the original author and article here.
Today, I worked on a service request that our customer reported some delays when they are connecting to Azure SQL Database using SQL Server Management Studio. In this article I would like to share with you an explanation about it.
We know that in Azure SQL Database we have two different user types: Login and Contained Users and following I would like to explain what is the impact using both of them connecting to Azure SQL Database from SQL Server Management Studio.
Before doing anything, I’m going to enable SQL Auditing that allow us to understand the different delays and what is hapenning behind the scenes when we are connecting using SQL SERVER Management Studio:
1) Login:
- I created a login using the following TSQL command: CREATE LOGIN LoginExample with Password=’Password123%’
- I’m going to give the permissions to a specific database that I created, let’s give the name DotNetExample.
- Connected to this database I run the following TSQL command to create the user and provide the permission.
- CREATE USER LoginExample FOR LOGIN LoginExample
- exec sp_addrolemember ‘db_owner’,’LoginExample’
- Using SQL Server Management Studio with the this user and specify the database in the connection string, the login process took around 15/20 seconds. Why?
- In order to explain it, let’s try to review the SQL Auditing file and see what is happening.
- All points to a normal login time and connection if we review the SQL Auditing of the user database.
- But, what is happening in the master database?.
- In this situation, I saw many DATABASE AUTHENTITICATION FAILED, several times, with this error message: additional_information <login_information><error_code>18456</error_code><error_state>38</error_state></login_information> “Cannot open a specified database master”
- Why? because as we defined as a Login, SQL Server Management Studio is trying to obtain information, most probably, about the databases list, information of the server, … and in every retry is waiting some seconds.

2) Contained User:
- I created an user the following TSQL command: CREATE USER LoginExampleC with Password=’Password123%’ and gave the db_owner permissions.
- But, Is the connection time the same?…In this situation, not, because as there is a contained user of this database, there is not needed to review any parameter of master database.
So, based on this situation and as Azure SQL Database is oriented to Database engine the best approach to reduce this time is to use a Contained User. However, if you want to reduce the time using login, you could do the following under the master database, CREATE USER LoginExample FOR LOGIN LoginExample, to allow the permission to connect to this master database.
Enjoy!
by Scott Muniz | Jun 30, 2020 | Azure, Microsoft, Technology, Uncategorized
This article is contributed. See the original author and article here.
Azure APIM – Validate API requests through Client Certificate using Portal, C# code and Http Clients
Client certificates can be used to authenticate API requests made to APIs hosted using Azure APIM service. Detailed instructions for uploading client certificates to the portal can be found documented in the following article – https://docs.microsoft.com/en-us/azure/api-management/api-management-howto-mutual-certificates-for-clients
Steps to authenticate the request –
- Via Azure portal
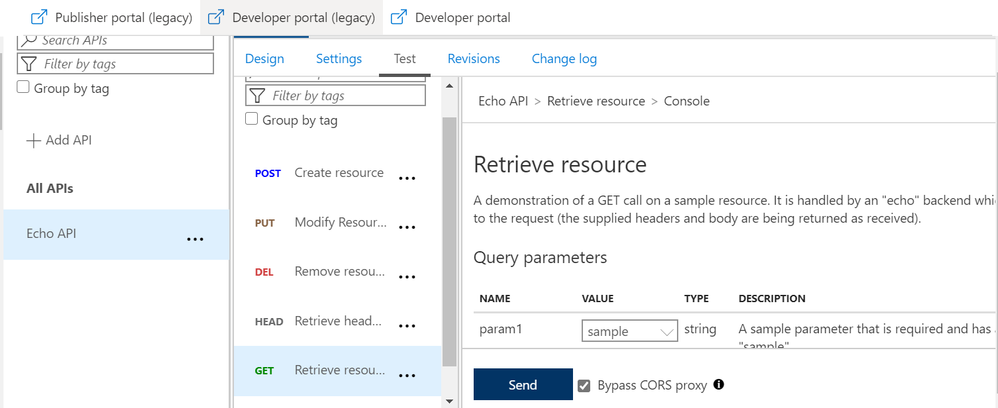
Once we have setup the certificate authentication using the above article, we can test an operation for a sample API (Echo API in this case). Here, we have chosen a GET operation and selected the “Bypass CORS proxy” option.
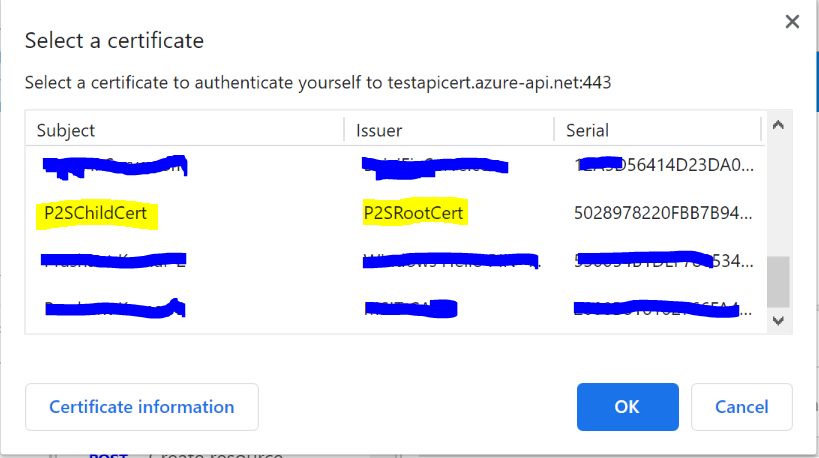
Once you click on the “Send” option, you would be asked to select the certificate that you would have already installed on your machine.

Note – This is the same certificate that you would have uploaded for your APIM service and added to the trusted list in the certificate store of your workstation.
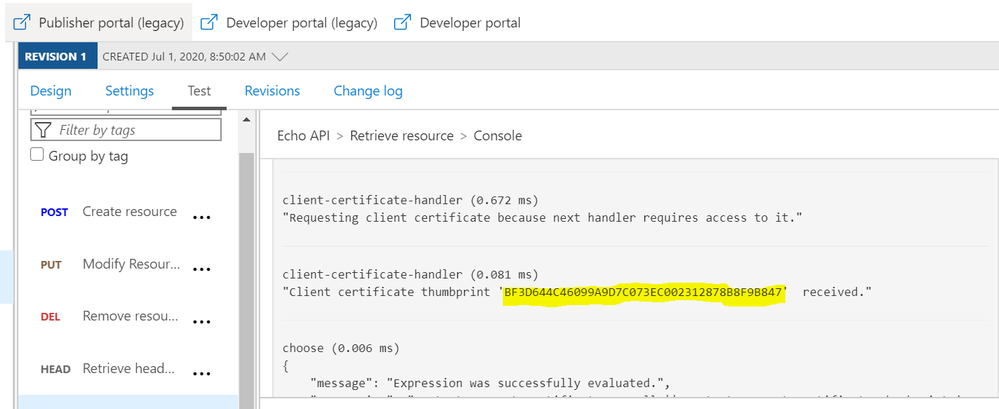
After successful authentication and request processing, you would receive the 200 OK response code. Upon maneuvering to the trace logs, you can also see the certificate thumbprint that was passed for authentication.

The inbound policy definition used for this setup is as below:
(Kindly update the certificate thumbprint with your client certificate thumbprint)
<choose>
<when condition="@(context.Request.Certificate == null || context.Request.Certificate.Thumbprint != "BF3D644C46099A9D7C073EC002312878B8F9B847")">
<return-response>
<set-status code="403" reason="Invalid client certificate" />
</return-response>
</when>
</choose>
- Through C# or any other language that supports SDKs–
We can use the below sample C# code block to authenticate API calls and perform API operations.
Kindly update the below highlighted values with your custom values before executing the sample code attached below
Client certificate Thumbprint: BF3D644C46099A9D7C073EC002312878B8F9B847
Request URL: https://testapicert.azure-api.net/echo/resource?param1=sample
Ocp-Apim-Subscription-Key: 4916bbaf0ab943d9a61e0b6cc21364d2
Sample C# Code:
using System;
using System.IO;
using System.Net;
using System.Security.Cryptography.X509Certificates;

namespace CallRestAPIWithCert
{
    class Program
    {
        static void Main()
        {
            // EDIT THIS TO MATCH YOUR CLIENT CERTIFICATE: the subject key identifier in hexadecimal.
            string thumbprint = "BF3D644C46099A9D7C073EC002312878B8F9B847";
            X509Store store = new X509Store(StoreName.My, StoreLocation.CurrentUser);
            store.Open(OpenFlags.ReadOnly);
            X509Certificate2Collection certificates = store.Certificates.Find(X509FindType.FindByThumbprint, thumbprint, false);
            X509Certificate2 certificate = certificates[0];
            System.Net.ServicePointManager.SecurityProtocol = SecurityProtocolType.Tls12;
            ServicePointManager.ServerCertificateValidationCallback = new System.Net.Security.RemoteCertificateValidationCallback(AcceptAllCertifications);

            HttpWebRequest req = (HttpWebRequest)WebRequest.Create("https://testapicert.azure-api.net/echo/resource?param1=sample");
            req.ClientCertificates.Add(certificate);
            req.Method = WebRequestMethods.Http.Get;
            req.Headers.Add("Ocp-Apim-Subscription-Key", "4916bbaf0ab943d9a61e0b6cc21364d2");
            req.Headers.Add("Ocp-Apim-Trace", "true");
            Console.WriteLine(Program.CallAPIEmployee(req).ToString());
            Console.WriteLine(certificates[0].ToString());

            Console.Read();

        }

        public static string CallAPIEmployee(HttpWebRequest req)
        {
            var httpResponse = (HttpWebResponse)req.GetResponse();
            using (var streamReader = new StreamReader(httpResponse.GetResponseStream()))
            {
                return streamReader.ReadToEnd();
            }
        }

        public static bool AcceptAllCertifications(object sender, X509Certificate certification, X509Chain chain, System.Net.Security.SslPolicyErrors sslPolicyErrors)
        {
            return true;
        }
    }
}
- Through Postman or any other Http Client
To use client certificate for authentication, the certificate has to be added under PostMan first.
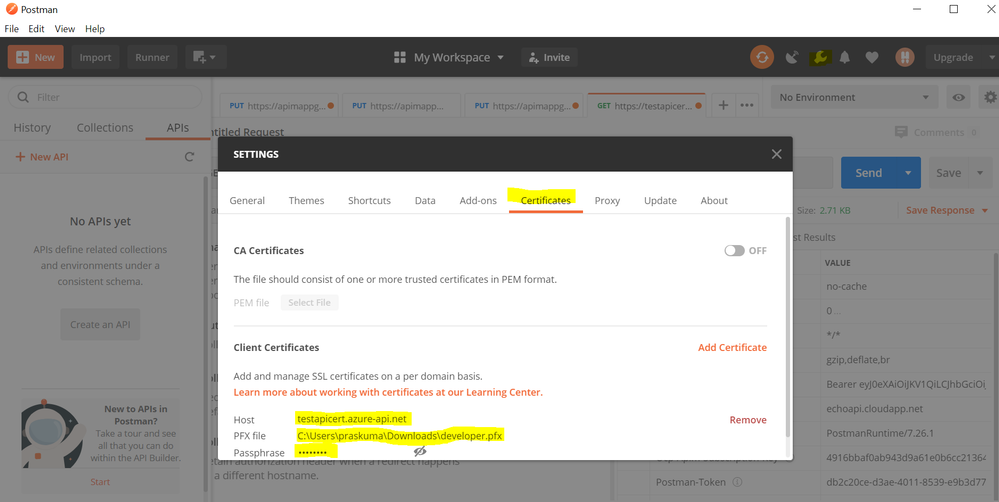
Maneuver to Settings >> Certificates option on PostMan and configure the below values:
Host: testapicert.azure-api.net (## Host name of your Request API)
PFX file: C:UserspraskumaDownloadsabc.pfx (## Upload the same client certificate that was uploaded to APIM instance)
Passphrase: (## Password of the client certificate)
Once the certificate is uploaded on PostMan, you can go ahead and invoke the API operation.
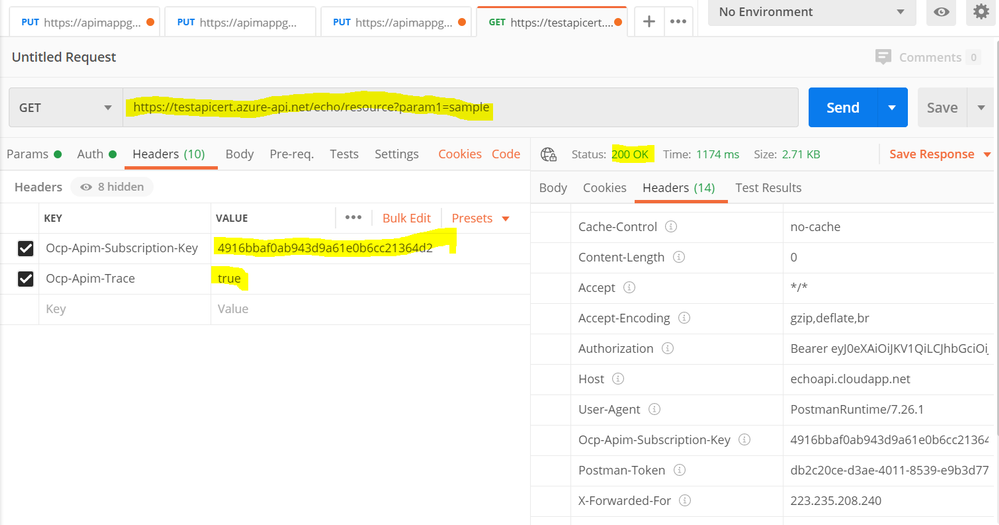
You need to add the Request URL in the address bar and also add the below 2 mandatory headers:
Ocp-Apim-Subscription-Key : 4916bbaf0a43d9a61e0bsssccc21364d2 (##Add your subscription key)
Ocp-Apim-Trace : true
Once updated, you can send the API request and receive a 200 OK response upon successful authentication and request processing.
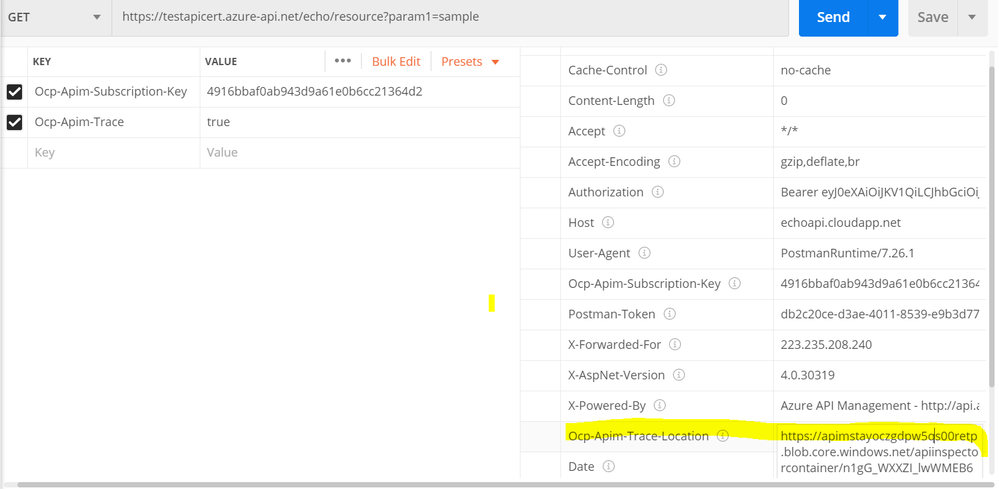
For detailed trace logs, you can check the value for the output header – Ocp-Apim-Trace-Location and retrieve the trace logs from the generated URL.
by Scott Muniz | Jun 30, 2020 | Azure, Microsoft, Technology, Uncategorized
This article is contributed. See the original author and article here.
Azure Migrate now supports assessments for Azure VMware Solution, providing even more options for you to plan your migration to Azure. Azure VMware Solution (AVS) enables you to run VMware natively on Azure. AVS provides a dedicated Software Defined Data Center (SDDC) for your VMware environment on Azure, ensuring you can leverage familiar VMware tools and investments, while modernizing applications overtime with integration to Azure native services. Delivered and operated as a service, your private cloud environment provides all compute, networking, storage, and software required to extend and migrate your on-premises VMware environments to the Azure.
Previously, Azure Migrate tooling provided support for migrating Windows and Linux servers to Azure Virtual Machines, as well as support for database, web application, and virtual desktop scenarios. Now, you can use the migration hub to assess machines for migrating to AVS as well.
With the Azure Migrate: Server Assessment tool, you can analyze readiness, Azure suitability, cost planning, performance-based rightsizing, and application dependencies for migrating to AVS. The AVS assessment feature is currently available in public preview.
This expanded support allows you to get an even more comprehensive assessment of your datacenter. Compare cloud costs between Azure native VMs and AVS to make the best migration decisions for your business. Azure Migrate acts as an intelligent hub, gathering insights throughout the assessment to make suggestions – including tooling recommendations for migrating VM or VMware workloads.
How to Perform an AVS Assessment
You can use all the existing assessment features that Azure Migrate offers for Azure Virtual Machines to perform an AVS assessment. Plan your migration to Azure VMware Solution (AVS) with up to 35K VMware servers in one Azure Migrate project.
- Discovery: Use the Azure Migrate: Server Assessment tool to perform a datacenter discovery, either by downloading the Azure Migrate appliance or by importing inventory data through a CSV upload. You can read more about the import feature here.
- Group servers: Create groups of servers from the list of machines discovered. Here, you can select whether you’re creating a group for an Azure Virtual Machine assessment or AVS assessment. Application dependency analysis features allow you to refine groups based on connections between applications.
- Assessment properties: You can customize the AVS assessments by changing the properties and recomputing the assessment. Select a target location, node type, and RAID level – there are currently three locations available, including East US, West Europe and West US, and more will continue to be added as additional nodes are released.
- Suitability analysis: The assessment gives you a few options for sizing nodes in Azure, between performance-based or as on-premises. It checks AVS support for each of the discovered servers and determines if the server can be migrated as-is to AVS. If there are any issues found, the assessment automatically provides remediation guidance.
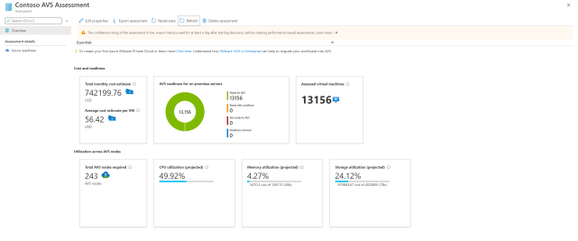
- Assessment and cost planning report: Run the assessment to get a look into how many machines are in use and what estimated monthly and per-machine costs will be in AVS. The assessment also recommends a tool for migrating the machines to AVS. With this, you have all the information you need to plan and execute your AVS migration as efficiently as possible.
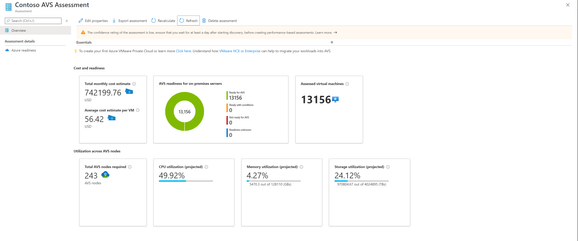
Figure 1 Assessment and Cost Planning Report
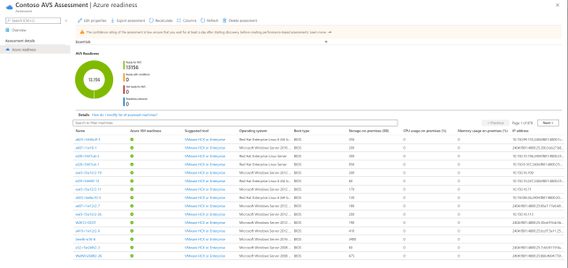
Figure 2 AVS Readiness report with suggested migration tool
Learn More


Recent Comments