by Scott Muniz | Sep 7, 2020 | Uncategorized
This article is contributed. See the original author and article here.
Sometimes our client apps, including browsers, are unable or unwilling to connect to an HTTPS site. A common cause: the certificate presented by the server endpoint fails the validation; the client does not trust the certificate presented by the server. This article is a continuation of http://linqto.me/https.
A bit of context
On 2020 August 19th, the Azure SignalR Service rotated (renewed) the authenticating certificate used by its endpoints. The entire trust chain has changed.
In some situations, the ASRS clients or the hubs could no longer connect to the service, with an error like:
ERROR Failed to connect to 'https://resourceName.service.signalr.net', will retry after the back off period.
Error detail: Unable to connect to the remote server. The remote certificate is invalid according to the validation procedure. Id: <GUID-here>
Of course, the first thought is to check the certificate that the service is presenting.
During the TLS handshake, when the secure channel is established for HTTPS, before any HTTP traffic can take place, the server is presenting its certificate. The server has to authenticate itself. And the client is checking the certificate:
- Is the certificate still valid? Isn’t it expired?
- Is the certificate issued for the domain that the server claims to be? Does the Subject name in the certificate match the site name (host-name) of the endpoint URL?
- Does the client trust the certificate chain? Does it trust the issuing authority or the entity endorsing the certificate authority?
- Was the certificate revoked by its issuing authority?
- Do the cryptographic details match, key and algorithms?
Below, we treat a bit on the third question: trusting the certificate chain. We check certificate identifiers against the Windows certificate store.
Certificate chain
So what’s the certificate’s trust chain? Well, the certificate of a server is issued by an authority that checks somehow the authenticity of that server or service. We call it the Certificate Authority or Issuing Authority. That authority should be trusted. Or we should trust, at least, the authority that is endorsing the Issuing Authority, which we call Root Authority. Sometimes, this chain of certification may be even longer.
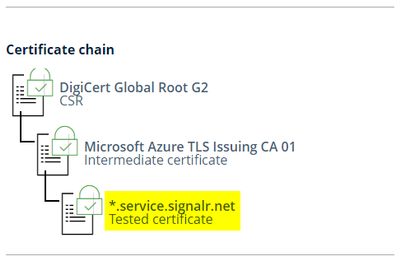
For a public HTTPS endpoint, we could use an online service to check its certificate. For my Azure SignalR Service instance, using the Ionos SSL Checker, I get the following chain:
 A certificate trust chain, from the Root Authority down to authenticated service
We can easily see the entire chain; each entity is identified with its own certificate. Reading from bottom up:
- The certificate of the service, used to authenticate to its clients
- The Issuing Authority, the one that signed and generated the service certificate
- The Root Authority, the one that is endorsing the Issuing Authority to release certificates
There are other SSL certificate test services too online, such as the one from SSLlabs.com. And we can also use a browser or even a network trace (such as with Wireshark) to see a certificate chain.
Identify the certificate
Certificates can be identified with several of their properties. But, to check them in the Windows certificate store easily, we could use:
- Either the Serial number of the certificate,
- Or its Thumbprint, which is the SHA-1 Fingerprint Hash computed from the certificate
The Serial number of the certificate is displayed by most of the SSL checking services. Illustrating with the output of the Ionos SSL Checker:

Most of the browsers allow to see the certificate of an HTTPS site, along with the trust chain. Identifiers can be picked from there too. For instance, using Firefox:


Note: With certificates of Root Authority, the Issuer of the certificate is the authority itself; this is how we tell that this is a Root Authority certificate.
 The certificate Thumprint is a computed Hash, SHA-1
Microsoft browsers, like Edge Chromium, are also displaying certificates in a window that is familiar from the Windows certificate store.
The trust chain can be navigated; we can see each certificate, for each entity in the chain, to check if they are OK:

 Certificate fields as shown by Windows UI
If we can’t use a browser or an online service – maybe because of an internal environment that prevents getting the presented certificate chain this way – we can use a network trace, such as one taken with Wireshark:
Let’s remember that, in TLS negotiation, after Client Hello and Server Hello, the server would present its certificate to authenticate itself to the client.
So, in a network trace, we see the certificates, each with its Serial Number and Issuer information:
 A network trace with Wireshark reveals the server certificate
Checking certificate store
Now that we know the certificate chain, with the identifiers of the certificates, we should check if our client accessing the service trusts the chain.
Microsoft applications and frameworks would use the Microsoft cryptographic API (CAPI), and that includes Microsoft browsers. Other browsers or technologies may use other APIs or crypto libraries for validating certificates. But Windows relies on its certificate store. So, we need to check if an issuing authority or its endorsing authority is trusted: does its certificate appear in the certificate store, in the needed location?
Using certificates console
Using the UI, we open Manage Computer Certificate or Manage User Certificate, depending if the client is a service, like an IIS-hosted Web application, or a desktop application running under a user’s security context.
Opening the certificates console, we check the Trusted/Third-Party Root Certification Authorities or the Intermediate Certification Authorities.
 The hash is used as certificate identifier; same certificate may appear in multiple stores
If we can’t find a valid entity’s certificate there, then perhaps we should install it. Luckily, this is done simply opening and importing the CER file of an authority. In some cases, a PFX container file has inside certificates and keys; it is common that entire certificate chains are included in the PFX container – importing the PFX may install all the contained certificates, including those of issuing or endorsing authorities.
Using PowerShell
The Windows certificate repository is using the certificate computed SHA-1 Fingerprint/Hash, or Thumbprint, as certificate identifier. This can be seen when we look into the Registry location where Windows is persisting the certificates:
ComputerHKEY_LOCAL_MACHINESOFTWAREMicrosoftSystemCertificates
But the certificates can also be searched by their Serial Number. Look:
After opening a PowerShell console, go to the certificate repository root:
cd cert:
Recursively search for the certificate…
… either by its Serial Number:
Get-ChildItem -Recurse | Where-Object {$_.SerialNumber -eq "033af1e6a711a9a0bb2864b11d09fae5"}
… or by its computed Hash, or Thumbprint, used as Path (or item name) in the Windows certificate store:
Get-ChildItem -Path "df3c24f9bfd666761b268073fe06d1cc8d4f82a4" -Recurse
For example, I get:
   PSParentPath: Microsoft.PowerShell.SecurityCertificate::CurrentUserRoot
Thumbprint                                Subject
DF3C24F9BFD666761B268073FE06D1CC8D4F82A4  CN=DigiCert Global Root G2, OU=www.digicert.com, O=DigiCert Inc, C=US

   PSParentPath: Microsoft.PowerShell.SecurityCertificate::CurrentUserAuthRoot
Thumbprint                                Subject
DF3C24F9BFD666761B268073FE06D1CC8D4F82A4  CN=DigiCert Global Root G2, OU=www.digicert.com, O=DigiCert Inc, C=US

   PSParentPath: Microsoft.PowerShell.SecurityCertificate::LocalMachineRoot
Thumbprint                                Subject
DF3C24F9BFD666761B268073FE06D1CC8D4F82A4  CN=DigiCert Global Root G2, OU=www.digicert.com, O=DigiCert Inc, C=US

   PSParentPath: Microsoft.PowerShell.SecurityCertificate::LocalMachineAuthRoot
Thumbprint                                Subject
DF3C24F9BFD666761B268073FE06D1CC8D4F82A4  CN=DigiCert Global Root G2, OU=www.digicert.com, O=DigiCert Inc, C=US
We could select a certain Store & Folder:
cd .LocalMachineRoot
Get all the properties of a certificate from there, if you need to check other properties too:
Get-ChildItem -Path "df3c24f9bfd666761b268073fe06d1cc8d4f82a4" | Format-List -Property *
Aside: Just in case you are wondering what I use to capture screenshots for illustrating my articles, check out this little ShareX application in Windows Store.
by Scott Muniz | Sep 7, 2020 | Uncategorized
This article is contributed. See the original author and article here.
Azure Security Center offers vulnerability assessment solutions for various resource types (e.g. Virtual Machines, SQL servers and databases and Container Registries). Vulnerability assessment solutions scan your resources periodically and help you monitor and remediate health issues on your resources. Security Center provides security recommendations that include all found vulnerabilities, along with remediation steps, and are updated with each scan when any new vulnerability is found. Each vulnerability is a security finding, and all security findings are available in the Security Center Portal under the related recommendation.
Using continuous export you can export these security findings in real-time (with every periodic scan of your resources) to Event Hub or Log Analytics workspace, for further analysis or integration with external workflows.
Implementation
To enable continuous export for security findings, follow the steps below:
- In the Azure Portal go to ‘Security Center’.
- Click on Pricing & settings.
- Select the desired subscription.
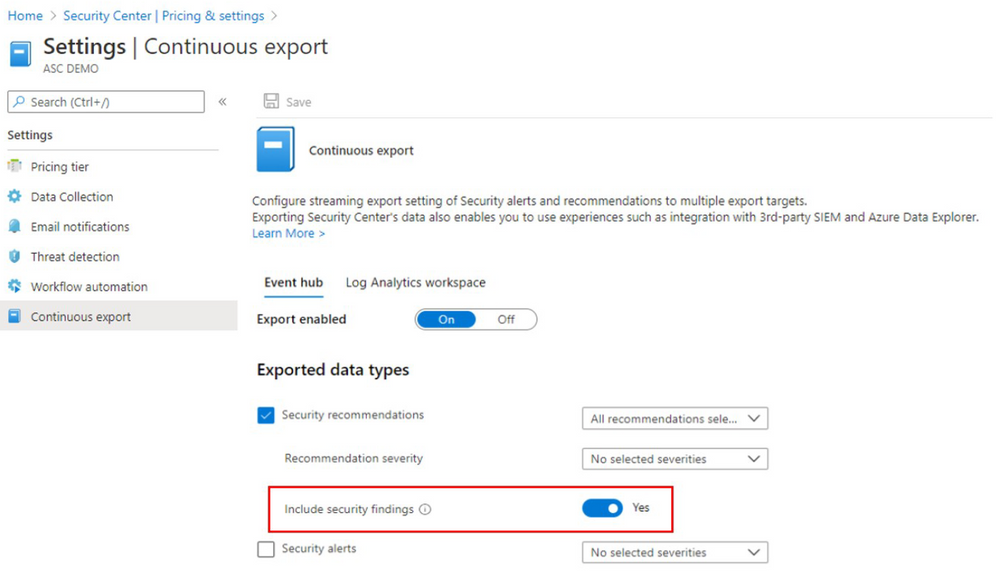
- Click on Continuous export.
- Enable export of security recommendations. Make sure that the recommendations you would like to export security findings for are selected in the recommendations drop down menu.
- Choose the Resource Group in which the automation resource will be created.
- Fill in the details of your export destination (Event Hub/Log Analytics workspace).
- Click on the Include security findings toggle to enable export of the security findings.
- Click Save.

Please note that to receive security findings on your resources, you should first install the vulnerability assessment solution on the relevant resources.
Data schemas
For export to Event Hub, the data schema is in line with the Sub Assessments API. When exporting the data to Log Analytics workspace the data will be exported to SecurityNestedRecommendation table, in the following schema:

Please note that the data is exported as one line per vulnerability per resource.
Common queries for Log Analytics workspace
When consuming security findings data through Log Analytics workspace, you might like to further analyze the data. Below are common queries for different vulnerability assessment solutions, follow the steps below to use them:
- In Azure Portal, navigate to the Log Analytics workspace to which you enabled continuous export.
- Click on Logs.
- Copy and paste a query from the samples described below.
- Set the desired Time range.
- Click Run.
Sample queries
Join security findings with security recommendations table:
SecurityNestedRecommendation
| extend RecommendationId=ParentRecommendationId, SubscriptionId=RecommendationSubscriptionId
| join kind=inner (
SecurityRecommendation
| extend SubscriptionId= extract(@”/subscriptions/(.+)/resourceGroup”,1,AssessedResourceId))
on SubscriptionId, RecommendationId
Extract server name and database name for SQL recommendation Vulnerability Assessment findings on your SQL databases should be remediated:
SecurityNestedRecommendation
| where ParentRecommendationId == “82e20e14-edc5-4373-bfc4-f13121257c37” //Vulnerability Assessment findings on your SQL databases should be remediated
| extend ServerName = extract(@”/servers/(.+)/databases”, 1, AssessedResourceId)
| extend DatabaseName = extract(@”(.+)/(.+)”, 2, AssessedResourceId)
Extract computer name for VM recommendation Vulnerabilities in your virtual machines should be remediated:
SecurityNestedRecommendation
| where ParentRecommendationId == “1195afff-c881-495e-9bc5-1486211ae03f” //Vulnerabilities in your virtual machines should be remediated
| extend VMName = extract(@”(.+)/(.+)”, 2, AssessedResourceId)
Extract registry resource Id, repository and image digest for Containers recommendation Vulnerabilities in Azure Container Registry images should be remediated (powered by Qualys):
SecurityNestedRecommendation
| where ParentRecommendationId == “dbd0cb49-b563-45e7-9724-889e799fa648″//Vulnerabilities in Azure Container Registry images should be remediated (powered by Qualys)
| extend RegistryResourceId = extract(@”/registries/(.+)/repositories”, 1, AssessedResourceId)
| extend Repository = tostring(AdditionalData.RepositoryName)
| extend ImageDigest = tostring(AdditionalData.ImageDigest)
Container Registry image vulnerability assessment results per scan, for Containers recommendation Vulnerabilities in Azure Container Registry images should be remediated (powered by Qualys):
SecurityNestedRecommendation
| where ParentRecommendationId == “dbd0cb49-b563-45e7-9724-889e799fa648″//Vulnerabilities in Azure Container Registry images should be remediated (powered by Qualys)
| extend RegistryResourceId = extract(@”/registries/(.+)/repositories”, 1, AssessedResourceId)
| extend Repository = tostring(AdditionalData.RepositoryName)
| extend ImageDigest = tostring(AdditionalData.ImageDigest)
| extend ScanStatus = RecommendationState
| extend ScanTime = TimeGenerated
| summarize scanFindingSeverityCount = count() by RecommendationSeverity, RegistryResourceId, Repository, ImageDigest, ScanStatus, ScanTime
| summarize severitySummary = make_bag(pack(RecommendationSeverity, scanFindingSeverityCount)) by RegistryResourceId, Repository, ImageDigest, ScanStatus, ScanTime
| order by RegistryResourceId, Repository, ImageDigest,ScanTime
Export to CSV file
You might like to export the results to CSV file for further analysis and tracking. Follow the steps below to do that:
- Click on Export.
- Choose the appropriate export type.

To learn more about Continuous Export, make sure to watch Episode 5 of Azure Security Center in the Field where we give more insights on this feature.
Reviewers
Yuri Diogenes, Principal Program Manager (@Yuri Diogenes)
Sulaiman Abu Rashed, Software Engineer
Miri Kreitenberger, Senior Software Engineer Manager
Meital Taran- Gutman, Principal PM Manager (@Meital Taran- Gutman)
Special Thanks to Maya Herskovic, Senior Program Manager
by Scott Muniz | Sep 7, 2020 | Uncategorized
This article is contributed. See the original author and article here.
Introduction
This is John Barbare and I am a Sr Customer Engineer at Microsoft focusing on all things in the Cybersecurity space. In this blog I will focus on a future release of Microsoft Defender Application Guard for Office available in limited preview for Windows 10 20H2. Windows 10 20H2 is now available for commercial customers to begin feature exploration and validation prior to being released for general availability. For the last several months I have tested and demoed multiple new features in Windows 10 20H1 as I was on Microsoft’s Elite Program before it became limited availability. One can access Windows 10 20H2 through normal channels, including Windows Update, Windows Server Update Services (WSUS), and Azure Marketplace. If you want to test out in a lab environment or proof of concept, you can also download the .iso file located here.
My interest in Microsoft Defender Application Guard came from demoing and then deploying to several large clients last year due to a high interest of attackers developing new techniques to breach large scale networks and compromising workstations. With phishing schemes remaining one of the top ways to dupe users into social engineering attacks, Microsoft Defender Application Guard is engineered and designed to proactively prevent multiple types of attacks. When Microsoft extended Microsoft Defender Application Guard for Office, it further decreased the overall attack surface reduction while also increasing employee’s productivity. Before we go into the features of Microsoft Defender Application Guard for Office, I will go over a brief introduction to Microsoft Defender Application Guard if one is not familiar.
Prerequisites for Microsoft Defender Application Guard
Hardware Requirements
- A 64-bit computer with a minimum of 4 cores (logical processors) is required for hypervisor and virtualization-based security (VBS). For more info about Hyper-V, see Hyper-V on Windows Server 2016 or Introduction to Hyper-V on Windows 10. For more info about hypervisors, see Hypervisor Specifications
- CPU virtualization extensions – Extended page tables, also called Second Level Address Translation (SLAT) and one of the following virtualization extensions for VBS: VT-x (Intel) or AMD-V
- Minimum 8GB RAM
- 5 GB free space, solid state disk (SSD) recommended for hard disk space
Software requirements
- Operating system – Windows 10 Enterprise edition, version 1709 or higher
Windows 10 Professional edition, version 1803 or higher
Windows 10 Professional for Workstations edition, version 1803 or higher
Windows 10 Professional Education edition version 1803 or higher
Windows 10 Education edition, version 1903 or higher
- Browser – Any variant of Microsoft Edge and Internet Explorer
Microsoft Defender Application Guard Brief Overview
Microsoft Defender Microsoft Defender Application Guard is a hardware Isolation leveraging a Hyper-V enabled container. The container uses a lightweight Virtual Machine (VM) that is resistant to kernel attacks and runs on a separate kernel from the host. There are two types of modes – Enterprise Management Mode and Standalone Mode. In Enterprise Management Mode, the administrator defines trusted sites through GPOs, Microsoft Intune, Microsoft Endpoint Configuration Manager, or your current mobile device management solution. Untrusted sites launch in the isolated Hyper-V container giving the user a malicious free browsing session.
Microsoft Defender Application Guard was created to target the following types of systems:
- Enterprise Desktops and Laptops -Domain-joined and managed by your organization.
- Bring your own device – Personally-owned laptops are not domain-joined, but are managed by your organization through tools, such as Microsoft Intune.
- Personal devices – Personally-owned desktops or mobile laptops are not domain-joined or managed by an organization. The user is an admin on the device and uses a high-bandwidth wireless personal network while at home or a comparable public network while outside.
In Standalone Mode, users can use hardware-isolated browsing sessions without any administrator or management policy configuration. In this mode, you must install Microsoft Defender Application Guard and then the user must manually start Microsoft Defender Application Guard while browsing trusted/untrusted sites. I normally do not recommend Standalone Mode to clients as it lets the user decide if they want to use a Microsoft Defender Application Guard session or to not use. Then the user can allow any action (good or bad) which might result in malicious behavior.
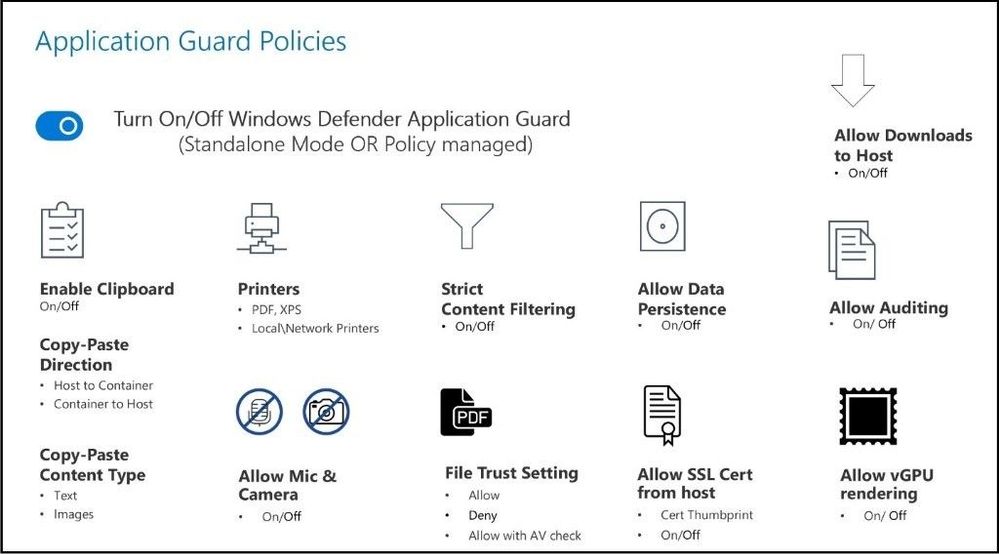
The following is a diagram of controls that are configurable for Microsoft Defender Application Guard sessions:
 AppGuard Policies
If an employee goes to an untrusted site, Microsoft Edge opens the site in an isolated Hyper-V-enabled container, which is separate from the host operating system. This container isolation means that if the untrusted site turns out to be malicious, the host PC is protected and the attacker cannot break out of the container or gain access to the local machine. The container is left running and until sign off or reboots the container is running in the background. For example, this approach makes the isolated container anonymous, so an attacker cannot get to your employee’s enterprise credentials or other sensitive information. Capabilities have also been extended for Application Guard for Google Chrome and Mozilla Firefox with browser side extensions as of this publication for users that chose other browsers.
Microsoft Defender Application Guard for Office
As stated previously, multiple files, phishing attacks, and malicious content from the internet pose a threat to users. Various other attack vectors, which include potentially unsafe locations, can contain viruses, worms, or other kinds of malware that can harm your computer and/or sensitive data. Microsoft Defender Application Guard steps in and gives you a second barrier to help protect you against these attacks. Microsoft Office will open files from potentially unsafe locations in Microsoft Defender Application Guard, a secure container, that is isolated from the device through hardware-based virtualization. When Microsoft Office opens files in Microsoft Defender Application Guard, a user can then securely read, edit, print, and save the files without having to re-open files outside of the container.
The settings for Microsoft Defender Application Guard for Office have additional controls you can set as depicted below. Office files supported include Excel for Microsoft 365, Word for Microsoft 365, and PowerPoint for Microsoft 365.
 AppGuard Policies for Office
Depending on if you set your configurations for the user to change the settings after opening the file or if you block the user with no privileges, one can see the difference in each Office file as seen in the image below.
 Different views per setting
If your administrator has enabled Safe Documents, the file will be verified against the Microsoft Defender Advanced Threat Protection service to determine if it is malicious before it is opened outside Microsoft Defender Application Guard.
Office will automatically use Microsoft Defender Application Guard to isolate untrusted documents under the following conditions:
- Microsoft Defender Application Guard is enabled in Windows. This can be enabled by either an administrator deploying policy or the user.
- The user is using Microsoft 365 Apps for enterprise client.
- The user signed into Office is licensed for Microsoft Defender Application Guard. Microsoft Defender Application Guard for Office will require either a Microsoft 365 E5 or Microsoft 365 E5 Security license.
If any of these conditions are not met, Office will use Protected View to isolate untrusted documents.
Files that are currently open in Protected View will open in Microsoft Defender Application Guard. These include:
- Files originating from the internet: This refers to files that are downloaded from domains that are not part of either the local intranet or a Trusted Sites domain on your device.
- Files that are located in potentially unsafe locations: This refers to folders on your computer or network that are considered unsafe, such as the Temporary Internet folder or other folders assigned by your administrator.
- Outlook attachments: Attachments in email can come from unreliable or unknown sources, such as someone outside your organization. Sometimes malicious attachments can appear to come from trusted senders or compromised accounts of trusted senders. Always confirm with the sender if you receive an unexpected or suspicious attachment via email.
Walkthrough of Opening an Office File in Microsoft Defender Application Guard
Ill demo using Microsoft Edge Chromium in User Mode on my test machine to show how Microsoft Defender Application Guard for Office will open an Office file. The settings will be slightly different as it will give me more options to choose from, which might be risky in some environments compared to Enterprise Mode.
I will first do a quick search for “Clemson Tigers Football Resume Template” on Bing.com and locate the website that contains the Office file I need. I find the site that contains the file, but as a regular user, I am not sure if the site (or file) has been spoofed, contains malicious content, or an active Ransomware campaign is in the Office file that will lock all the files on my computer. I go ahead and click the URL to open the Office file knowing I will be protected with Microsoft Defender Application Guard for Office.
 Searching for an untrusted Office document to open
When the file opens, it automatically goes into a container in Microsoft Defender Application Guard for Office as you can see from the window below.
 Untrusted Office document opening in AppGuard for Office
Once the file is open on my machine, I can view the document and the icon for Word on the taskbar has the shield inside to show that I am protected by using Microsoft Defender Application Guard for Office.
 Word document in the container
In addition to being able to read the document within the secure container, one can now use features like printing, commenting and review, light editing, and saving, while keeping the untrusted document within the Microsoft Defender Application Guard container.
When you encounter documents from untrusted sources that are not malicious, you can continue to be productive without worrying about putting your device at risk. If you do encounter a document that is malicious, it is safely isolated within Microsoft Defender Application Guard, keeping the rest of your systems safe.
After finishing the template, I will go ahead and save on my machine and the Office file will still be saved in an isolated container in my OneDrive folder. I have my settings configured so I can take it out of the container if I trust the source. For testing purposes, I have it configured like this to show you the different options. Always test all Microsoft Defender Application Guard Office settings in a test environment before implementing in production.
 AppGuard save as options
Next, I will go into my OneDrive and click on the same Office file. Notice it will open again in Microsoft Defender Application Guard for Office.
 Opening back up the Office file
Once the file opens, you can see the Word document opens back up in Microsoft Defender Application Guard for Office as seen in the called-out boxes.
 Office document opening back up in container
If I want to save the file outside the container, I can do so in this mode also. Once I click on the “Remove Protection”, the file is automatically scanned for any types of malicious threats or embedded scripts in Microsoft Defender ATP.
 Removing protection
The file being scanned by Microsoft Defender ATP to be deemed safe before being saved locally.
 Office file being scanned for threats
As one can see, the file has been deemed safe and the file will be saved in the folder of your choice with the necessary permissions.
Testing a Malicious (test) Word Document
To see what a malicious word document will do when trying to take it out of the container, we will download a test Word document that will create malicious executable content though an embedded macro. If your enterprise allows unsigned macros and they happen to be malicious, you will see what happens next. You can download the safe test file from Microsoft’s Attack Surface Reduction Rules test site located here. Once we click on the link and open the file, it automatically opens in Microsoft Defender Application Guard for Office.
 Opening a malicious Office file
When we go to save the file and attempt to take it out of the container (removing the protection), we are prompted with the following screen. I will go ahead and click on remove protection to see the actions that are taken.
 Removing protection
The file is confirmed to remove the protection and then scanned.
 Removing protection confirmation
 Office file being scanned for threats
The file is opened outside the container with a “security warning: macros have been disabled” as it has been determined to have a malicious macro(s) inside the Office document. Once I click on enable content to enable the macro(s), I am further prevented from working or editing the file.
 Security warning that macros have been disabled due to a threat
The file shows me the warning with information about the macro(s) and the Office file will be automatically closed and be prevented from running the malicious content.
 Confirmation of the threat and Office file closing
Conclusion
Thanks for taking the time to read this blog and I hope you had fun reading about the new Microsoft Defender Application Guard for Office. Since Office documents are immensely popular vectors for attacks, this new security feature will assist your enterprise in stopping Office file attacks by keeping them contained. By having this enhanced security feature, it will increase user productivity across your enterprise. Always test and refine these settings with a pilot group of users and devices first, before widely distributing to your organization! This new feature brings together Office, Windows, and Microsoft Defender ATP for an integrated value.
Hope to see you in my next blog and always protect your endpoints!
Thanks for reading and have a great Cybersecurity day!
Follow my Microsoft Security Blogs: http://aka.ms/JohnBarbare
References
Application Guard for Office
Application Guard for Office for Admins
Microsoft Defender Application Guard Overview
by Scott Muniz | Sep 7, 2020 | Uncategorized
This article is contributed. See the original author and article here.
Azure Data Factory will soon add support to Data Flows for “no quote character” in DelimitedText datasets for both source and sink. QuoteChar is the single character to quote column values if the column data contains the column delimiter. The typical scenario is double quotes (“). But with no quote char, it means there is no quote char present and the column value is not quoted, while escapeChar is used to escape the column delimiter and itself.
You can find and set the property in the Delimited Text dataset type.
*** Potential Breaking Change ***
If you currently are using the Delimited Text dataset in a dataflow that has quote char to “No quote char” and escape char set to any character except “No escape char”, this may result in unexpected behavior, depending upon your actual data, as described below.
If the dataset is used in dataflow source, the breaking change will occur only if your column value contains *multiple consecutive escape characters* (default: ); or it contains an escape character following with a column delimiter (default: ,).
E.g.
- If original data has column values with a double escape character, like abcd, the previous behavior will treat it as abcd. But the new behavior will treat it as abcd. Since are translated as escape ‘escape char’ itself.
- If original data has value with an escape character following with a column delimiter like ab,cd, the previous behavior will treat it as ab and cd, two columns. But the new behavior will treat it as ab,cd, one column. Since , are translated as an escape column delimiter.
If the dataset is used in a dataflow sink, the new behavior will occur if your column value contains column delimiters (default: ,); or it contains escape character (default: )
E.g.
- If the original data has column values with a column delimiter like “ab,cd,” the previous behavior will output “ab,cd”. But the new behavior will output “ab,cd”. This is because the column delimiter needs to be escaped.
- If original data has column values with an escape character like abcd, the previous behavior will output abcd. But the new behavior will output abcd. Since escape character needs to be escaped.
Mitigation
- If your pipeline doesn’t face these conditions mentioned above, you can just keep your pipeline as is.
- If your pipeline has breaking changes mentioned above, you can mitigate this by setting the quote char to a character that would not be part of your data values.

by Scott Muniz | Sep 6, 2020 | Uncategorized
This article is contributed. See the original author and article here.
This installment is part of a broader series to keep you up to date with the latest features in Azure Sentinel. These installments will be bite-sized to enable you to easily digest the new content.
Great news! You can now use an in-built connector to connect Microsoft Teams logs to your Azure Sentinel workspace. You may have already been doing this with a custom connector using the Office 365 API but now this functionality is available via an in-built connector in Sentinel.
With collaboration software becoming even more critical with the shift in work patterns that has taken place this year, monitoring these systems has become a priority for many organizations. The information that can be ingested using the Microsoft Teams connector includes details of actions such as file downloads, access requests sent, changes to group events, mailbox operations, Teams events (such as chat, team, member, and channel events), as well as the details of the user who performed the actions.
Connecting Microsoft Teams logs to Azure Sentinel enables you to view and analyze this data in your workbooks, query it to create custom alerts, and incorporate it to improve your investigation process, giving you more insight into your Office 365 security.
How to enable Microsoft Teams log ingestion in Azure Sentinel
- From the Azure Sentinel navigation menu, select Data connectors.

- Select Office 365 from the data connectors gallery, and then select Open Connector Page on the preview pane.

- On the Office 365 connector page, under Configuration select the tick box with Teams (Preview) and click Apply Changes.

And that’s it! You will now have Teams logs from your O365 tenant connected to your Sentinel workspace.
Get Started Today!
Try out the new connector and let us know your feedback using any of the channels listed in the Resources.
You can also contribute new connectors, workbooks, analytics and more in Azure Sentinel. Get started now by joining the Azure Sentinel Threat Hunters GitHub community and follow the guidance.
by Scott Muniz | Sep 6, 2020 | Azure, Technology, Uncategorized
This article is contributed. See the original author and article here.
Throughout this series, I’m going to discuss how Power Platform is particularly useful for ad-hoc basis jobs like provisioning resources on Azure.
In my previous post, we walked through how to install live-streaming related applications to Azure Windows VM while provisioning it. By the way, this type of VM provisioning is required ad-hoc basis, rather than a regular schedule. We create an ARM template for it, but we never know when it is used. The nature of ad-hoc workflows is like this. We may use it again, but we never know when it will be. We may not be ready to run when it needs to be run.
Power Apps is the right fit to handle this sort of running ad-hoc workflows on mobile devices. This post shows a glimpse of an idea how Power Apps and Power Automate handles Azure resource provisioning so that your IT pros in your organisation can create ad-hoc resources without having to get a DevOps engineer.
One Parameter Rules Power Automate Workflow?
The number of parameters from Power Apps is determined by the Power Apps trigger on Power Automate. If the number of parameters or parameter names used in a Power Automate workflow becomes too many, changes often, or is non-deterministic, this approach would be useful.
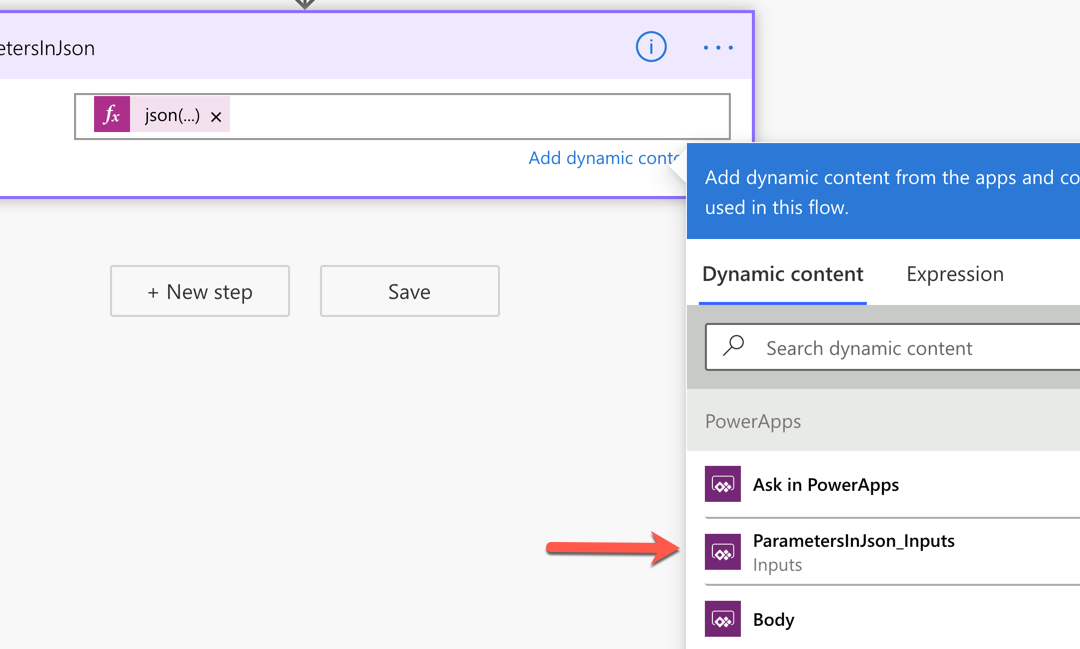
First of all, add a Compose action and change its name to ParametersInJson. Then create a parameter for it, which will be named to ParametersInJson_Inputs.

Add the function expression, json(triggerBody()?['ParametersInJson_Inputs']), to the Inputs field like this:
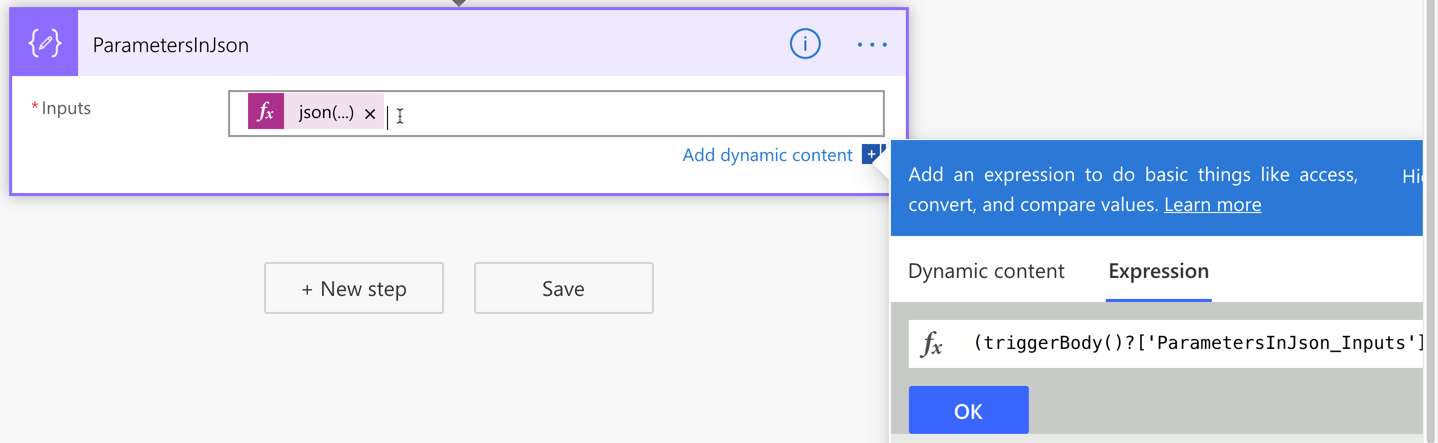
If we handle all the parameters passed from Power Apps in this way, we only have one parameter but take all values passed from Power Apps flexibly. This approach also avoids Power Apps from keeping remove and re-connect Power Automate over and over again whenever the parameters are updated.
Power Automate Workflow – Azure Resource Provisioning
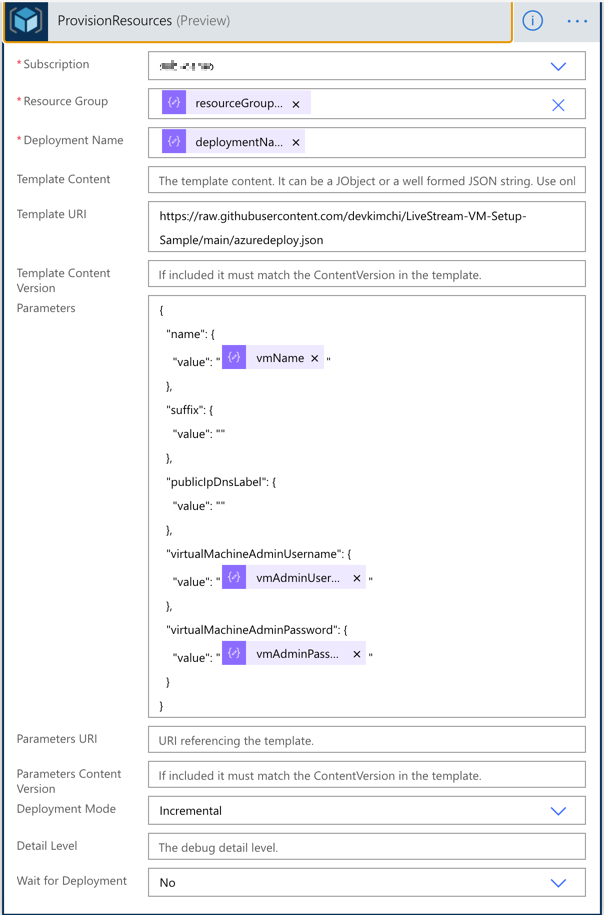
With the flexible parameter passed from Power Apps, run the ARM template deployment using the Azure Resource Manager deployment action. All the parameters used for this action are like:
outputs('ParametersInJson')?['resourceGroupName'],outputs('ParametersInJson')?['deploymentName'],outputs('ParametersInJson')?['vmName'],outputs('ParametersInJson')?['vmAdminUsername'] andoutputs('ParametersInJson')?['vmAdminPassword'].
Also, notice that the Wait for Deployment field value is set to No. I’ll discuss it soon.
Once this action is run, the result should be returned to Power Apps through the Response action. The following screenshot shows how it uses the output of the ARM deployment action with JSON schema.
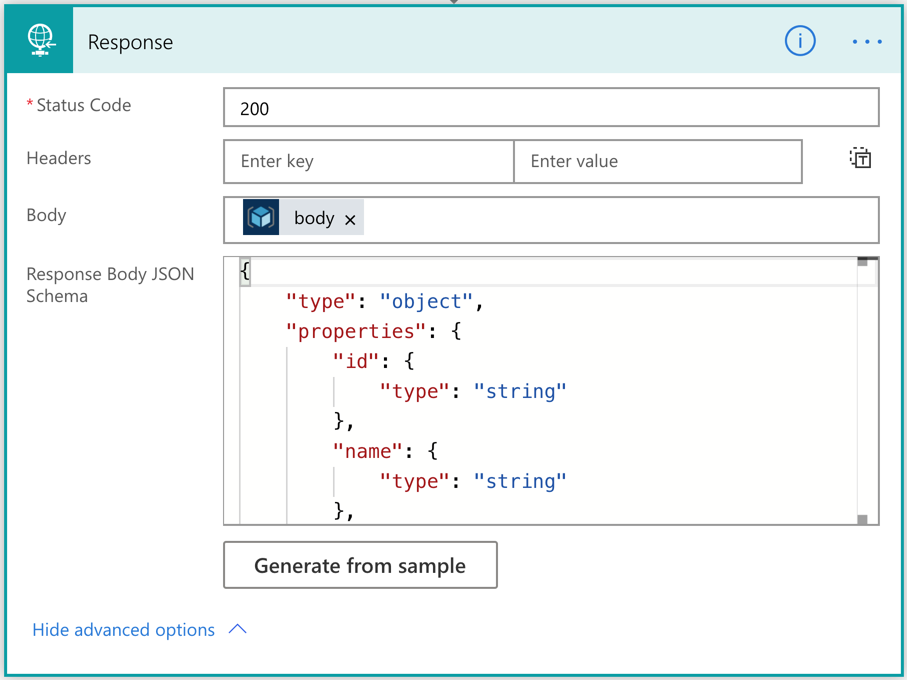
Now, we’ve created the workflow for Azure resource provisioning.
By the way, we need to consider the nature of this action. It takes from 30 seconds to 40 minutes or longer that completes the resource provisioning. As Power Apps can’t wait for it, the workflow should be running asynchronously. Did you remember that the Wait for Deployment field has been set to No in the previous action? The actual response has the status code of 201, not 200, because of this option.
How can we check the result of the resource provisioning? Let’s build another workflow for it.
Power Automate Workflow – Azure Resource Provisioning Status Check
This time, let’s build another workflow that checks the resource provisioning status. It only checks the status. We also use the same approach above to take the parameters from the Power App instance.
And let’s use the action to check the provisioning status. All the relevant variables look like:
outputs('ParametersInJson')?['resourceGroupName'] andoutputs('ParametersInJson')?['deploymentName']
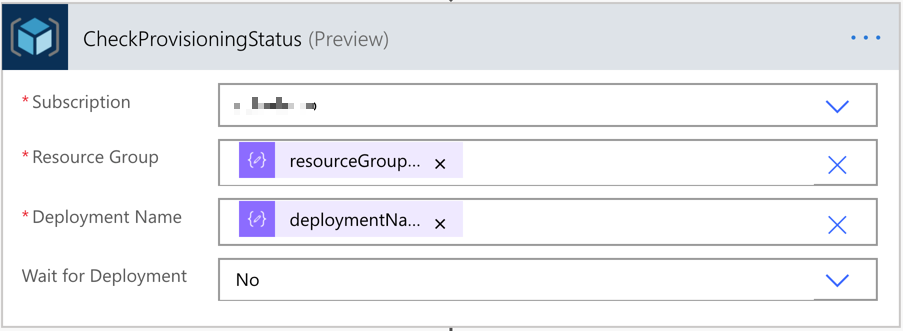
The last action is the Response action that sends the action response back to Power Apps.
We’ve now got two workflows for the resource provisioning. Let’s build the Power Apps now.
Power Apps – Ad-hoc Azure Resource Provisioning
The layout of the app that IT pros in your organisation will use might look like the following. It accepts five parameters from the user, which will be used for both Power Automate workflows. One button starts the resource provisioning, and the other button checks the provisioning status.
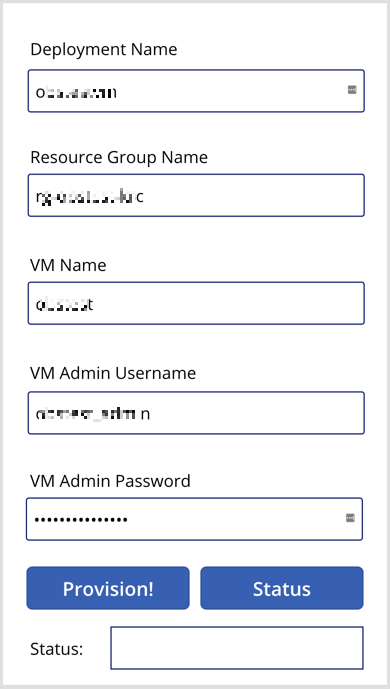
Connect the resource provisioning workflow to the Provision! button and define the button action like below.

Note that we use the Set() function this time. With this function, we create a temporary variable of request and assign the JSON object as its value. Then, the request value is sent to the Power Automate workflow via the CreateResource() function. The request object will be decomposed to a JSON object in the Power Automate workflow. And the response of this function is stored to the result collection, using the ClearCollect() function.
    Set(request, "{ 'deploymentName': '" & DeploymentName.Text & "', 'resourceGroupName': '" & ResourceGroupName.Text & "', 'vmName': '" & VMName.Text & "', 'vmAdminUsername': '" & VMAdminUsername.Text & "', 'vmAdminPassword': '" & VMAdminPassword.Text & "' }");
    ClearCollect(result, CreateResource.Run(request))
As mentioned above, the resource won’t be instantly provisioned as soon as we tap the Provision! button. Therefore, we should use the Status button to check the provisioning status.

Similar to the approach above, we use the Set() function to initialise the status variable and send it to Power Automate through the CheckProvisioningStatus() function. Then the result will be stored to the result collection.
    Set(status, "{ 'deploymentName': '" & DeploymentName.Text & "', 'resourceGroupName': '" & ResourceGroupName.Text & "' }");
    ClearCollect(result, CheckProvisioningStatus.Run(status))
I use the Status button for simplicity. But you can make use of the Timer control for a more meaningful way, which is beyond the discussion of this article.
Finally set the label control to take the result from the workflow like First(result).properties.provisioningState, using the First() function.

We’ve now got the Power App, too! Let’s run the Power App with the actual value.
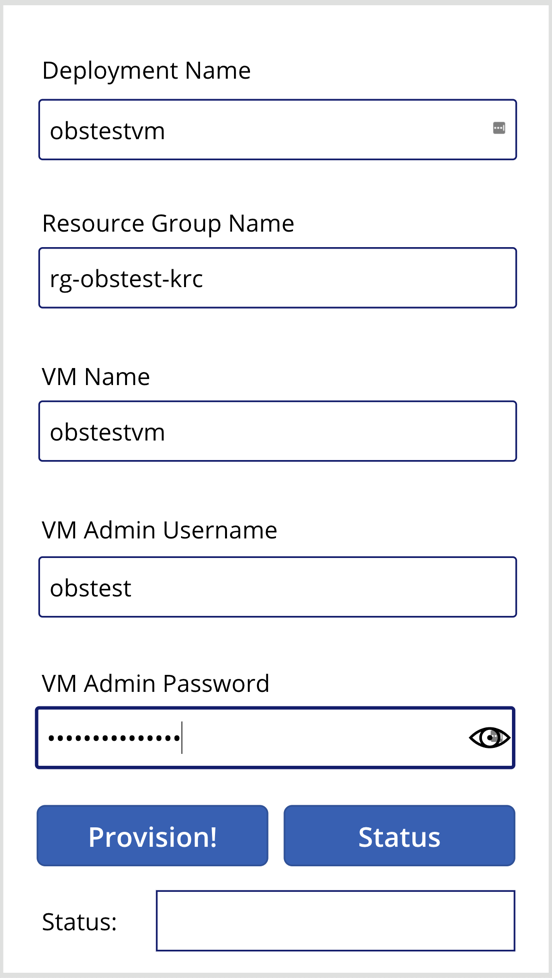
The first response from the provisioning will be like this:

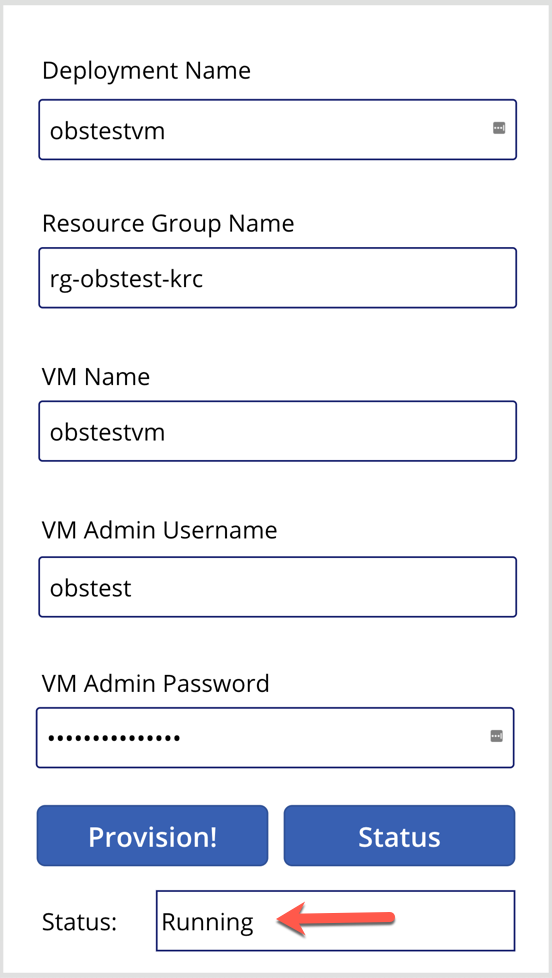
In the middle of the provisioning, the status will look like this:
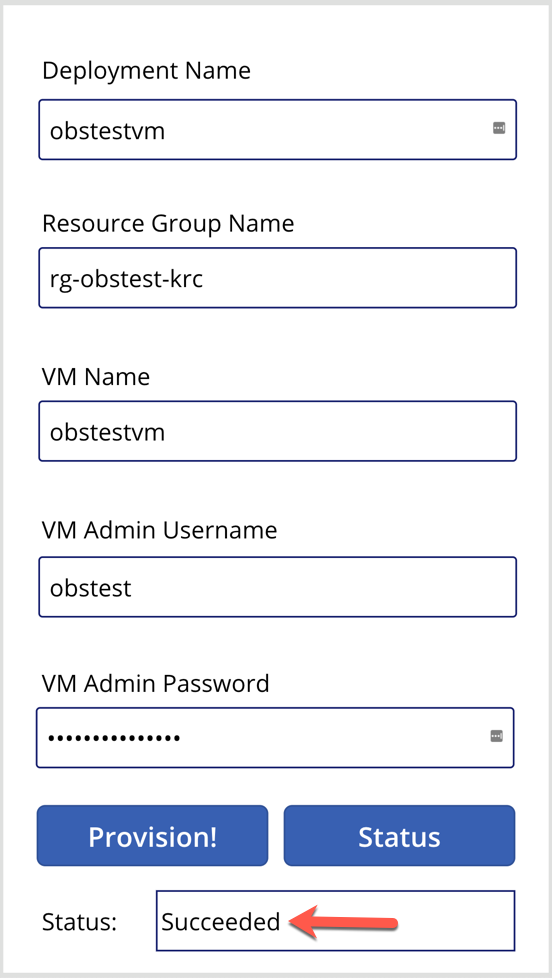
And after the resource provisioning is complete, the status will look like this:
So far, we’ve walked through how we built Power Automate workflows and Power Apps for ad-hoc Azure resource provisioning. We only used one use case here for simplicity, but there are more complex real-world examples with many ad-hoc scenarios in your business domain. If you can materialise those scenarios based on priority and frequency, it will increase productivity for sure.
This article was originally published on Dev Kimchi.

Recent Comments