by Scott Muniz | Sep 15, 2020 | Uncategorized
This article is contributed. See the original author and article here.
Today we are announcing the availability of quarterly servicing cumulative updates for Exchange Server 2016 and 2019. These updates include fixes for customer reported issues as well as all previously released security updates.
A full list of fixes is contained in the KB article for each CU, but we wanted to highlight the following.
Calculator Updates
A few bug fixes are included in this quarterly release of the Exchange Sizing Calculator. The calculator was updated to ensure CPU usage was correctly calculated in some scenarios and an issue in which when the second node was removed in worst case failure scenario, and which resulted in a zero transport DB size when Safety Net was enabled was also resolved.
Surface Hub Teams and Skype Experience
When Exchange Server 2019 CU5 and Exchange Server 2016 CU16 were released we subsequently discovered issues with Surface Hub devices configured with on-premises mailboxes. In those cases if both the Teams and Skype for Business clients were installed side by side, the Surface Hub would pick the incorrect client when joining meetings. The CU’s issued today resolved these issues.
Release Details
The KB articles that describe the fixes in each release and product downloads are available as follows:
Additional Information
Microsoft recommends all customers test the deployment of any update in their lab environment to determine the proper installation process for your production environment. For information on extending the schema and configuring Active Directory, please review the appropriate documentation.
Also, to prevent installation issues you should ensure that the Windows PowerShell Script Execution Policy is set to “Unrestricted” on the server being upgraded or installed. To verify the policy settings, run the Get-ExecutionPolicy cmdlet from PowerShell on the machine being upgraded. If the policies are NOT set to Unrestricted you should use the resolution steps in here to adjust the settings.
Reminder: Customers in hybrid deployments where Exchange is deployed on-premises and in the cloud, or who are using Exchange Online Archiving (EOA) with their on-premises Exchange deployment are required to deploy the currently supported cumulative update for the product version in use, e.g., 2013 Cumulative Update 23; 2016 Cumulative Update 18 or 17; 2019 Cumulative Update 7 or 6.
For the latest information on the Exchange Server and product announcements please see What’s New in Exchange Server and Exchange Server Release Notes.
Note: Documentation may not be fully available at the time this post is published.
The Exchange Team

by Scott Muniz | Sep 15, 2020 | Uncategorized
This article is contributed. See the original author and article here.
 Microsoft Ignite 2020
We’re a week away from Microsoft Ignite 2020 and this year’s event will be a free 48-hour all-digital experience. If you have not registered yet, secure your spot today and browse the session catalog to build your personalized schedule.
Here’s a quick rundown of sessions to get you started if you’re looking to learn more about Planner, Tasks in Teams, and other task management capabilities across Microsoft 365.
Keg Segment
The Future of Work by Jared Spataro
When, where, and how we work is fundamentally changing. Microsoft is in a unique position to understand the secular trends that are reshaping the future of work today, and for decades to come. Learn about the risks and durable trends impacting teamwork, organizational productivity, and employee wellbeing. Jared Spataro, CVP of Modern Work, will share the latest research and a framework for success for every IT professional and business leader to empower People for the new world of work, as well as the latest innovation in Microsoft 365 and Teams empowering human ingenuity at scale.
Tuesday, September 22 | 10:00 AM – 10:20 AM PDT
Tuesday, September 22 | 6:00 PM – 6:20 PM PDT
Wednesday, September 23 | 2:00 AM – 2:20 AM PDT
Digital Breakout
DB136 | Embrace a New Way of Work with Microsoft 365 by Angela Byers and Shin-Yi Lim with Ed Kopp (Rockwell Automation) and Magnus Lidström (Scania)
In an unprecedented time of workplace transformation, opportunities to thrive belong to those who embrace and adapt to the new normal. How do we collaborate remotely, stay connected and produce excellent work as a team? How do we stay productive while working from home? Join us for a new way to think about and manage work with Microsoft 365. Learn how Microsoft 365 makes it easier for your team to organize, share and track work all in one place – so you save time and accomplish more together.
Wednesday, September 23 | 12:15 PM – 12:45 PM PDT
Wednesday, September 23 | 8:15 PM – 8:45 PM PDT
Thursday, September 24 | 4:15 AM – 4:45 AM PDT
Ask the Experts
ATE-DB136 | Ask the Experts: Embrace a New Way of Work with Microsoft 365
Wednesday, September 23 | 9:00 PM – 9:30 PM PDT
Thursday, September 24 | 5:00 AM – 5:30 AM PDT
Pre-Recorded for On Demand
OD258 | Enable Business Continuity for your Firstline Workforce with Microsoft Teams by Scott Morrison and Zoe Hawtof
As organizations continue to adjust their operations and workforce to maintain business continuity, new capabilities in Microsoft Teams help Firstline workers stay focused on meeting customer needs. This session will focus on Shifts, Tasks and core communication along with Walkie Talkie capabilities to create a secure and centralized user experience that saves you time and money.
OD260 | Office Apps and Teams: Enabling virtual collaboration for the future of our hybrid work environment by Shalendra Chhabra
Connecting our solutions in a way that helps you stay productive and saves you time and effort is a priority to us. Our modern Office apps including Microsoft Teams as your hub for teamwork, and Outlook for direct communications and time management – we continue to create connected experiences to simplify how you stay organized and get things done. Learn how to manage your time more efficiently in your hybrid work environment by leveraging our collaboration capabilities.
Skilling Videos
Check out more content and resources in the Virtual Hub and Microsoft Tech Community Video Hub – all links will be live when Ignite officially kicks off.
Get more done with Microsoft Planner by Si Meng
Microsoft Planner gives teams an intuitive, collaborative, and visual task management experience for getting work done. Whether you’re new to Planner or consider yourself an expert, learn how to use Planner and find out more about recent new enhancements. We’ll also share the latest Planner integrations with Microsoft 365 applications, including the new Tasks app in Microsoft Teams.
Managing task capabilities across Microsoft 365 by Holly Pollock
Find out how task management across Microsoft 365 helps you find your tasks where you need them, regardless of where you captured them. In this session, we’ll share the latest integrations of tasks from Teams, Outlook, To Do, Planner, Office documents, Cortana and more.
Automate your Planner tasks workflow by Jackie Duong
Learn how to use Microsoft Power Automate to customize your Microsoft Planner tasks workflow for your organization.
Transform change management by syncing Message Center posts to Planner by Paolo Ciccu
A lot of actionable information about changes to Microsoft 365 services arrives in the Microsoft 365 message center. It can be hard to keep track of which changes require tasks to be done, when, and by whom, and to track each task to completion. You also might want to make a note of something and tag it to check on later. You can do these things and more when you sync your messages from the Microsoft 365 admin center to Microsoft Planner. Learn more about the new feature that can automatically create tasks based on your message center posts. Demo showing newly added message center feature where one can automatically create tasks in planner based on their message center posts.
Cortana – what’s new and what’s next for your personal productivity assistant in Microsoft 365 by Malavika Rewari, Saurabh Choudhury, Srikanth Sridhar, and A.J. Brush
Discover new ways to get time back on your busy schedule and focus on what matters with Cortana, now a natural part of Microsoft 365. From staying connected hands-free with voice assistance in Microsoft Teams and Outlook mobile to preparing for the day’s meetings with your personalized briefing email to finding what you need fast using natural language in Windows 10 – learn what’s possible with Cortana as well as what’s coming next.
Digitize and transform business processes with no-code building blocks and app templates in Teams by Weston Lander and Aditya Challapally
Organizations are already transforming many of their business processes on Teams – from approvals and task management, all the way to crowd sourcing the organization for top ideas. Learn how to use embedded building blocks and production-ready app templates to digitize and streamline key processes. In this session we’ll share how customers are leveraging these solutions without any custom development required, as well as how some recent innovations can help simplify these processes
Post-Ignite Expert Connections
If you like engaging in conversation with Microsoft product experts and peers, come join us after this year’s Ignite digital experience starting on September 24, 2020 through October 2020. Sign up here and choose from over 200 topics – and we would like to highlight two topics from the Planner team:
Using Microsoft Planner to better manage work remotely
How has your team adopted Planner during remote work? Tell us about your experience and what could help your team manage work more efficiently.
Task management: Plan your work
We’re curious to know how users typically manage their tasks and plan out their workday, work week, and workload. Join us to discuss topics like how you manage personal tasks in addition to group tasks, the importance of keeping tasks in one location, etc.
See you at Ignite on September 22-24, 2020 and follow the #MSIgnite action on Twitter: @MS_Ignite, @MSTCommunity, @MSFTMechanics. Be sure to check back here on this blog for the latest product updates and news.
******
“Tasks in Microsoft Teams” – The Intrazone podcast
In case you missed it, several members from our team sat down with the hosts of The Intrazone, a biweekly podcast series, to talk about Tasks in Teams and our journey on connecting task experiences across Microsoft 365. You can listen to that conversation below.
by Scott Muniz | Sep 15, 2020 | Azure, Technology, Uncategorized
This article is contributed. See the original author and article here.
One of the main SIEM use cases is incident management. Azure Sentinel Offers robust features that help the analyst to manage the life cycle of security incidents, including:
- Alert grouping and fusion
- Incident triaging and management
- An interactive investigation experience
- Orchestration and response using Logic Apps
In our customer engagements we learned that in some cases our customers need to maintain incidents in their existing ticketing (ITSM) system and use it as a single pane of glass for all the security incidents across the organization. One critical request that raises is the need for a bi-directional sync of Azure sentinel incidents.
This means, for example, that if a security incident is created in Azure Sentinel, it needs to be created in the ITSM system as well, and if this ticket is closed in the ITSM system, this should be reflected in Azure sentinel.
In this article, I demonstrate how to use Azure sentinel SOAR capability and ServiceNow (SNOW) Business Rules feature to implement this bi-directional incident sync between the two.
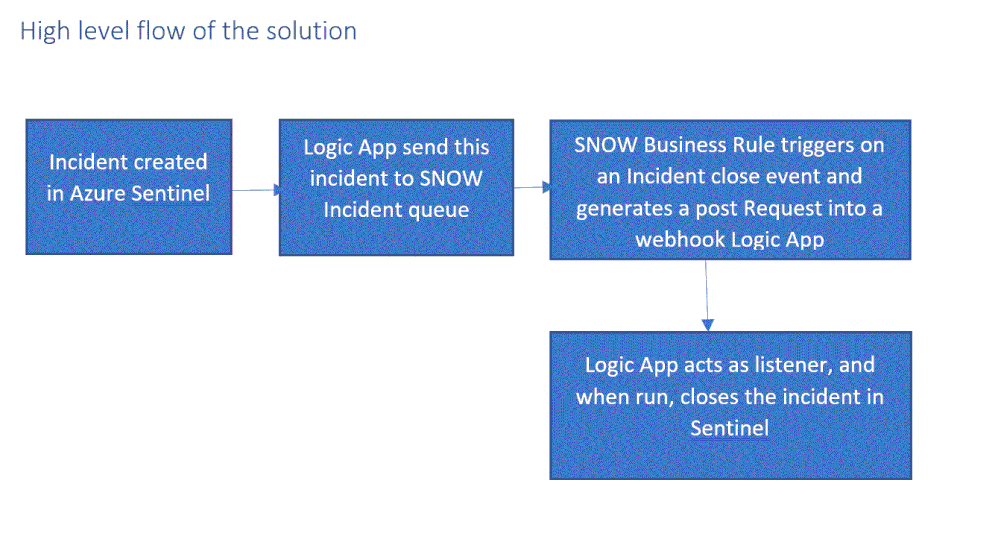
High level flow of the solution

Send an Azure Sentinel incident into ServiceNow incident queue
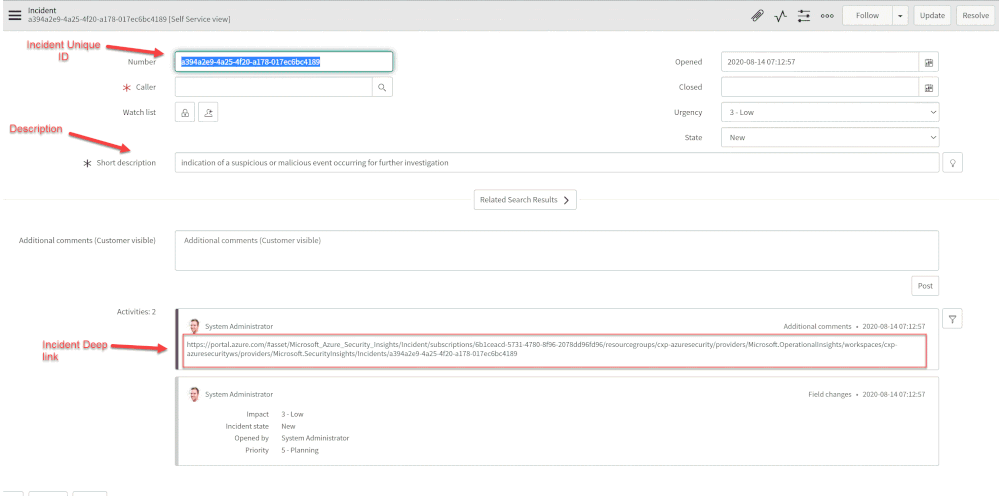
The playbook, available here and presented below, works as follows:
- Triggers automatically on a new Alert.
- Gets relevant properties from the Incident.
- Populates the workspace name variable.
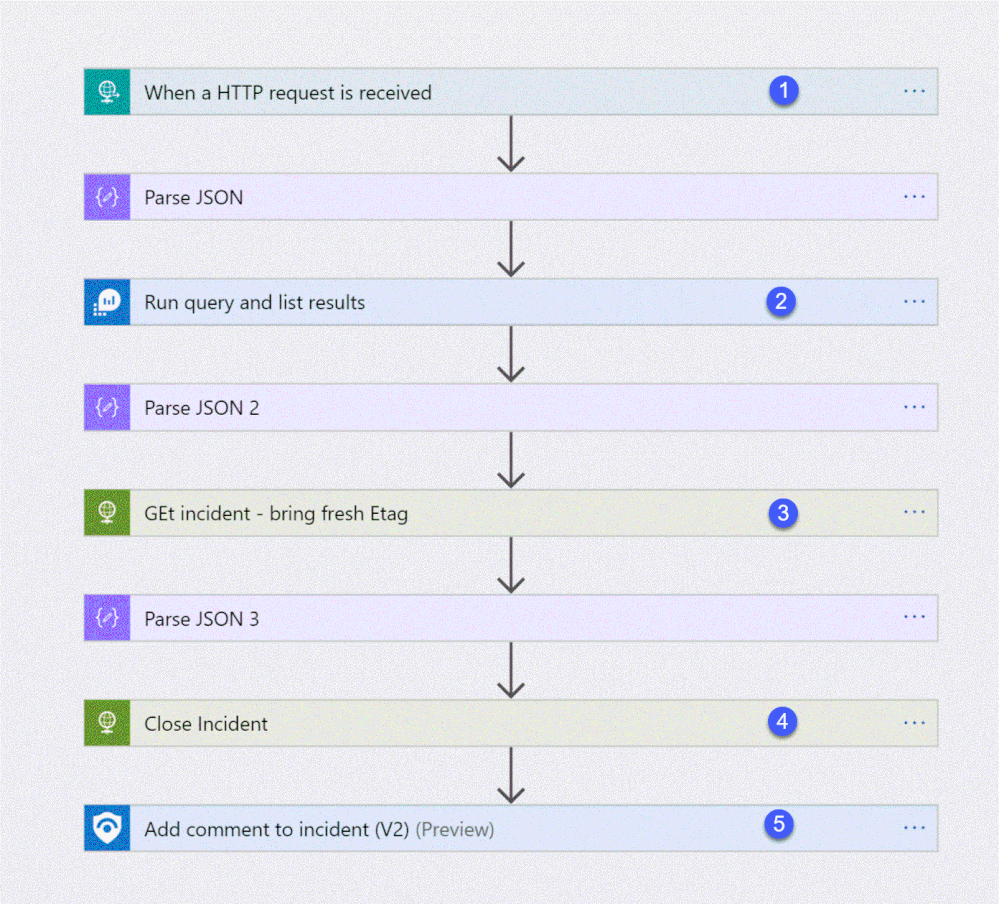
- Creates a record of incident type in ServiceNow and populate the Azure Sentinel Incident properties into the SNOW incident record using the following mapping:
|
ServiceNow
|
Sentinel
|
|
Number
|
Incident Unique ID
|
|
Short Description
|
Description
|
|
Severity
|
Severity
|
|
Additional comment
|
Incident Deep link
|
Deploying the solution
- Deploy the above Logic APP
- Attached this logic app to every analytics rule that you want to sync to ServiceNow
by selecting it on the automated response section. (currently you need to run this process for each analytics rule that you want to sync)

Once an analytics rule generates a new incident, a new incident will pop-up on the ServiceNow incident Page.
Close Sentinel Incident When it closed in ServiceNow.
Closing the incident in Azure Sentinel when it is closed in ServiceNow requires two components:
- A Business Rule in ServiceNow that run custom JS code when the incident is closed.
- A Logic App in Azure Sentinel that waits to the Business Rule POST request.
Step 1: Deploy the Logic App on Azure Sentinel.
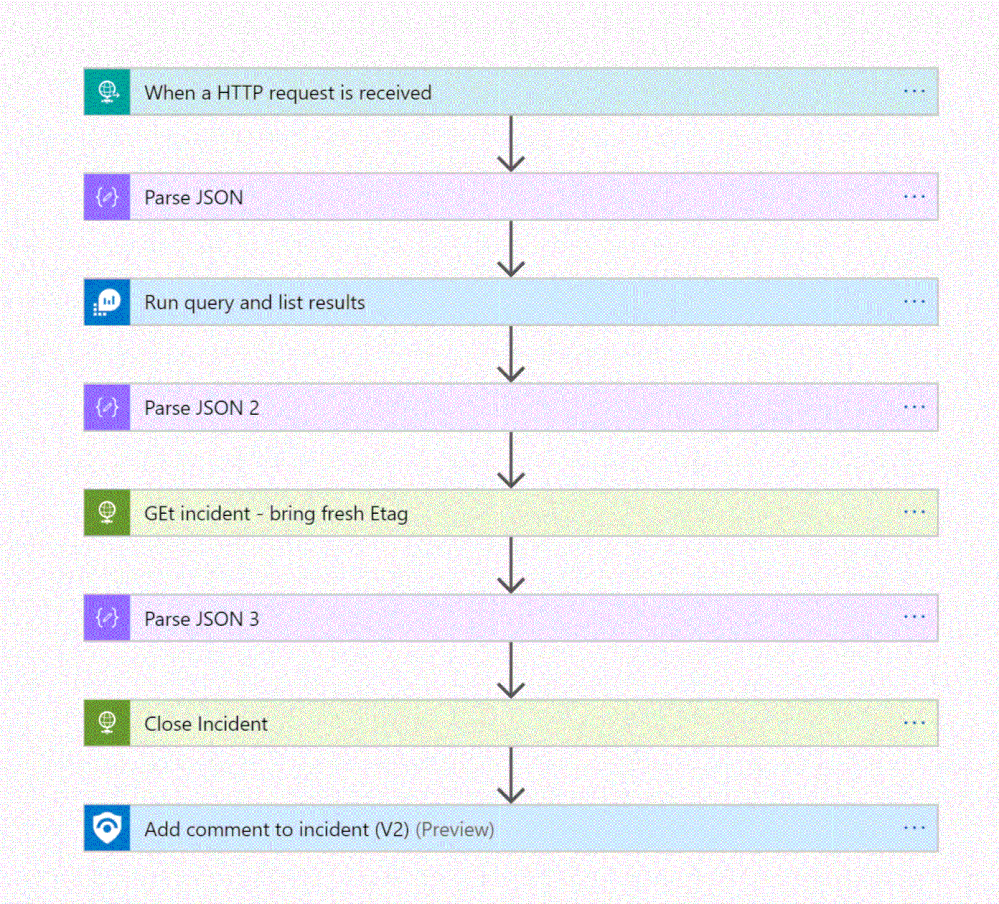
The playbook, available here and presented below, works as follows:
- Triger when an HTTP POST request hits the endpoint (1)
- Get relevant properties from the ServiceNow Incident.
- Close the incident on Azure Sentinel (4)
- Add comment with the name of the user who closed into an Azure sentinel incident comment (5)
Step 2: Configure the Logic App
- Copy the HTTP endpoint URL from the Logic App trigger part.
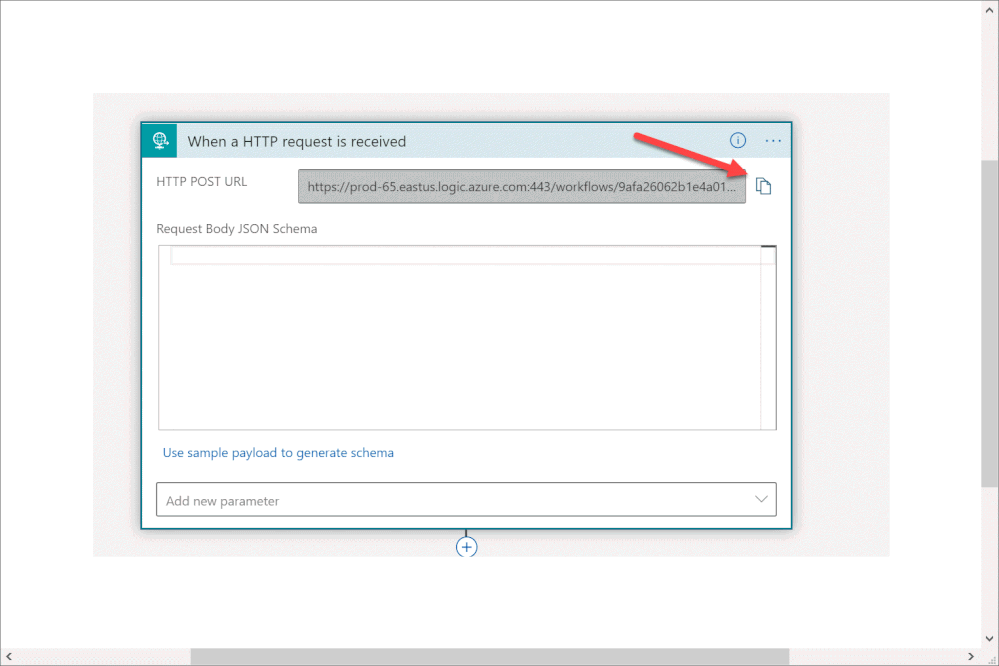
2. In “run query and list results” (2) authenticate with user that has log analytics read permission or Azure Sentinel Reader role as a minimum requirement.
3. In “get incident – bring fresh ETAG” (3) authenticate to AAD APP with a user that has an Azure Sentinel Reader role, or with a Managed identity with the same permission.
4. On “add comment to incident” (5) use a user that has an Azure Sentinel Contributor account.
Step 3: ServiceNow Business Rule
What is Business Rule?
Per ServiceNow documentation, a business rule is a server-side script that runs when a record is displayed, inserted, updated, or deleted, or when a table is queried.
To create the business rule
- Login to your ServiceNow Instance.
- In the left navigation type business rules, press New to create a new business rule.
(For a business rule types and scopes refer to ServiceNow documentation)
- Give the business rule a name, select Incident as the table, and check the Active and the Advanced checkboxes.
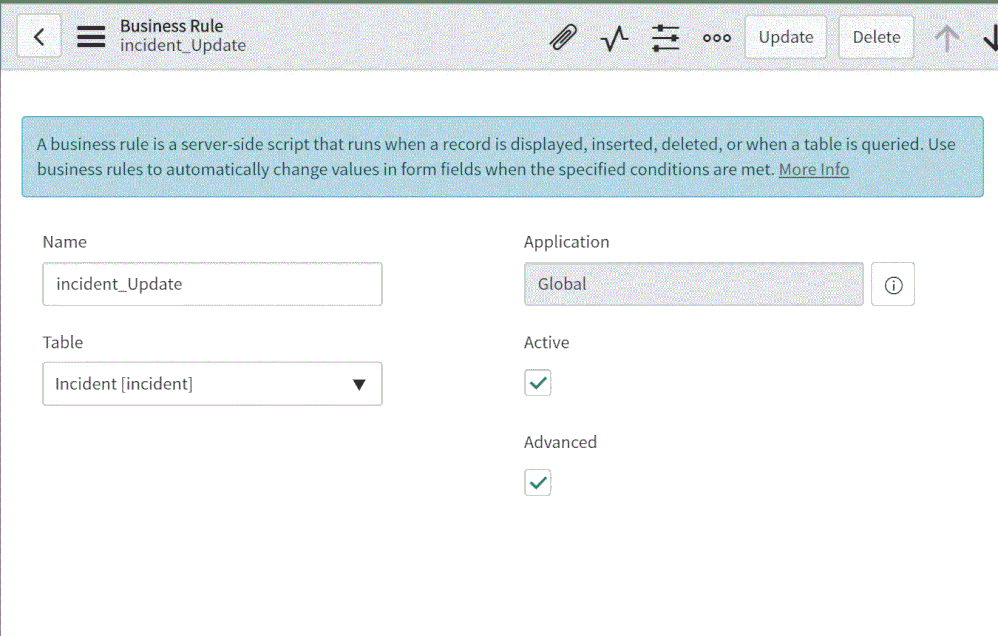
4. On the “When to run” tab, configure the controls as depicted on the screenshot below.
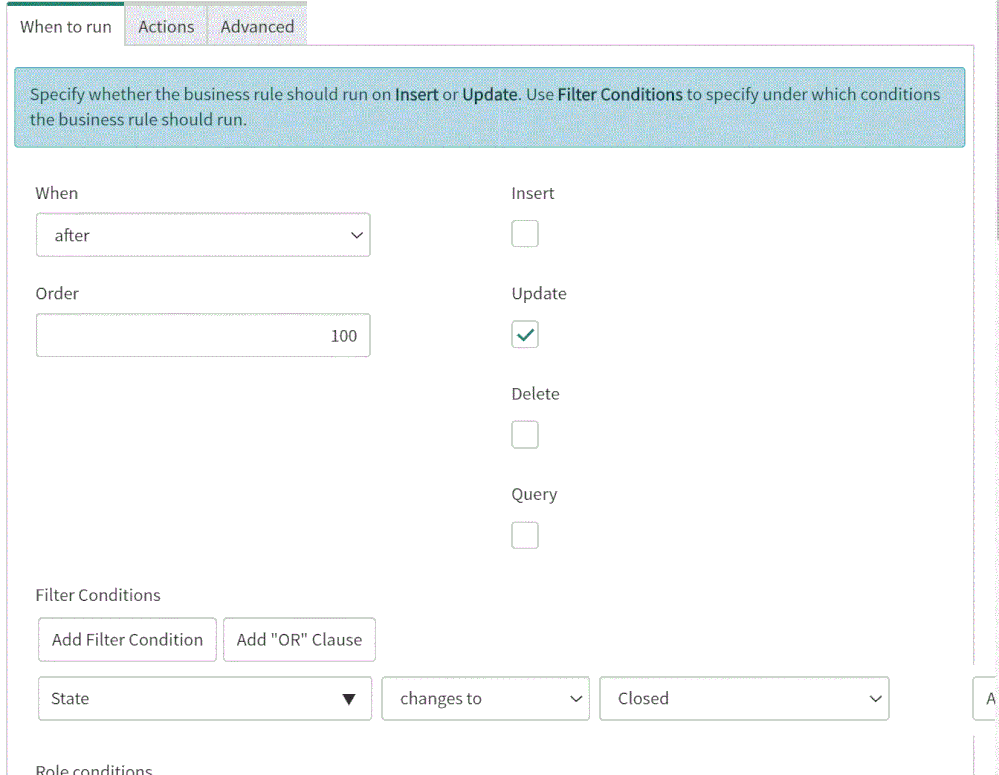
5. On the Advance tab, paste the above (like the picture below)

In line 8, replace the URL with the URL that we copied from the webhook Logic App above; this will be the endpoint that the business rule will interact with.
{
var ClosedUser = String(current.closed_by.name);
var Description = current.short_description.replace(/(rn|n|r|['"])/gm,", ");
var number = String(current.number);
var request = new sn_ws.RESTMessageV2();
var requestBody = {"Description": Description , "number": number ,  "ClosedBy":ClosedUser };
request.setRequestBody(JSON.stringify(requestBody));
request.setEndpoint('https://prod-65.eastus.logic.azure.com:443/workflows/9afa26062b1e4a0180d6ecefd26ab58e/triggers/manual/paths/invoke?api-version=2016-10-01&sp=%2Ftriggers%2Fmanual%2Frun&sv=1.0&sig=gv1HMcDt8DanJmOe3UvG22uyU_nere4rTQF8XnInYog');
request.setHttpMethod('POST');
request.setRequestHeader("Accept","application/json");
request.setRequestHeader('Content-Type','application/json');
var response = request.execute();
var responseBody = response.getBody();
var httpStatus = response.getStatusCode();
var parsedData = JSON.parse(responseBody);
gs.log(response.getBody());
}
In the above example I only send to sentinel 3 properties:
- ClosedBy – the username that closed the incident in Service Now
- Description – the incident description
- Number – the incident ID, originally received from Azure Sentinel.
You can modify the business rule Java Script code and add other properties that can add value to your use case.
Summary
Once the user closes the incident in ServiceNow, the listener Logic App triggers and closes the incident in Azure Sentinel, adding a relevant comment as you can see below:
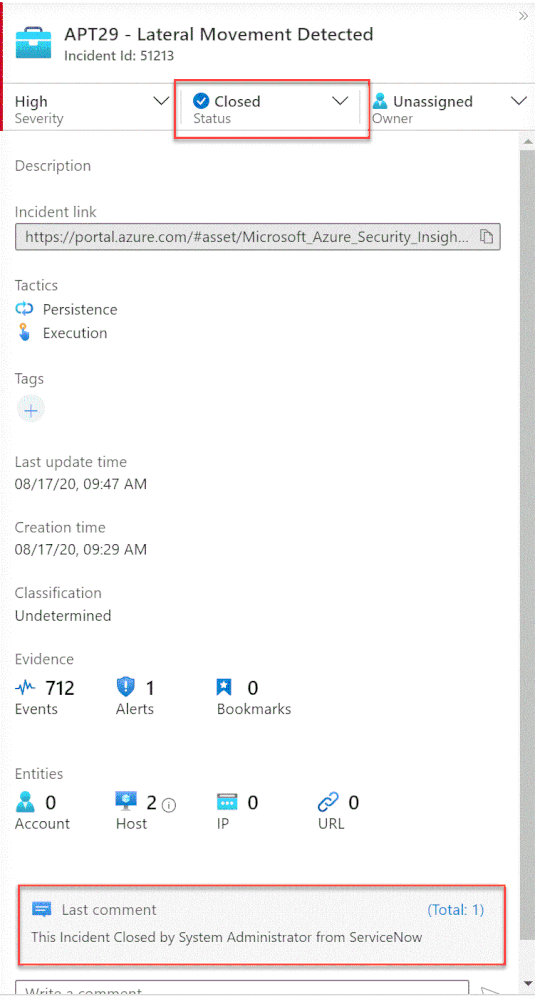
We just walked through the process of implementing incident sync between Azure Sentinel and Service Now by leveraging a Logic App and a ServiceNow business rule.
Thanks @Ofer_Shezaf for all the help during this blog creation.

by Scott Muniz | Sep 15, 2020 | Azure, Technology, Uncategorized
This article is contributed. See the original author and article here.
Introduction
Many Ops teams are looking at adopting Infrastructure as Code (IaC) but are encountering the dilemma of not being able to start from a green field perspective. In most cases organizations have existing resources deployed into Azure, and IaC adoption has become organic. Lack of available time and resources creates a potential “technical debt” scenario where the team can create new resources with IaC, but does not have a way to retrace the steps for existing deployments.
HashiCorp Terraform has a little used featured known as “import” which allows existing Resource Groups to be added to the state file, allowing Terraform to become aware of them. However, there are some restrictions around this which we are going to cover off.
Before We Begin
I’m going to walk us through a typical example of how “terraform import” can be used, but I want to share a few useful links first that I believe are worth looking at. The first is the HashiCorp Docs page on “terraform import”. This covers the basics, but it worth noting the information on configuration.
“The current implementation of Terraform import can only import resources into the state. It does not generate configuration. A future version of Terraform will also generate configuration.”
The second link is the Microsoft Docs tutorial on Storing Terraform State in Azure Storage, as we will use this option in the example.
Example
Ok, so let’s get to the fun stuff now! In this example I have an existing Resource Group in Azure called “legacy-resource-group”. Inside that I have an existing VNet called “legacy-vnet” (10.0.0.0/16 CIDR) and a default subnet (10.0.0.0/24 CIDR).
VNet

Subnet

If I try to create a new Terraform deployment that adds something to the Resource Group it will be unsuccessful as Terraform did not create the group to start with, so it has no reference in its state file. It will show an output like this:
Apply complete! Resources: 0 added, 0 changed, 0 destroyed.
What I want to do is import the resource group into an existing Terraform State file I have located in Azure Storage so that I can then manage the resource located within.
Let’s Start
In the example I am going to use the Azure Cloud Shell simply because it already has Terraform available, but you can obviously do this from your local machine using AZ CLI, Terraform or even VSCode. As we are going to use Azure Cloud Shell we will be using Vim to create our TF files, so if you are not fully up to speed on Vim you can find a great reference sheet here.
Step 1
We need to gather the resourceid of a legacy-resource-group, to do this we can gather the information from the properties section of the Resource Group blade, or we can type into the shell the following command:
az group show --name legacy-resource-group --query id --output tsv
This will output the resourceid in the following format:
/subscriptions/<SUBSCRIPTIONID>/resourceGroups/legacy-resource-group
Take a note of the resourceid as we will use it in a few steps.
Step 2
Now, we need to create a new Terraform file called import.tf. In a none shared state situation, we would only need to add a single line shown below:
resource "azurerm_resource_group" "legacy-resource-group" {}
However, as we are using a shared state, we need to add a few things. Lets first create our new file using the following command:
vi import.tf
We can then (using our commands guide sheet if you need it) add the following lines of code:
provider "azurerm" {
    version = "~>2.0"
    features {}
}
# This will be specific to your own Terraform State in Azure storage
terraform {
  backend "azurerm" {
    resource_group_name   = "tstate"
    storage_account_name  = "tstateXXXXX"
    container_name        = "tstate"
    key                   = "terraform.tfstate"
  }
}

resource "azurerm_resource_group" "legacy-resource-group" {}
Now we need to initiate Terraform in our working directory.
terraform init
If successful, Terraform will be configured to use the backend “azurerm” and present the following response:
Initializing the backend...

Successfully configured the backend "azurerm"! Terraform will automatically
use this backend unless the backend configuration changes.

Initializing provider plugins...
- Checking for available provider plugins...
- Downloading plugin for provider "azurerm" (hashicorp/azurerm) 2.25.0...

Terraform has been successfully initialized!

You may now begin working with Terraform. Try running "terraform plan" to see
any changes that are required for your infrastructure. All Terraform commands
should now work.

If you ever set or change modules or backend configuration for Terraform,
rerun this command to reinitialize your working directory. If you forget, other
commands will detect it and remind you to do so if necessary.
Now that Terraform has been initiated successfully, and the backend set to “azurerm” we can now run the following command to import the legacy-resource-group into the state file:
terraform import azurerm_resource_group.legacy-resource-group /subscriptions/<SUBSCRIPTONID>/resourceGroups/legacy-resource-group
If successful, the output should be something like this:
Acquiring state lock. This may take a few moments...
azurerm_resource_group.legacy-resource-group: Importing from ID "/subscriptions/<SUBSCRIPTIONID>/resourceGroups/legacy-resource-group"...
azurerm_resource_group.legacy-resource-group: Import prepared!
  Prepared azurerm_resource_group for import
azurerm_resource_group.legacy-resource-group: Refreshing state... [id=/subscriptions/<SUBSCRIPTIONID>/resourceGroups/legacy-resource-group]

Import successful!

The resources that were imported are shown above. These resources are now in
your Terraform state and will henceforth be managed by Terraform.

Releasing state lock. This may take a few moments...
We can now look at the state file to see how this has been added:
{
  "version": 4,
  "terraform_version": "0.12.25",
  "serial": 1,
  "lineage": "cb9a7387-b81b-b83f-af53-fa1855ef63b4",
  "outputs": {},
  "resources": [
    {
      "mode": "managed",
      "type": "azurerm_resource_group",
      "name": "legacy-resource-group",
      "provider": "provider.azurerm",
      "instances": [
        {
          "schema_version": 0,
          "attributes": {
            "id": "/subscriptions/<SUBSCRIPTIONID>/resourceGroups/legacy-resource-group",
            "location": "eastus2",
            "name": "legacy-resource-group",
            "tags": {},
            "timeouts": {
              "create": null,
              "delete": null,
              "read": null,
              "update": null
            }
          },
          "private": "eyJlMmJmYjczMC1lY2FhLTExZTYtOGY4OC0zNDM2M2JjN2M0YzAiOnsiY3JlYXRlIjo1NDAwMDAwMDAwMDAwLCJkZWxldGUiOjU0MDAwMDAwMDAwMDAsInJlYWQiOjMwMDAwMDAwMDAwMCwidXBkYXRlIjo1NDAwMDAwMDAwMDAwfSwic2NoZW1hX3ZlcnNpb24iOiIwIn0="
        }
      ]
    }
  ]
}
As you can see, the state file now has a reference for the legacy-resource-group, but as mentioned in the HashiCorp docs, it does not have the entire configuration.
Step 3.
What we are going to do now is to add two new subnets to our legacy-vnet. In this example I have created a new main.tf and renamed my import.tf as import.tfold just for clarity.
provider "azurerm" {
    version = "~>2.0"
    features {}
}

terraform {
  backend "azurerm" {
    resource_group_name   = "tstate"
    storage_account_name  = "tstateXXXXX"
    container_name        = "tstate"
    key                   = "terraform.tfstate"
  }
}

resource "azurerm_resource_group" "legacy-resource-group" {
    name      = "legacy-resource-group"
    location  = "East US 2"
}

resource "azurerm_subnet" "new-subnet1" {
  name                 = "new-subnet1"
  virtual_network_name = "legacy-vnet"
  resource_group_name  = "legacy-resource-group"
  address_prefixes     = ["10.0.1.0/24"]
}

resource "azurerm_subnet" "new-subnet2" {
  name                 = "new-subnet2"
  virtual_network_name = "legacy-vnet"
  resource_group_name  = "legacy-resource-group"
  address_prefixes     = ["10.0.2.0/24"]
}
We now use this file with “terraform plan” which should result in an output like this:
Acquiring state lock. This may take a few moments...
Refreshing Terraform state in-memory prior to plan...
The refreshed state will be used to calculate this plan, but will not be
persisted to local or remote state storage.

azurerm_resource_group.legacy-resource-group: Refreshing state... [id=/subscriptions/(SUBSCRIPTIONID>/resourceGroups/legacy-resource-group]

------------------------------------------------------------------------

An execution plan has been generated and is shown below.
Resource actions are indicated with the following symbols:
  + create

Terraform will perform the following actions:

  # azurerm_subnet.new-subnet1 will be created
  + resource "azurerm_subnet" "new-subnet1" {
      + address_prefix                                 = (known after apply)
      + address_prefixes                               = [
          + "10.0.1.0/24",
        ]
      + enforce_private_link_endpoint_network_policies = false
      + enforce_private_link_service_network_policies  = false
      + id                                             = (known after apply)
      + name                                           = "new-subnet1"
      + resource_group_name                            = "legacy-resource-group"
      + virtual_network_name                           = "legacy-vnet"
    }

  # azurerm_subnet.new-subnet2 will be created
  + resource "azurerm_subnet" "new-subnet2" {
      + address_prefix                                 = (known after apply)
      + address_prefixes                               = [
          + "10.0.2.0/24",
        ]
      + enforce_private_link_endpoint_network_policies = false
      + enforce_private_link_service_network_policies  = false
      + id                                             = (known after apply)
      + name                                           = "new-subnet2"
      + resource_group_name                            = "legacy-resource-group"
      + virtual_network_name                           = "legacy-vnet"
    }

Plan: 2 to add, 0 to change, 0 to destroy.

------------------------------------------------------------------------

Note: You didn't specify an "-out" parameter to save this plan, so Terraform
can't guarantee that exactly these actions will be performed if
"terraform apply" is subsequently run.
We can see that the plan is aware that only 2 items are to be added, which is our 2 new subnets. We can now run the following to deploy the configuration:
terraform apply -auto-approve
The final result should be similar to the below:
Acquiring state lock. This may take a few moments...
azurerm_resource_group.legacy-resource-group: Refreshing state... [id=/subscriptions/<SUBSCRIPTIONID>/resourceGroups/legacy-resource-group]
azurerm_subnet.new-subnet2: Creating...
azurerm_subnet.new-subnet1: Creating...
azurerm_subnet.new-subnet1: Creation complete after 1s [id=/subscriptions/<SUBSCRIPTIONID>/resourceGroups/legacy-resource-group/providers/Microsoft.Network/virtualNetworks/legacy-vnet/subnets/new-subnet1]
azurerm_subnet.new-subnet2: Creation complete after 3s [id=/subscriptions/<SUBSCRIPTIONID>/resourceGroups/legacy-resource-group/providers/Microsoft.Network/virtualNetworks/legacy-vnet/subnets/new-subnet2]

Apply complete! Resources: 2 added, 0 changed, 0 destroyed.
If we now look in our portal, we can see the new subnets have been created.
Subnets

If we take a final look at our state file, we can see the new resources have been added:
{
  "version": 4,
  "terraform_version": "0.12.25",
  "serial": 2,
  "lineage": "cb9a7387-b81b-b83f-af53-fa1855ef63b4",
  "outputs": {},
  "resources": [
    {
      "mode": "managed",
      "type": "azurerm_resource_group",
      "name": "legacy-resource-group",
      "provider": "provider.azurerm",
      "instances": [
        {
          "schema_version": 0,
          "attributes": {
            "id": "/subscriptions/<SUBSCRIPTIONID>/resourceGroups/legacy-resource-group",
            "location": "eastus2",
            "name": "legacy-resource-group",
            "tags": {},
            "timeouts": {
              "create": null,
              "delete": null,
              "read": null,
              "update": null
            }
          },
          "private": "eyJlMmJmYjczMC1lY2FhLTExZTYtOGY4OC0zNDM2M2JjN2M0YzAiOnsiY3JlYXRlIjo1NDAwMDAwMDAwMDAwLCJkZWxldGUiOjU0MDAwMDAwMDAwMDAsInJlYWQiOjMwMDAwMDAwMDAwMCwidXBkYXRlIjo1NDAwMDAwMDAwMDAwfSwic2NoZW1hX3ZlcnNpb24iOiIwIn0="
        }
      ]
    },
    {
      "mode": "managed",
      "type": "azurerm_subnet",
      "name": "new-subnet1",
      "provider": "provider.azurerm",
      "instances": [
        {
          "schema_version": 0,
          "attributes": {
            "address_prefix": "10.0.1.0/24",
            "address_prefixes": [
              "10.0.1.0/24"
            ],
            "delegation": [],
            "enforce_private_link_endpoint_network_policies": false,
            "enforce_private_link_service_network_policies": false,
            "id": "/subscriptions/<SUBSCRIPTIONID>/resourceGroups/legacy-resource-group/providers/Microsoft.Network/virtualNetworks/legacy-vnet/subnets/new-subnet1",
            "name": "new-subnet1",
            "resource_group_name": "legacy-resource-group",
            "service_endpoints": null,
            "timeouts": null,
            "virtual_network_name": "legacy-vnet"
          },
          "private": "eyJlMmJmYjczMC1lY2FhLTExZTYtOGY4OC0zNDM2M2JjN2M0YzAiOnsiY3JlYXRlIjoxODAwMDAwMDAwMDAwLCJkZWxldGUiOjE4MDAwMDAwMDAwMDAsInJlYWQiOjMwMDAwMDAwMDAwMCwidXBkYXRlIjoxODAwMDAwMDAwMDAwfX0="
        }
      ]
    },
    {
      "mode": "managed",
      "type": "azurerm_subnet",
      "name": "new-subnet2",
      "provider": "provider.azurerm",
      "instances": [
        {
          "schema_version": 0,
          "attributes": {
            "address_prefix": "10.0.2.0/24",
            "address_prefixes": [
              "10.0.2.0/24"
            ],
            "delegation": [],
            "enforce_private_link_endpoint_network_policies": false,
            "enforce_private_link_service_network_policies": false,
            "id": "/subscriptions/<SUBSCRIPTIONID>/resourceGroups/legacy-resource-group/providers/Microsoft.Network/virtualNetworks/legacy-vnet/subnets/new-subnet2",
            "name": "new-subnet2",
            "resource_group_name": "legacy-resource-group",
            "service_endpoints": null,
            "timeouts": null,
            "virtual_network_name": "legacy-vnet"
          },
          "private": "eyJlMmJmYjczMC1lY2FhLTExZTYtOGY4OC0zNDM2M2JjN2M0YzAiOnsiY3JlYXRlIjoxODAwMDAwMDAwMDAwLCJkZWxldGUiOjE4MDAwMDAwMDAwMDAsInJlYWQiOjMwMDAwMDAwMDAwMCwidXBkYXRlIjoxODAwMDAwMDAwMDAwfX0="
        }
      ]
    }
  ]
}
Wrap Up
Let’s look at what we have done:
- We’ve taken an existing resource group that was unmanaged in Terraform and added to our state file.
- We have then added two new subnets to the VNet, without destroying any existing legacy resources.
- We have then confirmed these have been added to the state file.
Ideally, we all want to be able to use “terraform import” to drag the entire config into the state file so that all resources will exist within the configuration, and from what HashiCorp have stated on the docs site this is on the roadmap, but for now this at least allows us to manage legacy resource groups moving forward.
by Scott Muniz | Sep 15, 2020 | Azure, Technology, Uncategorized
This article is contributed. See the original author and article here.
IPv6 is the most recent version of the Internet Protocol (IP) and the Internet Engineering Task Force (IETF) standard is already more than 20 years old, but for most of us is it still not something we have to deal with on a day-to-day basis. This is slowly changing as some areas of the world are running out of IPv4 addresses and local governments start to make IPv6 support mandatory for some verticals. This results in urgent requests by some of our customers to provide their webservices via IPv4 and IPv6 (so called dual stack) to fulfill their regulatory requirements.
The Internet Society published an article already back in June 2013 (see “Making Content Available Over IPv6”) on what potential implementations could look like. Their article is covering native IPv6, proxy servers and Network Address Translation (NAT). Even though the article is already a few years old, the different options are still valid.
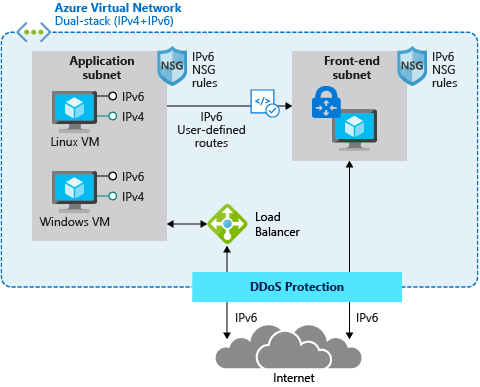
So how does this apply to Azure? Azure supports IPv6 and has done for quite some time now for most of its the foundational network and compute services. This enables native implementations using IPv4 and IPv6 by leveraging Azure’s dual stack capabilities.
For example, in scenarios where applications are mainly based on Virtual Machines (VMs) and other Infrastructure-as-a-Service (IaaS) services with full IPv6 support, we are able to use native IPv4 and IPv6 end-to-end. This avoids any complications caused by translations and it provides the most information to the server and the application. But it also means that every device along the path between the client and the server must handle IPv6 traffic.
The following diagram depicts a simple dual stack (IPv4/IPv6) deployment in Azure:

The native end-to-end implementation is most interesting for scenarios and use cases where direct server-to-server or client-to-server communication is required. This is not the case for most webservices and applications as they are typically already exposed through, or shielded behind a Firewall, a Web Application Firewall (WAF) or a reverse proxy.
Other more complex deployments and applications often times contain a set of 3rd-party applications or Platform-as-a-Service (PaaS) services like Azure Application Gateway (AppGw), Azure Kubernetes Services (AKS), Azure SQL databases and others that do not necessarily support native IPv6 today. And there might be also other backend services and solutions, in some cases hosted on IaaS VMs that are also not capable of speaking IPv6. This is where NAT/NAT64 or an IPv6 proxy solution comes to play. These solutions allow us to transition from IPv6 to IPv4 and vice versa.
Besides the technical motivation and need to translate from IPv6 to IPv4 are there also other considerations especially around education, the costs of major application changes and modernization as well as the complexity of an application architecture why customers consider using a gateway to offer services via IPv4/IPv6 while still leveraging IPv4-only infrastructure in the background.
A very typical deployment today, for example using a WAF, looks like this:
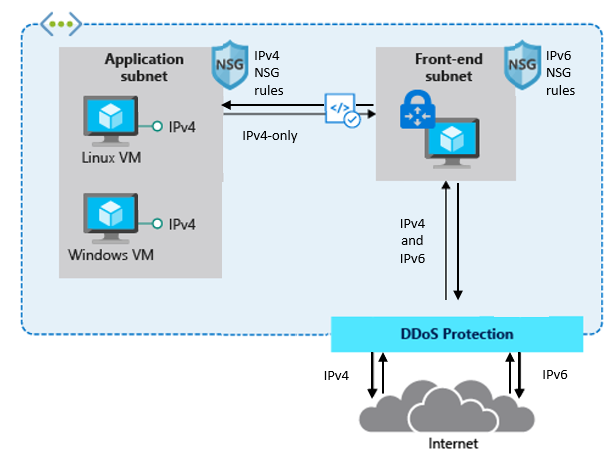
The difference between the first and the second drawing in this post is that the latter has a front-end subnet that contains for example a 3rd-Party Network Virtual Appliance (NVA) that accepts IPv4 and IPv6 traffic and translates it into IPv4-only traffic in the backend.
This allows customers to expose existing applications via IPv4 and IPv6, making them accessible to their end-users natively via both IP versions without the need to re-architect their application workloads and to overcome limitations in some Azure services and 3rd-Party services that do not support IPv6 today.
Here is a closer look on how a typical architecture could look like:
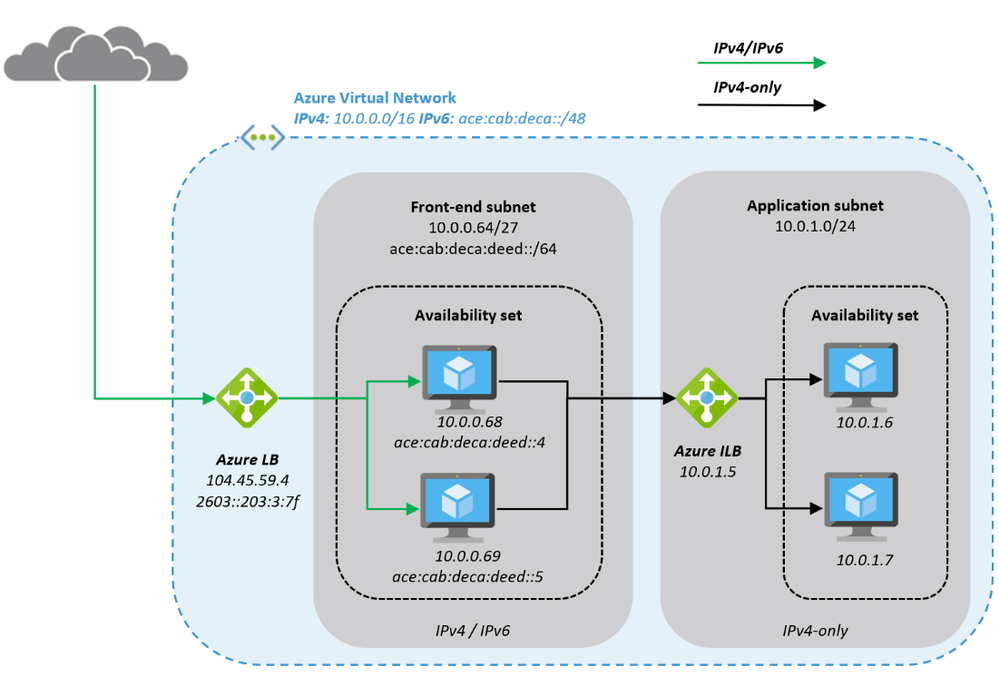
The Azure Virtual Network is enabled for IPv6 and has address prefixes for IPv4 and IPv6 (these prefixes are examples only). The “Front-end subnet” is enabled for IPv6 as well and contains a pair of NVAs. These NVAs are deployed into an Azure Availability Set, to increase their availability, and exposed through an Azure Load Balancer (ALB). The first ALB (on the left) has a public IPv4 and a public IPv6 address.
The NVAs (for example a WAF) in the Front-end subnet accept IPv4 and IPv6 traffic and can offer, depending on the ISV solution and SKU a broad set of functionality and translate the inbound traffic into IPv4 to access the application that is running in our “Application subnet”. The application is again exposed (internally; no public IP addresses) via IPv4 only through an internal ALB and only accessible from the NVAs in the front-end subnet.
This results in an architecture that provides services via IPv4 and IPv6 to end-users while the backend application is still using IPv4-only. The benefit of this approach is the reduced complexity, the application teams do not need to know and take care of IPv6, on one hand and on the other hand a reduced attach surface as between the front-end and the application subnet we’re only using the well-known and fully supported IPv4 protocol.
Instead of using a 3rd-party NVA, Azure offers similar, managed capabilities using the Azure Front Door (AFD) service. AFD is a global Azure service that “enables you to define, manage and monitor global routing for web traffic by optimizing for best performance and quick global failover for high availability” (see “What is Azure Front Door?”). AFD works at Layer 7 (OSI model) or HTTP/HTTPS layer and uses the anycast protocol and allows you to route client requests to the fastest and most available application backend. An application backend can be any Internet-facing service hosted inside or outside of Azure.
AFD’s capabilities include proxying IPv6 client requests and traffic to an IPv4-only backend as shown below:

The main architectural difference between the NVA-based approach we have described in the beginning of this post and the use of AFD service is, that the NVAs are customer-managed, work at Layer 4 (OSI model) and can be deployed into the same Azure Virtual Network as the application in a way where the NVA has a private and a public interface. The application is then only accessible through the NVAs which allows filtering of all ingress (and egress) traffic. Whereas AFD is a global PaaS service in Azure, living outside of a specific Azure Region and works at Layer 7 (HTTP/HTTPS). The application backend is an Internet-facing service hosted inside or outside of Azure and can be locked down to accept traffic only from your specific Front Door.
While we are in this post explaining these two solutions as different options to make IPv4-only applications and services hosted in Azure available to users via IPv4 and IPv6, it is in general and especially in more complex environments not either a WAF/NVA solution or Azure Front Door. It can be a combination of both where NVAs are used within a regional deployment while AFD is used to route the traffic to one or more regional deployments in different Azure regions (or other Internet-facing locations).
What’s next? Take a closer look into Azure Front Door service and its documentation to learn more about its capabilities to decide if either native end-to-end IPv4/IPv6 dual stack, a 3rd-party NVA-based solution or Azure Front Door services fulfils your needs to support IPv6 with your web application.
by Scott Muniz | Sep 14, 2020 | Azure, Technology, Uncategorized
This article is contributed. See the original author and article here.
On September 15, we will publish an update to the TLS certificates used by Azure Sphere devices to establish a connection to the update service. When a device takes the cert update, it will reboot once to apply it. There is no impact to device connectivity or operations other than an additional reboot as the device downloads new certs.
Device update can be temporarily delayed for up to 24 hours. For more information see Defer device updates in the customer documentation.
If you encounter problems
For self-help technical inquiries, please visit Microsoft Q&A or Stack Overflow. If you require technical support and have a support plan, please submit a support ticket in Microsoft Azure Support or work with your Microsoft Technical Account Manager/Technical Specialist. If you would like to purchase a support plan, please explore the Azure support plans.


Recent Comments