
by Scott Muniz | Sep 15, 2020 | Uncategorized
This article is contributed. See the original author and article here.

I wrote this post as a proof of concept and as a best effort to make a 16-bit application run on Windows 10 64-bit.
It will be demonstrated how to use a third-part open source framework called otya128 – winevdm, how to use MSIX, UWP Execution Alias and Packaging Support Framework.

Please notice that Microsoft recommends using virtualization or 32-bit machines to run 16-bit applications.
This post is only a proof of concept and for informational and training purposes only and are provided “as is” without warranty of any kind, whether express or implied.
Download the 16-bit emulator
As 64-bit operating system does not have support for the Windows NT DOS Virtual Machine (NTVM) system component, the first step is to download the 16-bit emulator called otya128 – winevdm that is open source and available on GitHub:

https://github.com/otya128/winevdm
You can clone the repository and build yourself or download the build artifact from the AppVeyor repository https://ci.appveyor.com/project/otya128/winevdm/history
If you opt to download the app from the AppVeyor repository, you need to choose what build you want:

Select the job:

And finally click on artifacts to download the artifact file:

Now, all you must do is to extract the files to a folder of your preference. I will extract the files in the following folder of the root of my C drive:
C:otvdm-master-1846
Installing Microsoft Visual Basic 3.0 IDE on Windows 10 64-bit
If you try to run the Visual Basic 3 installer (setup.exe), you will receive the following message telling that the application cannot run, since it is a 16-bit application and that the NTVDM is not available.

We need to run the otvdm.exe passing as argument the application that we want to launch, in our case, the setup.exe of Visual Basic 3.0:
C:otvdm-master-1846otvdm.exe "C:VBVB.EXE"
Notice that now the Visual Basic 3.0 16-bit installer has been successfully launched:

We can proceed with the installation:

The default destination folder is C:VB:

There are no registry keys, and all the files will be copied to the C:VB directory:

Done!!!! Visual Basic is successfully installed:

Click on Run Visual Basic 3.0 to launch VB3 on Windows 10 64-bit:

Notice that despite of Visual Basic 3 is available on Start menu, you can’t directly launch the app from there, as the app is 16-bit:

In that case you need to run the following command:
C:otvdm-master-1846otvdm.exe "C:VBVB.EXE"
Improving the app distribution and providing a better user experience through MSIX
Let’s see how MSIX can simplify the application deployment by keeping together the 16-bit emulator and VB3 application in a single MSIX installation file. The installation will be reduced to a single click action that will install the App in less than 10 seconds.
At the same time MSIX will provide a better user experience, allowing the users or other apps to call the application executable, in this case, VB.EXE without having to specify the otvdm emulator.
MSIX Packaging Tool
We need of the install the MSIX Packaging Tool, that is free and available on Microsoft Store:
https://www.microsoft.com/store/productId/9N5LW3JBCXKF

See the following documentation for more details about the tool:
https://docs.microsoft.com/windows/msix/mpt-overview
Before launching the MSIX Packaging Tool, move the emulator and VB folders to another folder, like C:setup:

This step is need, as MSIX Packaging Tool (MPT) will monitor the changes made on the computer environment. So, as we already have VB3 installed and we don’t want to install it again, I will just copy these two folders to their final destinations at the moment that the MPT will be monitoring the modifications.
Once installed, open the MSIX Packaging Tool and click on Application package to create a new package for the application:

The MSIX Packaging Tool will monitor the changes made on the environment. To perform the packaging, it is possible to use a virtual machine or the physical machine itself to install the application.
The best scenario is to use a virtual machine allowing you to reproduce the same process if necessary. It is important that the machine used to install the application does not contain the applications and their previously installed components.
Choose the desired scenario and click the Next button:

In this step, the tool will verify that the MSIX Packaging Tool Driver is installed and will disable Windows Update to decrease the number of changes to the operating system:

Click on the Next button.
Only MSIX packages signed with a valid certificate can be installed on Windows 10 machines.
You can create a self-signed certificate for testing purposes, using the following PowerShell command:
function CreateCertificate($name, $path)
{

    Set-Location Cert:LocalMachineMy

    New-SelfSignedCertificate -Type Custom -Subject "CN=$name" -KeyUsage DigitalSignature -FriendlyName $name -CertStoreLocation "Cert:LocalMachineMy"

    $cert = Get-ChildItem "Cert:LocalMachineMy" | Where Subject -eq "CN=$name"

    $pwd = ConvertTo-SecureString -String DefineTheCertificatePasswordHere@2020 -Force -AsPlainText

    Export-PfxCertificate -cert $cert.Thumbprint -FilePath "$path.pfx" -Password $pwd

    Export-Certificate -Cert $cert -FilePath "$path.cer"

    Move-Item -Path $cert.PSPath -Destination "Cert:LocalMachineTrustedPeople"

}

CreateCertificate "luisdem" "cert"
To execute the command, open PowerShell_ISE.exe and press F5. The command creates the test certificate and copies it to the Trusted People folder.
It is important to notice that this test certificate should only be used to approve the application in a test environment. To distribute the application.
Now, that we have a certificate, we can inform the certificate to have the final MSIX package file automatically signed. It is not necessary to provide the installer file, as the tool monitors all changes made to the operating system.

Click on the Next button.
In this step, it is necessary to provide information such as the name of the package, the description that will be displayed to the user during installation, the name of the supplier (must be the same as the certificate) and the version number. Fill in the requested information:

Click on the Next button.
Is in this step that we need to install the application.

As we already have the VB3 installed, this is the moment to moving back the emulator and VB3 folders to the drive C root:

Click on the Next button only after completing the application installation and all settings.
On the next screen it is necessary to define which applications will be visible in the start menu.
As VB3 is a 16-bit application that depends on the 16-bit emulator, select only the otvdm.exe, as follows:

Notice that is not possible to provide the arguments for the otvdm.exe, i.e., C:VBVB.EXE. For now, we can ignore the arguments as we are fix that later.
Follows the expected result so far:

Click on the Next button.
The following screen is displayed at the end of the installation and asks for confirmation if the monitoring can be ended:

Click the Next button, as the application does not install any services:

At this point, it is necessary to inform where the package will be generated, as well as it is possible to edit the package before saving it.
Click on the Package editor button to check the package structure, as follows:

Click on Open file to check how the manifest was generated:

It is possible to edit the manifest information, such as processor architecture, application description, minimum supported version of Windows 10 and others.
Change the ProcessorArchitecture to “x86”, the DisplayName and Description attributes to “Microsoft Visual Basic 3.0”:

Notice that the Executable attribute doesn’t have the C:otvdm-master-1846, but instead it has the value VFSAppVPackageDriveotvdm-master-1846. The AppVPackageDrive is the folder inside the package that corresponds to drive C. The application will look for the file on C:otvdm-master-1846 but it will be redirected to the folder inside the package (VFSAppVPackageDriveotvdm-master-1846).
The only problem here, is that is no possible to pass arguments in this manifest file. So, we will need to use Package Support Framework (PSF) to fix that.
For now, just change the Executable value path to “PsfLauncher32.exe” that is part of the PSF.

We will now create an execution ALIAS to allow launching the application by typing or calling the VB.EXE command. To do this, add the following lines just below the line </uap:VisualElements>:
<Extensions>
        <uap3:Extension Category="windows.appExecutionAlias"
                        Executable="PsfLauncher32.exe"
                        EntryPoint="Windows.FullTrustApplication">
          <uap3:AppExecutionAlias>
            <desktop:ExecutionAlias Alias="VB.EXE" />
          </uap3:AppExecutionAlias>
        </uap3:Extension>
 </Extensions>
Follows how the manifest file must be defined:

Save the file and close Notepad to free access to the MSIX Packaging Tool Editor screen.
Click on Package files and check if all the files and directories listed are used by the application.
Remove unnecessary files or directories to reduce the package size:

It is at this step that we need to add the Package Support Framework files, to allow the PsfLauncher32.exe calling the emulator passing the arguments.
To proceed, download the PSF files (PSFBinaries.zip) available on GitHub:
Releases · microsoft/MSIX-PackageSupportFramework (github.com)

And extract the contents to a folder of your preference. I will extract to C:PSF:

In the same folder, create a config.json file with the following content:
{
   "applications": [
    {
      "id": "OTVDM",
      "executable": "VFS/AppVPackageDrive/otvdm-master-1846/otvdmw.exe",
      "arguments": "AppVPackageDrive/VB/VB.EXE",
      "workingDirectory": "VFS"
    }
  ]
}
The id corresponds to the Application Id defined in the application manifest, the executable contains the emulator path inside the package and the arguments the VB3 path inside the package.
Switch back to MSIX Packaging Tool. In the Package file tab, right click on Package folder and click on
Add file from the context menu:

Add all the files that finish with 32 and the config.json files to the project:

Click on the Create button to generate the package and inform where the file should be generated.
The following screen will display where the MSIX file was generated as well as the log file:

Install the Visual Basic 3 packaged with MSIX
Double-click the package to install the application:

You can now launch the application directly from Start menu:

That solution is compatible with MSIX App Attach for Windows Virtual Desktop on-premises or on Microsoft Azure.

I hope you like it!!!
by Scott Muniz | Sep 15, 2020 | Uncategorized
This article is contributed. See the original author and article here.
We are officially one week away from our first ever digital Microsoft Ignite, and Microsoft Teams is bringing you an amazing lineup of content all-digital event experience. Given we’re doing things a little bit differently this year, we want to walk you through what your journey will look like. We’ve created over 40 sessions that span the breadth of Teams so you can hear about the newest product capabilities, get your questions answered, and learn how to create a resilient, inclusive, and connected workplace with Microsoft Teams.

Sessions
For a full list of sessions, check out the Teams digital brochure embedded at the bottom of this blog and bookmark this brochure link for future reference.
Featured Sessions
To kick off the 48 hours of continuous learning, we will be presenting our Modern Work and Teams keynotes. Join sessions from Teams executives and get a detailed view of our vision for Teams, the latest capabilities, and product roadmap.
- The Future of Modern Work – Jared Spataro, Corporate Vice President, Modern Work
- Creating a resilient and hybrid workplace with Microsoft Teams – Nicole Herskowitz, General Manager, Microsoft Teams Marketing
- Enabling collaboration, communication, and knowledge sharing with Microsoft Teams, SharePoint, Project Cortex, and more – Jeff Teper, Corporate Vice President, Microsoft Teams, SharePoint, OneDrive
Digital Breakouts
Next, dive deep into specific Teams topics by attending our 30-min digital breakouts. Digital breakout sessions will cover Teams Meetings, Calling, and Devices; Teams Core and Collaboration; Teams platform and Microsoft 365 platform; Security, Compliance, and Management; and Firstline Worker.
Ask the Experts
If you’re looking to engage with Teams product and engineering experts, join an “Ask the Expert” session following our digital breakouts. “Ask the Experts” are the perfect place to get your Teams questions answered and hear from subject matter experts that are closest to the product. Space is limited in Ask the Expert sessions so make sure you add those to your schedule ASAP.
Resources
Below is a list of resources you can take a look at now to learn more and bookmark to reference later:
- Register for Microsoft Ignite and start building your event schedule with Teams sessions.
- Access the Virtual Hub for deep-dive technical training for IT pros, developers, and community champions available on September 22nd and get access to interactive guides, community resources and more.
- Check out the Microsoft Tech Community Video Hub launching on September 22nd to view videos and join conversation.
- Follow Microsoft Teams on Twitter to stay up to date with the latest Teams @ Ignite news.
Teams Virtual Photo Booth
Staying true to an all-digital theme, we’re very excited to offer a Teams Virtual Photo Booth where you can share your Teams spirit with a selfie! The photo booth will be available from Friday, September 18 at 8:00am PDT to Thursday, September 24.
Come back on Friday to start sharing selfies and what you’re learning at Ignite on your favorite social media platforms. Don’t forget to use the #MicrosoftTeams and #MSIgnite hashtags so we can see what your Teams @ Ignite 2020 experience looks like.
Teams Digital Brochure
by Scott Muniz | Sep 15, 2020 | Uncategorized
This article is contributed. See the original author and article here.
While using Windows Updates for Business (WUfB) is not for everyone, its simplicity and familiar end-user experience make it quite attractive to many organizations. One thing that WUfB does not provide today is updates for third-party products. For that, you need to continue to use an on-premises solution like Microsoft Endpoint Manager Configuration Manager to complement WUfB.
Ultimately, deploying third-party updates when using WUfB is no different than deploying them using Configuration Manager by itself. Enabling third-party updates with WUfB requires the following three things:
- Enable and configure WUfB.
To enable WUfB, configure any WUfB related policy or setting using one of the following methods:
- Configure and enable software updates in Configuration Manager.
See Plan for software updates in Configuration Manager if necessary.
- Configure and enable third-party updates in Configuration Manager.
Do this using a handful of different methods, including the following:
- System Center Update Publisher (SCUP).
- The third-party updates feature set built into Configuration Manager.
- A tool from a third-party.
So, how does Configuration Manager work with WUfB to deliver third-party updates? The answer is dual-scan. Note that although dual-scan did cause some confusion in the past that resulted in the unintended installation of updates, you should not be afraid of it once you see how it works (as described in this post).
Dual-scan
Dual-scan is a feature of the Windows Update (WU) client. It enables the WU client to use WUfB and an on-premises WSUS instance to scan for update applicability and compliance. When you enable dual-scan, the WU client uses WUfB (and only WUfB) for Windows product updates and WSUS for non-Windows updates.
To enable dual-scan, enable a WUfB deferral policy on a system with a local WSUS server configured. This can be a WSUS server integrated into and automatically configured by, Configuration Manager (the scenario discussed here) or a stand-alone WSUS server. That’s all there is to it.
If you don’t want dual-scan, don’t enable any WUfB deferral policies. This is where a disconnect usually happens, as these policies are for WUfB only. They have no effect or purpose if another solution for deploying Windows updates is used, like Configuration Manager or WSUS, but they enable dual-scan.
See Using ConfigMgr With Windows 10 WUfB Deferral Policies for further details on dual-scan and explicitly stopping it.
Results
To prove out deploying third-party updates using Configuration Manager with WUfB enabled, I used one of the existing co-managed systems in my lab. The name of this system is ELKWIN2.
WUfB Configured
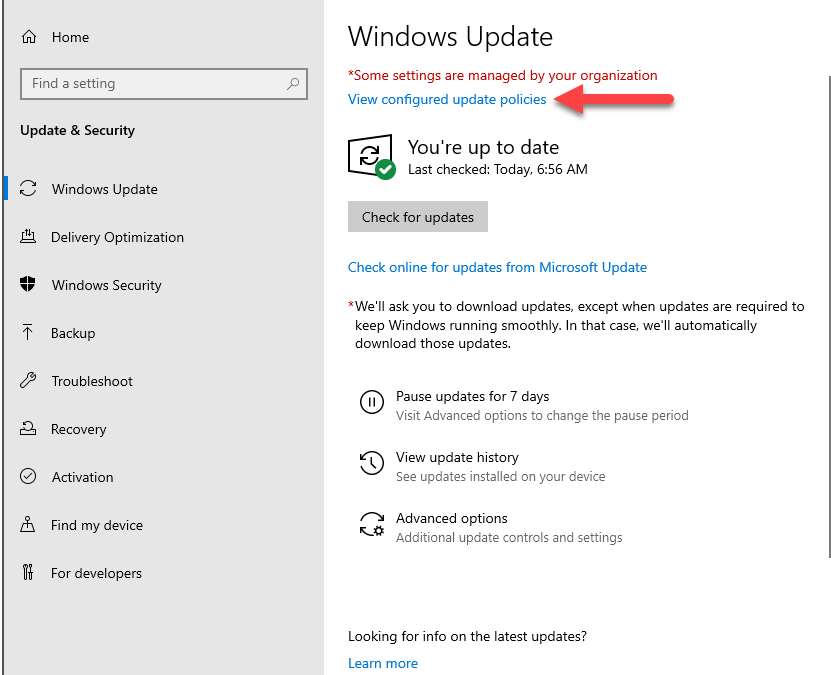
ELKWIN2 started life as a Windows 10 1909 system and was updated to 2004 using WUfB; it continues to receive quality updates from WUfB. You can see the Windows Update configuration in the following two screenshots from ELKWIN2, confirming the WUfB configuration.
 Windows Update settings
 Configured update policies
Software Updates Configured
Even though WUfB is configured on ELKWIN2 using Intune, the Configuration Manager Software Updates configuration is still targeted to the system and still applies to the system. Since ELKWIN2 is configured for WUfB and has a local WSUS server configured, dual-scan is also enabled. The following two screenshots show the WSUS server configuration and local group policies configured by the Configuration Manager agent.
 Resultant Set of Policies
 Registry
Third-party Updates Configured
For this, I created a custom update (for a custom application) in SCUP and published it to the Windows Server Update Services (WSUS) server integrated with the Configuration Manager site in my lab. After synchronizing the update catalog in Configuration Manager, the update showed up in the All Software Updates view, ready for compliance scanning and deployment.
 FakeApp 2.0 in System Center Updates Publisher
 FakeApp 2.0 Upgrade in Configuration Manager
I then initiated a Software Update Scan Cycle from the Actions tab in the Configuration Manager Control Panel applet on ELKWIN2. Finally, I forced ELKWIN2 to send all queued state messages to the site and checked the reports.
 Specific compliance state for an update (FakeApp 2.0 Upgrade)
 Compliance state for a specific computer (ELKWIN2)
As the reports show, ELKWIN2 requires the FakeApp 2.0 Upgrade. Also, note that no Windows updates show at all for ELKWIN2. That’s dual-scan at work. All that is necessary now is to download and deploy the update or configure an Automatic Deployment Rule to do this for us.
Conclusion
Even though WUfB doesn’t support third-party updates, it’s still possible to deploy and manage them using the ever-faithful Configuration Manager and the built-in Windows dual-scan functionality.
by Scott Muniz | Sep 15, 2020 | Uncategorized
This article is contributed. See the original author and article here.
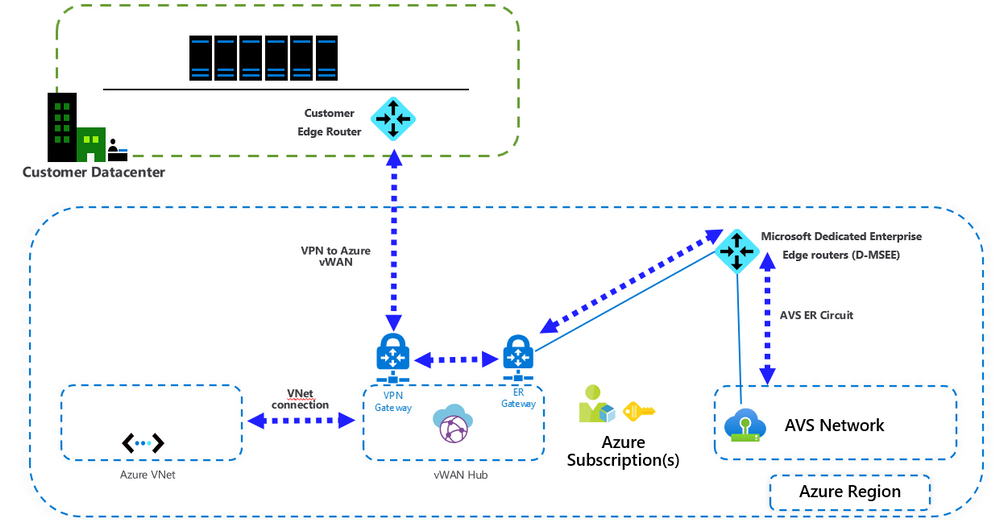
If you are not familiar with the Microsoft 365 Network Connectivity Principles, you should be. Refer to the video Overview of Network Connectivity Principles as a prelude to this topic.
For many companies, providing remote work options was already a rapidly growing movement (+173% since 2005 according to Global Workplace Analytics). That was before the COVID-19 crisis, which has massively accelerated that trend and highlighted a number of remote work problems that require immediate remediation. The need to maintain security without sacrificing performance has generated unprecedented demands on enterprise IT to support work-from-anywhere productivity at a massive scale.
Microsoft 365 is well positioned to help customers fulfill that demand, but high concurrency of users working from home generates a large volume of Microsoft 365 traffic which, if routed through forced tunnel VPN and on-premises network perimeters, causes rapid saturation and runs VPN infrastructure out of capacity. In this new reality, using VPN to access Microsoft 365 is no longer just a performance impediment, but a hard wall that not only impacts Microsoft 365 but critical business operations that still have to rely on the VPN to operate.
For many years enterprises have been using VPNs to support remote experiences for their users. Whilst core workloads remained on-premises, a VPN from the remote client routed through a datacenter on the corporate network was the primary method for remote users to access corporate resources. VPNs, network perimeters, and associated security infrastructure were often purpose built and scaled for a defined volume of traffic, typically with the majority of connectivity being initiated from within the corporate network, and most of it staying within the internal network boundaries.
VPN models where all connections from the remote user device are routed back into the on-premises network (known as forced tunneling) were largely sustainable as long as the concurrent scale of remote users was modest and the traffic volumes traversing VPN were low. The use of forced tunneled VPNs for connecting to distributed and performance sensitive cloud applications is extremely suboptimal. This problem has been growing for a number of years, with many customers reporting a significant shift of network traffic patterns. Traffic that used to stay on premises now connects to external cloud endpoints.
For customers who connect their remote worker devices to the corporate network or cloud infrastructure over VPN, Microsoft recommends that key Microsoft 365 scenarios including Microsoft Teams, SharePoint Online, and Exchange Online are routed over a VPN split tunnel configuration. This becomes especially important as the first line strategy to facilitate continued employee productivity during large scale work-from-home events such as the COVID-19 crisis. The essence of this approach is to provide a simple method for enterprises to mitigate the risk of VPN infrastructure saturation and dramatically improve Microsoft 365 performance in the shortest timeframe possible.
This VPN split tunnel guidance is in alignment with the Microsoft 365 Network Connectivity principles, which are designed to work efficiently for remote users whilst still allowing an organization to maintain security and control over their connectivity. These connectivity principles can also be implemented for remote users very quickly with limited work yet achieve a significant positive impact on the problems outlined above.
Microsoft’s recommended strategy for optimizing remote worker’s connectivity is focused on rapidly alleviating the problems with the traditional approach and providing high performance with a few simple steps. These steps guide you to split tunnel Microsoft 365 traffic for a small number of defined endpoints to bypass bottlenecked VPN infrastructure and leverage cloud-based security services natively available within the Microsoft 365 stack.
For the latest information on how to plan network connectivity for your remote users and provide the best possible cloud experience watch the Network Connectivity for Remote Users video below. This is one video from the 7 part Microsoft 365 Network Connectivity Video Series, which you can find at aka.ms/netvideos.


Recent Comments