by Scott Muniz | Sep 17, 2020 | Uncategorized
This article is contributed. See the original author and article here.
Today, more than ever, government organizations are facing increasing challenges associated with remote delivery of public services. The shift to support remote work has increased the need for government agencies to re-evaluate their security and compliance practices. Coupled with government employees accessing and sharing data remotely as well as collaborating in new ways using platforms like Microsoft Teams, government agencies need rich capabilities that help them efficiently discover relevant data. Public sector organizations are also under greater pressure to ensure they consistently meet industry compliance and security regulations. For example, many are required to respond quickly to Freedom of Information Act requests with relevant data.
Today we are excited to announce Advanced eDiscovery and Advanced Audit capabilities in Microsoft 365 are coming to Government Community Cloud (GCC), Government Community Cloud-High (GCC-H), and Department of Defense (DoD) environments. These new capabilities help organizations to efficiently respond to regulatory, legal, and forensic obligations with relevant data within the Microsoft 365 security and compliance boundary.
Discovering data where it lives with a more end–to–end eDiscovery solution
We often hear from customers that they are looking to reduce the complexity and cost of managing multiple solutions for their eDiscovery needs. In fact, according to Gartner, “by 2023, more than 70% of enterprise IT leaders will upgrade to an end-to-end e-discovery software.”
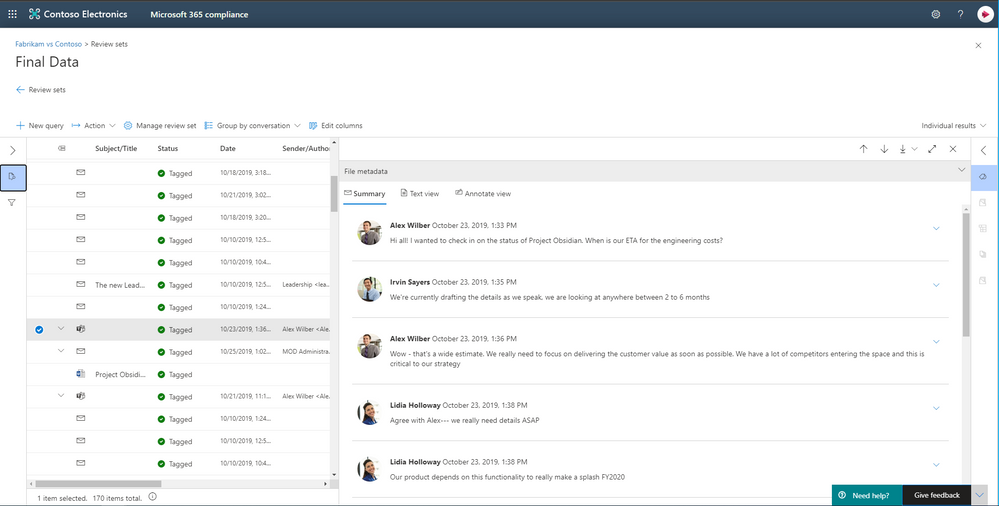
In April 2019, we delivered a new Advanced eDiscovery solution that supports the Electronic Discovery Reference Model by providing a more end-to-end workflow to identify, preserve, collect, process, review (early case assessment), and analyze data to help efficiently respond to legal and regulatory obligations or internal investigations.
To streamline the workflow, Advanced eDiscovery helps reduce the friction of identifying and collecting potential sources of relevant information by automatically mapping unique and shared data sources to the person of interest (custodian).
Additionally, native capabilities for Microsoft Teams, Yammer, SharePoint Online, OneDrive for Business, and Exchange Online further enhance data discovery by reconstructing Teams conversations instead of returning individual messages, or including the attachment and link in emails and Teams chats consistently without additional configuration.

Advanced eDiscovery also supports hundreds of non-Office 365 file types out of the box, and data connectors support additional third-party data sources such as Bloomberg, Facebook, and many more.
Intelligent, machine learning capabilities also help reduce the burden of review that traditionally happens one document at a time. Advanced eDiscovery provides a broad set of intelligent capabilities to help customers reduce and reduce large volumes of data to a relevant set. For example, an automatically generated query helps filter only for unique content by identifying near duplicates, which can help dramatically reduce data. You can learn more about this and other Advanced eDiscovery capabilities here.
Powering your forensic investigations with Audit
To help government customers understand the scope of a data breach and effectively respond to their regulatory, legal and internal obligations, we are also releasing Advanced Audit. Advanced Audit helps customers with their forensic investigations by providing access to additional audit events that are important to forensic investigations, extending audit log retention for up to 1 year, and offering faster access to management activity API.
With the new event in Advanced Audit, that means customers can understand when mail data was accessed using the “MailItemsAccessed” event. This new auditing action helps investigators determine the scope of compromise by identifying the specific mail items that may been accessed by a malicious attacker. It also helps organizations to defensibly assert that a specific piece of mail data was not compromised.
We also often hear from customers that they want to easily access historical audit log activities to support their forensic investigations. In fact, according to Ponemon Research, they estimate that the average time to identify and contain a data breach takes around 6 months. To help organizations conduct forensic investigations on audit log data beyond the default 90–days audit retention period, with Advanced Audit organizations can apply retention policy to their audit log data for up to one year. You can learn more about this and other Advanced Audit capabilities here.
Our commitment to our government and public sector customers
Moving forward, we are committed to delivering more capabilities in the Government Community Cloud, Government Community Cloud-High, and Department of Defense to ensure government entities can benefit from the compliance and risk management features within Microsoft 365.
The new features in Advanced eDiscovery and Advanced Audit will start rolling out to customer’s government cloud tenants in the coming weeks. To learn how government organizations are using technology to secure apps, devices, and data, read the “Digital Transformation in Government” e-book available at https://aka.ms/MicrosoftGovPlaybook. You can also find more information on how to use Microsoft 365 Compliance features in this video

by Scott Muniz | Sep 17, 2020 | Uncategorized
This article is contributed. See the original author and article here.

This LIVE online event will take place on Thursday 1st October
We’re only just starting to understand the true potential of technology at the intersection of Artificial Intelligence, MLOps (Machine Learning & DevOps), Cloud Computing and Edge Computing – but the possibilities are endless.
For the past few years, our AI Engineers, Data Scientists and Cloud Advocates at Microsoft have been working with the University of Oxford to further the development of these technologies and further the practical application of these in the world.
The collaboration has resulted in the University of Oxford offering specific courses on AI and Cloud/Edge computing – and on the development of the AI Edge Engineer Learning Path on Microsoft Learn.
The interplay between AI, cloud, and edge is a rapidly evolving domain. Currently, many IoT solutions are based on basic telemetry. The telemetry function captures data from edge devices and stores it in a data store. Our approach extends beyond basic telemetry. We aim to model problems in the real world through machine learning and deep learning algorithms and implement the model through AI and Cloud on to edge devices. The model is trained in the cloud and deployed on the edge device. The deployment to the edge provides a feedback loop to improve the business process (digital transformation).
In the AI Edge Engineering learning path, we take an interdisciplinary engineering approach. We aspire to create a standard template for many complex areas for deployment of AI on edge devices such as Drones, Autonomous vehicles etc. The learning path presents implementation strategies for an evolving landscape of complex AI applications. Containers are central to this approach. When deployed to edge devices, containers can encapsulate deployment environments for a range of diverse hardware. CICD (Continuous integration – continuous deployment) is a logical extension to deploying containers on edge devices. In future modules in this learning path, we may include other techniques such as serverless computing and deployment on Microcontroller Units.
The engineering-led approach underpins themes / pedagogies for engineering education such as
- Systems thinking
- Experimentation and Problem solving
- Improving through experimentation
- Deployment and analysis through testing
- Impact on other engineering domains
- Forecasting behaviour of a component or system
- Design considerations
- Working within constraints/tolerances and specific operating conditions – for example, device constraints
- Safety and security considerations
- Building tools which help to create the solution
- Improving processes – Using edge(IoT) to provide an analytics feedback loop to the business process to drive processes
- The societal impact of engineering
- The aesthetical impact of design and engineering
- Deployments at scale
- Solving complex business problems by an end-to-end deployment of AI, edge, and cloud.
Ultimately, AI, cloud, and edge technologies deployed as containers in CICD mode can transform whole industries by creating an industry-specific, self-learning ecosystem spanning the entire value chain. We aspire to design such a set of templates/methodologies for the deployment of AI to edge devices in the context of the cloud. In this learning path, you will:
- Learn about creating solutions using IoT and the cloud
- Understand the process of deploying IoT based solutions on edge devices
- Learn the process of implementing models to edge devices using containers
- Explore the use of DevOps for edge devices
Produced in partnership with the University of Oxford – Ajit Jaokar Artificial Intelligence: Cloud and Edge Implementations course
Now, we’re bringing together the team at Microsoft and the academics at University of Oxford that worked to build this learning path – and you can meet them and find out more about this free Learning Path, as well as some of the amazing applications of these technologies, at our event on 1st October.
Our event will take place LIVE on Microsoft Learn Live TV at the times below and there is no cost to attend.
Thursday 1st October 2020
| Mumbai |
Tel Aviv |
Berlin |
London |
NYC |
Seattle |
| 10.30pm |
8pm |
7pm |
6pm |
1pm |
10am |
by Scott Muniz | Sep 17, 2020 | Azure, Technology, Uncategorized
This article is contributed. See the original author and article here.
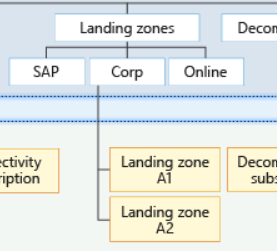
Building Azure landing zones means to leverage a scalable, modular approach to building out your environment based on a common set of design areas. Consequently, knowing and understanding the type of the application and workload (consequently called archetype) is important, as some of the Azure services do have specific requirements and platform dependencies.
The importance of the archetype also called out in the critical design areas, for example Red Hat OpenShift with regards to the DNS infrastructure.[1] Furthermore, this is also one of the reasons why you see different management groups below the landing zone management group.[2] In this specific case, which basically is the Contoso reference implementation, there are three specific landing zones: SAP, Corp and Online.
 Figure 1: Proposed management group structure with the Contoso reference implementation.
From the Contoso reference implementation:[3]
- Corp Landing Zones will include all Virtual Networks that do not expose public endpoints and that require connectivity to on-premises, as well as connectivity to other Landing Zones.
- Online Landing Zones include all Virtual Networks that have internet-facing applications via an Azure Application Gateway (v2).
- SAP represents a workload that merits separation given the implied specialization.
How to build archetype landing zones?
In order to build landing zones for used archetype, you need to understand all the specific requirements and dependencies. Unfortunately, there is no single place where you can find this information, but you need to gather this information for every Azure service used.
However, a general recommendation is to leverage the Azure Architecture Center where you can find many useful information. One specific example I would like to mention is Azure Kubernetes Service (AKS) within the Architecture Center.[4]
In the AKS production baseline (reference architecture), a baseline infrastructure that deploys an AKS cluster is built, with focus on security. The baseline includes recommendations for networking, security, identity, management, and monitoring of the cluster. Consequently, it’s aligned with the critical design areas in Enterprise-Scale.
Let’s look at one of the covered topics, which is networking security. The documented ingress and egress traffic flow are aligned with the recommendation you will find in Enterprise-Scale.[7][8] To be specific, using an Application Gateway and Web Application Firewall (WAF) to protect ingress traffic and use a Firewall, deployed in the (managed) hub, to protect egress traffic. But something that you will not find mentioned specifically in Enterprise-Scale are the recommended Azure Policy add-on for AKS.[6] Although policy-driven governance is one design principles in Enterprise-Scale, at this juncture you may have to build a specific landing zone including all the required policy and also role configurations. This may include network, storage, RBAC, and others.
Thus, in a nutshell, and also my personal approach:
- Assess the required archetype-specific policyDefinition, policyAssignments, roleDefinitions and roleAssignments.
- Assess whether there are overlaps with existing landing zones (management groups) and policyAssignments and roleAssignments.
- Assess whether a new dedicated management group, including the policyAssignments and roleAssignments, does not make the management more complicated (no need to create the same assignments on multiple management groups).
The role of Well-Architected Framework
The AKS production baseline mentioned above also follows the Azure Well-Architected Framework.[5] Though this is an AKS specific use case, all the deployed applications should follow the Well-Architected Framework, and therefore should address:
- Cost optimization
- Operation excellence
- Performance efficiency
- Reliability
- Security
Or in other words: Enterprise-Scale provides the all important recommendations for the platform engineering, the Well-Architected Framework all important recommendations for applications and workloads.
[1] https://docs.microsoft.com/en-us/azure/cloud-adoption-framework/ready/enterprise-scale/network-topology-and-connectivity#configure-dns-and-name-resolution-for-on-premises-and-azure-resources
[2] https://docs.microsoft.com/en-us/azure/cloud-adoption-framework/ready/enterprise-scale/management-group-and-subscription-organization
[3] https://github.com/Azure/Enterprise-Scale/blob/main/docs/reference/contoso/Readme.md
[4] https://docs.microsoft.com/en-us/azure/architecture/reference-architectures/containers/aks/secure-baseline-aks
[5] https://docs.microsoft.com/en-us/azure/architecture/framework/
[6] https://docs.microsoft.com/en-us/azure/governance/policy/concepts/policy-for-kubernetes
[7] https://docs.microsoft.com/en-us/azure/architecture/reference-architectures/containers/aks/secure-baseline-aks#secure-the-network-flow
[8] https://docs.microsoft.com/en-us/azure/cloud-adoption-framework/ready/enterprise-scale/network-topology-and-connectivity#plan-for-inbound-and-outbound-internet-connectivity
by Scott Muniz | Sep 17, 2020 | Uncategorized
This article is contributed. See the original author and article here.
Use of Microsoft Teams has increased greatly as of late with many of us now working from home. I have recently received a lot of questions in terms of how to complete specific tasks in Microsoft Teams amidst my friends and colleagues and thought it might be of value to share with all of you as well. Here is a list of the top 10 things to look out for when using Microsoft Teams.
- @mentioning someone not part of the Microsoft Teams Team
From my experience, security trimming within Microsoft 365 has always been working at its best. Therefore, if you try to @mention someone in a channel where the user is not part of that Team, permissions will not auto-magically change, and you simply won’t find a match for that user.
- Changing a Microsoft Team from Private to Public
From a Microsoft Teams perspective, the Team will now be available for users to join without requiring approval(s). They will become “Members” automatically if they decide to join.
And as we know, there is a close relationship between Teams and SharePoint. By changing the privacy settings, a built-in group called “Everyone except external users” will be added to the associated SharePoint site, and the user(s) will be able to access the content, with Edit permissions on the site.
Clicking on the “Conversations” tab in SharePoint (on the quick launch), the users will be added to the Microsoft 365 Group to join the fun!
- Renaming a Channel in Teams
Well… in Microsoft Teams, you now have the name you were after. Good job! BUT, it’s another story in SharePoint. And it can get extremely messy.
Every channel in Teams is translated by a folder in the SharePoint world. Therefore, you’d think that renaming a channel will rename the (associated) folder in SharePoint? Nope. It will not. At least at this point in time (Sept 2020). If you use the “Open in SharePoint” option, it will still work, but you’ll still see the old name.
Next, you try to rename the folder directly in SharePoint? Don’t do that! Because you’ll be faced with an error, and meanwhile, a folder has been RE-CREATED in SharePoint. With the old name!
Talking about confusing users…
- Creating a Private Channel in Teams
This is a feature in Microsoft Teams that we have for a few months now. That’s when the Team permissions model is broken. You want to allow a different set of people but stay in the same context (the Team). You’ll get a lock icon, and everything is beautiful.
But from a SharePoint perspective, a NEW site is created: Sure thing, you’re breaking the permissions, so things must be separated in the best way possible. Furthermore, those “private” sites are not visible in the SharePoint Admin Center, but only by using PowerShell (as of Sept 2020).
- Posting in Multiple Channels
Sometimes it’s useful to share information amongst the different Teams (you have access to) in the organization. By using the “Post in multiple channels” option, you avoid copy/paste, which could be time consuming.
By doing that, each Team you post into, will have its own thread of replies, and only changing the subject or the content of your post will be cascaded to the other channels.
- Adding Someone Else in Teams Chats
Teams Chats are usually for conversing with a particular user, not the whole team. But sometimes, you may want another colleague to join the discussion.
Because you’re currently in a One-To-One chat situation, adding a colleague will automatically create a new chat group, separated from your current one-to-one.
Note: If you’ve got a lot of chats going on, maybe you forgot you’ve already got a group chat with the same people you’re trying to add. If that’s the case, Microsoft Teams will automatically direct you to that group, and will not create a second group with the same people!
- Sharing Documents in Teams Chats
Compared to sharing in a channel, not much. The experience is the same. But the stored location is different! That’s right, files shared in Teams Chats aren’t going to SharePoint. Well… “technically” they are, but… Let’s not start confusing people.
Anyways, when sharing files in a chat (not a channel), the files are stored in your OneDrive For Business. If you look closely, there’s a folder called Microsoft Teams Chat Files. Inside are all the files shared in your chats, with the correct permissions given to appropriate users.
- Sharing Documents in Teams Chats (personal) and Adding Someone Later
In this scenario, we assume a minimum of 3 people are already chatting (as of Sept 2020), and then decide to add another participant to the conversation.
At this point, you’ll be asked to enter the name of the other participant, and choose amongst the following:
- Don’t include chat history
- Include history from the past number of days [number]
- Include all chat history
Those options are self-explanatory, and you can choose differently when adding users.
- Users Share Files in a Teams Chat Then Leave
If you leave the chat, you can’t add yourself back (even when you created the group), and only the remaining people can do so. The “Files” tab is empty BUT the files are still shared with the other participants. Your messages will persist and won’t be deleted.
Leave the organization: This is part of a wider Governance plan, as to what to do with OneDrive for Business files, emails, chats, etc… when a user is offboarded.
- Users Share Files in a Teams Chat Then Delete Those Files
Here we’re talking about deleting the files from the “Microsoft Teams Chat Files” in your OneDrive for Business.
Despite the file still being visible in the Teams Chat, the user you shared the document with, will face:
- Error message when clicking on the document,
- Error “404 Not Found” when trying to open in the browser,
- Error message “Sorry we ran into a problem, the file didn’t download” when trying to download it
Restoring the file from the Recycle Bin will resolve the problem, put the file back into the Microsoft Teams Chat Files folder, and restore the permissions.

by Scott Muniz | Sep 17, 2020 | Uncategorized
This article is contributed. See the original author and article here.
We are constantly keeping the Microsoft Defender ATP Ninja training up-to-date to include the latest content. If you want to refresh your knowledge and get updated, here is what has been added since the August update:
Legend:
|
Product videos
|
 Webcast recordings Webcast recordings
|
 Tech Community Tech Community
|
|
 Docs on Microsoft Docs on Microsoft
|
 Blogs on Microsoft Blogs on Microsoft
|
 GitHub GitHub
|
|
⤴ External
|
 Interactive guides Interactive guides
|
|
|
Module (ordered by roles SecOps & SecAdmin)
|
What’s new
|
|
SecOps Intermediate:
Module 3. Next generation protection
|
|
| SecOps Intermediate:
Module 6. Threat analytics
|
|
|
SecAdmin Fundamentals:
Module 2. Onboarding
|
|
|
SecAdmin Fundamentals:
Module 6. SIEM Integration
|
|
|
Learn about our partner integrations
|
|
by Scott Muniz | Sep 16, 2020 | Azure, Technology, Uncategorized
This article is contributed. See the original author and article here.
Hi IT Pros,
Recently, I search the internet and could not find the document for Azure ATP Setup and Troubleshooting. So, I prepare the document for our convenient reference and deployment in the future.
Please check it out and give your feedback.

AZURE ADVANCED THREAT PROTECTION
DEPLOYMENT AND TROUBLESHOOTING
The setup procedure for Azure Advanced Threat Protection – AATP, includes the following steps:
- Prepare Domain for AATP operation.
- Install Sensors for Domain Controllers
- Configure AATP
- Troubleshoot and Test.
***********
A. Prepare Domain for Azure ATP (ATTP)
- Creating the group Managed Service Accounts (gMSA) for ATTP.
In Windows Server 2012 and later Domain, services or service administrators do not need to manage password synchronization between service instances when using group Managed Service Accounts (gMSA).
You provision the gMSA in AD and then configure the service which supports Managed Service Accounts.
You can provision a gMSA using the *-ADServiceAccount cmdlets which are part of the Active Directory module. Service identity configuration on the host is supported by:
- Same APIs as sMSA, so products which support sMSA will support gMSA
- Services which use Service Control Manager to configure logon identity
- Services which use the IIS manager for application pools to configure identity
- Tasks using Task Scheduler.
gMSA Prerequisite:
- gMSA required KDS Root Key. It is used by the KDS service on DCs (along with other information) to generate passwords. It is required only once per forest.
a) To Create KDS Root key:
Add-KdsRootKey -EffectiveImmediately

Will need time for key to be propagated to all other DCs,
b) To create a gMSA using the New-ADServiceAccount cmdlet
On the Windows Server 2012 domain controller or later, Run AD Powershell:
- New-ADServiceAccount ITFarm1 -DNSHostName ITFarm1.contoso.com
-PrincipalsAllowedToRetrieveManagedPassword DC01$
-KerberosEncryptionType RC4, AES128, AES256
-ServicePrincipalNames http/ITFarm1.contoso.com/contoso.com, http/ITFarm1.contoso.com/contoso, http/ITFarm1/contoso.com, http/ITFarm1/contoso
|
Name
|
ITFarm1
|
|
DNSHostName
|
DC01.contoso.com
|
|
KerberosEncryptionType
|
None, RC4, AES128, AES256
|
|
ManagedPasswordIntervalInDays
|
Password change interval in days (default is 30 days if not provided)
|
|
PrincipalsAllowedToRetrieveManagedPassword
|
The computer accounts of the member hosts or the security group that the member hosts are a member of
|
|
SamAccountName
|
NetBIOS name for the service if not same as Name
|
|
ServicePrincipalNames
|
Service Principal Names (SPNs) for the service http/ITFarm1.contoso.com/contoso.com, http/ITFarm1.contoso.com/contoso, http/ITFarm1/contoso.com, http/ITFarm1/contoso, MSSQLSvc/ITFarm1.contoso.com:1433, MSSQLSvc/ITFarm1.contoso.com:INST01
|
Note: The password change interval can only be set during creation and cannot change later.
To create a gMSA for outbound authentication only using the New-ADServiceAccount cmdlet
- New-ADServiceAccount ITFarm1 -RestrictToOutboundAuthenticationOnly – PrincipalsAllowedToRetrieveManagedPassword DC01$
c) Add member hosts to gMSA
- Get-ADServiceAccount [-Identity] ITFarm1 -Properties PrincipalsAllowedToRetrieveManagedPassword

- Set-ADServiceAccount [-Identity] ITFarm1
-PrincipalsAllowedToRetrieveManagedPassword DC01$,DC02$,DC03$
Better option:
You could create AD Security Group “SensorDCs” whose members are Sensor DCs and set AD service account to allow retrieving password:
- Set-ADServiceAccount ITFarm1 -PrincipalsAllowedToRetrieveManagedPassword SensorDCs

B. Installing Sensor for All Domain Controllers
Prerequisites for Domain Controllers:
- Make sure Microsoft .Net Framework 4.7 or later is installed on the machine. If Microsoft .Net Framework 4.7 or later isn’t installed, the Azure ATP sensor setup package installs it, which may require a reboot of the server.
- Quick check if the Domain Controllers have enough CPU and Memory for Sensor to collect traffic packets and analyze them. The following CPU and Random Access Memory (RAM) capacity refers to the sensor’s own consumption, not the domain controller capacity.
|
Packets per second
|
CPU (cores)*
|
Memory** (GB)
|
|
0-1k
|
0.25
|
2.50
|
|
1k-5k
|
0.75
|
6.00
|
|
5k-10k
|
1.00
|
6.50
|
|
10k-20k
|
2.00
|
9.00
|
|
20k-50k
|
3.50
|
9.50
|
|
50k-75k
|
3.50
|
9.50
|
|
75k-100k
|
3.50
|
9.50
|
* This includes physical cores, not hyper-threaded cores.
** Random-access memory (RAM)
a. Create Azue ATP Instance
Sign in to https://portal.atp.azure.com with the Azure Account been potentially used as AATP administrator
New AATP Instance will be created:
Your Azure ATP instance is automatically named with the Azure AD initial domain name and created in the data center located closest to your Azure AD.
Click Configuration, Manage role groups, and use the Azure AD Admin Center link to manage your role groups.
b. Connect AATP Instance to AD Forest
The first time you open the Azure ATP portal, the following screen appears:

c. Download and Install the Sensor to DC
Download and copy the Access key. The access key is required for the Azure ATP sensor to connect to your Azure ATP instance (one-time-password for sensor deployment).
Under Configure the sensor, enter the installation path and the access key that you copied from the previous step, based on your environment:
Azure ATP sensor service and Azure ATP sensor updater service are now available in Windows Services as shown:
Finish, reboot the DC Sensor Server.
If the domain controller is the first deployed sensor, you will need to wait at least 15 minutes to allow the database backend to finish initial deployment of the necessary microservices.
If you experience any error during installation process, please refer to the Troubleshooting section (section IV)
d. To check if Sensor is working correctly:
Sign in to portal.atp.azure.com and check if sensor is working:
Installing AATP Sensor on Core Server:
- Support for Windows 2016, 2019 Server Core (nano editions are not supported)
- “Azure ATP sensor Setup.exe” /quiet NetFrameworkCommandLineArguments=”/q” AccessKey=”<Access Key>”
- Or by Powershell
./”Azure ATP sensor Setup.exe” /quiet NetFrameworkCommandLineArguments=”/q” AccessKey=”<Access Key>”
“Azure ATP sensor Setup.exe” [/quiet] [/Help] [NetFrameworkCommandLineArguments=”/q”]
C. Configure AATP
a. To Configure detection Exclusions and Honeytoken
Honeytoken accounts, which are used as traps for malicious actors – any authentication associated with these honeytoken accounts (normally dormant), triggers an alert.
Honeytokens can exist in many forms, from a dead, fake account to a database entry that would only be selected by malicious queries, making the concept ideally suited to ensuring data integrity. A particular example of a honeytoken is a fake email address used to track if a mailing list has been stolen.
- From the Azure ATP portal, click on the settings icon.
- Under Detection, click Entity tags.
- Under Honeytoken accounts, enter the Honeytoken account name and click the + sign. The Honeytoken accounts field is searchable and automatically displays entities in your network. Click Save.
- Add Sensitive Accounts:
Sensitive Accounts: Enter the account you want to monitor lateral movement, modification change, high privilege accounts.
Sensitive groups: Enter the account you want to monitor lateral movement, modification change, high privilege administrative group.
- Click Exclusions. Enter a user account or IP address to be excluded from the detection, for each type of threat.
- Click the plus sign. The Add entity (user or computer) field is searchable and will autofill with entities in your network. For more information, see Excluding entities from detections and the security alert guide.
- Click Save.
b. To receive notifications to a specific email address:
- In the Azure ATP portal, select the “settings” icon
- Click Notifications.
- Under Mail notifications, specify which notifications should be sent via email – they can be sent for new alerts (suspicious activities) and new health issues.
- Click Save.
c. Configure the Collection of Audit Events in GPO
Azure Advanced Threat Protection (Azure ATP) detection relies on specific Windows Event log entries to enhance some detections and provide additional information on who performed specific actions such as NTLM logons, security group modifications and others.
You can use the Default Domain Controllers Policy or a dedicated GPO to set the following audit policies:
- go to Computer Configuration > Policies > Windows Settings > Security Settings
- Go to Advanced Audit Policy Configuration
- Audit Policies.
- Under Audit Policies, edit each of the following policies
- select Configure the following audit events for both Success and Failure events.
|
GPO SETTINGS
|
|
Audit policy
|
Subcategory
|
Triggers event IDs
|
|
Account Logon
|
Audit Credential Validation
|
4776
|
|
Account Management
|
Audit Computer Account Management
|
4743
|
|
Account Management
|
Audit Distribution Group Management
|
4753, 4763
|
|
Account Management
|
Audit Security Group Management
|
4728, 4729, 4730, 4732, 4733, 4756, 4757, 4758
|
|
Account Management
|
Audit User Account Management
|
4726
|
|
System
|
Audit Security System Extension
|
7045
|
c. Configure the Collection of Event 8004 NTLM Authentication:
- Go to Local Policies > Security Options.
- Under Security Options, configure the specified security policies, as follows:
|
Network security: Restrict NTLM: Outgoing NTLM traffic to remote servers
|
Audit all
|
|
Network security: Restrict NTLM: Audit NTLM authentication in this domain
|
Enable all
|
|
Network security: Restrict NTLM: Audit Incoming NTLM Traffic
|
Enable auditing for all accounts
|

D. Troubleshoot and Test AATP result
a. To Test AATP
You could simulate the attacks from fake virus script and files at the following link :
https://securitycenter.microsoft.com/tutorials/all
View responses from AATP portal at https://portal.cloudappsecurity.com
b. Troubleshooting
AATP logs ‘ locations:
- Azure ATP Deployment logs
The Azure ATP deployment logs are located in the temp directory for the user who installed the product. C:UsersAdministratorAppDataLocalTemp (or one directory above %temp%).
C:Program FilesAzure Advanced Threat Protection Sensorversion numberLogs.
- Microsoft.Tri.Sensor.log – This log contains everything that happens in the Azure ATP sensor (including resolution and errors).
- Microsoft.Tri.Sensor-Errors.log – This log contains just the errors that are caught by the ATP sensor.
- Microsoft.Tri.Sensor.Updater.log – This log is used for the sensor updater process (automatically updated).
The knowns issue related to AATP setup and Configuration as follow:
- Sensor Installation error, error ID 1068:
Solution: Reboot is needed to start sensor service.
- Sensor Installation error, “Sensor Failure Communication”
System.Net.Http.HttpRequestException: An error occurred while sending the request. —>
or System.Net.WebException: Unable to connect to the remote server —>
or System.Net.Sockets.SocketException: A connection attempt failed because the connected party did not properly respond after a period of time, or established connection failed because connected host has failed to respond…
Solution: Make sure that communication is not blocked for localhost, on TCP port 444
- Sensor Installation error on DC with NIC Teaming
NIC Teaming for AATP required Npcap driver with WinPcap mode.
Solution:
- Uninstall Sensor,
- Install the Npcap version 0.9984 installer from https://nmap.org/npcap/
- using the GUI installer, deselect the loopback support and
select WinPcap mode.
- Reinstall the sensor package.
- Sensor installation error on DC with Multi Processor Group mode
For Windows Operating systems 2008R2 and 2012, Azure ATP Sensor is not supported in a Multi Processor Group mode.
Suggested possible workarounds:
If hyper threading is on, turn it off. This may reduce the number of logical cores enough to avoid needing to run in Multi Processor Group mode.
If your machine has less than 64 logical cores and is running on a HP host, you may be able to change the NUMA Group Size Optimization BIOS setting from the default of Clustered to Flat.
- Create AD Service Account with “key does not exist” error
Solution: You will need to create KDS Root key if get error: “Key does not exist”
More info:
Azure ATP setup
Server Core setup:
https://docs.microsoft.com/en-us/azure-advanced-threat-protection/atp-silent-installation
Azure ATP Configuration
https://docs.microsoft.com/en-us/azure-advanced-threat-protection/install-atp-step5
Troubleshooting
https://docs.microsoft.com/en-us/azure-advanced-threat-protection/troubleshooting-atp-known-issues#:~:text=Troubleshooting%20Azure%20ATP%20Known%20Issues%201%20Sensor%20failure,virtual%20machine%20sensor%20issue.%20…%20More%20items…%20
******
Thanks for reading this blog. Our next discussion topic would be the “AATP Operation” blog article.
Happy AATP Monitoring!
Disclaimer
The sample scripts are not supported under any Microsoft standard support program or service. The sample scripts are provided AS IS without warranty of any kind. Microsoft further disclaims all implied warranties including, without limitation, any implied warranties of merchantability or of fitness for a particular purpose. The entire risk arising out of the use or performance of the sample scripts and documentation remains with you. In no event shall Microsoft, its authors, or anyone else involved in the creation, production, or delivery of the scripts be liable for any damages whatsoever (including, without limitation, damages for loss of business profits, business interruption, loss of business information, or other pecuniary loss) arising out of the use of or inability to use the sample scripts or documentation, even if Microsoft has been advised of the possibility of such damages.

Recent Comments