by Contributed | Mar 8, 2024 | Technology
This article is contributed. See the original author and article here.
1 | What is #MarchResponsibly?
March is known for International Women’s Day – but did you know that women are one of the under-represented demographics when it comes to artificial intelligence prediction or data for machine learning? And did you know that Responsible AI is a key tool to ensure that the AI solutions of the future are built in a safe, trustworthy, and ethical manner that is representative of all demographics? J As we celebrate Women’s History Month, we will take this opportunity to share technical resources, Cloud Skills Challenges, and learning opportunities to build AI systems that behave more responsibly. Let’s #MarchResponsibly together.
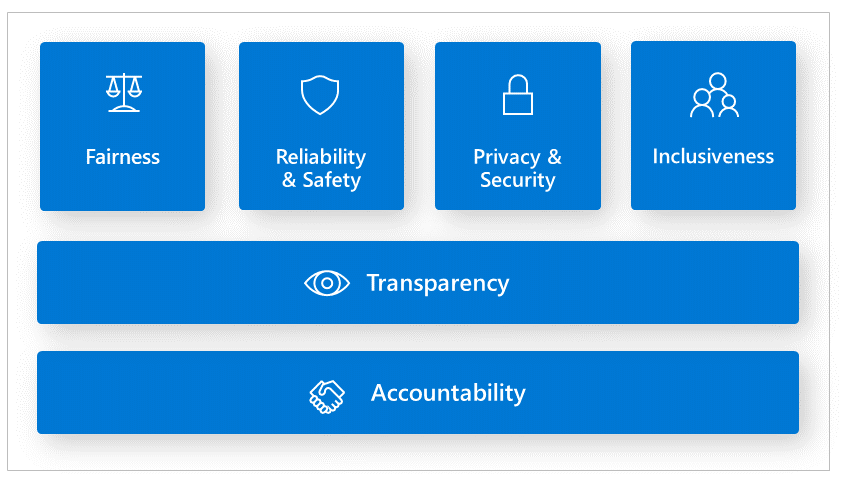
2 | What is Responsible AI?
Responsible AI principles are essential principles that guide organizations and AI developers to build AI systems that are less harmful and more trustworthy.
Reference the Responsible AI Standards
Fairness issues occur when the AI system favors one group of people vs another, even when they share similar characteristics. Inclusiveness is another area that we need to examine whether the AI system is intentionally or unintentionally excluding certain demographics. Reliability and Safety are another area that we must make sure to consider outliers and all the possible things that could go wrong. Otherwise, it can lead to negative consequences when AI has abnormal behavior. Accountability is the notion that people who design and deploy AI systems must be accountable for how their systems operate. We recently saw this example in the news where the U.S. Congress summoned social media tech leads to hearing how their social media algorithms are influencing teenagers to lose their lives and inflict self-harm. At the end of the day, who compensated the victims or their families for the loss or grief? Transparency is particularly important for AI developers to find out why AI models are making mistakes or not meeting regulatory requirements. Finally, security and privacy are an evolving concern. When an AI system exposes or accesses unauthorized confidential information this is a privacy violation.
3 | Why is Responsible AI Important?
Artificial Intelligence is at the center of many conversations. On a daily basis we are seeing increasing news headlines on the positive and negative impact of AI. As a result, we are seeing unprecedented scrutiny for governments to regulate AI and governments acting as a response. The trend has moved from building traditional machine learning models to Large Language models (LLMs). However, the AI issues remain the same. At the heart of everything is data. The underlining data collected is based on human behavior and content we create, which often includes biases, stereotypes, or lack of adequate information. In addition, data imbalance where there is an over or under representation of certain demographics is often a blind spot that leads to bias favoring one group verse another. Lastly, there are other data risks that could have undesirable AI effects such as using unauthorized or unreliable data. This can cause infringement and privacy lawsuits. Using data that is not credible will yield erroneous AI outcomes; or back decision-making based on AI predictions. As a business, not only is your AI system untrustworthy, but this can ruin your reputation. Other societal harms AI systems can inflict are physical or psychological injury, and threats to human rights.

3 | Empowering Responsible AI Practices
Having practical responsible AI tools for organizations and AI practitioners is essential to reducing negative impacts of AI system. For instance, debugging and identifying AI performance metrics are usually numeric value. Human-centric tools to analyze AI models are beneficial in revealing what societal factors impact erroneous outputs and prediction. To illustrate, the Responsible AI dashboard tools empowers data scientists and AI developers to discovers areas where there are issues:
Addressing responsible AI with Generative AI applications is another area where we often see undesirable AI outcomes. Understanding prompt engineering techniques and being able to detect offensive text or image, as well as adversarial attacks, such as jailbreaks are valuable to prevent harm.
Having resources to build and evaluate LLM applications in a fast and efficient manner is a challenge that is much needed. We’ll be sharing awesome services organizations and AI engineers can adopt to their machine learning lifecycle implement, evaluate and deploy AI applications responsibly.
4 | How can we integrate Responsible AI into our processes?
Data scientists, AI developers and organizations understand the importance of responsible AI, however the challenges they face are finding the right tools to help them identify, debug, and mitigate erroneous behavior from AI models.

Researchers, organizations, open-source community, and Microsoft have been instrumental in developing tools and services to empower AI developers. Traditional machine learning model performance metrics are based on aggregate calculations, which are not sufficient in pinpointing AI issues that are human-centric. In this #MarchResponsibly initiative you will gain knowledge on:
- Identifying and diagnosing where your AI model is producing error.
- Exploring data distribution
- Conducting fairness assessments
- Understanding what influences or drives your model’s behavior.
- Preventing jailbreaks and data breach
- Mitigating AI harms.
4 | How can you #MarchResponsibly?
- Join in the learning and communications – each week we will share our Responsible AI learnings!
- Share, Like or comment.
- Celebrate Women making an impact in responsible AI.
- Check out the Azure Responsible AI workshop.
- Check out the Responsible AI Study Guide to Microsoft’s FREE learning resources.
- Stay tuned to our #MarchResponsibly hashtag more resources.
5 | Share the Message!
by Contributed | Mar 8, 2024 | Technology
This article is contributed. See the original author and article here.
In this fifth and final blog post in our MLOps Production series, guest blogger Martin Bald, Senior Manager Developer Community from one of our startup partners Wallaroo.AI will go through model workload orchestration and show how to continue the journey for building scale and ease of management for deploying sustainable and value producing models into production.
Introduction
Throughout this blog series we have seen how we can easily and quickly get our ML models into production, validate them for desired outcomes, proactively monitor for data drift and take swift proactive action to ensure we have optimal model output. As we scale and deploy more models into this production process across multiple cloud environments, Data Scientists and ML Engineers are burdened with spending too many valuable cycles on the data plumbing and repetitive tasks needed just to get models to run and produce business reports – often using tools not designed for AI workloads.
Data engineers are also spending far too many cycles supporting data scientists as they try to run and analyze ML pipelines instead of building robust upstream data pipelines to ensure business continuity. In attempting to achieve value from their AI efforts, they soon find bottlenecks preventing them from realizing the production demands they need.
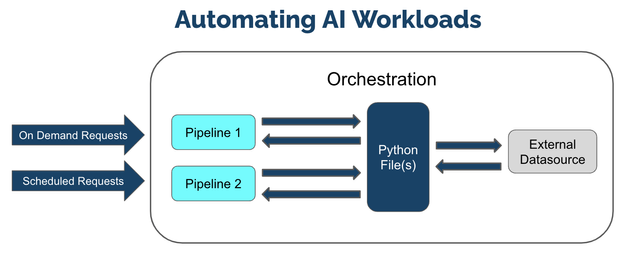
ML Workload Orchestration flow works within 3 tiers:
Tier
|
Description
|
ML Workload Orchestration
|
User created custom instructions that provide automated processes that follow the same steps every time without error. Orchestrations contain the instructions to be performed, uploaded as a .ZIP file with the instructions, requirements, and artifacts.
|
Task
|
Instructions on when to run an Orchestration as a scheduled Task. Tasks can be Run Once, where it creates a single Task Run, or Run Scheduled, where a Task Run is created on a regular schedule based on the Kubernetes cronjob specifications. If a Task is Run Scheduled, it will create a new Task Run every time the schedule parameters are met until the Task is killed.
|
Task Run
|
The execution of a task. These validate business operations and successfully identify any unsuccessful task runs. If the Task is Run Once, then only one Task Run is generated. If the Task is a Run Scheduled task, then a new Task Run will be created each time the schedule parameters are met, with each Task Run having its own results and logs.
|
Fig 1.
We can manage our models and pipelines and control how we deploy and undeploy resources and invite collaborators to work on projects with us.
We see from Fig 1 above that at its core orchestration is a Python file, one or more Python files to be exact. These Python files can contain any kind of processing code, other dependencies that we need. Essentially these files will contain references to one or more deployed pipelines. This allows us to schedule runs of these files and reference these pipelines that are deployed as needed.
It also fully supports the connections that we make so I can have as many of those connections as we need. We often see people using these automations to take live input feeds into the pipelines and write the results to another external data source or file store.
Once these are set up I can wrap them all in this orchestration and register that orchestration in the platform. This means that I can then create what is called Tasks or Runs of this Orchestration. These can be done On Demand or Ad Hoc or can be scheduled to run on a regular basis. For example we could schedule it to run every minute, day, week, month etc,.
This means that we can easily define, automate, and scale recurring production AI workloads that ingest data from predefined data sources, run inferencing, and deposit the results to a predefined location efficiently and easily with added flexibility for the needs of your business.
The remainder of this blog post will show practical examples of setting up Run Once and Schedule Run Tasks. You can access the tutorial ML Workload Orchestration Simple Tutorial and use the free Wallaroo.AI Community Edition which you can install to GitHub Codespaces, or Azure. There are also Free Inference Servers available on the Azure Marketplace to try out.
AI Workload Orchestration Example.
This example provides a quick set of methods and examples regarding Wallaroo Connections and Wallaroo ML Workload Orchestration.
In this example we will we will step through:
- Create a Wallaroo connection to retrieving information from an external source.
- Upload Wallaroo ML Workload Orchestration.
- Run the orchestration once as a Run Once Task and verify that the information was saved in the pipeline logs.
- Schedule the orchestration as a Scheduled Task and verify that the information was saved to the pipeline logs.
The first step is to import the various libraries we’ll use for this example.
import wallaroo
from wallaroo.object import EntityNotFoundError, RequiredAttributeMissing

# to display dataframe tables
from IPython.display import display
# used to display dataframe information without truncating
import pandas as pd
pd.set_option('display.max_colwidth', None)
import pyarrow as pa

import time

# Used to create unique workspace and pipeline names
import string
import random

# make a random 4 character suffix
suffix= ''.join(random.choice(string.ascii_lowercase) for i in range(4))
display(suffix)
The next step is to connect to Wallaroo through the Wallaroo client and set up the variables we will use. The Python library is included in the Wallaroo install and available through the Jupyter Hub interface provided with your Wallaroo environment.
Note: If logging into the Wallaroo instance through the internal JupyterHub service, use wl = wallaroo.Client() as seen below.
wl = wallaroo.Client()
# Setting variables for later steps
workspace_name = f'simpleorchestrationworkspace{suffix}'
pipeline_name = f'simpleorchestrationpipeline{suffix}'
model_name = f'simpleorchestrationmodel{suffix}'
model_file_name = './models/rf_model.onnx'
inference_connection_name = f'external_inference_connection{suffix}'
inference_connection_type = "HTTP"
inference_connection_argument = {'host':'https://github.com/WallarooLabs/Wallaroo_Tutorials/raw/main/wallaroo-testing-tutorials/houseprice-saga/data/xtest-1k.arrow'}
The following helper methods are used to either create or get workspaces, pipelines, and connections.
# helper methods to retrieve workspaces and pipelines

def get_workspace(name):
    workspace = None
    for ws in wl.list_workspaces():
        if ws.name() == name:
            workspace= ws
    if(workspace == None):
        workspace = wl.create_workspace(name)
    return workspace

def get_pipeline(name):
    try:
        pipeline = wl.pipelines_by_name(name)[0]
    except EntityNotFoundError:
        pipeline = wl.build_pipeline(name)
    return pipeline
Next we will create our workspace and pipeline for the tutorial. If this tutorial has been run previously, then this will retrieve the existing ones with the assumption they’re for us with this tutorial.
We’ll set the retrieved workspace as the current workspace in the SDK, so all commands will default to that workspace.
workspace = get_workspace(workspace_name)
wl.set_current_workspace(workspace)

pipeline = get_pipeline(pipeline_name)
We’ll now upload our model into our sample workspace, then add it as a pipeline step before deploying the pipeline to it’s ready to accept inference requests.
# Upload the model

housing_model_control = (wl.upload_model(model_name,
                                         model_file_name,
                                         framework=wallaroo.framework.Framework.ONNX)
                                         .configure(tensor_fields=["tensor"])
                        )

# Add the model as a pipeline step

pipeline.add_model_step(housing_model_control)

Fig 2.
deploy the pipeline
pipeline.deploy()
Output:
Waiting for deployment. This will take up to 45s……………….ok
 Fig 3
Fig 3
We will create the data source connection via the Wallaroo client command create_connection.
We’ll also create a data connection named inference_results_connection with our helper function get_connection that will either create or retrieve a connection if it already exists.
wl.create_connection(inference_connection_name, inference_connection_type, inference_connection_argument)

Fig 4.
The method Workspace add_connection(connection_name) adds a Data Connection to a workspace. We’ll add connections to our sample workspace, then list the connections available to the workspace to confirm.
workspace.add_connection(inference_connection_name)
workspace.list_connections()
With the pipeline deployed and our connections set, we will now generate our ML Workload Orchestration. Orchestrations are uploaded to the Wallaroo instance as a ZIP file. Orchestrations are uploaded with the Wallaroo client upload_orchestration(path) method.
We will loop until the uploaded orchestration’s status displays ready.
orchestration = wl.upload_orchestration(path="./remote_inference/remote_inference.zip")

while orchestration.status() != 'ready':
    print(orchestration.status())
    time.sleep(5)
Output:
pending_packaging
pending_packaging
packaging
packaging
packaging
packaging
packaging
packaging
packaging
packaging
wl.list_orchestrations()
 Fig 5.
Once an Orchestration has the status ready, it can be run as a task. The task runs options can be scheduled or run once.
Run Once Task
We’ll do both a Run Once task and generate our Run Once Task from our orchestration.
Tasks are generated and run once with the Orchestration run_once(name, json_args, timeout) method. Any arguments for the orchestration are passed in as a Dict. If there are no arguments, then an empty set {} is passed.
# Example: run once

import datetime
task_start = datetime.datetime.now()
task = orchestration.run_once(name="simpletaskdemo",
                              json_args={"workspace_name": workspace_name,
                                         "pipeline_name": pipeline_name,
                                         "connection_name": inference_connection_name
                                            })
The list of tasks in the Wallaroo instance is retrieved through the Wallaroo Client list_tasks() method. This returns an array list of the following: Fig 6.
For this example, the status of the previously created task will be generated, then looped until it has reached status started.
while task.status() != "started":
    display(task.status())
    time.sleep(5)
Output:
'pending'
‘pending’
‘pending’
We can view the inferences from our logs and verify that new entries were added from our task. We can do that with the task logs() method.
In our case, we’ll assume the task once started takes about 1 minute to run (deploy the pipeline, run the inference, undeploy the pipeline). We’ll add in a wait of 1 minute, then display the logs during the time period the task was running.
time.sleep(60)

task_end = datetime.datetime.now()
display(task_end)

pipeline.logs(start_datetime = task_start, end_datetime = task_end)
Output:
datetime.datetime(2023, 5, 23, 15, 28, 30, 718361)
Warning: Pipeline log size limit exceeded. Please request logs using export_logs
 Fig 7.
Output:
492 rows × 4 columns
Scheduled Run Task
The other method of using tasks is as a scheduled run through the Orchestration run_scheduled(name, schedule, timeout, json_args). This sets up a task to run on a regular schedule as defined by the schedule parameter in the cron service format.
e.g.
This task runs on the 42nd minute of every hour.
schedule={'42 * * * *'}
The following schedule runs every day at 12 noon from February 1 to February 15 2024 – and then ends.
schedule={'0 0 12 1-15 2 2024'}
For our example we will create a scheduled task to run every 5 minutes, display the inference results, then use the Orchestration kill task to keep the task from running any further.
It is recommended that orchestrations that have pipeline deploy or undeploy commands be spaced out no less than 5 minutes to prevent colliding with other tasks that use the same pipeline.
scheduled_task_start = datetime.datetime.now()
scheduled_task = orchestration.run_scheduled(name="simple_inference_schedule",
schedule="*/5 * * * *",
timeout=120,
json_args={"workspace_name": workspace_name,
"pipeline_name": pipeline_name,
"connection_name": inference_connection_name
})
while scheduled_task.status() != "started":
display(scheduled_task.status())
time.sleep(5)
Output:
'pending'
wait 420 seconds to give the scheduled event time to finish
time.sleep(420)
scheduled_task_end = datetime.datetime.now()

pipeline.logs(start_datetime = scheduled_task_start, end_datetime = scheduled_task_end)

492 rows × 4 columns
Fig 8.
Finally you can use the below commands to list the scheduled run tasks, and end them using the kill task command.
wl.list_tasks()

scheduled_task.kill()
Conclusion
In this final blog post in our series we have addressed a very common set of challenges that AI teams face with production AI workloads and how to solve them through Model Workload Orchestration. This means that we can easily define, automate, and scale recurring production AI workloads that ingest data from predefined data sources, run inferencing, and deposit the results to a predefined location efficiently and easily.
If you want to try the steps in this blog post series you can access the tutorials at this link and use the free inference servers available on the Azure Marketplace. Or you can download a free Wallaroo.AI Community Edition and .
Wallaroo.AI is a unified production AI platform built for Data Scientists and ML Engineers for easily deploying, observing, and optimizing machine learning in production at scale – in any cloud, on-prem, or at the edge.
by Contributed | Mar 6, 2024 | Technology
This article is contributed. See the original author and article here.
Windows 365 Customer Lockbox is now generally available for all organizations with a Microsoft 365 E5 or Office 365 E5 subscription. This security feature ensures that Microsoft cannot access content in your Cloud PCs to do service operations without your explicit approval.
What is Customer Lockbox?
In some cases, Microsoft support engineers may need to access your content to determine the root cause of an issue and address it. Windows 365 Customer Lockbox requires the engineer to request access from you as a final step in the approval workflow.
With Customer Lockbox, you have the option to approve or deny the request for your organization, and provide direct-access control to your content.
Customer Lockbox is included in the Microsoft 365 or Office 365 E5 subscriptions and can be added to other plans that have an Information Protection and Compliance or an Advanced Compliance add-on subscription. See Plans and pricing for more information.
How to use Windows 365 Customer Lockbox
Turn Customer Lockbox requests on or off
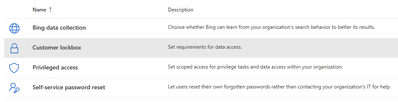
You can turn on Customer Lockbox controls in the Microsoft 365 admin center. When you turn on Customer Lockbox, Microsoft must obtain your organization’s approval before accessing any of your tenants’ content.
- Using a work or school account that has the global administrator role, go to https://admin.microsoft.com/ and sign in.
- Choose Settings > Org Settings > Security & Privacy
- In Security & Privacy, select Customer Lockbox.
Once you select Customer Lockbox, a right-hand column will appear. Check the “Require approval for all data access request” checkbox and press the Save button on the bottom of the column to turn on the feature.

Approve or deny a Customer Lockbox request
- Using a work or school account that has either the Global Administrator or the Customer Lockbox access role assigned, go to https://admin.microsoft.com/ and sign in.
- Choose Support > Customer Lockbox Requests

- A list of Customer Lockbox requests is displayed.

- Select the Customer Lockbox request, then choose Approve or Deny.

- A green confirmation message about the approval of the Customer Lockbox request will be displayed.


Auditing access
Once just-in-time (JIT) access expires, the troubleshooting ticket is marked as complete. You can then visit compliance.microsoft.com and select Audit under the Solutions category to see what was done during the session. For Windows 365 specific records, under Record types, select Windows365CustomerLockbox.

Retention policies can be updated based on your organization’s needs. For more information, explore Manage audit log retention policies and Audit log activities for Microsoft 365 services,
Learn more about Customer Lockbox and Windows 365 security
For more information about Customer Lockbox as a feature in general, see the documentation on Microsoft Purview Customer Lockbox. We also invite you to learn more about Customer Lockbox requests and security concepts in Windows 365.
To learn about submitting support tickets in the Microsoft Intune admin center, please see Get support in the Microsoft Intune admin center.
Continue the conversation. Find best practices. Bookmark the Windows 365 Tech Community, then follow us @MSWindowsITPro on X/Twitter and on LinkedIn. Looking for support? Visit Windows on Microsoft Q&A.


Recent Comments