This article is contributed. See the original author and article here.
Continuing our vision for Microsoft Copilot to bring the power of generative AI to everyone across work and life, we’re expanding availability and purchase options for individuals and organizations and bringing new value to Copilot Pro subscribers.
This article is contributed. See the original author and article here.
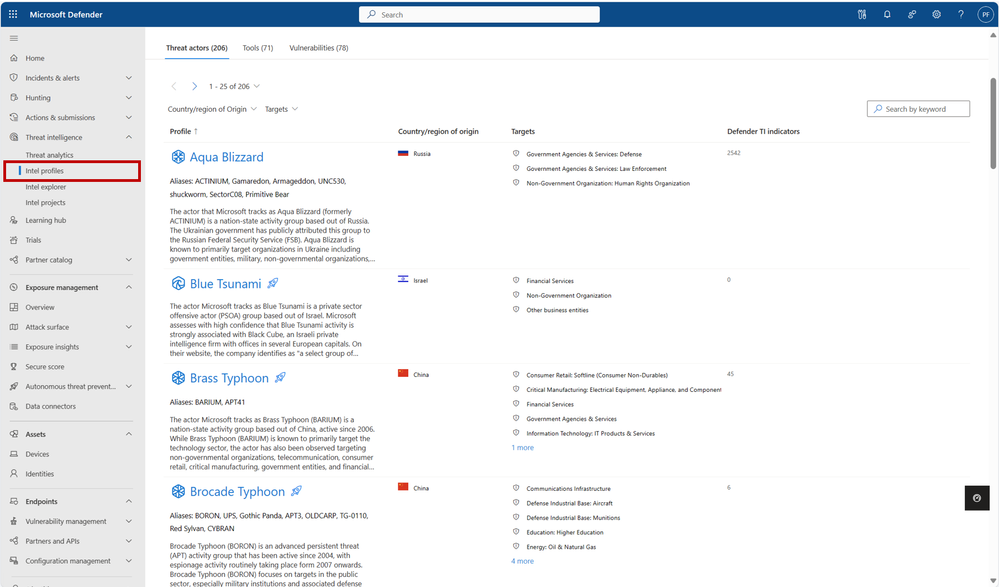
The Microsoft Defender Threat Intelligence (MDTI) team is excited to announce that we are revealing previews for each of our 350+ intel profiles to all Defender XDR customers for the first time. This represents Microsoft’s broadest expansion of threat intelligence content to non-MDTI premium customers yet, adding nearly 340 intel profiles to Defender XDR customers’ view, including over 200 tracked threat actors, tools, and vulnerabilities that Microsoft has not named anywhere else.
Note: Profiles in the standard edition will not contain indicators of compromise (IOCs), which are reserved for MDTI premium customers.
Intel Profiles standard edition experience
You can visit our more than 350 intel profiles on the “Intel profiles” tab under the “Threat intelligence” blade in the left navigation menu:
350+ intel profiles are now available to all Defender XDR customers via the “Intel profiles” tab under the threat intelligence blade, including information on over 200 threat actors, tools, and vulnerabilities that Microsoft has not mentioned publicly to date.
Currently, our corpus of shareable finished threat intelligence contains 205+ named threat actors, 70+ malicious tools, and 75+ vulnerabilities, with more to be released on a continual basis. To view our full catalog for each of the three profile types – Threat Actors, Tools, and Vulnerabilities – click their respective tab near the top of the page.
In the intel profiles page list view, profiles containing limited information are marked with an icon. However, don’t let this symbol stop you – each of these profiles contain the same detailed summary (“Snapshot”) written at the start of the content for premium customers. For threat actor profiles, this section often includes a valuable description of the actor’s origins, activities, techniques, and motivations. On tool and vulnerability profiles, these summaries describe the malicious tool or exploit and illustrate its significance, with details from real-world activity by threat actor groups when available. This information enables leaders of threat intelligence and security programs to take an intel-led approach, starting with the threat actors, tools, and vulnerabilities that matter most to their organization and building a robust strategy outward.
Our intel profiles containing full content can be distinguished from the limited profiles in the list view as they do not contain the icon. Full profiles can contain much additional detail beyond a Snapshot, including:
Real details from past threat actor activity, tool usage, and vulnerability exploits, including phishing templates, malicious attachments, code excerpts and more from actual threat investigations
Detailed TTPs (tactics, techniques, and procedures) and attack path analyses, based on both past and potential future exploitation attempts, and their corresponding MITRE ATT&CK (Adversarial Tactics, Techniques, and Common Knowledge) techniques
Detections and Hunting Queries, which list alerts and detections that may indicate the presence of the above threats
Advanced Hunting queries to identify adversary presence within a customer’s network
Microsoft Analytic Rules, which result in alerts and incidents to signal detections associated with adversarial activity
Recommendations to protect your organization against the threat
And References for more information.
Full intel profiles contain extensive information on threat actors, tools, and vulnerabilities by leveraging details from actual threat investigations.
On the intel profiles page, each of the tabs for the three profile types contains a local search box, enabling you to quickly discover profiles of interest by matching keywords. Additionally, the Threat actors tab enables you to filter for the Country/Region of Origin and Targets (representing Targeted Industries) of actor groups, helping to narrow the list down to the profiles that are most important to your organization:
Use the filter and search functions to narrow profile lists down to the content that is most relevant to your organization.
With the inclusion of MDTI results in Defender XDR’s global search bar, you also may use this top-level search to discover intel profiles from anywhere in the portal based on keywords. Refer to the linked blog for inspiration on what you can search for and what other MDTI results you can expect.
About intel profiles
Intel profiles are Microsoft’s definitive source of shareable knowledge on tracked threat actors, malicious tools, and vulnerabilities. Written and continuously updated by our dedicated security researchers and threat intelligence experts, intel profiles contain detailed analysis of the biggest threats facing organizations, along with recommendations on how to protect against these threats and IOCs to hunt for these threats within your environment.
As the defender of four of the world’s largest public clouds, Microsoft has unique visibility into the global threat landscape, including the tools, techniques, and vulnerabilities that threat actors are actively using and exploiting to inflict harm. Our team of more than 10,000 dedicated security researchers and engineers is responsible for making sense of more than 65 trillion security signals per day to protect our customers. We then build our findings into highly digestible intel profiles, so high-quality threat intelligence is available where you need it, when you need it, and how you need it.
Just one year after launching intel profiles at Microsoft Secure last year, Microsoft’s repository of shareable threat intelligence knowledge has expanded to over 205 named threat actors, 70 tools, and 75 vulnerabilities, with more added every month.
This article is contributed. See the original author and article here.
In this month’s Empowering.Cloud community update, we cover the latest briefings from MVPs, the Microsoft Teams Monthly Update, updates in the Operator Connect world and upcoming industry events. There’s lots to look forward to!
Jason Wynn, MVP and Presales Specialist at Carillion, shows us how to get the most out of our meeting room experience, troubleshoot some common issues and explains how and why we’re trying to get all this information together.
Use of Teams Admin Center, Microsoft Pro Portal and Power BI reports
MVP Kevin McDonnell introduces us to the topic of M365 for Frontline Workers, including challenges faced by frontline works and how Microsoft 365 can help provide a solution to some of these.
Challenges faced by Frontline Workers
Challenges faced by managers and organizers
Solutions in Microsoft 365 for Frontline Workers include:
M365 can help boost productivity, improve employee experience and provide personalized information and support for Frontline Workers
In this month’s Microsoft Teams monthly update, MVP Tom Arbuthnot gives us the rundown on all the latest Microsoft Teams news, including new certified devices and Shared Calling in TAC.
Teams and Microsoft Apps on Apple Vision Pro
Shared Calling now in Teams Admin Center
Teams 2.1 client cutover coming soon
Improved Copilot in Teams and in Windows for prompting, chat history and a prompt library
Microsoft 365 Backup Public Preview with fast restorability and native data format
Android 9 and Android 10 Device Certificate Extensions
Pexip bringing a ‘Teams-like experience’ to Cloud Video Interop (CVI)
Microsoft Teams Insider Podcast
Complex Voice Strategies for Global Organizations with Zach Bennett
Philipp Beck, Former CEO and Founder of Luware, and MVP Tom Arbuthnot delve into key developments in the world of Microsoft Teams and Contact Center.
Microsoft Teams Operator Connect Updates
The numbers are continuing to rise in the Microsoft Teams Operator Connect world with there now being 89 operators and 86 countries covered. Will we reach 100 providers or countries first?!
Check out our full Power BI report of all the Operators here:
Teams Fireside Chat – 14th March, 16:00 GMT | Virtual
Hosts: MVP Tom Arbuthnot
Guest Speaker: MVPs and Microsoft speakers LIVE from MVP summit
This month’s Teams Fireside Chat is a special one as Tom Arbuthnot will be hosting live from the MVP Summit at the Microsoft campus in Redmond, where he’ll be joined by other MVPs for an expertise-filled session.
Microsoft Teams Devices Ask Me Anything – 18/19th March | Virtual
Microsoft Teams Devices Ask Me Anything is a monthly community which gives you all an update on the important and Microsoft Teams devices news, as well as the chance to ask questions and get them answered by the experts. We have 2 sessions to cover different time zones, so there’s really no excuse not to come along to at least one!
EMEA/NA – 18th March, 16:00 GMT | Virtual
Hosts: MVP Graham Walsh, Michael Tressler, Jimmy Vaughan
Everything You Need to Know as a Microsoft Teams Service Owner at Enterprise Connect – 25th March | In-Person
Training Session: led by MVP Tom Arbuthnot
Whether you’re in the network team, telecoms team or part of the Microsoft 365 team, MVP Tom Arbuthnot’s training session will help you avoid common pitfalls and boost your success as he takes you through everything you need to know as a Microsoft Teams Service Owner.
Teams Fireside Chat – 11th April, 16:00 GMT | Virtual
Hosts: MVP Tom Arbuthnot
Guest Speaker: Vandana Thomas, Product Leader, Microsoft Teams Phone Mobile
Join other community members as we chat with Microsoft’s Product Leader for Teams Phone Mobile, Vandana Thomas on April’s Teams Fireside Chat. As usual, we’ll open up the floor to discussion to bring along your burning Microsoft Teams questions to get them answered by the experts.
Comms vNext – 23-24 April | In-Person | Denver, CO
Comms VNext is the only conference in North America dedicated to Microsoft Communications and Collaboration Technologies and aims to bring the community together for an event full of deep technical sessions from experts, an exhibition hall with 40 exhibitors and some great catering too!
This article is contributed. See the original author and article here.
Afua Bruce is a leading public interest technologist, professor, founder and CEO of ANB Advisory, and author of The Tech that Comes Next. Her work spans AI ethics, equitable technology, inclusive data strategies, and STEM opportunities. We were thrilled to welcome her insights and experiences to the keynote stage at the Global Nonprofit Leaders Summit.
In her keynote presentation, Afua explores:
How nonprofit leaders can use AI to invent a better future, and shares three pillars of leadership: leading people, leading processes, and leading technology.
Examples of how nonprofits have used AI to improve their hiring, communication, and decision making, and how they have created guidelines and policies for using AI responsibly and ethically.
Tips on how to get started with AI—such as identifying pain points, exploring available tools, and learning with nonprofit and tech communities.
Afua explored the theme of community-guided innovation in her earlier blog, How nonprofits can manage and lead transformation together, emphasizing that collaboration and connection are critical to how nonprofits meet the challenges and speed of AI transformation.
This article is contributed. See the original author and article here.
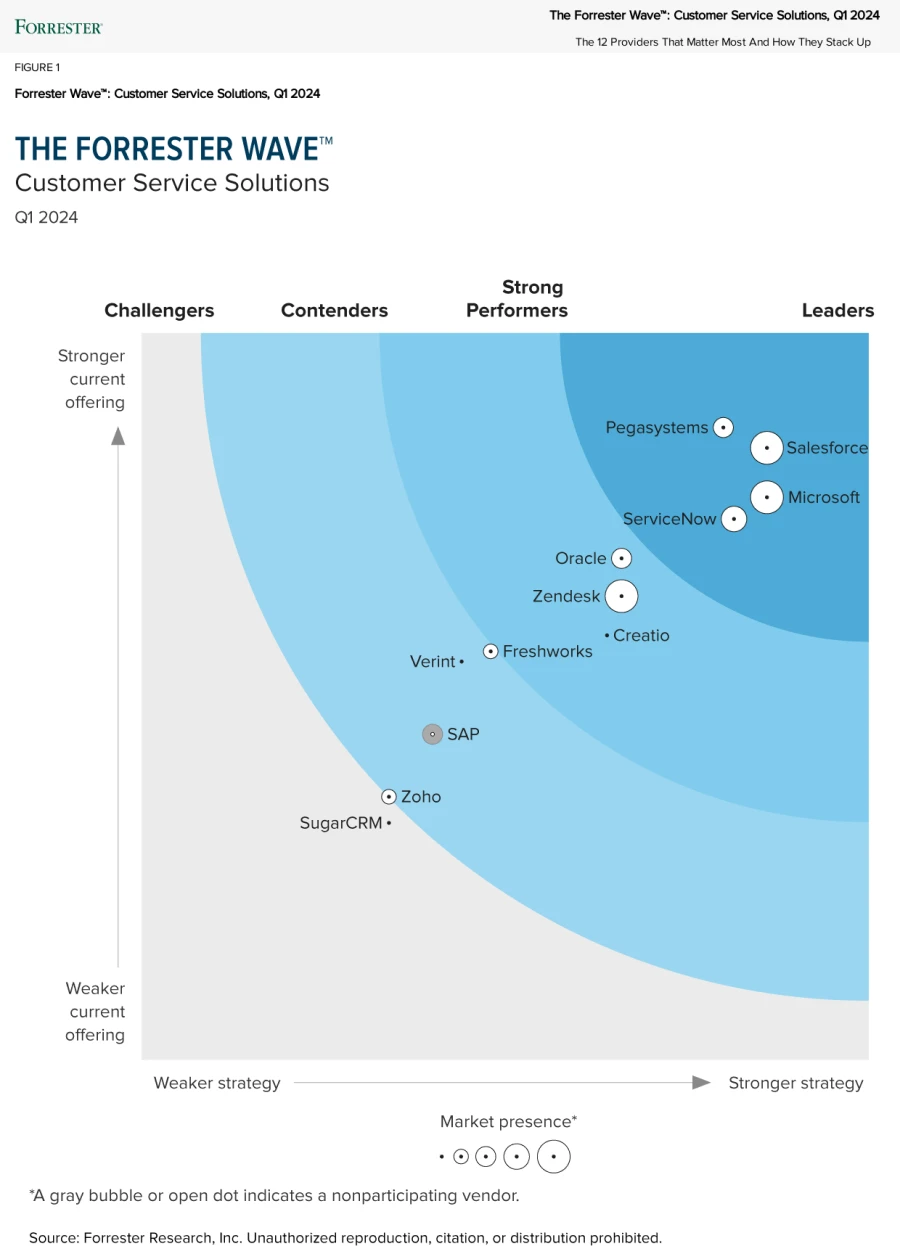
Most organizations find it’s no longer good enough to just measure successful service engagements solely on whether a customer issue is resolved. Instead, they aim to deliver personalized, fast service experiences at every touchpoint through all engagement channels. The best way to do this is by building long-term customer loyalty and transforming operations with modern, AI-enhanced capabilities across all service processes and interactions. That’s why we are continuously enhancing Microsoft Dynamics 365 Customer Service to empower our customers and help them differentiate their service organizations. Today, we’re happy to announce that Microsoft has been named a Leader in The Forrester WaveTM: Customer Service Solutions, Q1 2024 attaining top scores possible in the business intelligence, process management, and collaboration criteria.
Investing in AI and a unified platform for modernizing customer service
More and more, service agents feel increased pressure to provide smart, fast, and customized answers when presented with customer issues. But finding information and experts to quickly resolve an issue can present its own challenges. According to the Microsoft Work Trend Index, 62% of people spend too much time scouring for information during their workday. For service organizations, agents who must scramble to find information can mean both slower time to resolution for individual cases and a lower number of cases addressed per day overall. The agent experience is the heart of Dynamics 365 Customer Service. The key to improving satisfaction in service delivery is enabling agents to take customer requests from any channel, handle multiple sessions at a time, interact with multiple apps without losing context, and enhance their workflow with productivity tools. Our answer is to provide a solution that helps service organizations harness the power of data, AI, automation, and collaboration to help agents focus on resolving customer issues quickly. Dynamics 365 Customer Service helps service organizations unlock trusted knowledge to accelerate onboarding and case resolution, improve efficiency, and automate tasks for agents in their flow of work.
More recently, we’ve brought Microsoft Copilot into Dynamics 365 Customer Service. Copilot provides real-time, AI-powered assistance to help customer support agents solve issues faster by relieving them from mundane tasks—such as searching and note-taking—and freeing their time for more high-value interactions with customers. Without costly development time, organizations can simply point to their data and, in a few minutes, unlock generative AI-powered conversations across their knowledge bases and other sources. Agents can use Copilot to respond to incoming email, factoring in other relevant customer data to produce a personalized, accurate, and editable reply. Contact center managers can also use Copilot analytics to view usage and better understand how next-generation AI impacts the business. In addition, service agents are empowered with additional AI experiences and automation to help fuel collaboration and productivity for delivering world-class customer service at scale. We recently completed a study that evaluated the impact of Copilot in Dynamics 365 Customer Service on agent productivity for our own Microsoft Support agents providing customer care across the commercial business. They found that agents can quickly look up answers to high-volume requests and avoid lengthy investigations of previously documented procedures. One of our lines of business with these characteristics has realized a 22% reduction in time to close cases using Copilot.
At Microsoft, we strive to enable our customers to empower their customers to engage on their terms, at their optimal times, and on their channels of choice. We believe we have earned our position as a Leader by developing a customer service solution that enables agents to focus on delivering more cutting-edge service experiences by harnessing available data and using the power of generative AI to deliver consistent, personalized customer experiences; maximize their productivity; and optimize service operations. And with our comprehensive service platform that includes automation, knowledge management, collaboration, and more, service organizations can streamline case management, enable more personalized service, and get a clear, 360-degree view into how their service organization is performing. As Forrester points out in its report, “Microsoft’s vision is broader than just customer service, and it’s firmly grounded in three principles: Engagement must be personalized via AI; customer service must be highly collaborative; and outcomes must drive improvements. Microsoft Dynamics 365 Customer Service actualizes this vision.”
Building on next-generation AI that’s enterprise ready
Microsoft Dynamics 365 is built on Microsoft Azure OpenAI Service, so our customers can rest assured that it offers data privacy and protection. Azure OpenAI Service offers a range of privacy features, including data encryption and secure storage, enabling organizations to control access to their data, and provides detailed auditing and monitoring capabilities.
Creating responsible AI solutions
Most importantly, we are committed to creating responsible AI by design. Our work is guided by a core set of principles: fairness, reliability and safety, privacy and security, inclusiveness, transparency, and accountability. We are putting those principles into practice across the company to develop and deploy AI that will have a positive impact on society.
The Forrester Wave™
Microsoft is a Leader in the The Forrester Wave™: Customer Service Solutions, Q1 2024.
We’re excited to be recognized as a Leader in the Forrester Wave and are committed to providing innovative customer service platform capabilities to help our customers continuously improve their own customer service offerings.
This article is contributed. See the original author and article here.
Introduction:
JavaScript, the powerhouse behind many applications, sometimes faces limitations when it comes to memory in a Node.js environment. Today, let’s dive into a common challenge faced by many applications – the default memory limit in Node.js. In this blog post, we’ll explore how to break free from these limitations, boost your application’s performance, and optimize memory usage.
Understanding the Challenge:
Node.js applications are confined by a default memory limit set by the runtime environment. This can be a bottleneck for memory-intensive applications. Fortunately, Node.js provides a solution by allowing developers to increase this fixed memory limit, paving the way for improved performance.
Checking Current Heap Size:
Before making any tweaks, it’s crucial to grasp your Node.js application’s current heap size. The code snippet below, saved in a file named `heapsize.js`, uses the V8 module to retrieve the system’s current heap size:
For blessed images (Images developed by Microsoft), SSH would be enabled by default, however your app should be up and running without any issues.
Under configuration blade -> General Settings on Azure app service. Ensure that SSH is “on” as shown below,
After successfully loading your SSH session, navigate to /home and create a file named heapsize.js using the command – touch heapsize.js. Edit the file using the vi editor with the command – vi heapsize.js.
Copy the code snippet above, then save the file by entering `!wq` and pressing Enter.
Run the file using `node heapsize.js`, and you will receive the following output.
Note: In case you encounter v8 module not found issues, attempt to resolve it by installing v8 from SSH using the command – `npm install v8`.
Adjusting Memory Limits:
To increase the memory limit for your Node.js application, use the `–max-old-space-size` flag when starting your script. The value following this flag denotes the maximum memory allocation in megabytes.
For instance, running the following command increases the heap size:
node --max-old-space-size=6000 heapsize.js
This modification results in an expanded total heap size, furnishing your application with more memory resources.
Testing on Azure app service:
In the section on how-to run-on Azure App Service, we’ve learned how to check the current heap size. Now, for the same file, let’s attempt to increase the heap size and conduct a test.
Execute the command “node –max-old-space-size=6000 heapsize.js” in the WebSSH session. You can observe the difference with and without the argument –max-old-space-size=6000.
Automating Memory Adjustments with App Settings on Azure App Service:
For a more streamlined approach, consider adding the `–max-old-space-size` value directly as an app setting. This setting allows you to specify the maximum memory allocation for your Node.js application.
In the above snippet, replace “ with the desired maximum memory allocation for your application.
Sample screenshot:
How to choose the value to which you can increase the heap size?
Selecting an appropriate heap size value is contingent upon the constraints of the app service plan. Consider a scenario where you’re utilizing a 4-core CPU, and concurrently running three applications on the same app service plan. It’s crucial to recognize that the CPU resources are shared among these applications as well as certain system processes.
In such cases, a prudent approach involves carefully allocating the heap size to ensure optimal performance for each application while taking into account the shared CPU resources and potential competition from system processes. Balancing these factors is essential for achieving efficient utilization of the available resources within the specified app service plan limits.
For example:
Let’s consider an example where you have a 4-core CPU and a total of 32GB memory in your app service plan. We’ll allocate memory to each application while leaving some headroom for system processes.
Total Memory Available: 32GB
System Processes Overhead: 4GB Reserve 4GB for the operating system and other system processes.
Memory for Each Application: (32GB – 4GB) / 3 = 9.33GB per Application Allocate approximately 9.33GB to each of the three applications running on the app service plan.
Heap Size Calculation for Each Node.js Application: Suppose you want to allocate 70% of the allocated memory to Node.js heap. Heap Size per Application = 9.33GB * 0.7 ≈ 6.53GB
Total Heap Size for All Applications: 3 * 6.53GB = 19.59GB This is the combined heap size for all three Node.js applications running on the app service plan.
Remaining Memory for Other Processes: (32GB – 19.59GB) = 12.41GB
The remaining memory can be utilized by other processes and for any additional requirements.
These calculations are approximate and can be adjusted based on the specific needs and performance characteristics of your applications. It’s essential to monitor the system’s resource usage and make adjustments accordingly.
Validating on Azure app Service:
To validate, you can check the docker.log present in the location – /home/Logfiles and check the docker run command as below and you can see the app setting NODE_OPTIONS getting appended to the docker run command.
docker run -d --expose=8080 --name xxxxxx_1_d6a4bcfd -e NODE_OPTIONS=--max-old-space-size=6000 appsvc/node:18-lts_20240207.3.tuxprod
Conclusion:
Optimizing memory limits is pivotal for ensuring the seamless operation of Node.js applications, especially those handling significant workloads. By understanding and adjusting the memory limits, developers can enhance performance and responsiveness. Regularly monitor your application’s memory usage and adapt these settings to strike the right balance between resource utilization and performance. With these techniques, unleash the full potential of your JavaScript applications!


Recent Comments