by Scott Muniz | Jul 1, 2020 | Azure, Microsoft, Technology, Uncategorized
This article is contributed. See the original author and article here.
We are making available the private preview of Azure Arc enabled SQL Server. The preview includes the following features:
- Use the Azure Portal to register and track the inventory of your SQL Server instances across on-premises, edge sites, and multi-cloud in a single view.
- Use Azure Security Center to produce a comprehensive report of vulnerabilities in SQL Servers and get advanced, real time security alerts for threats to SQL Servers and the OS.
- Investigate threats in SQL Servers using Azure Sentinel.
You can register any Windows or Linux based SQL Server to track your inventory. Azure Security Center’s advanced data security works on Windows-based SQL Server version 2012 or higher, running on virtual machines and physical servers and hosted on any infrastructure outside of Azure.
Here’s a video of the Arc enabled SQL Server experience with Azure Security Center.
If you are interested in participating in this preview, please fill out the sign-up form and select the option Server Management (SQL Server).
by Scott Muniz | Jul 1, 2020 | Azure, Microsoft, Technology, Uncategorized
This article is contributed. See the original author and article here.
Intro
There are many excellent resources available that explain the motivation for going to the cloud and/ or Application modernisation. Assumption is that Azure is the Cloud provider and there is a NEW application that needs to be hosted. The application can be written in any of the popular languages. For existing workloads have a look at this for guidance; please be aware that the flow is a start but not as binary as it would suggest.
Hosting the application on a VM is also an option but is not being considered as taking maximum advantage of the available cloud benefits. VM hosting is not within the scope.
Summary
With (full) PAAS offerings like Azure Webapps and Azure Functions you make optimal use of the Cloud Benefits. Although you have a Pay as You go model there is a price tag for all the functionality you get out of the box. Although the PAAS offerings try to have a non opinionated technology stack the implementation is done according to the best practices of Microsoft and will never be as open and flexible like the open source solutions.
Hosting on a (semi-paas) container solution like AKS, can be considerably cheaper initially. However customer responsibility and operational costs are higher than solutions based on Webapps and Functions. Container solutions give a higher flexibility but do not come with standard solutions like Application authentication out of the box. In general more skills are required from the Developers and Operators maintaining the Containerised solution(s) on the other hand you have a very flexible platform that is based on the latest open source standards.
There is no right or wrong here, only what is suitable to you. When making a decision try to make it an educated one, the decision matrix below could be a start for your journey.
Hosting options
To have a better understanding of the products a short description of the product and its features is given. Intention is to give a quick overview, more information can be found in the links provided.
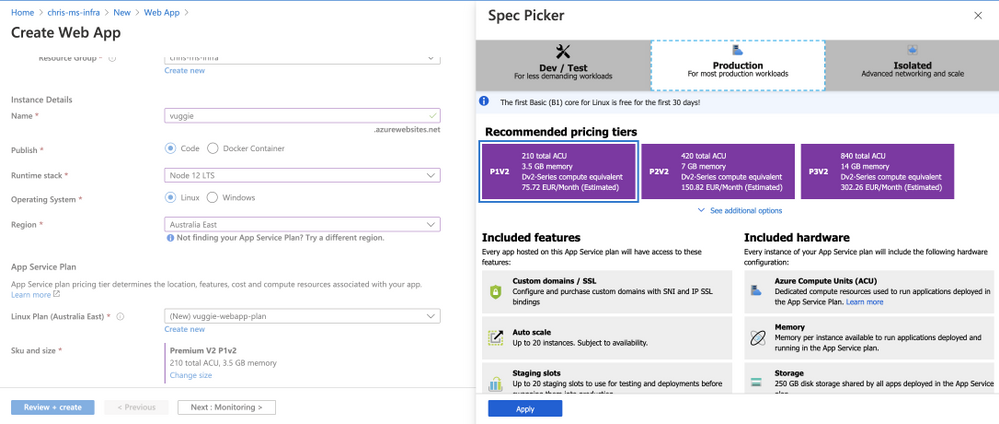
Azure Web apps
WebApps gives you a platform to host your applications based on an underlying runtime stack, for eg: Tomcat on linux for nodejs and python based workloads.
This platform is linked to an App Service Plan which gives you a set of features and capabilities.
There are 3 major SKU types for WebApps:
- Dev/ Test; ideal for hosting small solution, has the least capabilities but is also the cheapest
- Prod; Has all the features you probably need, hosted on a shared platform
- Isolated; Has all the features you need. Also referred as Application Service Environment or ASE, this is the enterprise ready solution where you have dedicated hardware on a dedicated network and tenant.
Within one of the SKU types you can select a tier which has impact on the specifications and specs:

With Azure Webapps you do not have to worry about setting up and maintaining an infrastructure for your applications.
Short summary of operational concerns:
- Scalability; depending on SKU and tier, your APP can scale as desired
- (High) Availability; depending on SKU and tier, WebApps will make sure that your service is available
- Security; built in features like integration with AAD and using Azure Services via Service endpoints (Prod SKU and up). Your Webapp is also by default protected against known vulnerabilities like Denial of Service Attacks.
- Monitoring and Alerting; Alerts can be easily configured and integration with Azure Monitoring and App insights provides valuable insights.
Other important features are the KUDU toolkit for version management and integration with CI/CD tooling and Deployment slots for deploying new releases in a blue/green scenarios.
Azure Webapps provides the functionality of hosting containers as well, but (my opinion) that makes no sense as Azure Webapps is not designed to be a container orchestrator or scheduler.
The AWS alternative to Azure Webapps is Elastic Beanstalk. For more information, please have a look at the documentation.
Azure Functions
Considered by many as the holy grail of modern application hosting. Azure Functions is also referred as Serverless technology, the idea is to abstract the Server (infra) away and put the main focus on the function(s) of your app.
Azure functions shines in scenarios where you need event driven architectures. It is (in general) not used for hosting long running (stateful) applications.
Azure functions is often used in conjunction with an (process) orchestrator like Azure Logic Apps. Below are some well known scenario’s for Azure Functions:

Two concepts are essential in the usage of Azure Functions: Trigger and Bindings.
A Trigger is an event that is responsible for the start of a the execution of a Function; example of triggers are:
- EventHub Trigger
- Blob Storage Trigger
- Http Webhook
- Timer Trigger
Bindings are links to the data used within the function.
There are Input Bindings and Output Bindings, an example of an InputBinding could be a message on a queue and the output could be a transformed message that will be persisted in a database using an output binding.
Short summary of operational concerns:
- Scalability; depending on SKU and tier, your Azure Function can scale as desired
- (High) Availability; depending on SKU and tier, Azure Functions will make sure that your service is available
- Security; built in features like integration with AAD, integrations with other Azure products are very easy as well, for eg APIm
- Monitoring and Alerting; Alerts can be easily configured and integration with Azure Monitoring and App insights provides valuable insights.
Cost efficiency is a major factor for using Azure Functions.
While with other platforms you are paying for the usage of the underlying hosting platform, with Azure functions you do not. Azure Functions provides the concept of Micro Billing, with micro billing you only pay for the actual usage of the function.
The AWS alternative to Azure Functions is Lambda. For more information, please have a look at the documentation.
Azure Kubernetes Service
Container technology has made a tremendous growth in usage and adaption the last 5 years. With Kubernetes on the forefront of hosting container workloads it has an enormous following and the fanbase is growing. Azure provides hosting of container workloads through several services but Azure Kubernetes Service (AKS) is by far the fastest growing service at the moment.
An alternative with most of the functionalities is Azure Redhat Openshift (ARO), this is considered an opinionated version of managed Kubernetes. It is implemented according to the best practices of Redhat. ARO uses Red Hat Enterprise Linux CoreOS in stead of Ubuntu (debian based), which is used by AKS . ARO is a collaboration between Microsoft and Redhat.
AKS is a semi PAAS offering; Simply put Kubernetes consists of 2 components:
- Management component; responsible for managing your workloads
- Worker nodes; the worker bees that are responsible for hosting your application
The managed component is a PAAS offering which is free of use; depending if you choose to have a SLA. The worker nodes are the compute power and is considered the IAAS solution for this offering.
However this is not fully true as the maintenance of the Operating System is executed by Microsoft, the customer is responsible for the reboot actions that might be needed.
Upgrading the Kubernetes version itself is very easy but must initiated by the customer, there are tools available that can assist in this (for eg KURED).
Microsoft has put all effort in to make maintenance of this shared responsibility platform as easy as possible.

Once this platform is UP and running it provides an enormous flexible platform that can host almost all open source based solutions like: Apache Flink and ElasticSearch. AKS even supports hosting Windows containers.
Short summary of operational concerns:
- Scalability; AKS uses a POD autoscaler for Pod distribution across existing nodes and a Cluster Autoscaler that utilises the underlying VM scale-sets.
- (High) Availability; Kubernetes is designed for HA scenarios, in most regions Availability zones bring an extra layer of availability insurance
- Security; Application security does not come out of the box, however API security for managing AKS is an option that is easily configured to work with AAD integration and Kubernetes RBAC
- Monitoring and Alerting; AKS comes with the option to automatically integrate with Azure Monitor, by enabling this option an extra deployment on your kubernetes cluster is running which is responsible for logging the AKS/ app events.
Kubernetes and thus AKS is also suitable to host event driven solutions. With KEDA you can host Azure Functions on your AKS cluster, it does provide all the functionality using triggers and bindings but does not have the micro billing feature like Azure Functions does.
The AWS alternative to Azure Kubernetes Service is Elastic Kubernetes Service. For more information, please have a look at the documentation.
Decision Matrix
| Features |
Costs |
Features |
 = Fully Managed = Fully Managed |
$ = Affordable
|
+ = Limited
|
 = Partially Managed = Partially Managed |
$$ = Mid Priced
|
++ = OK
|
 = Self Managed = Self Managed |
$$$ = Premium |
+++ = Excellent |
Links:
by Scott Muniz | Jul 1, 2020 | Azure, Microsoft, Technology, Uncategorized
This article is contributed. See the original author and article here.
While building an Azure Functions application, setting an IoC container for dependency injection has many benefits by comparing to just using the static classes and methods. Azure Functions leverages the built-in IoC container featured by ASP.NET Core that is easy to use, without having to rely on any third-party libraries. Throughout this post, I’m going to discuss five different ways to pick up a dependency injected from multiple instances sharing with the same interface.
Implementing Interface and Classes
Let’s assume that we’re writing one IFeedReader interface and three different classes, BlogFeedReader, PodcastFeedReader and YouTubeFeedReader implementing the interface. There’s nothing fancy.
public interface IFeedReader
{
    string Name { get; }
    string GetSingleFeedTitle();
}

public class BlogFeedReader : IFeedReader
{
    public BlogFeedReader()
    {
        this.Name = "Blog";
    }

    public string Name { get; }

    public string GetSingleFeedTitle()
    {
        return "This is blog item 1";
    }
}

public class PodcastFeedReader : IFeedReader
{
    public PodcastFeedReader()
    {
        this.Name = "Podcast";
    }

    public string Name { get; }

    public string GetSingleFeedTitle()
    {
        return "This is audio item 1";
    }
}

public class YouTubeFeedReader : IFeedReader
{
    public YouTubeFeedReader()
    {
        this.Name = "YouTube";
    }

    public string Name { get; }

    public string GetSingleFeedTitle()
    {
        return "This is video item 1";
    }
}
IoC Container Registration #1 – Collection
Let’s register all the classes declared above into the Configure() method in Startup.cs.
public override void Configure(IFunctionsHostBuilder builder)
{
    builder.Services.AddTransient<IFeedReader, BlogFeedReader>();
    builder.Services.AddTransient<IFeedReader, PodcastFeedReader>();
    builder.Services.AddTransient<IFeedReader, YouTubeFeedReader>();
}
By doing so, all three classes have been registered as IFeedReader instances. However, from the consumer perspective, it doesn’t know which instance is appropriate to use. In this case, using a collection as IEnumerable<IFeedReader> is useful. In other words, inject a dependency of IEnumerable<IFeedReader> to the FeedReaderHttpTrigger class and filter one instance from the collection.
public class FeedReaderHttpTrigger
{
    private readonly IFeedReader _reader;

    public FeedReaderHttpTrigger(IEnumerable<IFeedReader> readers)
    {
        this._reader = readers.SingleOrDefault(p => p.Name == "Blog");
    }

    [FunctionName(nameof(FeedReaderHttpTrigger.GetFeedItemAsync))]
    public async Task<IActionResult> GetFeedItemAsync(
        [HttpTrigger(AuthorizationLevel.Function, "post", Route = "feeds/item")] HttpRequest req,
        ILogger log)
    {
        var title = this._reader.GetSingleFeedTitle();

        return new OkObjectResult(title);
    }
}
It’s one way to use the collection as a dependency. The other way to use the collection is to use a loop. It’s useful when we implement either a Visitor Pattern or Iterator Pattern.
public class FeedReaderHttpTrigger
{
    private readonly IEnumerable<IFeedReader> _readers;

    public FeedReaderHttpTrigger(IEnumerable<IFeedReader> readers)
    {
        this._readers = readers;
    }

    [FunctionName(nameof(FeedReaderHttpTrigger.GetFeedItemAsync))]
    public async Task<IActionResult> GetFeedItemAsync(
        [HttpTrigger(AuthorizationLevel.Function, "post", Route = "feeds/item")] HttpRequest req,
        ILogger log)
    {
        var title = default(string);
        foreach (reader in this._readers)
        {
            if (reader.Name != "Blog")
            {
                continue;
            }

            title = reader.GetSingleFeedTitle();
        }

        return new OkObjectResult(title);
    }
}
IoC Container Registration #2 – Resolver
It’s similar to the first approach. This time, let’s use a resolver instance to get the dependency we want. First of all, declare both IFeedReaderResolver and FeedReaderResolver. Keep an eye on the instance of IServiceProvider as a dependency. It’s used for the built-in IoC container of ASP.NET Core, which can access to all registered dependencies.
In addition to that, this time, we don’t need the Name property any longer as we use conventions to get the required instance.
public interface IFeedReaderResolver
{
    IFeedReader Resolve(string name);
}

public class FeedReaderResolver : IFeedReaderResolver
{
    private readonly IServiceProvider _provider;

    public FeedReaderResolver(IServiceProvider provider)
    {
        this._provider = provider;
    }

    public IFeedReader Resolve(string name)
    {
        var type = Assembly.GetAssembly(typeof(FeedReaderResolver))
                           .GetType($"{name}FeedReader");
        var instance = this._provider.GetService(type);

        return instance as IFeedReader;
    }
}
After that, update Configure() on Startup.cs again. Unlike the previous approach, we registered xxxFeedReader instances, not IFeedReader. It’s fine, though. The resolver sorts this out for FeedReaderHttpTrigger.
public override void Configure(IFunctionsHostBuilder builder)
{
    builder.Services.AddTransient<BlogFeedReader>();
    builder.Services.AddTransient<PodcastFeedReader>();
    builder.Services.AddTransient<YouTubeFeedReader>();

    builder.Services.AddTransient<IFeedReaderResolver, FeedReaderResolver>();
}
Update the FeedReaderHttpTrigger class like below.
public class FeedReaderHttpTrigger
{
    private readonly IFeedReader _reader;

    public FeedReaderHttpTrigger(IFeedReaderResolver resolver)
    {
        this._reader = resolver.Resolve("Blog");
    }

    [FunctionName(nameof(FeedReaderHttpTrigger.GetFeedItemAsync))]
    public async Task<IActionResult> GetFeedItemAsync(
        [HttpTrigger(AuthorizationLevel.Function, "post", Route = "feeds/item")] HttpRequest req,
        ILogger log)
    {
        var title = this._reader.GetSingleFeedTitle();

        return new OkObjectResult(title);
    }
}
IoC Container Registration #3 – Resolver + Factory Method Pattern
Let’s slightly modify the resolver that uses the factory method pattern. After this modification, it removes the dependency on the IServiceProvider instance. Instead, it creates the required instance by using the Activator.CreateInstance() method.
public class FeedReaderResolver : IFeedReaderResolver
{
    public IFeedReader Resolve(string name)
    {
        var type = Assembly.GetAssembly(typeof(FeedReaderResolver))
                           .GetType($"{name}FeedReader");
        var instance = Activator.CreateInstance(type);

        return instance as IFeedReader;
    }
}
If we implement the resolver class in this way, we don’t need to register all xxxFeedReader classes to the IoC container, but IFeedReaderResolver would be sufficient. By the way, make sure that all xxxFeedReader instances cannot be used as a singleton if we take this approach.
public override void Configure(IFunctionsHostBuilder builder)
{
    builder.Services.AddTransient<IFeedReaderResolver, FeedReaderResolver>();
}
IoC Container Registration #4 – Explicit Delegates
We can replace the resolver with an explicit delegates. Let’s have a look at the code below. Within Startup.cs, declare a delegate just outside the Startup class.
public delegate IFeedReader FeedReaderDelegate(string name);
Then, update Configure() like below. As we only declared the delegate, its actual implementation goes here. The implementation logic is not that different from the previous approach.
public override void Configure(IFunctionsHostBuilder builder)
{
    builder.Services.AddTransient<BlogFeedReader>();
    builder.Services.AddTransient<PodcastFeedReader>();
    builder.Services.AddTransient<YouTubeFeedReader>();

    builder.Services.AddTransient<FeedReaderDelegate>(provider => name =>
    {
        var type = Assembly.GetAssembly(typeof(FeedReaderResolver))
                           .GetType($"FeedReaders.{name}FeedReader");
        var instance = provider.GetService(type);

        return instance as IFeedReader;
    });
}
Update the FeedReaderHttpTrigger class. As FeedReaderDelegate returns the IFeedReader instance, another method call should be performed through the method chaining.
public class FeedReaderHttpTrigger
{
    private readonly FeedReaderDelegate _delegate;

    public FeedReaderHttpTrigger(FeedReaderDelegate @delegate)
    {
        this._delegate = @delegate;
    }

    [FunctionName(nameof(FeedReaderHttpTrigger.GetFeedItemAsync))]
    public async Task<IActionResult> GetFeedItemAsync(
        [HttpTrigger(AuthorizationLevel.Function, "post", Route = "feeds/item")] HttpRequest req,
        ILogger log)
    {
        var title = this._delegate("Blog").GetSingleFeedTitle();

        return new OkObjectResult(title);
    }
}
IoC Container Registration #5 – Implicit Delegates with Lambda Function
Instead of using the explicit delegate, the Lambda function can also be used as the implicit delegate. Let’s modify the Configure() method like below. As there is no declaration of the delegate, define the Lambda function.
public override void Configure(IFunctionsHostBuilder builder)
{
    builder.Services.AddTransient<BlogFeedReader>();
    builder.Services.AddTransient<PodcastFeedReader>();
    builder.Services.AddTransient<YouTubeFeedReader>();

    builder.Services.AddTransient<Func<string, IFeedReader>>(provider => name =>
    {
        var type = Assembly.GetAssembly(typeof(FeedReaderResolver))
                           .GetType($"FeedReaders.{name}FeedReader");
        var instance = provider.GetService(type);

        return instance as IFeedReader;
    });
}
As the injected object is the Lambda function, FeedReaderHttpTrigger should accept the Lambda function as a dependency. While it’s closely similar to the previous example, it uses the Lambda function this time for dependency injection.
public class FeedReaderHttpTrigger
{
    private readonly Func<string, IFeedReader> _func;

    public FeedReaderHttpTrigger(Func<string, IFeedReader> func)
    {
        this._func = func;
    }

    [FunctionName(nameof(FeedReaderHttpTrigger.GetFeedItemAsync))]
    public async Task<IActionResult> GetFeedItemAsync(
        [HttpTrigger(AuthorizationLevel.Function, "post", Route = "feeds/item")] HttpRequest req,
        ILogger log)
    {
        var title = this._func("Blog").GetSingleFeedTitle();

        return new OkObjectResult(title);
    }
}
—
So far, we have discussed five different ways to resolve injected dependencies using the same interface, while building an Azure Functions application. Those five approaches are very similar to each other. Then, which one to choose? Well, there’s no one approach better than the other four, but I guess it would depend purely on the developer’s preference.
This post has been cross-posted to DevKimchi.
by Scott Muniz | Jul 1, 2020 | Azure, Microsoft, Technology, Uncategorized
This article is contributed. See the original author and article here.
A new Azure Sentinel notebook experience will soon be released which provides several management, security, customization, and productivity benefits. Examples of these benefits includes, but is not limited to, a new intuitive UI with Intellisense, compute provisioning via ARM template support, Azure Virtual Network (VNET) support as well as a full range of compute configuration options.
While the existing Azure Notebooks website and service will be retired by September 29th (see link for the announcement), the existing Azure Sentinel notebook experience will not be impacted or interrupted as a result of the planned retirement.
Continue to check back for additional announcements as we transition to the new Azure Sentinel notebook experience. For questions or concerns, let us know!
by Scott Muniz | Jul 1, 2020 | Azure, Microsoft, Technology, Uncategorized
This article is contributed. See the original author and article here.
Today, I worked on a service request that our customer reported some delays when they are connecting to Azure SQL Database using SQL Server Management Studio. In this article I would like to share with you an explanation about it.
We know that in Azure SQL Database we have two different user types: Login and Contained Users and following I would like to explain what is the impact using both of them connecting to Azure SQL Database from SQL Server Management Studio.
Before doing anything, I’m going to enable SQL Auditing that allow us to understand the different delays and what is hapenning behind the scenes when we are connecting using SQL SERVER Management Studio:
1) Login:
- I created a login using the following TSQL command: CREATE LOGIN LoginExample with Password=’Password123%’
- I’m going to give the permissions to a specific database that I created, let’s give the name DotNetExample.
- Connected to this database I run the following TSQL command to create the user and provide the permission.
- CREATE USER LoginExample FOR LOGIN LoginExample
- exec sp_addrolemember ‘db_owner’,’LoginExample’
- Using SQL Server Management Studio with the this user and specify the database in the connection string, the login process took around 15/20 seconds. Why?
- In order to explain it, let’s try to review the SQL Auditing file and see what is happening.
- All points to a normal login time and connection if we review the SQL Auditing of the user database.
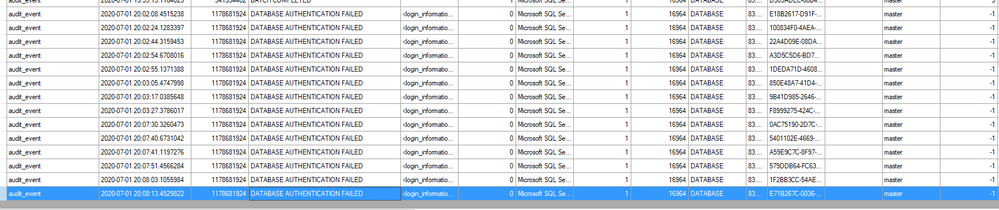
- But, what is happening in the master database?.
- In this situation, I saw many DATABASE AUTHENTITICATION FAILED, several times, with this error message: additional_information <login_information><error_code>18456</error_code><error_state>38</error_state></login_information> “Cannot open a specified database master”
- Why? because as we defined as a Login, SQL Server Management Studio is trying to obtain information, most probably, about the databases list, information of the server, … and in every retry is waiting some seconds.

2) Contained User:
- I created an user the following TSQL command: CREATE USER LoginExampleC with Password=’Password123%’ and gave the db_owner permissions.
- But, Is the connection time the same?…In this situation, not, because as there is a contained user of this database, there is not needed to review any parameter of master database.
So, based on this situation and as Azure SQL Database is oriented to Database engine the best approach to reduce this time is to use a Contained User. However, if you want to reduce the time using login, you could do the following under the master database, CREATE USER LoginExample FOR LOGIN LoginExample, to allow the permission to connect to this master database.
Enjoy!

Recent Comments