Customize and access the improved Active Conversation form 

Customize and access the improved Active Conversation form 

This article is contributed. See the original author and article here.

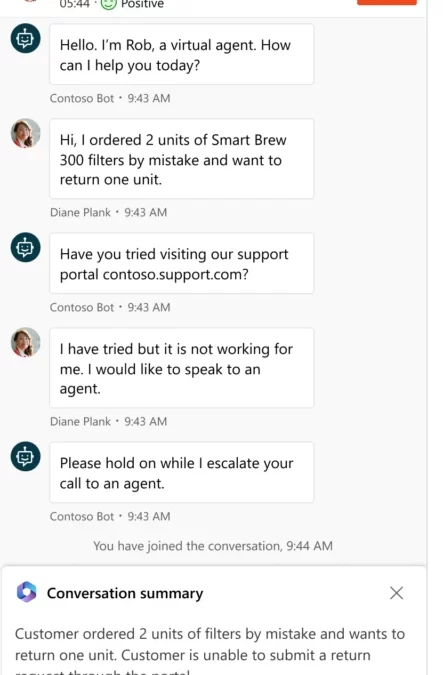
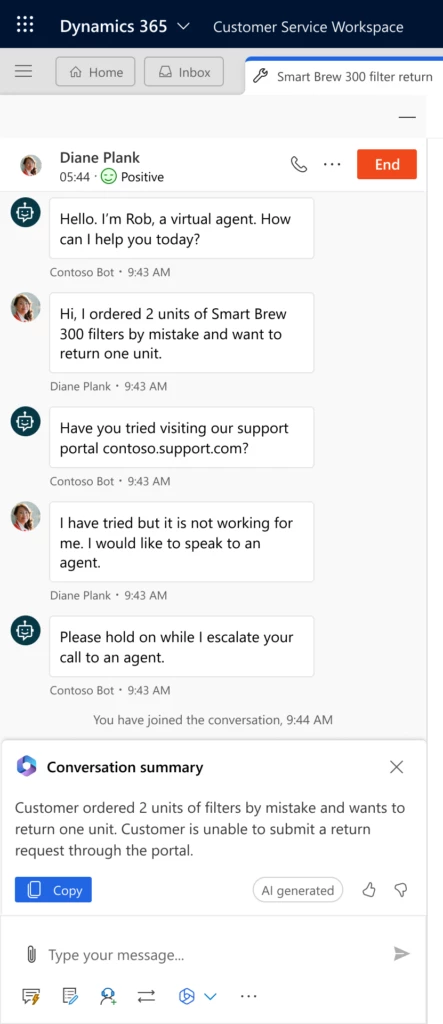
Customer service agents in a digital contact center interact with multiple customers daily through live chat, phone calls, and social media channels. During customer interactions, often they find themselves searching for relevant information on various screens or other systems, resulting in increased wait time for the end customer. Also, they want to quickly capture or update the information about their conversation, in real time without having to create or link a case to a conversation. Recent enhancements to the Active Conversation form allow agents to access and edit relevant information without any screen switching.  

Now, agents have all the relevant information at their fingertips, so that they spend less time looking for information on different screens or systems and help customers quickly. This leads to a reduction in average wait time and better customer satisfaction.  

Customize the Active Conversation form

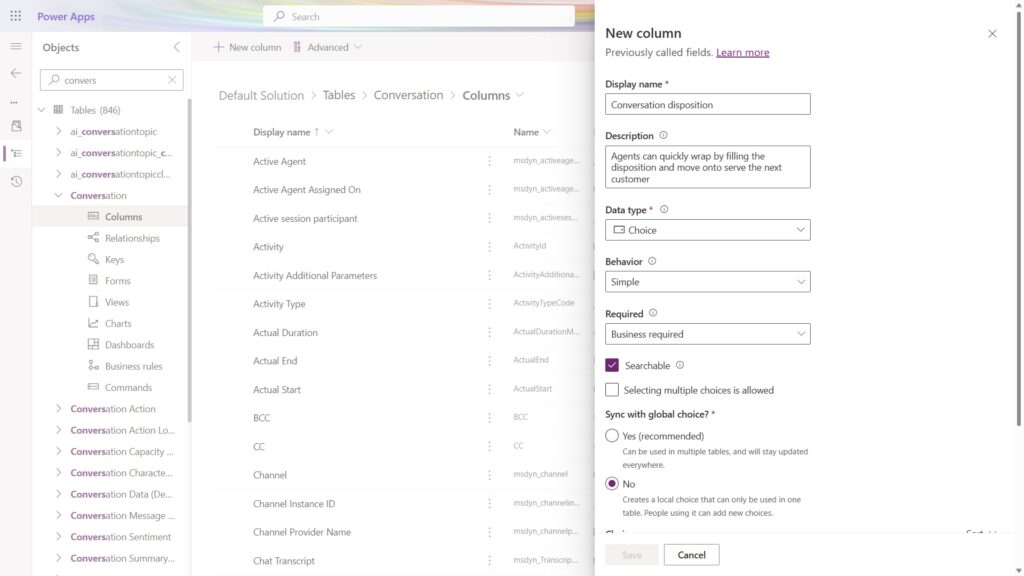
This feature allows administrators to add custom fields on the conversation form and embed canvas apps to display the information from external sources. To ensure agents can capture information quickly, it offers agents the flexibility to view pre-filled information and update it as needed while interacting with the customer. They can view the records related to the conversation on the sub-grids. 

Access the enhanced Active Conversation form  

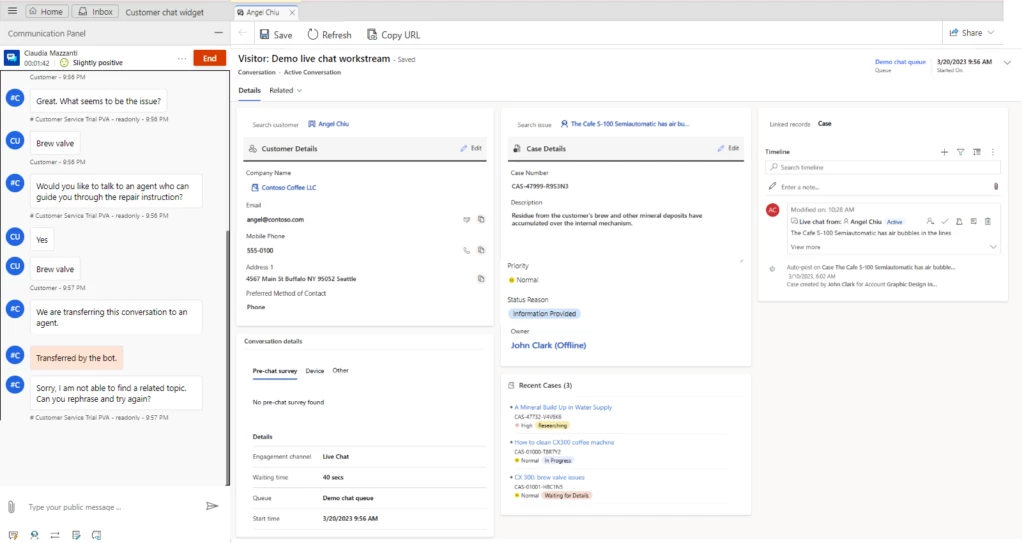
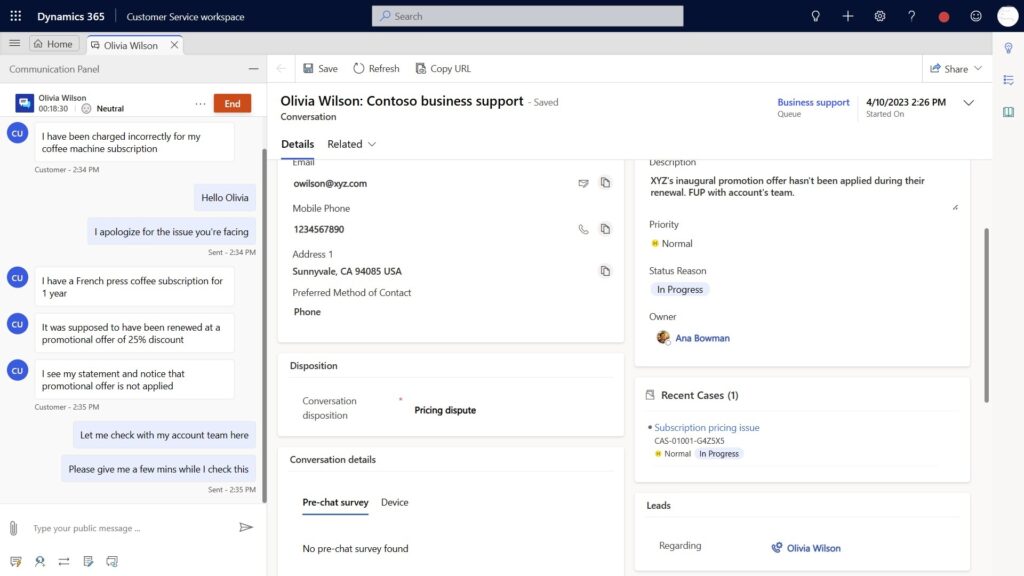
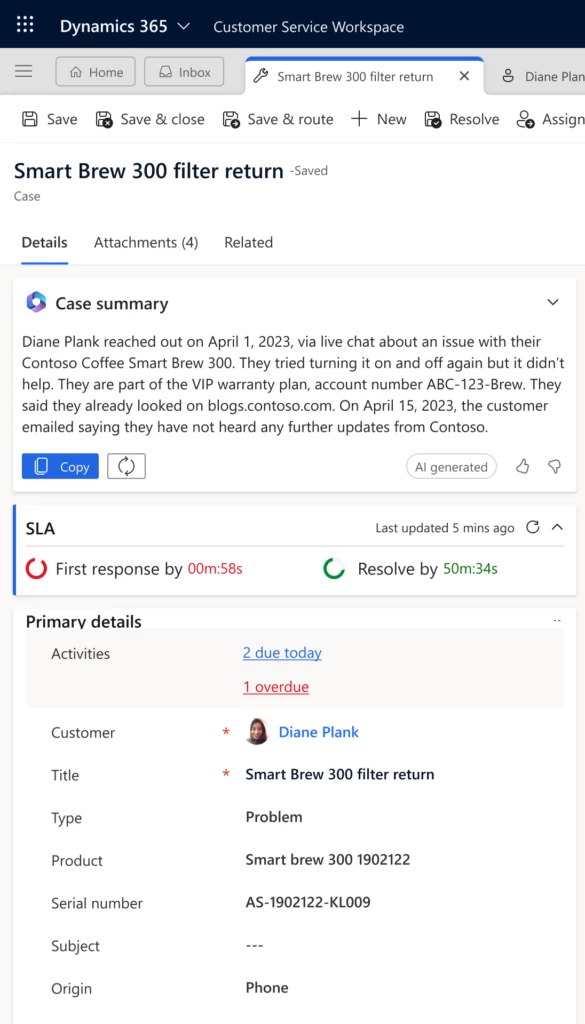
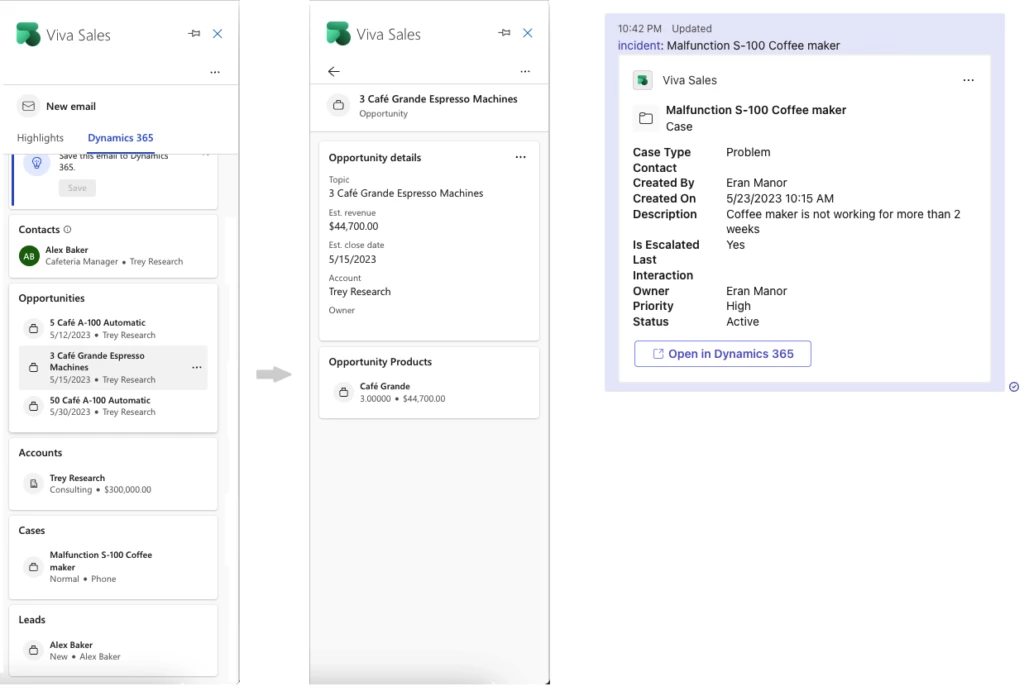
The Active Conversation form now displays the Customer 360 card. This allows agents to view information related to the customer. They can also make inline edits without having to navigate to contact or account form. Similarly, it shows case details with information related to the case linked to the conversation and allows agents to make inline edits as needed. Administrators can configure the fields they want to show on both these cards.

Additionally, the form includes the configurable recent cases card. This shows the color-coded priority and case status for easy discoverability by the agents. Moreover, switching from the active to the closed conversation form is restricted when the conversation is still active. The reverse is true as well. 

Administrators can enable these enhancements in the Customer Service workspace application by navigating to the Customer Service Admin center > Workspaces > Active Conversation form settings. 

Learn more 

To learn more, read the documentation:  

View Active Conversation in Omnichannel for Customer Service | Microsoft Learn 

The post Customize and access the improved Active Conversation form  appeared first on Microsoft Dynamics 365 Blog.

Brought to you by Dr. Ware, Microsoft Office 365 Silver Partner, Charleston SC.

Customize the conversation table for your business needs 

Customize the conversation table for your business needs 

This article is contributed. See the original author and article here.

Organizations in different industries need to visualize their customer interactions in different ways. With customized columns in the conversation table, organizations can enable agents to quickly summarize the purpose of the interaction, and they can associate conversations with leads. The ability to customize the conversation table improves agent productivity and creates positive customer outcomes.  

Improve agent productivity and CSAT with conversation table customization 

When agents converse with customers, the Active Conversation form helps capture the details of the interaction. And consequently, supervisors and other agents can easily understand it. 

Ana is a customer service agent at Contoso who works tirelessly, juggling multiple customer problems over chat throughout the day. After every conversation with a customer, she patiently reviews her interaction, summarizes the issue, and writes wrap-up notes. She wishes there were a better way to quickly capture the outcomes of customer interactions and move on to serve other customers instead of spending time wrapping up the conversation.   

Dynamics 365 Customer Service does not have an out-of-the-box solution to serve her needs. However, admins can now customize the conversation table to help agents like Ana wrap up cases more quickly. Conversation table customization now supports adding columns, charts, views and connecting conversations to leads or any other activity-enabled table. 

Now that the conversation table is customizable, contact centers can tailor the agent experience to business-specific use cases like Ana’s. When the conversation table is customizable to Ana’s needs, she can save time, serve more customers, lower wait times for customers, and leave them happy with Contoso’s service.  

Create positive customer outcomes by associating leads with conversations  

Contoso enabled Conversation disposition as a custom column on the conversation table and added it to the active conversation form.  

Olivia, a Contoso customer, contacts Contoso support over webchat. She wants to find out why she was charged full price for her coffee subscription instead of the promotional price. The agent assigned to address Olivia’s concern, Ana, checks with her account team, and rectifies the error. Ana quickly wraps the conversation by specifying “Pricing dispute” disposition instead of having to write elaborate notes. Ana or any other agent connected to Olivia in the future can quickly get the context and complete interaction history through dispositions instead of having to go through one note after the other.

With the ability to view service and sales data in a single record, Ana can pitch a special offer to Olivia and associate a lead to this conversation immediately in the same form. Contoso’s sales team can follow up with Olivia subsequently through the lead.  This single source of information offers a true end-to-end customer experience without having to juggle between sales and support lines.  

Contact center supervisors can review interactions like Olivia’s pricing dispute or other dispositions and take appropriate preventive measures based on aspects of the conversation such as volume or sentiment.  

The use cases for customization are truly limitless and best left to the imagination of our customers and their business scenarios.  

Customize the conversation table 

Now you can extend the conversation table just like any other Dynamics 365 table from the customization experience in Power Apps. Use the Regarding column to associate any activity enabled entity to Conversation. You can create additional columns, views, and charts. This feature is enabled by default for all customers with our April 2023 release wave.  

Customize the conversation table in Power Apps

Learn more

Watch a quick video introduction.

To find out more about conversation customization in Customer Service, read the documentation:

The post Customize the conversation table for your business needs  appeared first on Microsoft Dynamics 365 Blog.

Brought to you by Dr. Ware, Microsoft Office 365 Silver Partner, Charleston SC.

Accelerate support ramp-ups, handoffs, and wrap-ups with Copilot summarization 

Accelerate support ramp-ups, handoffs, and wrap-ups with Copilot summarization 

This article is contributed. See the original author and article here.

Support agents often have to manage complex and lengthy conversations and cases. These require a lot of time and attention to understand and resolve. Wouldn’t it be great if there was a way to quickly get the gist of what’s going on without having to read through every single message or all the information linked to a case? 

Now agents can use Copilot to ramp up fast. Copilot summarization automatically generates concise and informative summaries of conversations and cases in simple, intuitive natural language. Agents can read these summaries in seconds and get up to speed on the most important details. 

Conversation summarization

Conversation summarization is available for any digital messaging or voice conversation that involves a virtual agent handoff to live support, an agent consult, or conversation wrap-up notes. You can also request a conversation summary on demand at any time during the conversation. 

A conversation summary will capture the key information such as the customer’s name, the issue or request, the steps taken so far, the case status, and any relevant facts or data. It will also highlight any sentiment expressed by the customer or the agent, plus action items or next steps.

Case summarization 

Case summarization is available in a single click, right on the case form. It captures highlights from key case fields such as Customer, Case title, Case type, Subject, Case Description, Product, and Priority. It also considers linked timeline records such as notes, emails and conversation summaries when the conversation summary feature is enabled. Case summaries can help support agents catch up on who has worked on the case so far. They can also see what has happened in previous communications, and any issues that have been addressed to date. This information helps agents quickly determine the best next steps.  

A case summary is valuable during case collaborations, transfers, and final resolutions when support agents are documenting what occurred throughout the case lifecycle. They are especially valuable in accelerating the administrative tasks surrounding multiday or long running cases. 

Extensibility and customization

Copilot summarization is flexible and adaptable to your organization’s needs and preferences. You can customize and extend the feature in various ways. 

With conversation summary, administrators can specify which actions trigger a conversation summary in the Customer Service admin center. For example, you can enable conversation summary only for handoffs and consults, or only for conversation wrap-ups, or for all three. 

With case summary, administrators can add the case summary card to any form that uses the case entity in Power Apps. This makes it easy to extend the functionality to any customized application that support teams use. 

Copilot summarization is a powerful tool that can help you accelerate your support processes and improve customer satisfaction. By providing agents with quick access to the most relevant information, Copilot helps save time, reduce errors, and enhance communication. Try it today and see how it can transform your support experience. 

Plan for future updates

We plan to update Copilot experiences monthly with features and enhancements. The AI models and prompts will be updated regularly behind the scenes, and you’ll see the quality of Copilot’s responses improve over time. The following features are already on our roadmap:  

  • Out-of-box analytics. These reports will give supervisors insight into how their agents are using Copilot and its impact on their tracked support metrics.  
  • SharePoint support for Copilot knowledge. Organizations who have their support content outside of Dynamics today can easily connect to a SharePoint content source. 

AI solutions built responsibly 

Enterprise grade data privacy at its core. Azure OpenAI offers a range of privacy features, including data encryption and secure storage. It allows users to control access to their data and provides detailed auditing and monitoring capabilities. Copilot is built on Azure OpenAI, so enterprises can rest assured that it offers the same level of data privacy and protection. 

Responsible AI by design. We are committed to creating responsible AI by design. Our work is guided by a core set of principles: fairness, reliability and safety, privacy and security, inclusiveness, transparency, and accountability. We are putting those principles into practice across the company to develop and deploy AI that will have a positive impact on society.

Learn more

For more information on extending the case summary, see Configure Copilot features for custom case forms and custom apps | Microsoft Learn 

The post Accelerate support ramp-ups, handoffs, and wrap-ups with Copilot summarization  appeared first on Microsoft Dynamics 365 Blog.

Brought to you by Dr. Ware, Microsoft Office 365 Silver Partner, Charleston SC.

Upgrade Project Service Automation to Project Operations

Upgrade Project Service Automation to Project Operations

This article is contributed. See the original author and article here.

Hello to the Project Service Automation (PSA) Community!

Back in November 2022 we announced the availability of the second phase of Project Service Automation to Project Operations upgrade, making it possible to upgrade projects with up to 500 tasks.  If all projects in your environment contain 500 tasks or less, we strongly encourage you to start your upgrade process as soon as possible so you can take advantage of many new Project Operations features such as: 

  • Integration with Project for the Web with many new advanced scheduling features
  • Project Budgeting and Time-phased forecasting  
  • Date Effective price overrides 
  • Revision and Activation on Quotes   
  • Material usage recording in projects and tasks 
  • Subcontract Management 
  • Advances and Retained-based contracts 
  • Contract not-to-exceed 
  • Task based billing 
  • Multi-customer contracts 

Learn more

Curious to know details about the upgrade process? Please check this link and learn more about it! 
 
Want to learn more about Project Operations? Check this link and navigate to our detailed documentation! 

Want to try Project Operations? Click here and sign up for a 30 days trial! 

Thank you

The Microsoft Project Operations Product Team 

The post Upgrade Project Service Automation to Project Operations appeared first on Microsoft Dynamics 365 Blog.

Brought to you by Dr. Ware, Microsoft Office 365 Silver Partner, Charleston SC.

Maximizing efficiency in Resource Scheduling: Prioritizing Locked Bookings

Maximizing efficiency in Resource Scheduling: Prioritizing Locked Bookings

This article is contributed. See the original author and article here.

In Resource Scheduling Optimization, dispatchers can lock existing scheduled bookings to Resource, Time or Time Range, or Resource and Time based on their scheduling scenarios.

What are locked options and why are they needed?

Once a booking is created, a lock can be set on the Scheduling Lock Options field in the Resource Scheduling Optimization tab of the Bookable Resource Booking record.

There are 4 options:

  • Lock to ‘Time Range’. A repair work order is scheduled for tomorrow and a confirmation sent to customer stating that a technician will be arriving between 9am to 12pm in the morning. In case if this repair work order needed to be rescheduled as part of rescheduling or re-optimization process, RSO will need to make sure estimated arrival time for this booking still between 9am to 12pm but may move this booking to other resource if needed in order to optimize global scheduling results.
  • Lock to ‘Resource’. Sometimes, certain technicians manage work order requests for specific service accounts, in this case, dispatchers can configure technician as ‘Must choose from’ resource on Resource Requirement record before requirement gets fulfilled, or if the booking already created lock the booking to this resource. RSO will make sure to keep this booking assigned to the same resource but may move to another time in order to optimize global scheduling results.
  • Lock to ‘Time’, similar like Lock to ‘Time Range’, instead of keeping the booking within a time window, RSO will make sure to keep the estimated arrival time for this booking at exact time but may move this booking to another resource if needed in order to optimize global scheduling results.
  • Lock to ‘Resource and Time’: Sometimes, there are specific commitments with customers, which requires booking time or assigned technician to not change, with this lock option, RSO will NOT change this booking at all, it may recalculate estimated travel time based on prior booking changes.

How did RSO handle locked bookings before?

Before this changes, RSO administrators could select and rank ‘Locked booking’ objective on optimization goal, RSO will try to include locked bookings and optimize together with other bookings. When there are too many locked bookings in optimization scope, it reduces the flexibility of RSO system to generate optimal results. To improve global optimization results, RSO may decide to NOT include some locked bookings in the new proposed schedule, and since RSO will not delete locked bookings either, these locked bookings will be treated as ‘Ignored’. Dispatchers will end up seeing overlapping bookings on schedule board, or technician gets double booked which causes confusions and disruption.

For example, there are two requirements, Repair work (1 hour) and Install boiler (8 hours). We have one resource (Jeff) that works 8 hours per day. If you book repair work (1 hour) to the resource Jeff and lock that booking to Jeff, when RSO runs with the objective of maximizing total working hours, RSO decides to ignore the booking for Repair work (1 hour) and create another booking for Install boiler (8 hours) to maximize the total working hours. Since Repair work (1 hour) gets ignored from the final schedule and not being deleted, Jeff ends up being double booked.

Improved logic for locked bookings

With the improved logic for locked bookings shipped along RSO 3.4.0.8, RSO will ALWAYS include locked bookings in the new proposed schedules, and schedule other bookings around.

In the previous example for Jeff, RSO will make sure that booking for Repair work (1 hour) remains on the schedule, won’t create booking for Install boiler (8 hours) to avoid overlapping.

Excessive use of lock constraints may result in poor optimization of the final schedule. For example: Jeff has low utilization as there isn’t any other requirement can fit into the remaining hours.

Booking lock options should be used wisely to maximize Resource Scheduling Optimization results and minimize interference with other Resource Scheduling Optimization objectives.

Will RSO still respect locked bookings when locked bookings violate scheduling constraints?

Sometimes, dispatchers may lock a booking explicitly without being aware that the locked booking potentially violates certain scheduling constraints.

E,g: skill matching, a booking gets assigned to a technician who does not have the required skill. 

In this case, RSO will still respect locked bookings and make sure this locked booking is in the final schedule, as RSO respects user decision of the ‘locked booking’.  RSO shows a prompt: “Locked booking is infeasible, has invalid match of resource skill” to let the user decide in case they would like to correct manually and explicitly.

These are some of the new enhancements to allow efficiency in resource scheduling. Do review the detailed documentation on Universal Resource Scheduling for Dynamics 365 Field Service overview – Dynamics 365 Field Service | Microsoft Learn for further information.


The post Maximizing efficiency in Resource Scheduling: Prioritizing Locked Bookings appeared first on Microsoft Dynamics 365 Blog.

Brought to you by Dr. Ware, Microsoft Office 365 Silver Partner, Charleston SC.

Enhancing Seller Productivity: Customize Viva Sales Forms 

Enhancing Seller Productivity: Customize Viva Sales Forms 

This article is contributed. See the original author and article here.

In today’s competitive business landscape, maximizing the value sellers derive from sales tools is paramount. One key aspect of achieving this is the ability for customers to customize Viva Sales forms, enabling them to have the right business information at the right time. This blog post explores how the latest Viva Sales update empowers administrators to add relevant out-of-the-box or custom entities to enhance the Viva Sales experience, so sellers can reduce context switching across applications and instead focus on building stronger relationships with their customers to close deals faster. 

We have integrated Viva Sales settings with the underlying CRM app, offering a more cohesive admin experience. When adding a new entity to Viva Sales, administrators now have the option to select an existing view from the CRM app to retrieve metadata information. This CRM view determines the fields to be shown, their order, filtering, and sorting definitions for Viva Sales forms and list views. 

Customize Viva Sales: Add new entities to Viva Sales from the Forms menu entry in the admin settings

Adding new entities to Viva Sales 

Viva Sales administrators can easily add entities from the Viva Sales settings. It’s important to note that only entities directly related to existing Viva Sales entities are available for selection. Additionally, administrators can control how the new entity is related to relevant existing Viva Sales entities. This influences its visibility in the Outlook side pane. For example, when admins add the Case entity, defining its relation to Contact and Accounts will determine how it displays in the main view and the detailed entities view within the Outlook side pane. Entities related to other entities will appear in the detailed view of their corresponding entities. For instance, adding the “Opportunity Product” entity will show the product list for a specific opportunity in the detailed view of opportunity records. 

Adding new entities through customization extends their availability across various Viva Sales experiences, including the Outlook side pane and the Teams message extension. This ensures that sellers can access and interact with the relevant information seamlessly within their preferred Viva Sales flow of work. 

Add new entity: Admin selects a CRM view to use as a reference for the entity form and views.  

Sellers have additional entities in the Viva Sales side pane and can click to see entity details and related entities. Sellers can also share any entity with their colleagues in Teams using an adaptive card. 

Seller views: side panel available entities, side panel detail view and Microsoft Teams adaptive card

Keeping Viva Sales customization up to date 

When changes are made to the CRM entities exposed in Viva Sales it is important to refresh the Viva Sales settings area to reflect the update. These changes are not automatically refreshed and require action to keep a consistent experience across the applications.

Removing entities

Administrators have the flexibility to remove entities from Viva Sales. If an entity has related entities within Viva Sales, these related entities will be removed together with the main entity. This will happen unless they are still associated with other entities. Contact remains an exception and can’t be removed from Viva Sales. Removing entities doesn’t remove any data from Viva Sales or your CRM app. It only impacts the visibility of CRM data in the Viva Sales app. 

Saving Outlook emails and meetings to custom entities 

Empowering sellers with greater flexibility, the latest customize Viva Sales update enables saving Outlook emails and meeting activities to any Viva Sales out-of-the-box or custom entity. Sellers can now save activities to any entity that has been added to Viva Sales. Please note that today saving to custom entities is currently available exclusively for Dynamics 365 customers. 

Save email activity to a lead record.  

The ability to customize Viva Sales forms plays a pivotal role in ensuring the information is highly relevant and impactful for the seller while keeping them working within the applications they prefer. The latest update allows Viva Sales administrators to:

  • Effortlessly add new relevant custom and out-of-the-box entities.
  • Leverage CRM views.
  • Provide sellers with a tailored experience across various interfaces.

By keeping Viva Sales customization up to date and allowing for expanded options when saving Outlook activities, this update equips sellers with the tools they need to excel in their sales endeavors. Embrace the power of customization in Viva Sales and unlock a more efficient and personalized sales workflow. 

Next steps

Don’t have Viva Sales yet? get started now! Microsoft Viva Sales | Microsoft Viva 

Read the getting started guide to customize forms and fields 

The post Enhancing Seller Productivity: Customize Viva Sales Forms  appeared first on Microsoft Dynamics 365 Blog.

Brought to you by Dr. Ware, Microsoft Office 365 Silver Partner, Charleston SC.