by Scott Muniz | Aug 11, 2020 | Azure, Microsoft, Technology, Uncategorized
This article is contributed. See the original author and article here.
This installment is part of a broader series to keep you up to date with the latest enhancements to the Azure Sentinel Devops template.
This blog is a collaboration between @Cristhofer Munoz & @Matt_Lowe.
Introduction
Threats are evolving just as quickly as data-volume growth, with bad actors exploiting every possibility and technique to gain access to the corporate network. At the same time, the risk surface has widened as companies shift to hybrid-cloud environments, adopt DevOps and Internet of Things (IoT) technologies, and expand their remote workforces.
Amid this landscape, organizations require a bird’s-eye view of security posture across the enterprise, hence a security information and event management (SIEM) system is a critical element.
Frankly, deploying a SIEM is not a trivial task. Organizations struggle with the number of tasks to adopt a SIEM due to the lack of an agile methodology to plan, execute, and validate its initial success and deploy into production.
To help alleviate this challenge, we’ve developed an Azure Sentinel DevOps Board Template which serves as a blueprint to understand the tasks and activities to deploy Azure Sentinel following recommended practices. By leveraging the Azure Sentinel DevOps Boards one can quickly start tracking user stories, backlog items, task, features, and bugs associated with your Azure Sentinel deployment. The Azure Sentinel DevOps Board is not a static template, it can be modified to reflect your distinctive needs. You will have the ability to quickly add and update the status of work using the Kanban board. You can also assign work to team members and tag with labels to support queries and filtering.
For additional information on Azure Boards, please refer the public documentation.
In this template we provide prescriptive guidance for the following Azure Sentinel use cases:
- Define Use Cases
- Get Started with Azure Sentinel | Tutorials
- Onboard Azure Sentinel | Prerequisites
- Azure Sentinel Architecture
- Setup Azure Sentinel
- Data Collection
- Visualize your security data with Workbooks
- Enabling Analytics
- Respond to threats
- Proactive threat hunting
- Advanced Topics

Getting Access | Azure DevOps Generator
The purpose of this initiative is to simplify the process and provide tactical guidance to deploy Azure Sentinel by providing an Azure Sentinel DevOps board template that provides the prescriptive guidance you need to get going with your deployment. To populate the Azure Sentinel board, we utilized the Azure DevOps Demo generator service to create pre-populated content.
To get started:
1. Browse to the Azure DevOps Demo Generator site by selecting the link, or copy https://azuredevopsdemogenerator.azurewebsites.net/ into your browser’s URL field.
2. Click Sign In and provide the Microsoft or Azure AD account credentials associated with an organization in Azure DevOps Services. If you don’t have an organization, click on Get Started for Free to create one and then log in with your credentials.
3. After signing in, you will arrive at the “Create New Project” page.

4. Provide a name for your project (such as “AzSentinelDeployment”) that you and other contributors can use to identify the project.
5. Next, Select the organization you will use to host the project created by the Azure DevOps Demo Generator. (You may have multiple accounts of which you are a member, and which are associated with your login, so choose carefully.)
6. Lastly, select the demo project template you want to provision by clicking … (Choose Template) button.

7. A new pane will populate providing you the ability to select a pre-populated template. Click on the Azure Community tab, there you will find the Azure Sentinel Devops template.

8. Select the Azure Sentinel Devops template and create the project. Your project may take a couple of minutes for the Demo Generator to provision. When it completes, you will be provided with a link to the demo project.

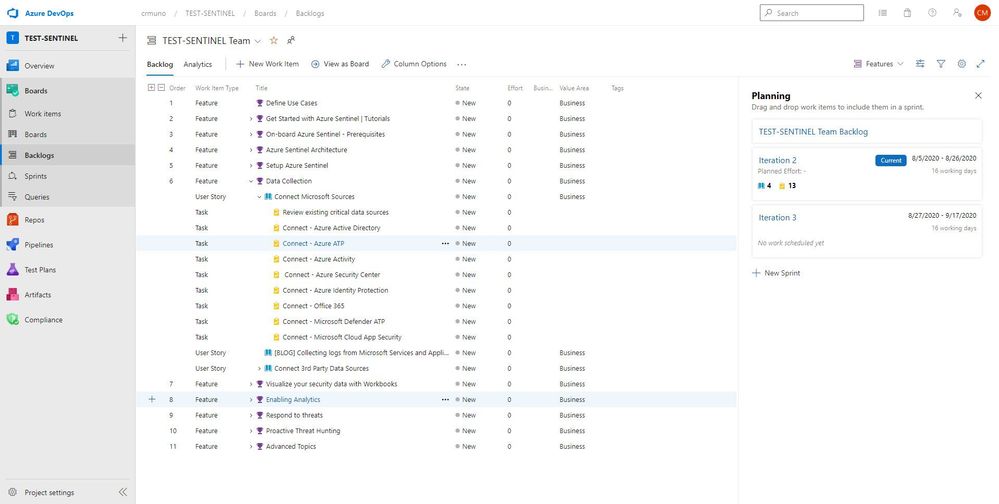
9. Select the link to go to the new demo Azure DevOps Services project and confirm it was successfully provisioned. You should arrive at the following page:

10. To access the Azure Sentinel backlog where you will find the features, user stories, and tasks to deploy Azure Sentinel, hover over Boards, and select Backlogs. Make sure that you are viewing the Features hierarchy. The backlog page will be the main page you will visit to consume the recommended practices and detailed steps to deploy Azure Sentinel.
.

Adding Team Members
1. Open your project, and then select Project settings > Teams. Then, select your project.

2. Select Add to invite members to your project.

3. Add users or groups, and then choose Save.

Enter the email addresses of the new users, separated by semicolons, or enter the display names of existing users. Add them one at a time or all at once.
How to Use
The template is comprised of features, user stories, and tasks providing guidance and recommended practices for your Azure Sentinel deployment. The template should help your team to discuss, agree on acceptance criteria, delegate ownership, create iterations, track the progress and efficiently deploy Azure Sentinel.
Note: Please remember that the template is not static, it can be modified to your reflect distinctive needs. You have the ability to add your own features, user stories, and tasks to reflect your custom use cases.
In this template we provide prescriptive guidance for the following Azure Sentinel use cases:
- Define Use Cases
- Get Started with Azure Sentinel | Tutorials
- Onboard Azure Sentinel | Prerequisites
- Azure Sentinel Architecture
- Setup Azure Sentinel
- Data Collection
- Visualize your security data with Workbooks
- Enabling Analytics
- Respond to threats
- Proactive threat hunting
- Advanced Topics
The use cases above are listed as Features, comprised of user stories and tasks providing detailed steps to satisfy the use case. The user stories and tasks are nested within each feature. Each task under the user stories includes important information such as links to public documentation, blogs, and webinars that provide you the necessary information complete the task.

In total, there are 11 features that have been listed above. Features 1 through 4 cover any initial steps and pre-requisites for preparing your Azure Sentinel deployment. Features 5 through 11 cover the actual steps for setting up and exploring features with Azure Sentinel.
Feature 1: Define Use Cases
Defining use cases is the most important step for this entire process. There must be a need and use when pursuing the deployment of a product. To provide some ideas or guidance, Gartner has created an article that covers how to determine and build great use cases when deploying a SIEM.
Feature 2: Get Started with Azure Sentinel | Tutorials
To help introduce and prepare you for the deployment of Azure Sentinel, this feature includes the well put together Azure Sentinel Ninja Training with additional Kusto training to assist. This training is to help introduce the concepts and features of the product with materials to help educate and prepare your users for day to day usage of Azure Sentinel.
Feature 3: Onboard Azure Sentinel | Prerequisites
It is important to identify and understand what the prerequisites are for deploying and using Azure Sentinel. To assist with this, this feature in the template provides a list of prerequisites as well as any associated documents that provide additional information that will help with addressed them.
Feature 4: Azure Sentinel Architecture
The design of a SIEM is as important as the SIEM itself. When deploying, it is essential to anticipate design, architecture, and best practices. To provide some guidance and advice, a blog that covers the best practices for implementing Azure Sentinel and Azure Security Center is included.
Along with the best practices for implementing Azure Sentinel, it is essential to understand the costs associated with using the product. Azure Sentinel as a service is mostly free but it is important to understand where the costs are coming from and how you can project costs when reviewing data ingestion options and volume. The Azure Calculator is an invaluable tool that assists with this process and can provide insight into how much it will cost to ingest data that is not free.
Feature 5: Setup Azure Sentinel
The use cases have been determined. The learning material has been reviewed. The prerequisites are understood. The architecture is set and the costs are projected. It is time to begin to take action and deploy the resources to set up Azure Sentinel. As covered in the Ninja training, Azure Sentinel is built on top of the Azure Log Analytics service. This service will serve as the main point for ingestion and log retention. The Azure Log Analytics is where one will collect, process, and store data at cloud scale. For reference, documentation for creating a new workspace is listed in this feature. Once the workspace is ready to go, it is time to onboard it to Azure Sentinel. The documentation for onboarding the workspace is also included in the feature.
Once the service is set up, it is time to determine the permissions that are needed for the users that will be using it. Azure Sentinel has 3 different roles backed by Azure role-based access control (Azure RBAC) to provide built-in roles that can be assigned to users, groups, and services in Azure. The document with the roles is listed in the feature. Additionally, permissions can be assigned on the table level for data in order to prevent users from seeing certain data types if desired.
Feature 6: Data Collection
Data ingestion is the oxygen of Azure Sentinel. Azure Sentinel improves the ability to collect and use data from a variety of sources to unblock customer deployments and unlock full
SIEM value.
Setting up data collection begins not only the data ingestion, but also the machine learning capabilities of Azure Sentinel. When exploring the dozens of connectors that are available out of the box, we recommend to enable the Microsoft security data connectors first. Once first part connectors are chosen, it is time to explore the 3rd party connectors. Each connector listed in this feature includes a description and a reference to the associated document.


Feature 7: Visualize your security data with Workbooks
Once data begins to be ingested, it is time to visualize the data to monitor trends, identify anomalies, and present useful information within Azure Workbooks. Out of the box, there are dozens of built-in Workbooks to choose from as well as several from the Azure Sentinel GitHub community page. Within the feature for Workbooks are a few sample Workbooks to consider. Not every data source or connector will have a Workbook but there are quite a few that can be useful.
Feature 8: Enabling Analytics
One of the main features of Sentinel is its ability to detect malicious or suspicious behaviors based on the MITRE attack framework. Out of the box, there are over 100 different detections built in that were made by Microsoft Security Professionals. These are simple to deploy and the feature in the template provides documentation for deploying the template detection rules, as well as the document for creating your own custom detection rules.
Feature 9: Respond to threats
To compliment its SIEM capabilities, Azure Sentinel also has SOAR capabilities. This feature contains helpful documents for setting up Playbooks for automated response, deploying Playbooks from the GitHub repository, and how to integrate ticket managing services via Playbooks.
Feature 10: Proactive threat hunting
To go along with the reactive features, Azure Sentinel also provides proactive capabilities that provide you the ability to proactively search, review, and respond to undetected or potentially malicious activities that may indicate a sign of intrusion/compromise. Azure Sentinel offers dozens out of the box hunting queries that identify potentially exploitable or exploited areas and activities within your environment. This feature within the template provides links and information to ignite your proactive threat hunting journey with out the box threat hunting queries, bookmarks, Azure Notebooks, and livestream.
Feature 11: Advanced Topics
If desired, Azure Sentinel can be deployed and managed as code. To help provide context and guidance, this feature within the template includes a blog post that covers how one can deploy and managed Azure Sentinel as code.
Assign work items to a team member
You can only assign a work item to one person at a time. The Assigned To field is a person-name field designed to hold an user identity recognizable by the system. Within the work item form, choose the Assigned To field to select a project member. Or, you can begin typing the name of a project member to quickly focus your search to a select few.

Tracking Progress with Boards
Azure DevOps utilizes a progress tracking approach that is similar to Agile project management. Boards lists each task, the state of progress, and the individuals that are assigned to the tasks. As the tasks are worked on, they will move within the Board until they are closed. The tasks can also be clicked and dragged around the Board as desired. This will provide you the blueprint understanding the completed and outstanding tasks for your Azure Sentinel deployment.

What’s Next
The current version of the Azure Devops Board template provides you the blueprint to understand the tasks and recommended practices to onboard to Azure Sentinel. The next iteration will incorporate a CI/CD pipeline that will enhance and automate the tasks/phases covered in the Azure Devops Board template. The CI/CD pipeline will automate your Azure Sentinel deployment so you spend less time with the nuts and bolts and more time securing your environment.
Get started today!
Supercharge your cloud SIEM today!
We encourage you to leverage the Azure Sentinel Devops Board template to accelerate your Azure Sentinel deployment following recommended practices.
Try it out, and let us know what you think!
by Scott Muniz | Aug 11, 2020 | Azure, Microsoft, Technology, Uncategorized
This article is contributed. See the original author and article here.
We are bringing this blog post to continue the learning about the protection that Azure Security Center offers for the SQL IaaS VMs. As you learnt in this blog post, Azure Security Center protects SQL servers hosted on either Azure VMs, Azure Arc and on-premises.
SQL Server on Azure Arc
While hybrid approaches bring greater power and flexibility, they also present greater complexity. Azure Arc was announced at Ignite 2019 to better address these challenges. Using Azure Arc, organizations can deliver a broader range of services while simplifying matters of management and security. Azure Arc provides deeper integration across all your Azure environment. Essentially Azure Arc allows organizations to use Azure’s management technologies (“control plane”) to centrally administer public cloud resources along with on-premises servers, virtual machines, and containers. All of Azure’s AI, automation, compliance and security best practices are now available to manage all of their distributed cloud resources, and their underlying infrastructure, which is known as “connected machines.” Additionally, several of Azure’s AI and data services can now be deployed on-premises and centrally managed through Azure Arc, enhancing local and offline management and offering greater data sovereignty.
Utilize Azure Security Center to produce a comprehensive report of vulnerabilities in SQL Servers and get advanced, real-time security alerts for threats to SQL Servers and the OS. Azure Security Center centralizes all security policies and protects the entire managed environment. When Security Center is enabled, the Azure monitoring agents will report data back from the servers, networks, virtual machines, databases, and applications. The Azure Security Center analytics engines will ingest the data and use AI to provide guidance. It will recommend a broad set of improvements to enhance security, such as closing unnecessary ports or encrypting disks and more. Azure Arc extends these security features to connected machines and services to protect all registered resources.
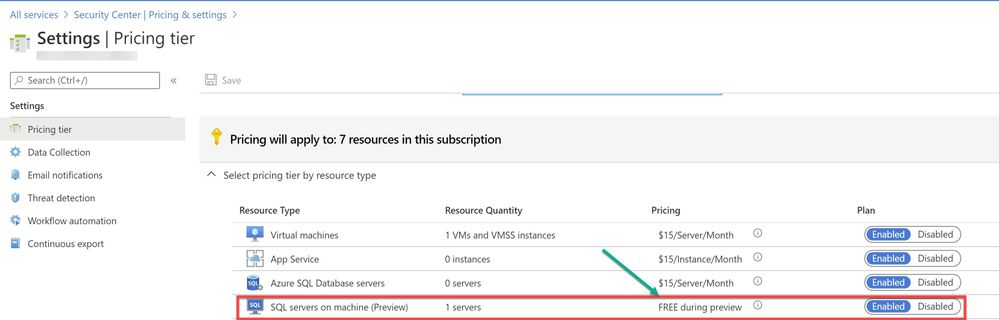
To use this threat detection capability, you need to enable the SQL servers on machine threat bundle in Azure Security Center pricing tier as shown in ‘Image 1’:

Image 1: Azure Security Center Pricing Tier
If your SQL server is hosted on Azure Arc machine and if you have auto-provisioning option enabled, Log Analytics agent will be automatically installed in your machine. If Otherwise, you can deploy the Log Analytics agent using the Security Center recommendation “Log Analytics agent should be installed on your Windows-based Azure Arc machines (Preview)”. Alternatively, you can install the agent manually in two easy steps by adding the Log Analytics VM extension. Refer to this article for step-by-step procedure to enable extension from portal/JSON/PowerShell.
A PowerShell script was used in this case to simulate a SQL injection attack scenario on the SQL server running on Azure Arc.
Injection flaws allow attackers to relay malicious code through an application to another system. These attacks include calls to the operating system via system calls, the use of external programs via shell commands, as well as calls to backend databases via SQL (i.e., SQL injection). Attackers can go around authentication and authorization of a web page or web application and retrieve the content of the entire SQL database. SQL injection is a particularly widespread and dangerous form of injection. The consequences are particularly damaging, as an attacker can obtain, corrupt, or destroy database contents. Security Center detects unusual and potentially harmful attempts to access SQL servers based on behavior analysis using machine learning.
In this scenario, Azure Security Center detected the threat and provided an alert with details of the machine, attacker activity, host information and more as shown in ‘Image 2 & Image 3’

Image 2: Security Alert, Alert details

Image 3: Security Alert, Take Action
NOTE: As of June 2020 release, Two new recommendations have been added to help deploy the Log Analytics Agent to your Azure Arc machines and ensure they’re protected by Azure Security Center:
- Log Analytics agent should be installed on your Windows-based Azure Arc machines (Preview)
- Log Analytics agent should be installed on your Linux-based Azure Arc machines (Preview)
These new recommendations will appear in the same four security controls as the existing (related) recommendation, Monitoring agent should be installed on your machines: remediate security configurations, apply adaptive application control, apply system updates, and enable endpoint protection. The recommendations also include the Quick fix capability to help speed up the deployment process.
In the next blog posts, we will discuss on how you can leverage Azure Security Center to protect your SQL IaaS VMs hosted On-premises. Stay Tuned!!
Special thanks to:
Yuri Diogenes, Senior PM, CxE Security – ASC Team for reviewing this post.
by Scott Muniz | Aug 11, 2020 | Azure, Microsoft, Technology, Uncategorized
This article is contributed. See the original author and article here.
With the recent release by HashiCorp and Microsoft of the Azure DevOps Provider 0.0.1 for Terraform we look at how to use these new features to create repeatable standardized projects into Azure DevOps.
Introduction.
In this article we are going to look at the new Terraform Provider for Azure DevOps. Firstly, lets provide some useful links:
At the time of authoring this article the provider is at version 0.0.1. Functionality is still a little limited and some of the documentation needs more detail, but all the basics are there.
So What Can I Do With This?
One question that has been asked many times is “Can I automate and template Azure DevOps Projects?”. Well, the answer is now yes.
The Terraform Azure DevOps Provider allows us to be able to create a standard Terraform deployment that creates a Project inside a DevOps Organization. We can use the resources to then describe what features we want enabled, disabled, or configured.
I have created a sample GitHub repo that holds the code examples we are going to look at below.
Ok, So Let’s Get Started.
Like many others, I tend to break my Terraform files up into smaller sub files to make things a little easier to navigate. In the GitHub Repo I have five .tf files:
- main.tf
- variables.tf (used to set my var. options cleanly)
- outputs.tf
- ado_repository.tf (we will cover this in more detail in the article)
- github_service_connection.tf (we will use this to setup a connection to the GitHub Repo)
I’m not going to cover what all of the files do in this article (there are some great blog posts out there already for that), but if you are interested in getting a detailed understanding of Terraform I recommend you check out our very own Adin Ermie.
Let’s start by taking a look at the main.tf file. The first area to note is that we need to define the org_service_url for Azure DevOps and personal_access_token we are going to use within the Provider Block.
The Organization Service URL is just the address to your DevOps org, for example https://dev.azure.com/myorg
Have a look at the following Microsoft document for detailed steps on how to setup a Personal Access Token in Azure DevOps.
main.tf
provider "azuredevops" {
  version = ">= 0.0.1"
  # Remember to specify the org service url and personal access token details below
  org_service_url = "xxxxxxxxxxxxxxxxxxxx"
  personal_access_token = "xxxxxxxxxxxxxxxxxxxx"
}

resource "azuredevops_project" "terraform_ado_project" {
  project_name       = var.project_name
  description        = var.description
  visibility         = var.visibility
  version_control    = var.version_control
  work_item_template = var.work_item_template
  # Enable or desiable the DevOps fetures below (enabled / disabled)
  features = {
      "boards" = "enabled"
      "repositories" = "enabled"
      "pipelines" = "enabled"
      "testplans" = "enabled"
      "artifacts" = "enabled"
  }
}
The rest of the arguments here are self-explanatory. we provide the basic options to setup the project and select to enable or disable the feature we require.
Next, we will look at the github_service_connection.tf. What we are doing here is defining a service connection into GitHub using GitHub Personal Access Tokens. Configuring GitHub PATs is documented here.
github_service_connection.tf
resource "azuredevops_serviceendpoint_github" "serviceendpoint_github" {
  project_id            = azuredevops_project.terraform_ado_project.id
  service_endpoint_name = "Sample GithHub Personal Access Token"

  auth_personal {
    # Also can be set with AZDO_GITHUB_SERVICE_CONNECTION_PAT environment variable
    personal_access_token = "xxxxxxxxxxxxxxxxxxxx"
  }
}
Finally, I am using an outputs.tf to return the newly created Project ID and Project URL.
outputs.tf
output "Project_ID" {
  value = azuredevops_project.terraform_ado_project.id
}

output "Project_URL" {
  value = azuredevops_project.terraform_ado_project.id
}
A Note About Repos.
Something that has been noted by a few people is that the Import option on the azuredevops_git_repository resource does not seem to work. Although documented as Import being a supported option (for public repos only at this time), it returns an error message.
Demo
Here is a quick demo of the code in action.
Wrap Up!
So thats it! A straightforward way to create Azure DevOps Projects within your Organization, simple and repeatable.
by Scott Muniz | Aug 10, 2020 | Azure, Microsoft, Technology, Uncategorized
This article is contributed. See the original author and article here.
Azure Active Directory B2C (Azure AD B2C) is a great way to enable secure authentication for your users across mobile and web — from basic sign-in and sign-out, to profile management and more.
While Azure AD B2C is designed to work well on any iOS or Android phone or tablet, integrating with any auth provider can be particularly tricky on a mobile device, particularly if you’re building a “hybrid” mobile app using something like Cordova or Capacitor. Issues like secure token storage, Man-In-The-Middle attacks, and timely security updates can be troublesome, and create risks if not handled properly.
That’s why the Ionic team designed Auth Connect. Ionic Auth Connect makes it easy to add secure authentication to any hybrid mobile app running on iOS, Android, or the web. Using a simple, powerful API, it handles logging in and/or registering a user with an authentication provider (such as Azure Active Directory) using industry-standard OAuth/OpenId Connect.
Getting Started
In this tutorial, we’ll add login/logout functionality to a basic Ionic app by integrating Ionic Auth Connect. There’s only a few steps required to implement Auth Connect with Azure AD B2C in an Ionic app: configure Azure AD B2C, install Auth Connect in an Ionic app, and configure Auth Connect to use Azure AD B2C.
To begin, clone this repository and follow along. The “start” folder contains the basic structure of the app that we’ll make changes to and the “completed” folder contains the finished app as a reference point if needed.
NOTE: An Ionic Native Enterprise Edition key is required in order to install and use the Ionic Auth Connect plugin. Ionic Native Enterprise features a library of Premier plugins and solutions that are fully supported and maintained by the Ionic team, with access to Ionic experts and a guaranteed response SLA to mission-critical app development. If you are interested in acquiring a key or learning more, please contact us here.
To see what Ionic Auth Connect looks like in action, view this short video.
After cloning the code, do the following:
1. Install the Ionic CLI:
npm install -g @ionic/cli
2. In a terminal, change directory into the “start” folder in the repository:
cd demo-authconnect-azureb2c/start
3. Run npm install. NOTE: This will fail if an Ionic Native key hasn’t been registered.
4. Run ionic serve to build and serve the app locally in a web browser.
The Reference App
The Ionic app is a modified version of a blank Angular starter project. It consists of two pages: the Home page displays the signed-in user’s details (which will be retrieved from Azure AD B2C) and the Login page protects the Home page from unauthorized access.
Azure Active Directory B2C Configuration
Before integrating Auth Connect into the Ionic app, you’ll need to get Azure Active Directory (AD) B2C up and running.
Note: For complete information on configuring Azure AD, consult the official B2C documentation which includes tutorials on creating a B2C tenant, registering applications, and more.
Create an Azure AD B2C Tenant
If you don’t have one, create a new B2C tenant.
Register an Application
Sign into the Azure Portal then navigate to the Azure AD B2C service page.
Begin by creating a new Application under Manage – App registrations – New registration.

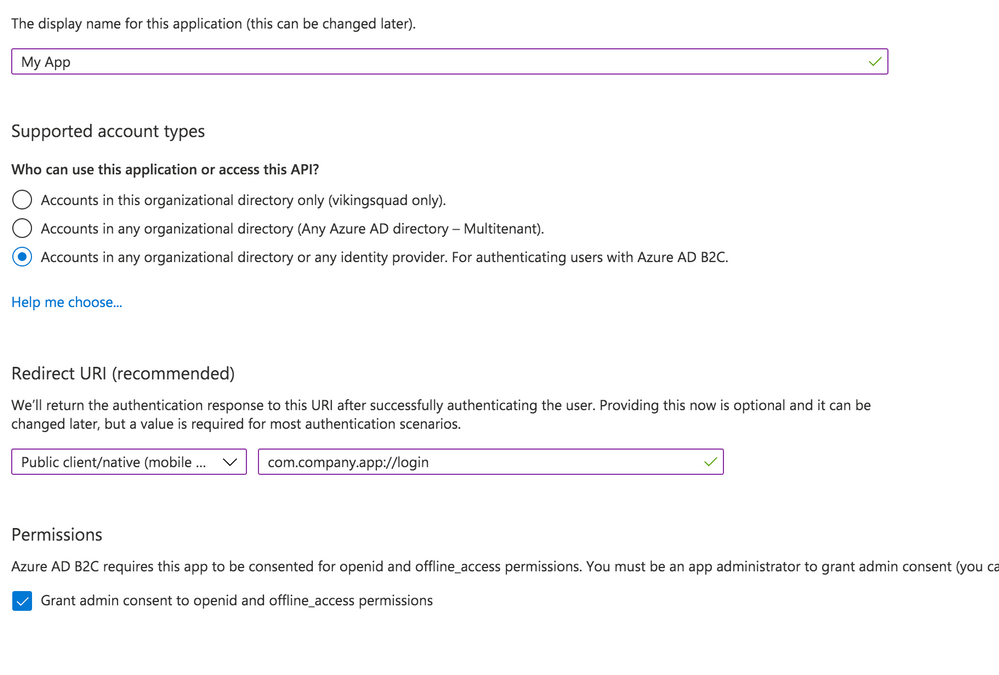
Give your app a new name, then select the Supported Account Types.
With that in hand, set the Redirect URI. Choose “Public client/native (mobile & desktop)” – we’ll add web support in a separate step. Then, fill in the text field value with your globally unique App Id, which is used both in the Azure configuration as well as the native mobile app’s configuration. Typically, this takes the form of company-AppName or reverse DNS style – com.company.app. Use the formula “uniqueId://page”. After the app user signs into Azure AD, this tells Auth Connect which page to redirect to in your app. While any page can be used, in this example we’ll use the Login page, such as com.company.app://login. Click the register button to create the app.
Add Web Platform
With the app created, navigate to Manage – Authentication. Click the “Add a Platform” button. Under Web applications, choose “single-page application.”
Under Redirect URIs, specify a web URL. In this example, for local testing, we’ll use http://localhost:8100/ along with the name of your app’s core login page (typically, login).
Next, under Logout URL, specify a web URL to redirect to once the user has logged out of your app. Again, for local testing, specify https://localhost:8100/ along with the name of the logout page (typically logout).
Finally, under Implicit Grant, toggle “Access tokens.” Click the Configure button to save.

Back on the Authentication page, look under the Single-page application settings. Click the “Add URI” button to add additional Redirect URIs, including those for other environments like staging or production. Click Save when ready.

Expose an API
Navigate to the “Expose an API” page. Click “Add a scope”, then for the Scope name, provide a value such as “user_impersonation.” For the display name and description fields, add details describing that this is for authenticating your users. Set the state to enabled then click the “Add scope” button.
Configure API Permissions
Next, we need to authorize our app so it can connect to Azure B2C and retrieve user profile information alongside login credentials. Navigate to the API Permissions page then click the “Add a permission” button. Under “Select an API”, choose “My APIs” then click the name of the B2C app we’re currently configuring. Next, select the “user_impersonation” permission (or whatever name you labeled it in the previous step) then click the “Add permissions” button.
Save the application, then click on the newly added permission row. Click the “Grant admin consent for [your organization name]” button then choose “Yes.”

Click on the “user_impersonation” permission row again to open the modal window, then click to copy the link that is displayed. Note this URL, because it will be used as part of Auth Connect’s “scopes” property later.

Create User Flows (Policies)
Create at least one User Flow, the series of pages that define the entire authentication experience for your app. At a minimum, create a Sign up and sign in flow. Once the User Flow has been created, select it from the User Flow list, then click “Run user flow” from the Overview tab. Note the URL at the top of the page, used to configure Auth Connect’s Discovery URL property.
Azure AD B2C is now ready to use with Auth Connect.
Install Auth Connect
Auth Connect works on the web or on mobile. For deploying to mobile, we’ll use Capacitor, Ionic’s cross-platform native runtime for building native mobile and web apps, using JavaScript, HTML, and CSS, with one shared codebase. Learn more about the project and how to deploy this Ionic app to mobile here.
Adding Capacitor is easy:
ionic integrations enable capacitor
Run the following command to install the Auth Connect plugin. For the AUTH_URL_SCHEME variable, use the globally unique App Id (ex: com.company.app) you decided on when configuring the Azure AD app above.
npm install @ionic-enterprise/auth --variable AUTH_URL_SCHEME=com.company.app
npx cap sync
Configure Auth Connect
Configuring Auth Connect involves two steps: adding configuration details into the app from your Azure AD tenant and implementing login/logout functionality.
Azure Configuration Details
Since the Azure AD B2C app will support different values per environment (typically staging, QA, production, etc.) we can support that in the Ionic app using Angular’s environments. Open src/environments/environment.ts then add the following. We’ll begin with a web-based configuration since it’s easier to build and test locally in a browser:
import { IonicAuthOptions } from '@ionic-enterprise/auth';

export const azureWebConfig : IonicAuthOptions = {
  // the auth provider
  authConfig: 'azure',
  // The platform which we are running on
  platform: 'web',
  // client or application id for provider
  clientID: 'FILL_IN',
  // the discovery url for the provider
  // OpenID configuration
  discoveryUrl: 'FILL_IN',
  // the URI to redirect to after log in
  redirectUri: 'http://localhost:8100/login',
  // requested scopes from provider
  scope: 'openid offline_access email profile FILL_IN',
  // the URL to redirect to after log out
  logoutUrl: 'http://localhost:8100/login',
  // Show provider login in either current window or new tab
  implicitLogin: "CURRENT"
};
Some of these `IonicAuthOptions` values are unique and must be set based on the Azure AD app that we just created above:
* platform: Use “web” if running as a PWA or “capacitor” when the app is deployed as an iOS or Android app.
* clientID: Your app’s _Application (client) ID_, found on the Overview page. Example: cebbb0be-d578-4bbd-9712-4b0fe05c06aa
* redirectUri: The URI to redirect to after the user has logged in. Since we’re testing locally in a browser, use “http://localhost:8100/login” since this is what `ionic serve` runs on.
* logoutUrl: The URI to redirect to after the user has logged out. Again, use “http://localhost:8100/”.
The scope property is used to unlock access to protected resources, such as read/write permissions. There’s a variety of attributes available; an example looks like: “openid offline_access email profile”.
In addition to the values above, add the Full Scope Value link created earlier to the `scope` property. To find it in the Azure AD B2C portal, navigate to the “Expose an API” page then click on the Scope you defined earlier. In the modal window, copy the link that appears under “Scope name.” All together, it will look similar to this:
scope: 'openid offline_access email profile https://orgname.onmicrosoft.com/api/user_impersonation',
The discoveryUrl can be found by navigating to the main Azure AD B2C page -> Policies -> User flows -> [Select User Flow] -> Overview tab -> Run user flow button. The discovery link is at the top of the page and will look like the following format:
https://B2C-TENANT-NAME.b2clogin.com/B2C-TENANT-NAME.onmicrosoft.com/v2.0/.well-known/openid-configuration?p=POLICY-NAME
Where B2C-TENANT-NAME is your tenant name and the POLICY-NAME is the name of the User Flow created earlier.
The native mobile configuration is almost the same as the web. Make a copy of the web configuration then change the redirect and logout urls. Use the same AUTH_URL_SCHEME variable value (App Id) from when the Auth Connect plugin was installed. For example, “com.company.app://” plus the name of the Login page. Change the platform to “capacitor”:
export const azureNativeConfig : IonicAuthOptions = {
  platform: 'capacitor',
  redirectUrl: 'com.company.app://login',
  logoutUrl: 'com.company.app://logout'

  // snip - other variables
}
Create an Authentication Service for Login Functionality
With Azure AD environment configurations added to the Ionic app, we can now leverage them in an AuthenticationService class that encapsulates Azure AD and Ionic Auth Connect’s login functionality.
Generate this class using the ionic generate command:
ionic generate service services/authentication
Open up src/app/services/authentication.service.ts and import Auth Connect, RxJs (for tracking login status changes), and the Azure AD configuration objects we just created:
import { Injectable } from '@angular/core';
import { Platform } from '@ionic/angular';
import { IonicAuth } from '@ionic-enterprise/auth';
import { Subject, Observable } from 'rxjs';
import { azureNativeConfig, azureWebConfig } from '../../environments/environment';
Next, extend the IonicAuth class in order to gain access to Auth Connect’s functionality, and in the constructor, instantiate it with the proper Azure configuration object. Using Ionic’s Platform API, we can dynamically choose which configuration to use based on whether the app is running on the web or a mobile device.
export class AuthenticationService extends IonicAuth {
  constructor(platform: Platform) {
    // Determine whether to run on mobile or the web
    const selectedConfig = platform.is('hybrid') ? azureNativeConfig : azureWebConfig;
    super(selectedConfig);
}
Implementing login functionality is quite simple – we define our own login method then call Auth Connect’s login method.
async login(): Promise<void> {
  await super.login();
}
Upon successful login, Auth Connect calls the `onLoginSuccess` event, which we can override here to run any additional logic we need. In this case, we can emit an RxJs event when the login status changes (either logged in or logged out) then react accordingly (direct the user into the app or back to the Login page).
onLoginSuccess() {
    this._loginStatusChanged.next(true);
}
Define the status change observable right below the class definition:
 // Emit event when login status changes
  private _loginStatusChanged: Subject<boolean>;

  get loginStatusChanged(): Observable<boolean> {
    return this._loginStatusChanged.asObservable();
  }
To detect and act on the login status changing, head over to `app.component.ts` in `src/app`. Import the AuthenticationService class, then subscribe to the status change observable:
import { AuthenticationService } from './services/authentication.service';

// snip

constructor(

    private auth: AuthenticationService,
    private navController: NavController,
    private platform: Platform
  ) {

    this.initializeApp();

    this.auth.loginStatusChanged.subscribe(authenticated =>
         this.handleAuthChange(authenticated));
  }
Next, add a method that inspects the status of the login attempt. If successful, redirect the user to the Home page, otherwise, remain on the Login page:
private handleAuthChange(authenticated: boolean) {
    if (authenticated) {
      this.navController.navigateRoot(['home']);
    } else {
      this.navController.navigateRoot(['login']);
    }
  }
The last step is easy: leveraging the AuthenticationService from the Login page (`src/app/login/login.page.ts`). First, add a click handler to the Login button:
<ion-button (click)="login()" strong shape="round">
   Log in
</ion-button>
Next, add a new method to call the AuthenticationService’s login method:
async login() {
  await this.authService.login();
}
Just one last step required. When running as a web app, the user will be redirected to the Azure AD sign-in page. After successful sign-in, they’ll be sent back to the Ionic app and since this is a “fresh” load of the page, we need to pass the access token along to Auth Connect. To do so, pass the browser’s url to Auth Connect’s `handleCallback` function:
async ngOnInit() {
    if (window.location.hash) {
        await this.authService.handleCallback(window.location.href);
    }
}
Once handleCallback completes, Auth Connect will call `onLoginSuccess()` in the AuthenticationService class, which triggers the login status change event, ultimately permitting the user access to the Home page.
That’s it! Click the Login button in the browser, sign in using your Azure AD B2C credentials, then you should be redirected to the Home app.
View Azure AD User Details
Logging in is nice, but what if we took it one step further by displaying some of the Azure AD user’s profile details on the Home page?
Back over in the AuthenticationService, declare a new method to retrieve the user’s profile info from Azure. Access all information via Auth Connect’s `getIdToken` function:
async getUserInfo() {
    const idToken = await this.getIdToken();
    if (!idToken) {
      return;
    }

    let email = idToken.email;

    if (idToken.emails instanceof Array) {
      email = idToken.emails[0];
    }

    return {
      id: idToken.sub,
      email: email,
      firstName: idToken.given_name,
      lastName: idToken.family_name,
      picture: "assets/user-placeholder.jpg"
    };
  }
Next, over in the Home page (`src/app/home/home.page.ts`), make the call to `getUserInfo` when the page loads:
user: any;

constructor(private authService: AuthenticationService) { }

async ngOnInit() {
    this.user = await this.authService.getUserInfo();
}
To complete this, update the Home page’s HTML template so that it now displays the user’s profile info:
<ion-content>
  <div class="ion-padding">
    <div align="center" *ngIf="user">
      <ion-avatar>
        <img src="{{ user.picture }}">
      </ion-avatar>

      <p>{{ user.firstName}} {{ user.lastName }}</p>
      <p>{{ user.email }}</p>
    </div>

    <ion-button expand="block" (click)="logout();" style="margin-top: 50px">Log out</ion-button>
  </div>
</ion-content>
If you’re still running `ionic serve`, save all files, then the page should reload, displaying your Azure AD user profile details.
Implementing Log Out
The last step is to add logout functionality. Since we’re already in the Home page code, add a new function that calls Auth Connect’s `logout` function directly:
async logout() {
    await this.authService.logout();
  }
Back over in AuthenticationService, implement Auth Connect’s “onLogout” event, which fires once it has successfully logged out the current user. All the app needs to do is fire the login status changed event, passing “false” to indicate that the user is no longer logged in:
onLogout() {
    this._loginStatusChanged.next(false);
  }
Recall that this event will be caught over in `app.component.ts`, and since “authenticated” is now false, the user will be redirected to the Login page:
private handleAuthChange(authenticated: boolean) {
    if (authenticated) {
      this.navController.navigateRoot(['home']);
    } else {
      this.navController.navigateRoot(['login']);
    }
  }
Reload the page, click the Logout button, and you should be signed out then redirected to the Login page.
What’s Next?
In just a few steps, we added Azure AD B2C authentication to an Ionic app, with complete login and logout functionality. With Auth Connect now in place, there are many paths to go from here. You can further tweak the Azure AD user experience (such as customizing the user interface) or begin testing Auth Connect in a native app right away.
About Ionic Auth Connect
Auth Connect is built and maintained by the Ionic team. Ionic makes tools and services that empower web developers to deliver stunning native mobile and web applications, using the web tools, libraries, and frameworks that they know and love. Our cross-platform native runtime, Capacitor, provides a secure way to deliver web-based applications on a mobile device. When coupled with Ionic’s Auth Connect solution, implementing single sign-on in web applications is even easier.
Happy app building!

Recent Comments