by Scott Muniz | Sep 1, 2020 | Azure, Microsoft, Technology, Uncategorized
This article is contributed. See the original author and article here.
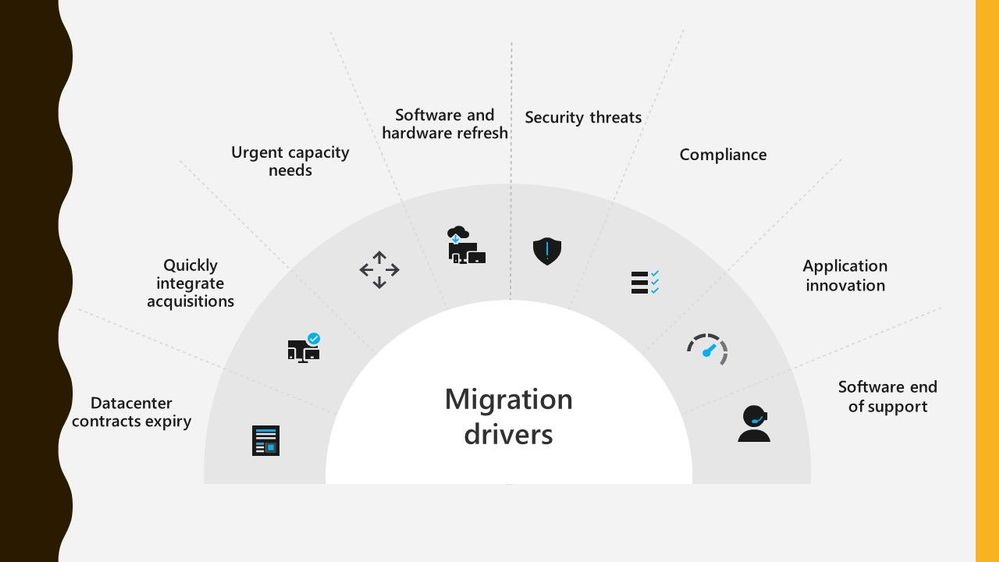
Migrating workloads from on prem datacentres to Azure is something a lot of organisations are thinking about. There are lots of drivers making customers think about this, whether it be physical capacity issues or software refresh timelines.
 Migration Drivers
Migrating workloads is a big project and any tooling or guidance that can help make that project easier is often welcomed. And this is where Azure Migrate can assist. Azure Migrate is billed as the hub for datacentre migrations, able to assist with discovery, assessment, and migration of many key migration scenarios such as servers, databases, virtual desktops and data.
Azure Migrate is a free service, and often a question people ask how true that is so let’s tackle that subject.
Discovery and Assessment Costs
I’m a big advocate of organisations carrying out a full discovery and assessment of their environment as the first stage during their migration project, and I talk more about it in my blog post looking at the information you should be looking to discover during that discovery. Azure Migrate is a great tool for doing that initial discovery of your environment, it can collect basic information like server name, operating system version and resource configuration.
The other discovery piece of Azure Migrate: Server Assessment is being able to map how your servers all interconnect. Showing you the ports and services that connect, because let’s face it your servers don’t work independently from each other they are all part of a larger puzzle.
For this dependency visualization Azure Migrate: Server Assessment leverages the power and technology from Log Analytics. The dependency visualization is free for the first 180 days from the day of associating a Log Analytics workspace with the Server Assessment tool. After 180 days, standard Log Analytics charges will apply. And if you use any other solution within that Log Analytics workspace it is not free, and you’ll incur standard Log Analytics charges.
My recommendation is to leave the tool gathering the dependency visualization data for at least 30 days as that should capture a good picture of what happens within your environment and show any specific workload spikes.
Migration Costs
When you come to migrating your servers into Azure as Infrastructure as a Service (IaaS) virtual machines, the Azure Migrate: Server Migration tool can help you with that.
When you start to replicate machines from your own environment up in to Azure you will start to incur charges for Azure Storage, storage transactions and data transfer during replication. However, the license charges for Server Migration are waived for the first 180 days.
So the Azure Migrate: Server Assessment part is free for the first 180 days and I’d like to think that most companies are looking to complete the cutover and run their workload live in Azure well within that 180 day period.
Conclusion
So, I think it is fair to say that you can utilise Azure Migrate for your migration for free. Albeit some surrounding services may cost you but there are mechanisms in place that can avoid you incurring to many charges. I’d love to hear if you’ve used Azure Migrate during your migration project and how it helped keep your migration costs down. :grinning_face:
by Scott Muniz | Aug 31, 2020 | Azure, Microsoft, Technology, Uncategorized
This article is contributed. See the original author and article here.
Hi, all! Rod Trent here. I am a Cybersecurity CE/Consultant at Microsoft and working with Azure Sentinel. I also blog for our Secure Infrastructure Blog and have quite a few Azure Sentinel articles posted there already.
Customers ask quite often how they can share their Workbooks with others outside of Azure Sentinel, i.e., give access to the valuable visualizations/reports to those that don’t need full Azure Sentinel access.
The solution is actually much easier than it might seem and involves a very simple method of using the pinning features of Workbooks and setting appropriate RBAC rights.
The most important piece is ensuring that the proper, least privilege rights are in place to enable viewing of the Workbook data on the Azure Dashboard. But, before digging into that, read my recent walkthrough for properly Pinning Entire Azure Sentinel Workbooks to Azure Dashboards.
After understanding how best to promote the Workbook data to an Azure Dashboard, now you just need to set the proper access rights.
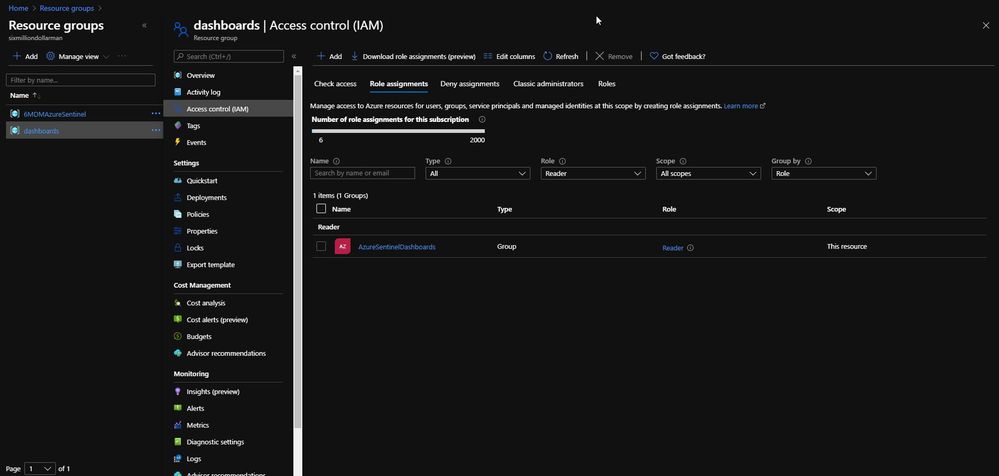
When you follow the instructions listed above, part of the pinning process is saving the dashboard to a resource group. By default, the resource group is dashboards, as shown in the next image.
The dashboards resource group (or whatever you rename it to) needs to have Reader role assignment in place for the individual or individuals that need access to the specific Dashboard. As shown below, I have an Azure Active Directory group called AzureSentinelDashboards with the Reader role on the dashboards resource group. As a best practice, you should always assign groups versus individual role assignments. The user I want to give Dashboard access to, Andre Rene Roussimoff, is a member of the AzureSentinelDashboards group. This gives Andre proper access to the dashboard but doesn’t yet give him access to the Azure Sentinel data. To do that, I have to also assign proper Log Analytics workspace access.

After the dashboards role has been assigned, I now need to assign access to the Log Analytics workspace for Azure Sentinel. This ensures that the user or users can view the data in addition to having access to the Azure Sentinel Workbook that has been pinned as a shared Azure Dashboard.
In the Access control for the Azure Sentinel Log Analytics workspace, I assign the AzureSentinelDashboards group as a Reader of the resource.

As shown in the next image, Andre now has access to the dashboard and also the Azure Sentinel Workbook data.

Summary
Keep in mind, though — this is simply Reader access. If Andre tries to click on any of the Workbook’s dynamic components, he’ll get an error message. But, still…this gives Azure Sentinel analysts a quick and easy way to make Workbooks and reporting data available to those that shouldn’t have full access to the Azure Sentinel console.
P.S. If you’ve been following along, I hope you’ve picked up that there’s a TV theme to my personal Azure Sentinel demo site. Any guess how Andre Rene Roussimoff plays into that TV theme?
by Scott Muniz | Aug 30, 2020 | Azure, Microsoft, Technology, Uncategorized
This article is contributed. See the original author and article here.
Throughout this series, I’m going to discuss how Power Platform is particularly useful for ad-hoc basis jobs like provisioning resources on Azure.
- Provisioning VM for Streamers with Chocolatey
- Ad-hoc Resource Deployment through Power Apps
Everything has gone. I mean all off-line meetups and conferences disappeared. Instead, they have gone virtual – online meetups and conferences. For community events, they have two options – one that purchases a solution for online events, and the other that build a live streaming solution by themselves. If you are a community event organiser and running a live streaming session by yourself, it doesn’t really matter whether you install all necessary applications on your computer or not. However, if the event scales out, which includes inviting guests and/or sharing screens, it could be challenging unless your computer has relatively high spec enough.
For this case, there are a few alternatives. One option is to use a virtual machine (VM) on the Cloud. A VM instance can be provisioned whenever necessary, then destroyed whenever no longer required. However, this approach also has a caveat from the “live streaming” point of view. Every time you provision the VM instance, you should install all the necessary applications by hand. If this is not happening very often, it may be OK. But it’s still cumbersome to manually install those apps. Throughout this post, I’m going to discuss how to automatically install live streaming related software using Chocolatey during the provision of Azure Windows VM.
The sample code used in this post can be found at this GitHub repository.
Acknowledgement
Thanks Henk Boelman and Frank Boucher! Their awesome blog posts, Henk’s one and Frank’s one helped a lot to me set this up.
Installing Live Streaming Applications
As we’re using a Windows VM, we need those applications for live streaming.
- Microsoft Edge (Chromium): As of this writing, Chromium-based Edge is not installed as default. Therefore, it’s good to update to this version.
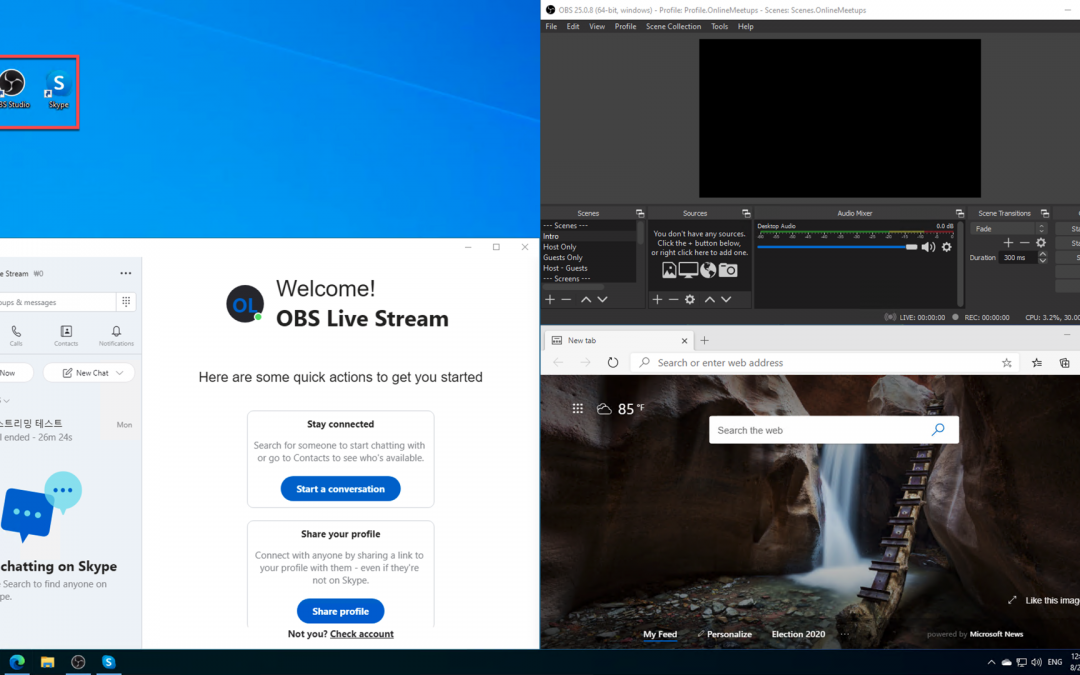
- OBS Studio: Open source application for live streaming.
- OBS Studio NDI Plug-in: As OBS itself doesn’t include the NDI feature, this plug-in is required for live streaming.
- Skype for Content Creators: This version of Skype can enable the NDI feature. With this feature enabled, we can capture screens from all participants and shared screens, respectively.
These are the bare minimum for live streaming. Let’s compose a PowerShell script that installs them via Chocolatey. First of all, we need to install Chocolatey using the downloadable installation script (line #2). Then, install the software using Chocolatey (line #5-8). The command may look familiar if you’ve used a CLI-based application package management tool like apt or yum from Linux, or brew from Mac.
    #Install Chocolatey
    Set-ExecutionPolicy Bypass -Scope Process -Force; iex ((New-Object System.Net.WebClient).DownloadString('https://chocolatey.org/install.ps1'))

    #Install Software
    choco install microsoft-edge -y
    choco install obs-studio -y
    choco install obs-ndi -y
    choco install skype -y
So, if this installation script can be executable while provisioning the Windows VM instance on Azure, we can always use the fresh VM with newly installed applications.
Provisioning Azure Windows VM
Now, let’s provision a Windows VM on Azure. Instead of creating the instance on Azure Portal, we can use the ARM template for this. Although there are thousands of ways using the ARM template, let’s use the quick start templates as a starting point. Based on this template, we can customise the template for our live streaming purpose. We use the template, Deploy a simple Windows VM, and update it. Here is the template. I omitted details for brevity, except VM specs like VM size (line #43) and VM image details (line #48-51).
    {
        "$schema": "https://schema.management.azure.com/schemas/2019-04-01/deploymentTemplate.json#",
        "contentVersion": "1.0.0.0",
        "parameters": {
          ...
        },
        "variables": {
          ...
        },
        "resources": [
          {
            "comments": "=== STORAGE ACCOUNT ===",
            "type": "Microsoft.Storage/storageAccounts",
            ...
          },
          {
            "comments": "=== PUBLIC IP ADDRESS ===",
            "type": "Microsoft.Network/publicIPAddresses",
            ...
          },
          {
            "comments": "=== NETWORK SECURITY GROUP: DEFAULT ===",
            "type": "Microsoft.Network/networkSecurityGroups",
            ...
          },
          {
            "comments": "=== VIRTUAL NETWORK ===",
            "type": "Microsoft.Network/virtualNetworks",
            ...
          },
          {
            "comments": "=== NETWORK INTERFACE ===",
            "type": "Microsoft.Network/networkInterfaces",
            ...
          },
          {
            "comments": "=== VIRTUAL MACHINE ===",
            "type": "Microsoft.Compute/virtualMachines",
            "apiVersion": "[variables('virtualMachine').apiVersion]",
            ...
            "properties": {
              "hardwareProfile": {
                "vmSize": "Standard_D8s_v3"
              },
              ...
              "storageProfile": {
                "imageReference": {
                  "publisher": "MicrosoftWindowsDesktop",
                  "offer": "Windows-10",
                  "sku": "20h1-pro-g2",
                  "version": "latest"
                },
                ...
              },
              ...
            }
          },
          {
            "comments": "=== VIRTUAL MACHINE EXTENSION: CUSTOM SCRIPT ===",
            "type": "Microsoft.Compute/virtualMachines/extensions",
            ...
          }
        ],
        "outputs": {}
      }
If you want to see the full ARM template, click the following link to GitHub.
See ARM Template in full
Custom Script Extension
We’ve got the VM instance ready. However, we haven’t figured out how to run the PowerShell script during the provision. To run the custom script, add this extension to the ARM template. The custom script in the template looks below. The most important part of this template is the property value. Especially, pay attention to both fileUris (line #16) and commandToExecute (line #19).
    {
        "comments": "=== VIRTUAL MACHINE EXTENSION: CUSTOM SCRIPT ===",
        "type": "Microsoft.Compute/virtualMachines/extensions",
        "apiVersion": "[providers('Microsoft.Compute', 'virtualMachines/extensions').apiVersions[0]]",
        "name": "['mystreamingvm', '/config-app')]",
        "location": "[resourceGroup().location]",
        "dependsOn": [
          "[resourceId('Microsoft.Compute/virtualMachines', 'mystreamingvm')]"
        ],
        "properties": {
          "publisher": "Microsoft.Compute",
          "type": "CustomScriptExtension",
          "typeHandlerVersion": "1.10",
          "autoUpgradeMinorVersion": true,
          "settings": {
            "fileUris": "https://raw.githubusercontent.com/devkimchi/LiveStream-VM-Setup-Sample/main/install.ps1"
          },
          "protectedSettings": {
            "commandToExecute": "[concat('powershell -ExecutionPolicy Unrestricted -File ', './install.ps1')]"
          }
        }
      }
fileUris indicates the location of the custom script. The custom script MUST be publicly accessible like GitHub URL or Azure Blob Storage URL.commandToExecute is the command to execute the custom script. As we use the PowerShell script downloaded externally, add the -ExecutionPolicy Unrestricted parameter to loosen the permission temporarily. ./install.ps1 is the filename of the executing script from the URL.
ARM Template Execution
Once everything is done, run the ARM template for deployment. Here’s the PowerShell command:
    New-AzResourceGroupDeployment `
    -Name  `
    -ResourceGroupName  `
    -TemplateFile ./azuredeploy.json `
    -TemplateParameterFile ./azuredeploy.parameters.json `
    -Verbose
And, here’s the Azure CLI command:
    az group deployment create
    -n
    -g
    --template-file ./azuredeploy.json
    --parameters ./azuredeploy.parameters.json
    --verbose
If you’re lazy enough, click the following button to run the deployment template directly on Azure Portal.

It takes time to complete all the provisioning. Once it’s done, access to VM through either RDP or Bastion.

You can see all the applications have been installed!
So far, we’ve discussed how to automatically install applications for live streaming, using Chocolatey, while provisioning a Windows VM on Azure. There are many reasons to provision and destroy VMs on the Cloud. Using an ARM Template and custom script for the VM provisioning will make your life easier. I hope this post gives small tips to live streamers using VMs for their purpose.
This article was originally published on Dev Kimchi.
by Scott Muniz | Aug 30, 2020 | Azure, Microsoft, Technology, Uncategorized
This article is contributed. See the original author and article here.
This blogpost can support your DevOps journey to make your Continuous Integration and Continuous Delivery (CI CD) for companies and or customers. What is DevOps?
People, Process, and Technology to continually provide value to customers.
While adopting DevOps practices automates and optimizes processes through technology, it all starts with the culture inside the organization—and the people who play a part in it. The challenge of cultivating a DevOps culture requires deep changes in the way people work and collaborate. But when organizations commit to a DevOps culture, they can create the environment for high-performing teams to develop.
My name is James van den Berg and I’m a MVP in Cloud and Datacenter Management on my DevOps journey as an IT Infrastructure Guy managing datacenters on-prem and in the Microsoft Azure Cloud. Today It’s not only a Virtual Machine or a Website to deploy for your customers, it’s much more then that like :
- Time to market, deploy your solution fast without waiting on dependencies because you automated your process with a CI CD Pipeline.
- Security and Monitoring to keep you in Controle.
- Working together with different Teams who are each responsible for a part of the solution.
- The complete DevOps Pipeline must be Compliant
Here you can start with Azure DevOps on Microsoft Learn platform.
In the following step-by-step guide, you will see how easy it can be to Build your own first pipeline.
Before you start, you need a Microsoft Azure Subscription to start with.
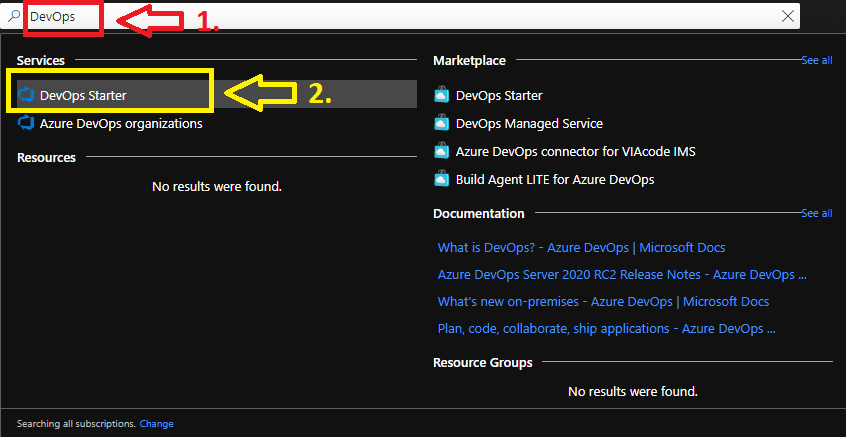
1. Login your Azure subscription and type DevOps in your search bar.

Click on DevOps Starter

From here you can start with a new application of your choice or bring your own code from Git Hub.
I will choose a new dot NET application, but when you have your Own Code on Git Hub for example it will integrate in your Azure Cloud Pipeline like this :

Your existing repository on Git Hub will integrate with your Azure DevOps Pipeline. But for this step-by-step guide we will make an ASP.NET Web application pipeline in Microsoft Azure Cloud.

Here you choose your Application Framework and you can select a SQL Database for your Solution.
More information about all the quick starts in Azure DevOps Starter.

The Next step is to select the right Azure services to run on your ASP.NET solution. I selected the Windows Web App fully managed compute platform.

Complete the last step and you can change your Service Plan at additional settings when you need more resources. From here the Azure DevOps Starter has enough information to Build your first Azure Pipeline solution in the Cloud. 

Pipeline in Progress.
When you Click here on the Build link you will be redirected to your Azure DevOps environment.
Here you find more information about Microsoft Azure DevOps

Azure DevOps Pipeline creation in Progress.
To monitor the creation of your Pipeline solution, you can see that in the live logs :

Live monitoring the deployment

Your Azure DevOps Starter deployment is running.

Your ASP.NET Web App running with a Pipeline.

Your Deployment in Azure DevOps.
From here is the baseline deployment of your solution done with Azure DevOps Starter and can you Configure the Pipeline environment with the other teams to get RBAC and Dashboards in place to work with.

Azure DevOps Dashboard.
Conclusion :
Microsoft Azure DevOps Starter supports you with the basic of your Pipeline Solution. It’s a good start for your DevOps journey and to configure your solution with other teams to get your compliant result for your customer or business.
You can follow me on Twitter : @JamesvandenBerg
More information :
Blog : Microsoft Azure DevOps Blog
Follow on Twitter : @AzureDevOps
Start here with Microsoft Azure DevOps

by Scott Muniz | Aug 28, 2020 | Azure, Microsoft, Technology, Uncategorized
This article is contributed. See the original author and article here.
This post was written by Sagar Chandra Reddy Lankalain in collaboration with Ji Eun Kwon. Sagar and Ji Eun currently serve as the Program Managers for VS and .NETat Microsoft.
Azure Lab Services is a managed cloud service that enables educators and IT to easily roll out cost-efficient labs with customizable virtual machines, without having to master the complexities of setting up cloud infrastructure.
Azure Lab Services helps to quickly create virtual lab environments and enables to easily run a class, set up a training lab, or host a hackathon in the cloud so that users can access lab resources from anywhere, anytime.
Azure Lab Services provides the following key capabilities:
- Simple User Experience – Provide immediate access to VMs for invited users. With one click users can connect and start working – no Azure subscription needed.
- Flexibility – Use thousands of Azure Marketplace images or bring in your custom images to quickly provision lab VMs and use repeatedly across labs
- Cost Optimization and Tracking – Manage your lab budget with usage control features. Schedule designated usage times or set up recurring auto-shutdowns and start times. Track individuals’ hourly usage or limit usage by setting up quotas.
- Automatic Management and Scaling – Provisioning and scaling to hundreds of VMs with a single click, with the service managing all underlying infrastructure
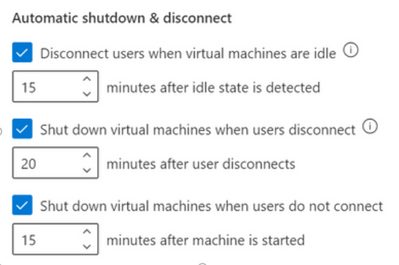
Azure Lab Services has recently rolled out new cost control features that will proactively prevent waste of virtual machine usage hours inside the labs! The combination of these three automatic shutdown and disconnect features will now catch most of the cases where users accidentally leave their virtual machines running:

These settings can be configured at both the lab account level and the lab level. If the settings are enabled at the lab account level, they will be applied to all labs within the lab account. Any changes to the settings made at the lab level will override the lab account level configuration. For all new lab accounts, these settings will be turned on by default.
Let’s look at what each setting does in detail.
- Automatically disconnect users from virtual machines that the OS deems idle (Windows-only)
This is a setting that is only available for Windows virtual machines. When the setting is turned on, any machines in the lab, including the template virtual machine, will automatically disconnect the user when the Windows OS deems the session to be idle. Windows OS’s definition of idle uses two criteria:
- User absence – no keyboard or mouse input
- Lack of resource consumption – all the processors and all the disks were idle for a certain % of time
Users will see a message like this inside the virtual machines before they are disconnected:

Please note that the virtual machine is still running when the user is disconnected. If the user reconnects to the virtual machine by signing in, windows or files that were open or unsaved work previous to the disconnect will still be there. In this state, because the virtual machine is running, it still counts as active and accrues cost.
To automatically shut down the idle Windows virtual machines that are disconnected, use the combination of “Disconnect users when virtual machines are idle” and “Shut down virtual machines when users disconnect” settings.
For example, if you configure the settings as follows:
- Disconnect users when virtual machines are idle – 15 minutes after idle state is detected
- Shut down virtual machines when users disconnect” – 5 minutes after user disconnects
The Windows virtual machines will automatically shutdown 20 minutes after the user stops using them.

- Automatically shut down virtual machines when users disconnect (Windows & Linux)
This setting now supports both Windows and Linux virtual machines. When this setting is on, automatic shutdown will occur when:
- For Windows, Remote Desktop (RDP) connection is disconnected
- For Linux, SSH connection is disconnected
This feature utilizes the Linux Diagnostic Extension and is available for only the specific distributions and versions of Linux that the Linux Diagnostic Extension supports.
You can specify how long the virtual machines should wait for the user to reconnect before automatically shutting down.
- Automatically shut down virtual machines that are started but users don’t connect
Inside a lab, a user might start a virtual machine but never connect to it. For example:
- A schedule in the lab starts all virtual machines for a class session, but some students do not show up and don’t connect to their machines.
- A user starts a virtual machine, but forgets to connect.
The “Shut down virtual machines when users do not connect” setting will catch these cases and automatically shut down the virtual machines.
—-
Please enable these settings to minimize waste in your labs and check out Azure Lab Services Blog for such important features and updates.
by Scott Muniz | Aug 28, 2020 | Azure, Microsoft, Technology, Uncategorized
This article is contributed. See the original author and article here.
Final Update: Friday, 28 August 2020 23:39 UTC
We’ve confirmed that all systems are back to normal with no customer impact as of 8/28, 21:30 UTC. Our logs show the incident started on 8/28, 17:30 UTC and that during the 4 hours that it took to resolve the issue, customers in the West US Region could have experience delayed or lost Diagnostic Logs. Customers using App Services Logs in Public Preview could have also experienced missed or delayed logs in all US and Canada Regions.
- Root Cause: The failure was due to a backend dependency.
- Incident Timeline: 4 Hours – 8/28, 17:30 UTC through 8/28, 21:30 UTC
We understand that customers rely on Azure Monitor as a critical service and apologize for any impact this incident caused.
-Eric Singleton

Recent Comments