by Scott Muniz | Sep 15, 2020 | Azure, Technology, Uncategorized
This article is contributed. See the original author and article here.
By: Trevor Davis @tredavis and Carlos Villuendas @CarlosV
Challenge
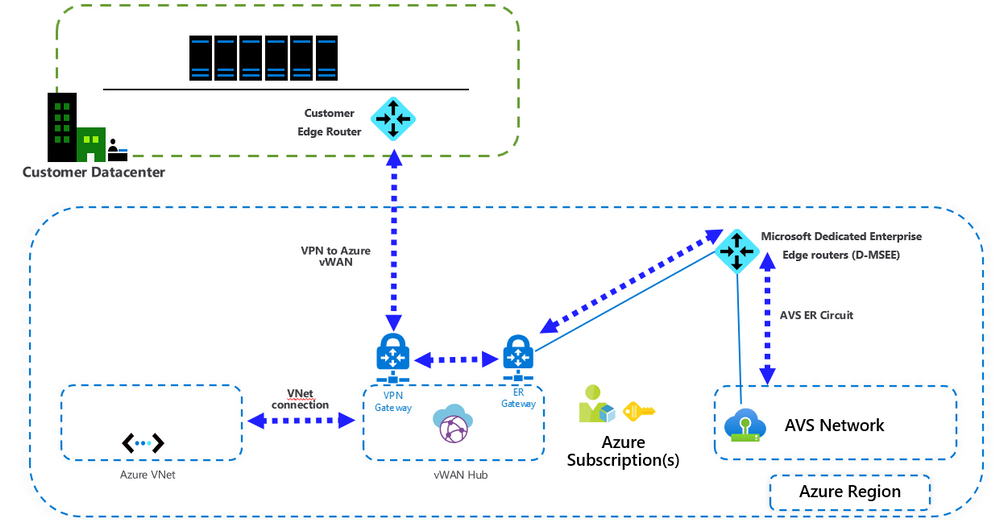
ExpressRoute is the preferred method to connect the customer’s on-premises environment to Azure VMware Solution (AVS), but what happens if you do not have access to ExpressRoute?
Solution
Connect your on-premises site to AVS using VPN and Azure Virtual WAN.
Azure Virtual WAN allows transit connectivity between VPN and ExpressRoute. This implies that VPN-connected sites can communicate with ExpressRoute-connected sites.
Reference: https://docs.microsoft.com/en-us/azure/virtual-wan/virtual-wan-about#transit-er
NOTE: Azure VMware Solution (AVS) is connected to the Azure backbone via an ExpressRoute.
Architecture

Important points
- VMware HCX is not supported by VMware over VPN. If the customer intends to migrate workloads from on-premises to Azure VMware Solution (AVS), another migration tool needs to be used.
- This configuration requires the standard Azure Virtual WAN type. Check this article for more details.
- When connecting Azure Virtual WAN to a virtual network, make sure that the virtual network does not have any virtual network gateways. This is very important when planning the connection to an existing Azure environment. More details here.
Installation
After Azure VMware Solution is deployed, you can connect your on-premises environment to Azure VMware Solution (AVS) using VPN and Azure Virtual WAN following these steps.
- Create an Azure Virtual WAN.
- Create a hub.
- Create a site.
- Connect a VPN site to a hub.
- Connect a Vnet to a hub (if needed)
- Connect the ExpressRoute circuit to a hub.
Steps 1 to 5 are covered in this article: Create a Site-to-Site connection using Azure Virtual WAN
Step 6 is covered in this article: Create an ExpressRoute association using Azure Virtual WAN
Installation notes:
- Format the VPN configuration file to make it more readable.
To configure your on-premises VPN device, you will need to download the VPN configuration from the Azure portal, instructions here. The configuration file will look like the following image. Use VS Code to format the configuration file to look like the example in this article.

- You can connect multiple virtual networks to the virtual WAN hub, even virtual networks from different Azure subscriptions.
by Scott Muniz | Sep 15, 2020 | Azure, Technology, Uncategorized
This article is contributed. See the original author and article here.
To master data in the cloud, you need the right foundation—a solid understanding of core data concepts, such as relational data, nonrelational data, big data, and analytics. Plus familiarity with the roles, tasks, and responsibilities in the world of data and data analytics. Are you there? Certification can help you prove it.
Certification in Azure Data Fundamentals offers the foundation you need to build your technical skills and start working with data in the cloud. Mastering the basics can help you jump-start your career and prepare you to dive deeper into other technical opportunities Azure offers.
The Azure Data Fundamentals certification validates your foundational knowledge of core data concepts and how they’re implemented using Azure data services. You earn it by passing Exam DP-900: Microsoft Azure Data Fundamentals.
You can use your Azure Data Fundamentals certification to prepare for other Azure role-based certifications, like Azure Database Administrator Associate, Azure Data Engineer Associate, or Data Analyst Associate, but it’s not a prerequisite for any of them.
What are the prerequisites?
If you’re new to the cloud or just starting out with Azure, first choose Azure Fundamentals training and certification. Find out how to Master the basics with Microsoft Certified: Azure Fundamentals.
If you’re just beginning to work with data in the cloud, this certification is for you. You should be familiar with the concepts of relational and nonrelational data and with different types of data workloads, such as transactional or analytical.
How can you get ready?
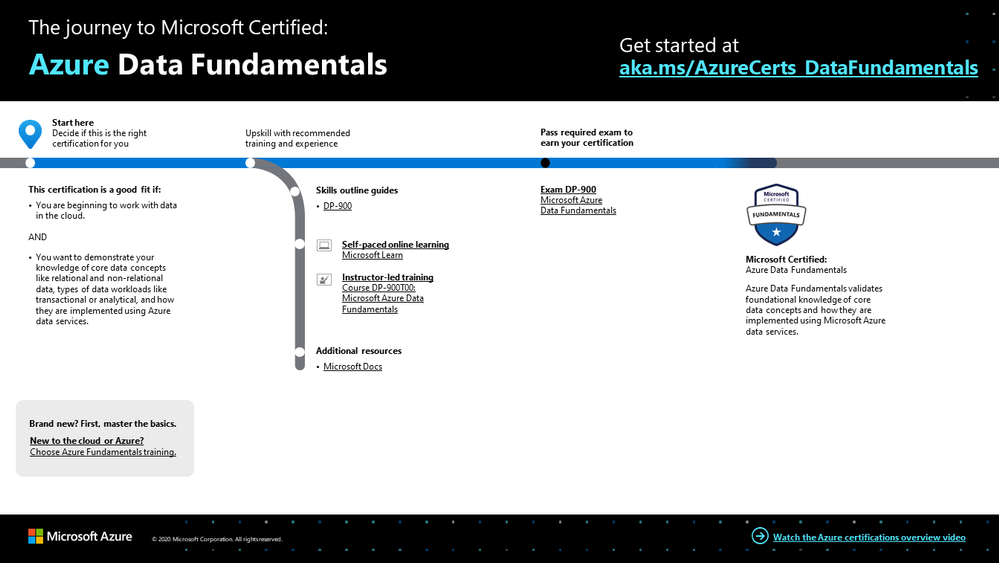
To help you plan your journey, check out our infographic, The journey to Microsoft Certified: Azure Data Fundamentals. You can also find it in the resources section on the certification and exam pages, which contains other valuable help for Azure professionals.
 The journey to Microsoft Certified: Azure Data Fundamentals
To map out your journey, follow the sequence in the infographic. First, decide whether this is the right certification for you.
Next, to understand what you’ll be measured on when taking Exam DP-900, review the skills outline guide on the exam page.
Sign up for training that fits your learning style and experience:
After you pass the exam and earn your certification, continue mastering the basics with Azure AI Fundamentals, level up with the Azure Database Administrator Associate, Azure Data Engineer Associate, or Data Analyst Associate certifications, or find the right Microsoft Azure certification for you, based on your profession (or the one you aspire to).
It’s time to master the basics!
Use your Azure Data Fundamentals certification as a starting point to explore more training on Azure, SQL Server and other technologies and to chart your path forward. If you’re looking to advance your career or to jump-start a new one, the message is the same: establish your foundations. Earn your certification, and open up new possibilities for your career and for turning your ideas into solutions on Azure.
Related posts
Understanding Microsoft Azure certifications
Finding the right Microsoft Azure certification for you
Master the basics of Microsoft Azure—cloud, data, and AI
by Scott Muniz | Sep 15, 2020 | Azure, Technology, Uncategorized
This article is contributed. See the original author and article here.
One of the main SIEM use cases is incident management. Azure Sentinel Offers robust features that help the analyst to manage the life cycle of security incidents, including:
- Alert grouping and fusion
- Incident triaging and management
- An interactive investigation experience
- Orchestration and response using Logic Apps
In our customer engagements we learned that in some cases our customers need to maintain incidents in their existing ticketing (ITSM) system and use it as a single pane of glass for all the security incidents across the organization. One critical request that raises is the need for a bi-directional sync of Azure sentinel incidents.
This means, for example, that if a security incident is created in Azure Sentinel, it needs to be created in the ITSM system as well, and if this ticket is closed in the ITSM system, this should be reflected in Azure sentinel.
In this article, I demonstrate how to use Azure sentinel SOAR capability and ServiceNow (SNOW) Business Rules feature to implement this bi-directional incident sync between the two.
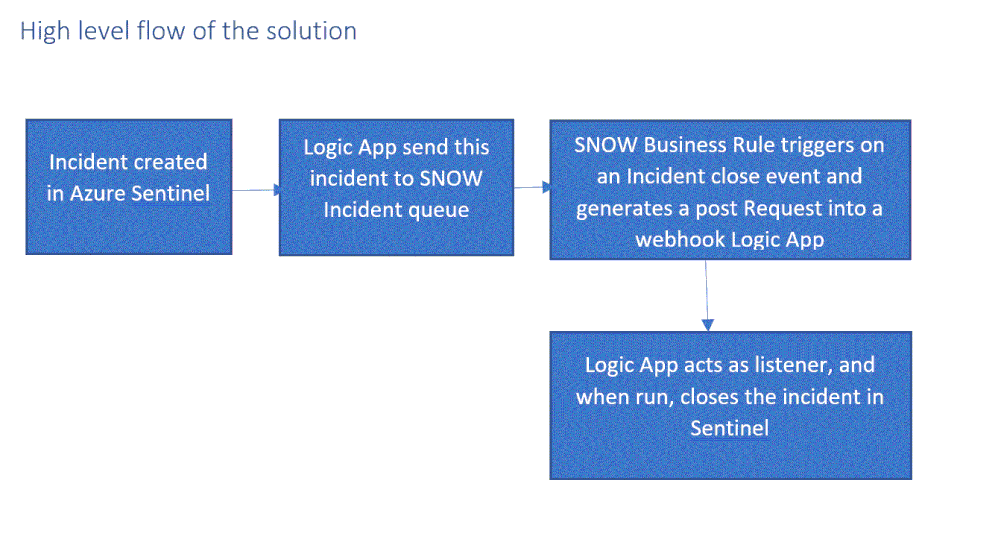
High level flow of the solution

Send an Azure Sentinel incident into ServiceNow incident queue
The playbook, available here and presented below, works as follows:
- Triggers automatically on a new Alert.
- Gets relevant properties from the Incident.
- Populates the workspace name variable.
- Creates a record of incident type in ServiceNow and populate the Azure Sentinel Incident properties into the SNOW incident record using the following mapping:
|
ServiceNow
|
Sentinel
|
|
Number
|
Incident Unique ID
|
|
Short Description
|
Description
|
|
Severity
|
Severity
|
|
Additional comment
|
Incident Deep link
|

Deploying the solution
- Deploy the above Logic APP
- Attached this logic app to every analytics rule that you want to sync to ServiceNow
by selecting it on the automated response section. (currently you need to run this process for each analytics rule that you want to sync)

Once an analytics rule generates a new incident, a new incident will pop-up on the ServiceNow incident Page.

Close Sentinel Incident When it closed in ServiceNow.
Closing the incident in Azure Sentinel when it is closed in ServiceNow requires two components:
- A Business Rule in ServiceNow that run custom JS code when the incident is closed.
- A Logic App in Azure Sentinel that waits to the Business Rule POST request.
Step 1: Deploy the Logic App on Azure Sentinel.
The playbook, available here and presented below, works as follows:
- Triger when an HTTP POST request hits the endpoint (1)
- Get relevant properties from the ServiceNow Incident.
- Close the incident on Azure Sentinel (4)
- Add comment with the name of the user who closed into an Azure sentinel incident comment (5)

Step 2: Configure the Logic App
- Copy the HTTP endpoint URL from the Logic App trigger part.

2. In “run query and list results” (2) authenticate with user that has log analytics read permission or Azure Sentinel Reader role as a minimum requirement.
3. In “get incident – bring fresh ETAG” (3) authenticate to AAD APP with a user that has an Azure Sentinel Reader role, or with a Managed identity with the same permission.
4. On “add comment to incident” (5) use a user that has an Azure Sentinel Contributor account.
Step 3: ServiceNow Business Rule
What is Business Rule?
Per ServiceNow documentation, a business rule is a server-side script that runs when a record is displayed, inserted, updated, or deleted, or when a table is queried.
To create the business rule
- Login to your ServiceNow Instance.
- In the left navigation type business rules, press New to create a new business rule.
(For a business rule types and scopes refer to ServiceNow documentation)
- Give the business rule a name, select Incident as the table, and check the Active and the Advanced checkboxes.

4. On the “When to run” tab, configure the controls as depicted on the screenshot below.

5. On the Advance tab, paste the above (like the picture below)

In line 8, replace the URL with the URL that we copied from the webhook Logic App above; this will be the endpoint that the business rule will interact with.
{
var ClosedUser = String(current.closed_by.name);
var Description = current.short_description.replace(/(rn|n|r|['"])/gm,", ");
var number = String(current.number);
var request = new sn_ws.RESTMessageV2();
var requestBody = {"Description": Description , "number": number ,  "ClosedBy":ClosedUser };
request.setRequestBody(JSON.stringify(requestBody));
request.setEndpoint('https://prod-65.eastus.logic.azure.com:443/workflows/9afa26062b1e4a0180d6ecefd26ab58e/triggers/manual/paths/invoke?api-version=2016-10-01&sp=%2Ftriggers%2Fmanual%2Frun&sv=1.0&sig=gv1HMcDt8DanJmOe3UvG22uyU_nere4rTQF8XnInYog');
request.setHttpMethod('POST');
request.setRequestHeader("Accept","application/json");
request.setRequestHeader('Content-Type','application/json');
var response = request.execute();
var responseBody = response.getBody();
var httpStatus = response.getStatusCode();
var parsedData = JSON.parse(responseBody);
gs.log(response.getBody());
}
In the above example I only send to sentinel 3 properties:
- ClosedBy – the username that closed the incident in Service Now
- Description – the incident description
- Number – the incident ID, originally received from Azure Sentinel.
You can modify the business rule Java Script code and add other properties that can add value to your use case.
Summary
Once the user closes the incident in ServiceNow, the listener Logic App triggers and closes the incident in Azure Sentinel, adding a relevant comment as you can see below:

We just walked through the process of implementing incident sync between Azure Sentinel and Service Now by leveraging a Logic App and a ServiceNow business rule.
Thanks @Ofer_Shezaf for all the help during this blog creation.

by Scott Muniz | Sep 15, 2020 | Azure, Technology, Uncategorized
This article is contributed. See the original author and article here.
Introduction
Many Ops teams are looking at adopting Infrastructure as Code (IaC) but are encountering the dilemma of not being able to start from a green field perspective. In most cases organizations have existing resources deployed into Azure, and IaC adoption has become organic. Lack of available time and resources creates a potential “technical debt” scenario where the team can create new resources with IaC, but does not have a way to retrace the steps for existing deployments.
HashiCorp Terraform has a little used featured known as “import” which allows existing Resource Groups to be added to the state file, allowing Terraform to become aware of them. However, there are some restrictions around this which we are going to cover off.
Before We Begin
I’m going to walk us through a typical example of how “terraform import” can be used, but I want to share a few useful links first that I believe are worth looking at. The first is the HashiCorp Docs page on “terraform import”. This covers the basics, but it worth noting the information on configuration.
“The current implementation of Terraform import can only import resources into the state. It does not generate configuration. A future version of Terraform will also generate configuration.”
The second link is the Microsoft Docs tutorial on Storing Terraform State in Azure Storage, as we will use this option in the example.
Example
Ok, so let’s get to the fun stuff now! In this example I have an existing Resource Group in Azure called “legacy-resource-group”. Inside that I have an existing VNet called “legacy-vnet” (10.0.0.0/16 CIDR) and a default subnet (10.0.0.0/24 CIDR).
VNet

Subnet

If I try to create a new Terraform deployment that adds something to the Resource Group it will be unsuccessful as Terraform did not create the group to start with, so it has no reference in its state file. It will show an output like this:
Apply complete! Resources: 0 added, 0 changed, 0 destroyed.
What I want to do is import the resource group into an existing Terraform State file I have located in Azure Storage so that I can then manage the resource located within.
Let’s Start
In the example I am going to use the Azure Cloud Shell simply because it already has Terraform available, but you can obviously do this from your local machine using AZ CLI, Terraform or even VSCode. As we are going to use Azure Cloud Shell we will be using Vim to create our TF files, so if you are not fully up to speed on Vim you can find a great reference sheet here.
Step 1
We need to gather the resourceid of a legacy-resource-group, to do this we can gather the information from the properties section of the Resource Group blade, or we can type into the shell the following command:
az group show --name legacy-resource-group --query id --output tsv
This will output the resourceid in the following format:
/subscriptions/<SUBSCRIPTIONID>/resourceGroups/legacy-resource-group
Take a note of the resourceid as we will use it in a few steps.
Step 2
Now, we need to create a new Terraform file called import.tf. In a none shared state situation, we would only need to add a single line shown below:
resource "azurerm_resource_group" "legacy-resource-group" {}
However, as we are using a shared state, we need to add a few things. Lets first create our new file using the following command:
vi import.tf
We can then (using our commands guide sheet if you need it) add the following lines of code:
provider "azurerm" {
    version = "~>2.0"
    features {}
}
# This will be specific to your own Terraform State in Azure storage
terraform {
  backend "azurerm" {
    resource_group_name   = "tstate"
    storage_account_name  = "tstateXXXXX"
    container_name        = "tstate"
    key                   = "terraform.tfstate"
  }
}

resource "azurerm_resource_group" "legacy-resource-group" {}
Now we need to initiate Terraform in our working directory.
terraform init
If successful, Terraform will be configured to use the backend “azurerm” and present the following response:
Initializing the backend...

Successfully configured the backend "azurerm"! Terraform will automatically
use this backend unless the backend configuration changes.

Initializing provider plugins...
- Checking for available provider plugins...
- Downloading plugin for provider "azurerm" (hashicorp/azurerm) 2.25.0...

Terraform has been successfully initialized!

You may now begin working with Terraform. Try running "terraform plan" to see
any changes that are required for your infrastructure. All Terraform commands
should now work.

If you ever set or change modules or backend configuration for Terraform,
rerun this command to reinitialize your working directory. If you forget, other
commands will detect it and remind you to do so if necessary.
Now that Terraform has been initiated successfully, and the backend set to “azurerm” we can now run the following command to import the legacy-resource-group into the state file:
terraform import azurerm_resource_group.legacy-resource-group /subscriptions/<SUBSCRIPTONID>/resourceGroups/legacy-resource-group
If successful, the output should be something like this:
Acquiring state lock. This may take a few moments...
azurerm_resource_group.legacy-resource-group: Importing from ID "/subscriptions/<SUBSCRIPTIONID>/resourceGroups/legacy-resource-group"...
azurerm_resource_group.legacy-resource-group: Import prepared!
  Prepared azurerm_resource_group for import
azurerm_resource_group.legacy-resource-group: Refreshing state... [id=/subscriptions/<SUBSCRIPTIONID>/resourceGroups/legacy-resource-group]

Import successful!

The resources that were imported are shown above. These resources are now in
your Terraform state and will henceforth be managed by Terraform.

Releasing state lock. This may take a few moments...
We can now look at the state file to see how this has been added:
{
  "version": 4,
  "terraform_version": "0.12.25",
  "serial": 1,
  "lineage": "cb9a7387-b81b-b83f-af53-fa1855ef63b4",
  "outputs": {},
  "resources": [
    {
      "mode": "managed",
      "type": "azurerm_resource_group",
      "name": "legacy-resource-group",
      "provider": "provider.azurerm",
      "instances": [
        {
          "schema_version": 0,
          "attributes": {
            "id": "/subscriptions/<SUBSCRIPTIONID>/resourceGroups/legacy-resource-group",
            "location": "eastus2",
            "name": "legacy-resource-group",
            "tags": {},
            "timeouts": {
              "create": null,
              "delete": null,
              "read": null,
              "update": null
            }
          },
          "private": "eyJlMmJmYjczMC1lY2FhLTExZTYtOGY4OC0zNDM2M2JjN2M0YzAiOnsiY3JlYXRlIjo1NDAwMDAwMDAwMDAwLCJkZWxldGUiOjU0MDAwMDAwMDAwMDAsInJlYWQiOjMwMDAwMDAwMDAwMCwidXBkYXRlIjo1NDAwMDAwMDAwMDAwfSwic2NoZW1hX3ZlcnNpb24iOiIwIn0="
        }
      ]
    }
  ]
}
As you can see, the state file now has a reference for the legacy-resource-group, but as mentioned in the HashiCorp docs, it does not have the entire configuration.
Step 3.
What we are going to do now is to add two new subnets to our legacy-vnet. In this example I have created a new main.tf and renamed my import.tf as import.tfold just for clarity.
provider "azurerm" {
    version = "~>2.0"
    features {}
}

terraform {
  backend "azurerm" {
    resource_group_name   = "tstate"
    storage_account_name  = "tstateXXXXX"
    container_name        = "tstate"
    key                   = "terraform.tfstate"
  }
}

resource "azurerm_resource_group" "legacy-resource-group" {
    name      = "legacy-resource-group"
    location  = "East US 2"
}

resource "azurerm_subnet" "new-subnet1" {
  name                 = "new-subnet1"
  virtual_network_name = "legacy-vnet"
  resource_group_name  = "legacy-resource-group"
  address_prefixes     = ["10.0.1.0/24"]
}

resource "azurerm_subnet" "new-subnet2" {
  name                 = "new-subnet2"
  virtual_network_name = "legacy-vnet"
  resource_group_name  = "legacy-resource-group"
  address_prefixes     = ["10.0.2.0/24"]
}
We now use this file with “terraform plan” which should result in an output like this:
Acquiring state lock. This may take a few moments...
Refreshing Terraform state in-memory prior to plan...
The refreshed state will be used to calculate this plan, but will not be
persisted to local or remote state storage.

azurerm_resource_group.legacy-resource-group: Refreshing state... [id=/subscriptions/(SUBSCRIPTIONID>/resourceGroups/legacy-resource-group]

------------------------------------------------------------------------

An execution plan has been generated and is shown below.
Resource actions are indicated with the following symbols:
  + create

Terraform will perform the following actions:

  # azurerm_subnet.new-subnet1 will be created
  + resource "azurerm_subnet" "new-subnet1" {
      + address_prefix                                 = (known after apply)
      + address_prefixes                               = [
          + "10.0.1.0/24",
        ]
      + enforce_private_link_endpoint_network_policies = false
      + enforce_private_link_service_network_policies  = false
      + id                                             = (known after apply)
      + name                                           = "new-subnet1"
      + resource_group_name                            = "legacy-resource-group"
      + virtual_network_name                           = "legacy-vnet"
    }

  # azurerm_subnet.new-subnet2 will be created
  + resource "azurerm_subnet" "new-subnet2" {
      + address_prefix                                 = (known after apply)
      + address_prefixes                               = [
          + "10.0.2.0/24",
        ]
      + enforce_private_link_endpoint_network_policies = false
      + enforce_private_link_service_network_policies  = false
      + id                                             = (known after apply)
      + name                                           = "new-subnet2"
      + resource_group_name                            = "legacy-resource-group"
      + virtual_network_name                           = "legacy-vnet"
    }

Plan: 2 to add, 0 to change, 0 to destroy.

------------------------------------------------------------------------

Note: You didn't specify an "-out" parameter to save this plan, so Terraform
can't guarantee that exactly these actions will be performed if
"terraform apply" is subsequently run.
We can see that the plan is aware that only 2 items are to be added, which is our 2 new subnets. We can now run the following to deploy the configuration:
terraform apply -auto-approve
The final result should be similar to the below:
Acquiring state lock. This may take a few moments...
azurerm_resource_group.legacy-resource-group: Refreshing state... [id=/subscriptions/<SUBSCRIPTIONID>/resourceGroups/legacy-resource-group]
azurerm_subnet.new-subnet2: Creating...
azurerm_subnet.new-subnet1: Creating...
azurerm_subnet.new-subnet1: Creation complete after 1s [id=/subscriptions/<SUBSCRIPTIONID>/resourceGroups/legacy-resource-group/providers/Microsoft.Network/virtualNetworks/legacy-vnet/subnets/new-subnet1]
azurerm_subnet.new-subnet2: Creation complete after 3s [id=/subscriptions/<SUBSCRIPTIONID>/resourceGroups/legacy-resource-group/providers/Microsoft.Network/virtualNetworks/legacy-vnet/subnets/new-subnet2]

Apply complete! Resources: 2 added, 0 changed, 0 destroyed.
If we now look in our portal, we can see the new subnets have been created.
Subnets

If we take a final look at our state file, we can see the new resources have been added:
{
  "version": 4,
  "terraform_version": "0.12.25",
  "serial": 2,
  "lineage": "cb9a7387-b81b-b83f-af53-fa1855ef63b4",
  "outputs": {},
  "resources": [
    {
      "mode": "managed",
      "type": "azurerm_resource_group",
      "name": "legacy-resource-group",
      "provider": "provider.azurerm",
      "instances": [
        {
          "schema_version": 0,
          "attributes": {
            "id": "/subscriptions/<SUBSCRIPTIONID>/resourceGroups/legacy-resource-group",
            "location": "eastus2",
            "name": "legacy-resource-group",
            "tags": {},
            "timeouts": {
              "create": null,
              "delete": null,
              "read": null,
              "update": null
            }
          },
          "private": "eyJlMmJmYjczMC1lY2FhLTExZTYtOGY4OC0zNDM2M2JjN2M0YzAiOnsiY3JlYXRlIjo1NDAwMDAwMDAwMDAwLCJkZWxldGUiOjU0MDAwMDAwMDAwMDAsInJlYWQiOjMwMDAwMDAwMDAwMCwidXBkYXRlIjo1NDAwMDAwMDAwMDAwfSwic2NoZW1hX3ZlcnNpb24iOiIwIn0="
        }
      ]
    },
    {
      "mode": "managed",
      "type": "azurerm_subnet",
      "name": "new-subnet1",
      "provider": "provider.azurerm",
      "instances": [
        {
          "schema_version": 0,
          "attributes": {
            "address_prefix": "10.0.1.0/24",
            "address_prefixes": [
              "10.0.1.0/24"
            ],
            "delegation": [],
            "enforce_private_link_endpoint_network_policies": false,
            "enforce_private_link_service_network_policies": false,
            "id": "/subscriptions/<SUBSCRIPTIONID>/resourceGroups/legacy-resource-group/providers/Microsoft.Network/virtualNetworks/legacy-vnet/subnets/new-subnet1",
            "name": "new-subnet1",
            "resource_group_name": "legacy-resource-group",
            "service_endpoints": null,
            "timeouts": null,
            "virtual_network_name": "legacy-vnet"
          },
          "private": "eyJlMmJmYjczMC1lY2FhLTExZTYtOGY4OC0zNDM2M2JjN2M0YzAiOnsiY3JlYXRlIjoxODAwMDAwMDAwMDAwLCJkZWxldGUiOjE4MDAwMDAwMDAwMDAsInJlYWQiOjMwMDAwMDAwMDAwMCwidXBkYXRlIjoxODAwMDAwMDAwMDAwfX0="
        }
      ]
    },
    {
      "mode": "managed",
      "type": "azurerm_subnet",
      "name": "new-subnet2",
      "provider": "provider.azurerm",
      "instances": [
        {
          "schema_version": 0,
          "attributes": {
            "address_prefix": "10.0.2.0/24",
            "address_prefixes": [
              "10.0.2.0/24"
            ],
            "delegation": [],
            "enforce_private_link_endpoint_network_policies": false,
            "enforce_private_link_service_network_policies": false,
            "id": "/subscriptions/<SUBSCRIPTIONID>/resourceGroups/legacy-resource-group/providers/Microsoft.Network/virtualNetworks/legacy-vnet/subnets/new-subnet2",
            "name": "new-subnet2",
            "resource_group_name": "legacy-resource-group",
            "service_endpoints": null,
            "timeouts": null,
            "virtual_network_name": "legacy-vnet"
          },
          "private": "eyJlMmJmYjczMC1lY2FhLTExZTYtOGY4OC0zNDM2M2JjN2M0YzAiOnsiY3JlYXRlIjoxODAwMDAwMDAwMDAwLCJkZWxldGUiOjE4MDAwMDAwMDAwMDAsInJlYWQiOjMwMDAwMDAwMDAwMCwidXBkYXRlIjoxODAwMDAwMDAwMDAwfX0="
        }
      ]
    }
  ]
}
Wrap Up
Let’s look at what we have done:
- We’ve taken an existing resource group that was unmanaged in Terraform and added to our state file.
- We have then added two new subnets to the VNet, without destroying any existing legacy resources.
- We have then confirmed these have been added to the state file.
Ideally, we all want to be able to use “terraform import” to drag the entire config into the state file so that all resources will exist within the configuration, and from what HashiCorp have stated on the docs site this is on the roadmap, but for now this at least allows us to manage legacy resource groups moving forward.

by Scott Muniz | Sep 15, 2020 | Azure, Technology, Uncategorized
This article is contributed. See the original author and article here.
IPv6 is the most recent version of the Internet Protocol (IP) and the Internet Engineering Task Force (IETF) standard is already more than 20 years old, but for most of us is it still not something we have to deal with on a day-to-day basis. This is slowly changing as some areas of the world are running out of IPv4 addresses and local governments start to make IPv6 support mandatory for some verticals. This results in urgent requests by some of our customers to provide their webservices via IPv4 and IPv6 (so called dual stack) to fulfill their regulatory requirements.
The Internet Society published an article already back in June 2013 (see “Making Content Available Over IPv6”) on what potential implementations could look like. Their article is covering native IPv6, proxy servers and Network Address Translation (NAT). Even though the article is already a few years old, the different options are still valid.
So how does this apply to Azure? Azure supports IPv6 and has done for quite some time now for most of its the foundational network and compute services. This enables native implementations using IPv4 and IPv6 by leveraging Azure’s dual stack capabilities.
For example, in scenarios where applications are mainly based on Virtual Machines (VMs) and other Infrastructure-as-a-Service (IaaS) services with full IPv6 support, we are able to use native IPv4 and IPv6 end-to-end. This avoids any complications caused by translations and it provides the most information to the server and the application. But it also means that every device along the path between the client and the server must handle IPv6 traffic.
The following diagram depicts a simple dual stack (IPv4/IPv6) deployment in Azure:

The native end-to-end implementation is most interesting for scenarios and use cases where direct server-to-server or client-to-server communication is required. This is not the case for most webservices and applications as they are typically already exposed through, or shielded behind a Firewall, a Web Application Firewall (WAF) or a reverse proxy.
Other more complex deployments and applications often times contain a set of 3rd-party applications or Platform-as-a-Service (PaaS) services like Azure Application Gateway (AppGw), Azure Kubernetes Services (AKS), Azure SQL databases and others that do not necessarily support native IPv6 today. And there might be also other backend services and solutions, in some cases hosted on IaaS VMs that are also not capable of speaking IPv6. This is where NAT/NAT64 or an IPv6 proxy solution comes to play. These solutions allow us to transition from IPv6 to IPv4 and vice versa.
Besides the technical motivation and need to translate from IPv6 to IPv4 are there also other considerations especially around education, the costs of major application changes and modernization as well as the complexity of an application architecture why customers consider using a gateway to offer services via IPv4/IPv6 while still leveraging IPv4-only infrastructure in the background.
A very typical deployment today, for example using a WAF, looks like this:

The difference between the first and the second drawing in this post is that the latter has a front-end subnet that contains for example a 3rd-Party Network Virtual Appliance (NVA) that accepts IPv4 and IPv6 traffic and translates it into IPv4-only traffic in the backend.
This allows customers to expose existing applications via IPv4 and IPv6, making them accessible to their end-users natively via both IP versions without the need to re-architect their application workloads and to overcome limitations in some Azure services and 3rd-Party services that do not support IPv6 today.
Here is a closer look on how a typical architecture could look like:

The Azure Virtual Network is enabled for IPv6 and has address prefixes for IPv4 and IPv6 (these prefixes are examples only). The “Front-end subnet” is enabled for IPv6 as well and contains a pair of NVAs. These NVAs are deployed into an Azure Availability Set, to increase their availability, and exposed through an Azure Load Balancer (ALB). The first ALB (on the left) has a public IPv4 and a public IPv6 address.
The NVAs (for example a WAF) in the Front-end subnet accept IPv4 and IPv6 traffic and can offer, depending on the ISV solution and SKU a broad set of functionality and translate the inbound traffic into IPv4 to access the application that is running in our “Application subnet”. The application is again exposed (internally; no public IP addresses) via IPv4 only through an internal ALB and only accessible from the NVAs in the front-end subnet.
This results in an architecture that provides services via IPv4 and IPv6 to end-users while the backend application is still using IPv4-only. The benefit of this approach is the reduced complexity, the application teams do not need to know and take care of IPv6, on one hand and on the other hand a reduced attach surface as between the front-end and the application subnet we’re only using the well-known and fully supported IPv4 protocol.
Instead of using a 3rd-party NVA, Azure offers similar, managed capabilities using the Azure Front Door (AFD) service. AFD is a global Azure service that “enables you to define, manage and monitor global routing for web traffic by optimizing for best performance and quick global failover for high availability” (see “What is Azure Front Door?”). AFD works at Layer 7 (OSI model) or HTTP/HTTPS layer and uses the anycast protocol and allows you to route client requests to the fastest and most available application backend. An application backend can be any Internet-facing service hosted inside or outside of Azure.
AFD’s capabilities include proxying IPv6 client requests and traffic to an IPv4-only backend as shown below:

The main architectural difference between the NVA-based approach we have described in the beginning of this post and the use of AFD service is, that the NVAs are customer-managed, work at Layer 4 (OSI model) and can be deployed into the same Azure Virtual Network as the application in a way where the NVA has a private and a public interface. The application is then only accessible through the NVAs which allows filtering of all ingress (and egress) traffic. Whereas AFD is a global PaaS service in Azure, living outside of a specific Azure Region and works at Layer 7 (HTTP/HTTPS). The application backend is an Internet-facing service hosted inside or outside of Azure and can be locked down to accept traffic only from your specific Front Door.
While we are in this post explaining these two solutions as different options to make IPv4-only applications and services hosted in Azure available to users via IPv4 and IPv6, it is in general and especially in more complex environments not either a WAF/NVA solution or Azure Front Door. It can be a combination of both where NVAs are used within a regional deployment while AFD is used to route the traffic to one or more regional deployments in different Azure regions (or other Internet-facing locations).
What’s next? Take a closer look into Azure Front Door service and its documentation to learn more about its capabilities to decide if either native end-to-end IPv4/IPv6 dual stack, a 3rd-party NVA-based solution or Azure Front Door services fulfils your needs to support IPv6 with your web application.
by Scott Muniz | Sep 14, 2020 | Azure, Technology, Uncategorized
This article is contributed. See the original author and article here.
On September 15, we will publish an update to the TLS certificates used by Azure Sphere devices to establish a connection to the update service. When a device takes the cert update, it will reboot once to apply it. There is no impact to device connectivity or operations other than an additional reboot as the device downloads new certs.
Device update can be temporarily delayed for up to 24 hours. For more information see Defer device updates in the customer documentation.
If you encounter problems
For self-help technical inquiries, please visit Microsoft Q&A or Stack Overflow. If you require technical support and have a support plan, please submit a support ticket in Microsoft Azure Support or work with your Microsoft Technical Account Manager/Technical Specialist. If you would like to purchase a support plan, please explore the Azure support plans.

Recent Comments