by Contributed | Sep 25, 2020 | Azure, Technology, Uncategorized
This article is contributed. See the original author and article here.
Azure App Services supports an interesting feature called Manage Identity from Azure Active Directory.
This allows your App Services to easily connect to Azure Resources such as Azure KeyVault, Azure Storage, Azure SQL . The complete list of resources that support this feature are available in the following document:
Azure Services that support managed identities – Azure AD | Microsoft Docs
You could refer to our documentation for more details on this feature here.
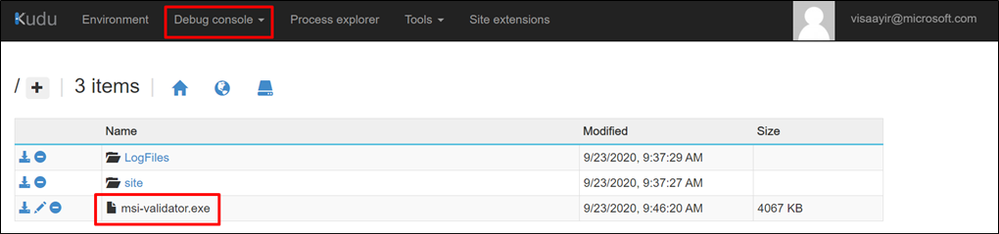
MSI-Validator helps you troubleshoot issues with Managed Identity for Azure App Services.
The link to download this tool is available in the attachments section of the blog.
Installation Steps:
- Download the zip file from the attachments.
Current version – v1.0.0.0
- Extract it to the local folder.
- Drag and drop “msi-validator.exe” to the Kudu console of the App Service (https://<webapp-name>.scm.azurewebsites.net)

Commands:
- To Get an Access Token :
msi-validator get-token -r <resource>
Valid Arguments for resource = keyvault, storage, sql
Sample:
msi-validator get-token -r keyvault
msi-validator get-token -r storage
msi-validator get-token -r sql
- To Test the connection
msi-validator test-connection -r <resource> -e <endpoint>
Valid Arguments for resource = keyvault, storage, sql
Sample:
msi-validator test-connection -r "keyvault" -e "https://<keyvault-name>.vault.azure.net/secrets/<secret-key>"
msi-validator.exe test-connection -r storage -e https://<storage-name>.blob.core.windows.net/webapp/<container-name>/<blob-path>
msi-validator.exe test-connection -r sql -e "Data Source=<server-name>.database.windows.net;Initial Catalog=<database-name>;"
Troubleshooting:
- From the Identity Blade of the App Service, ensure that Managed Identity is turned on.

- Navigate to Kudu Console (https://<webapp-name>.scm.azurewebsites.net) > Environment Section and search for MSI (Ctrl + F)

The Environmental Variables “MSI_ENDPOINT” and “MSI_SECRET” would have been set automatically.
- Run the command “msi-validator get-token -r <resource>” and check if a token is being returned.

An access token should be returned.
Otherwise, it indicates that MSI service has issues reaching out to Azure Active Directory to fetch a token.
Things to check :
- Does the App Service have regional VNet Integration / is the App in ASE?
Are there any User Defined Routes on the subnet to which the App Service is integrated ?
If Yes , is the device to which the traffic is force tunneled, blocking any Azure Active Directory Dependency ?
- Do you still face the issue if Managed Identity is disabled and enabled again ?
- Run the command “msi-validator test-connection -r <resource> -e “<endpoint>” ” and check if data is returned from the resource or inspect the error message..
KeyVault:
From the below error message, we see that the App Service doesn’t have necessary permissions to access the KeyVault. 
Resolution:
- Navigate to the Access Policies Blade of KeyVault from the Azure Portal.
- Click on “+ Add Access Policy“

- Provide the necessary permission.

-
Choose the Service Principal (name of the App Service)

Storage:

Resolution :
Navigate to the Access Control IAM) > Add Role assignment and choose the necessary storage related permission. The roles should be configured as per your application’s use case.

SQL:
The application could fail while connecting to Azure SQL using MSI with the error message: “Unable to connect to SQL. Exception : Login failed for user ‘<token-identified principal>’“

Resolution:
If you want, you can add the identity to an Azure AD group, then grant SQL Database access to the Azure AD group instead of the identity. For example, the following commands add the managed identity from the previous step to a new group called myAzureSQLDBAccessGroup:
groupid=$(az ad group create --display-name myAzureSQLDBAccessGroup --mail-nickname myAzureSQLDBAccessGroup --query objectId --output tsv)
msiobjectid=$(az webapp identity show --resource-group myResourceGroup --name <app-name> --query principalId --output tsv)
az ad group member add --group $groupid --member-id $msiobjectid
az ad group member list -g $groupid
In the Cloud Shell, sign in to SQL Database by using the SQLCMD command. Replace <server-name> with your server name, <db-name> with the database name your app uses, and <aad-user-name> and <aad-password> with your Azure AD user’s credentials.
sqlcmd -S <server-name>.database.windows.net -d <db-name> -U <aad-user-name> -P "<aad-password>" -G -l 30
In the SQL prompt for the database you want, run the following commands to grant the permissions your app needs. For example,
CREATE USER [<identity-name>] FROM EXTERNAL PROVIDER;
ALTER ROLE db_datareader ADD MEMBER [<identity-name>];
ALTER ROLE db_datawriter ADD MEMBER [<identity-name>];
ALTER ROLE db_ddladmin ADD MEMBER [<identity-name>];
GO
<identity-name> is the name of the managed identity in Azure AD. If the identity is system-assigned, the name always the same as the name of your App Service app. To grant permissions for an Azure AD group, use the group’s display name instead (for example, myAzureSQLDBAccessGroup).
Type EXIT to return to the Cloud Shell prompt.
The back-end services of managed identities also maintains a token cache that updates the token for a target resource only when it expires. If you make a mistake configuring your SQL Database permissions and try to modify the permissions after trying to get a token with your app, you don’t actually get a new token with the updated permissions until the cached token expires.
Modify connection string
Remember that the same changes you made in Web.config or appsettings.json works with the managed identity, so the only thing to do is to remove the existing connection string in App Service, which Visual Studio created deploying your app the first time. Use the following command, but replace <app-name> with the name of your app.
az webapp config connection-string delete --resource-group myResourceGroup --name <app-name> --setting-names MyDbConnection
You could refer to our official documentation regarding this at Tutorial: Access data with managed identity – Azure App Service | Microsoft Docs

by Contributed | Sep 25, 2020 | Azure, Technology, Uncategorized
This article is contributed. See the original author and article here.
Well Microsoft Ignite 2020 is over and while our step counters may not have captured as many steps as last year… but it doesn’t mean that there wasn’t a plethora of Azure news shared. Here are the headlines we are covering this week: The IT Professional’s role in the Responsible use of AI, Azure Automanage for VMs, Move resources to another region with Azure Resource Mover, New Windows Virtual Desktop Capabilities, Hybrid Cloud announcements surrounding Azure Arc and Azure Stack as well as the Microsoft Learn module of the week.
The IT Professional’s Role in the Responsible use of Artificial Intelligence
Artificial Intelligence, like Operations, is in everything these days. From the way we work – to the way we go about our daily lives – AI enables us to make quicker, smarter decisions on what our next steps should be. But that also raises the question of ethics and more specifically the ethical use and management of AI.
An example of responsible AI utilization came in the form of the newly announced spatial analysis capability in the Computer Vision Azure Cognitive Service. Its advanced AI models aggregate insights from multiple cameras to count the number of people in the room, measure the distance between individuals, and monitor wait and dwell times. Organizations can now apply this technology to use their space in a safe, optimal way.
I also had the opportunity to sit down with members of the Microsoft Ethics & Society team to discuss the IT Professional’s role in responsible adoption of Artificial Intelligence as well as share the corresponding resources made available.
Azure Automanage for virtual machines
Newly announced service, Azure Automanage reduces the OpEx burden for VMs further by automating day-to-day operational requirements in areas such as security, anti-malware, compliance, disaster recovery, etc. Through its virtual machine best practices capability, select services are discovered, onboarded, and configured across the entire lifecycle of both dev/test and production VMs. You can add VMs individually or do so at scale safe in the knowledge that if your VMs deviate from best practices, Azure Automanage will detect and automatically correct it.
Azure Resource Mover: Move resources across regions from resource groups
Resource Mover helps you to move Azure resources between Azure regions. You might move resources to different Azure regions to: Align to a region launch, Align for services/features, Respond to business developments, Align for proximity, Meet data requirements, Respond to deployment requirements, and Respond to decommissioning.
New Windows Virtual Desktop Capabilities Announced
To help customers continue to accelerate this move to secure remote work with Windows Virtual Desktop, Microsoft has announced several new capabilities that make it even easier to deploy, secure, and scale your virtual desktop deployments. These new capabilities will be available in public preview by the end of the calendar year 2020. These capabilities include:
- Microsoft Endpoint Manager support for Windows 10 multisession will provide IT admins with the ability to manage and secure virtual desktops the same way as physical devices.
- New integration with Azure Monitor, providing customers with a workbook that captures all the relevant monitoring insights and provides rich visualizations to identify and troubleshoot issues quickly. This is an important consideration for customers looking to monitor and troubleshoot easily while deploying virtual desktops at scale.
- The ability to add application layers from the Azure portal, helping customers onboard applications quickly — with a few clicks, you can now deploy and publish applications for your employees.
MS Learn Module of the Week
This Microsoft Learn module provides an introductory overview of various hybrid-cloud technologies and how you can connect an on-premises environment to Azure in a way that works best for your organization.
Let us know in the comments below if there are any news items you would like to see covered in next week show. Az Update streams live every Friday so be sure to catch the next episode and join us in the live chat.
by Contributed | Sep 25, 2020 | Azure, Technology, Uncategorized
This article is contributed. See the original author and article here.
Introduction
This is Andrew Coughlin and I am a Customer Engineer at Microsoft focusing on Azure IaaS. In this blog I will focus on how to add an additional server to an Azure File Sync and how to remove the old server. This process should be followed if you are looking to retire your old Azure File Sync server and want to replace it with a newer server. However, if you are currently having issues with your Azure File Sync Server this blog is not for your scenario. If you are having issues with your sync server it is best to open a support request and work with an engineer to solve the problem.
Prerequisites
- Existing Azure File Sync Service setup and configured.
- Deploy a new Windows Server.
- Download the Azure File Sync Agent here.
- Prepare your Windows Server to use Azure File Sync as documented here.
Install the Azure File Sync Agent
To install the Azure File Sync Agent, you will go to the location where you downloaded the executable.
NOTE: Each version of Windows Server has its own version of the installation executable.
- Then you will execute the installer.
- Click Next, on the welcome setup wizard.
- Accept the terms and conditions and click Next.
- Click Next, on Feature Selection.
- Set your proxy settings if required, click Next.
- Check the checkbox next to Automatically update when a new version becomes available, then select the day and time, then click Install.
- Wait for the installation to finish.
- Click Finish.

Register it to the Storage Sync Service
Once you have installed the Azure Sync Service, you need to register your server with the service. To do this you will do the following on the new server:
- Click OK, on the Azure File Sync – Agent Update
- Click Sign In.
- You will be prompted for your global administrator username / password.
- You will then select the subscription, resource group and storage sync service, then click Register.
- Network connectivity test will show green, you may need to click retest.
- Click Close once done.

Add the Server Endpoint
Currently we have installed the agent and registered the new server with the Azure File Sync Service. Next, we will add the new server endpoint to our existing Sync group. We will go to the portal and search for Storage Sync Service.

Then you will click on the Storage Sync Service you are going to add this new server to.

Click on Overview and then click on your sync group.

Click on the old Server endpoint.

Take note of your current tiering policies for volume policy and date policy.

Click on the X on the Server Endpoint Properties Window.
Click Add server endpoint.

On the Add server endpoint screen, select the server from the dropdown list on Registered Server, and type the path to be synced as part of the sync group. (Example: E:Shares)

If your current server endpoint is doing cloud tiering, enable Cloud Tiering and configure the new server endpoint to match the old server endpoint configuration, then click Create.

You will now see 2 server endpoints, and the new one you just added will be in a pending status.

When the setup is complete the new server should show healthy:

If you switch to the new server, you will see new files being populated:

We now have our new server added and part of the sync group. As files are created on the old server, they are synced to the file share and back to the second file server.
Verify Sync on new Azure File Sync Server
Next you need to verify that the new server has completed a sync. To do this we will open eventvwr on the new server.
Then navigate to Applications and Services Logs Microsoft FileSync Agent Telemetry. We want to filter on Event ID 9102, this is logged once a sync has completed. For additional information around this event id you can visit this page.

Next thing to do is to create the shares. This is one article that explains how to export / import share permissions.
Remove Server Endpoint
WARNING: Before completing this next step make sure synchronization, as noted in ‘Verify Sync on new Azure File Sync Server’, has completed and no client devices are no longer talking to this server. Don’t complete these steps until all clients are talking to the new server. There are several ways you can move your client devices:
- Add the server to the existing DFS target folder, see my blog here for more information.
- Shutdown the old server, rename the new server to the old server name, be advised the server endpoint in the portal doesn’t update the name as noted here.
- Create a CNAME from the old server to the new server, for documentation for creating a cname use this link.
Normally when you remove a server endpoint you may only have 1 server in the sync group. Before you do this, you would make sure to recall those files. In this scenario, we have 2 servers in the sync group and therefore we do not need to recall the files. However if you are retiring an Azure File Sync server that you want to keep the files locally on the file server you will want to recall the files before proceeding as documented here.
Go back to the Azure Portal, then the Storage Sync Service and the Sync Group. Click on the old sync server and click Delete.

Type the name of the server in the text box and click Delete.


Remove Registered Server
The second to the last step is unregistering the server from the Azure File Sync Service. To do this go back to the Azure Portal, then the Storage Sync Service. Click Registered Servers and click on the server you are wanting to retire. Next, we will click on Unregister Server.

Type the name of the server in the text box and click Unregister.


Uninstall the Azure File Sync agent
The last step is an optional task, since we removed the server from the sync group and unregistered it, those are the more important tasks. If you would like to uninstall the agent, it is 4 simple steps as outlined below:
- Click Start > Control Panel > Add/Remove Programs (Programs and Features).
- Click on Storage Sync Agent > Click Uninstall.

- Click Yes, on Are you sure you want to uninstall Storage Sync Agent.
- Click Yes to restart now, or No to restart later.
Conclusion
In 6-7 easy steps, we replaced an old Windows Server running Azure File Sync with a new Windows Server. Are you a Premier or Unified customer? If so and you are wanting to know more about Azure File Sync, ask your CSAM about the Activate Azure with Azure File offering. Thank you for taking the time to read this blog, I hope this helps you and see you next time.
by Contributed | Sep 24, 2020 | Azure, Technology, Uncategorized
This article is contributed. See the original author and article here.
Giving certified IoT devices the ability to stand out from the crowd
As we work across the IoT industry, we continue to hear from device builders that you are looking for help connecting with customers who want to find the right device to meet their needs and differentiating your devices by making them solution ready. With over 30 billion active IoT devices in the world and 400 percent growth in devices over the past three years, the industry is moving incredibly fast; the challenge of connecting the right audience with the right product will only become more difficult.
To enable you to keep up with this pace, I am pleased to share that a unified and enhanced Azure Certified Device program is now generally available, expanding on previous Microsoft certification offerings.
At the heart of this device certification program is a promise—a promise to device builders that they can not only quickly get their devices to market, but also better differentiate and promote their devices. And a promise to buyers that they can easily identify devices that meet their needs and purchase those devices with confidence that they have Microsoft approval. Our promise is to the entire IoT ecosystem: Microsoft is committed to helping a diverse set of partners easily create and find IoT devices built to run on Azure, and we’ll support connecting those devices with the right customers.
Visit our Getting Started with the Azure Certified Device program page to learn more.
Advantages of certifying IoT devices with Microsoft Azure
At Microsoft, we have been certifying devices for over 20 years, resulting in the creation of an ecosystem of over one billion PCs worldwide, that you, our partners, helped build. Now, we are enhancing how we apply our certification experience to our expertise in the cloud—building an IoT device ecosystem that will be exponentially larger—with tens of millions of devices connected to Azure and tens of thousands of customers utilizing devices built by our rapidly growing IoT device builder community. As we continue to build a thriving IoT ecosystem, we are committed to going even further for IoT builders and buyers through our improved tools and services as well as the following certification commitments:
-
Giving customers confidence: Customers can confidently purchase Azure certified devices that carry the Microsoft promise of meeting specific capabilities.
-
Matchmaking customers with the right devices for them: Device builders can set themselves apart with certification that highlights their unique capabilities. And customers can easily find the products that fit their needs based on certification differentiation.
-
Promoting certified devices: Device builders get increased visibility, contact with customers, and usage of the Microsoft Azure Certified Device brand.
Three certifications available today, with more coming
This IoT device certification program offers three specific certifications today (with more on the way!). Certifications currently available include Azure Certified Device, IoT Plug and Play, and Edge Managed.
Azure Certified Device
Azure Certified Device certification validates that a device can connect with Azure IoT Hub and securely provision through the Device Provisioning Service (DPS). This certification reflects a device’s functionality and interoperability, which are a necessary baseline for more advanced certifications.
IoT Plug and Play
Announced in August, IoT Plug and Play certification validates Digital Twin Definition Language (DTDL) version 2 and interaction based on your device model. It enables a seamless device-to-cloud integration experience and enables hardware partners to build devices that can easily integrate with cloud solutions based on Azure IoT Central as well as third-party solutions. Additionally, Azure IoT platform services and SDKs for IoT Plug and Play will be generally available by the end of this month. View our developer documentation for more information, and join the companies already beginning to prepare and certify their devices for IoT Plug and Play.
Edge Managed
Edge Managed certification focuses on device management standards for Azure connected devices. Today, this program certification focuses on Edge runtime compatibility for module deployment and management. Informed by conversations with our partners, our Edge Managed certification will continue to grow in the future with additional customer manageability needs.
Security and edge AI certifications soon in private preview
In addition to the currently available certifications, we are also working on additional security and edge AI certifications, which will soon be in private preview. These programs reflect our continued engagement with customers and partners to address key customer needs and business opportunities in delivering both secure and high-quality AI perception experiences at the edge. Interested partners can contact the Azure Certified Device team for more information.
Accelerate business with the Azure Certified Device Catalog
The Azure Certified Device certification program connects a community of device builders with solution builders and buyers through the Azure Certified Device Catalog. Certified devices are searchable based on which devices meet which capabilities, allowing device builders to differentiate their offerings based on the certification program. By certifying their devices to appear in the Azure Certified Device Catalog, device builders gain access to a worldwide audience looking to reliably purchase devices that are built to run on Azure. Meanwhile, buyers can use the catalog as a one-stop-shop they can trust to find and review a wide array of IoT devices.
Next steps for pursuing IoT device certification
If you’re a device builder, now is the right time to start thinking about how IoT device certification can benefit your company—elevating your profile and better positioning your devices to reach a broader market. Begin saving valuable time and make your devices stand out from the crowd by taking part in the Azure Certified Device program.
Visit our Getting Started with the Azure Certified Device program page to learn more.
by Contributed | Sep 24, 2020 | Azure, Technology, Uncategorized
This article is contributed. See the original author and article here.
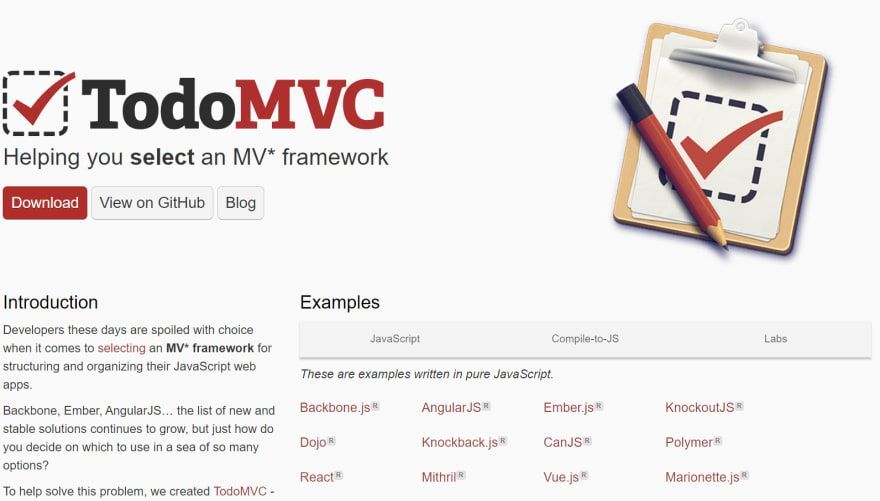
TodoMVC is a very well known (like ~27K GitHub stars known) application among developers as it is a really great way to start to learn a new Model-View-Something framework. It has plenty of samples done with different frameworks, all implementing exactly the same solution. This way is very easy to compare them against each other and see what is the one you prefer. Creating a To-Do App is easy enough, but not too easy, to be the perfect playground to learn a new technology.

The only issue with TodoMVC project is that it “only” focus on front-end solutions. What about having a full-stack implementation of the TodoMVC project with also back-end API and a database? Well it turns out that there is also an answer for that: Todo-Backend. There are more than 100 implementations available! Pretty cool, uh?
If you want to have a test run building a full-stack solution using a new technology stack you want to try, you are pretty much covered.
Full Stack with Azure Static Web Apps, Node, Vue and Azure SQL
Lately I was intrigued by the new Azure Static Web Apps that promises an super-easy Azure deploy experience, integration with Azure Function and GitHub Actions, and ability to deploy and manage a full-stack application in just one place, so I really wanted to try to take the chance to create a 100% serverless TodoMVC full stack implementation using:
-
Vue.Js for the frontend as I find it really really cool and powerful;
-
Azure Static Web Apps as I can manage the full-stack app just from one place and deploy just by doing a git push;
-
Node.js for the backend, as I’m learning it and I want to keep exercising. Not to mention that is very common and very scalable;
-
Azure SQL as I want to have a database ready for anything I may want to throw at it;
I searched in the TodoMVC and TodoBackend but didn’t find this specific stack of technologies…so why not creating it myself, I thought? Said and done! Here’s some notes I took while building this.
Azure Static Web Apps

Still in Preview but I loved it as soon as I saw it. Is just perfect for a full-stack development experience. In one shot you can deploy front-end and back-end, make sure they are correctly configured to work together (you know, CORS) and correctly secured.
Deployment is as easy as configuring a GitHub Action, that is actually automatically done for you, even if you still have full access to it, so you can customize it if needed (for example to include the database in the CI/CD process).
Azure Static Web Apps will serve a static HTML whatever you specify as the app and will spin up and deploy an Azure Function using Node.js to run the back-end using anything you instead specify as the api:

As you can guess from the configuration, my repo contains the front-end in the client folder and the back-end code in the api folder:

Front-End: Vue.js
As I’m still learning also Vue I kept the code very simple and actually started from the TodoMVC Vue sample you can find on the Vue website: TodoMVC Example.
I like this sample a lot as it shows the power of Vue.js using a single file. Very easy to understand if you have just started learning it. If you are already an experienced Vue user, you’ll be happy to know the Azure Static Web Apps has a native support for Vue, so that you can build and deploy Vue CLI. I’m honestly not that expert yet so I really like the super-simple approach that Vue also offers. Plus I also think that the super-simple approach is perfect for learning, which make it just great for this post.

Call a REST API
The original TodoMVC sample uses a local storage to persist To-Do data. Thanks to the Watchers feature that Vue provides, the code JavaScript code you need to write is very simple as any changes to a watched list – todo in this case – is automatically persisted locally via the following snipped of code:
watch: {
    todos: {
        handler: function(todos) {
            todoStorage.save(todos);
        },
        deep: true
    }
},
Of course, to create a real-world full-stack sample, I wanted to send the To-Do list data to a REST API, avoiding the usage of local storage, to enable more interesting scenarios, like collaboration, synchronization on multiple devices and so on.
Instead of relying on a Watcher, which would unfortunately send the entire list to the REST API and not only the changed item, I decided to go for a more manual way and just call the REST API just binding them directly to the declared methods:
methods: {
    addTodo: function () {
        var value = this.newTodo && this.newTodo.trim();
        if (!value) {
            return;
        }
        fetch(API + "/", {headers: HEADERS, method: "POST", body: JSON.stringify({title: value})})
        .then(res => {
            if (res.ok) {
                this.newTodo = ''
                return res.json();
            }
        }).then(res => {
            this.todos.push(res[0]);
        })
    },
Connecting the addTodo method to an HTML object is really simple:
<header class="header">
    <h1>todos</h1>
    <input class="new-todo" autofocus autocomplete="off" placeholder="What needs to be done?" v-model="newTodo"
        @keyup.enter="addTodo" />
</header>
With these changes done, it’s now time to take a look at the back-end.
Back-End: Node
Azure Static Web Apps only support Node.js as a backend language today. No big deal, Node.js is a great, fast and scalable language that works perfectly with Azure Function and Azure SQL so we’re really good here. If you are not familiar on how to run Azure Function with Node.js and Azure SQL make sure to read this article: Serverless REST API with Azure Functions, Node, JSON and Azure SQL. As Azure Static Web Apps uses Azure Functions behind the scenes, everything you learned for Azure Function will be applicable to Azure Static Web Apps back-ends.
The client will send a HTTP request to the back-end REST API passing the To-Do payload as JSON. For example to mark a To-Do as done, this JSON
{"completed":true}
will be send via a PUT request:
https://xyz.azurestaticapps.net/api/todo/29
to set the To-Do with Id 29 as done. If everything is ok the REST API will return the entire object, to make sure the client always have the freshest data:
[{
    "id":29,
    "title":"Write about Vue",
    "completed":1
}]
Thanks to Azure SQL support to JSON, the back-end doesn’t have to do a lot…just turn an HTTP request into a call via the TDS protocol supported by Azure SQL but beside that there isn’t a lot to do. JSON will be passed as is, so what the back-end really has to do is to make sure that depending on the HTTP request method invoked, the correct Azure SQL operation will be executed. For example a PUT request should call and UPDATE statement. Implementation is very easy:
switch(method) {
    case "get":
        payload = req.params.id ? { "id": req.params.id } : null;
        break;
    case "post":
        payload = req.body;
        break;
    case "put":
        payload =  {
            "id": req.params.id,
            "todo": req.body
        };
        break;
    case "delete":
        payload = { "id": req.params.id };
        break;
}
If you have more complex needs you may decide to implement one function per HTTP request method, but it this case would have been an overkill. I really try to follow the KISS principle as much as possible. The simple the better. But not simpler! (Of course if that would be production code I would check and make sure that JSON is actually valid and harmless before passing it to Azure SQL. Never trust user-provided input, you never know!)
Database: Azure SQL
Azure SQL has been created with just one simple table:
create table dbo.todos
(
  id int not null primary key
    default (next value for [global_sequence]),
  todo nvarchar(100) not null,
  completed tinyint not null
    default (0)
)
As a developer I still prefer to use JSON in the backend and to send data back and forth to Azure SQL, so that I can also minimize the roundtrips and thus improve performances, so all the stored procedures I’m using have this very simple signature:
create or alter procedure [web].[get_todo]
@payload nvarchar(max)
Then inside the stored procedure I can then use OPENJSON or any of the JSON functions to manipulate JSON. This way it becomes really easy to accept “n” To-Do as input payload. For example, let’s say I want to delete three To-Dos at once. I can pass something like
[{"id":1}, {"id":2}, {"id":8}]
and then just by writing this
delete t from dbo.todos t
where exists (
   select p.id
   from openjson(@payload) with (id int) as p where p.id = t.id
)
I can operate on all the selected To-Dos at once. Super cool, and super fast! The ability of Azure SQL to operate both with relational and non-relational features is really a killer feat!
Why Azure SQL and not a NoSQL database?
Answering that question could take a book so let me try to summarize. A NoSQL database for a To-Do list app is more than enough. But I always try to think about future improvements, and I want to make sure than anything I’d like to do in future will be reasonably well supported by my database. I might need to have geospatial data, to aggregate data to do some analytics, I may want to use graph or I may need to create a concurrent system to allow more than one person working on he same to-do list and I need a structure without locks. All these things are available inside Azure SQL without requiring me to use anything other than a technology I already know. This means that I’ll be super productive. I won’t even have scalability issues as with Azure SQL I can go up to 100 TB.
A To-Do list has a pretty well-defined schema, and the performance I can get out of a properly designed relational database are exceptional and cover a huge spectrum of use cases. With a NoSQL database I might squeeze a bit more performances when I focus on a very specific use case, but at the expense of all the others. I really want to keep door open to any improvement so, for this time, for my use case and future needs, I think Azure SQL is the best option I have here.
Keep in mind that well-defined schema doesn’t mean carved in stone. I can have all the flexibility I may want as I can easily store To-Do as JSON (or just a part of it) into Azure SQL, mixing relational and non-relational features, allowing end-users to add custom field and properties if the want to. Actually, you know what? That looks like a great idea for a post. I’ll definitely write on on this topic, so stay tuned!
Conclusion
Creating and deploying a full-stack solution is really easy now, thanks to Azure Static Web Apps. Completely serverless, you can just focus on coding and design while enjoying the simplicity – along with scalability and flexibility – that serverless solution offers. Azure SQL will guarantee that your solution is future-prof, providing scalability out and up to 100 TB with all the perks of a modern post-relational database, like multi-model support, security built-in, columnstore, lock-free tables and anything you may need in your wildest dream.
As usual enjoy the full source code here: https://github.com/Azure-Samples/azure-sql-db-todo-mvc
by Contributed | Sep 24, 2020 | Azure, Technology, Uncategorized
This article is contributed. See the original author and article here.
TodoMVC is a very well known (like ~27K GitHub stars known) application among developers as it is a really great way to start to learn a new Model-View-Something framework. It has plenty of samples done with different frameworks, all implementing exactly the same solution. This way is very easy to compare them against each other and see what is the one you prefer. Creating a To-Do App is easy enough, but not too easy, to be the perfect playground to learn a new technology.
The only issue with TodoMVC project is that it “only” focus on front-end solutions. What about having a full-stack implementation of the TodoMVC project with also back-end API and a database? Well it turns out that there is also an answer for that: Todo-Backend. There are more than 100 implementations available! Pretty cool, uh?
If you want to have a test run building a full-stack solution using a new technology stack you want to try, you are pretty much covered.
Full Stack with Azure Static Web Apps, Node, Vue and Azure SQL
Lately I was intrigued by the new Azure Static Web Apps that promises an super-easy Azure deploy experience, integration with Azure Function and GitHub Actions, and ability to deploy and manage a full-stack application in just one place, so I really wanted to try to take the chance to create a 100% serverless TodoMVC full stack implementation using:
-
Vue.Js for the frontend as I find it really really cool and powerful;
-
Azure Static Web Apps as I can manage the full-stack app just from one place and deploy just by doing a git push;
-
Node.js for the backend, as I’m learning it and I want to keep exercising. Not to mention that is very common and very scalable;
-
Azure SQL as I want to have a database ready for anything I may want to throw at it;
I searched in the TodoMVC and TodoBackend but didn’t find this specific stack of technologies…so why not creating it myself, I thought? Said and done! Here’s some notes I took while building this.
Azure Static Web Apps
Still in Preview but I loved it as soon as I saw it. Is just perfect for a full-stack development experience. In one shot you can deploy front-end and back-end, make sure they are correctly configured to work together (you know, CORS) and correctly secured.
Deployment is as easy as configuring a GitHub Action, that is actually automatically done for you, even if you still have full access to it, so you can customize it if needed (for example to include the database in the CI/CD process).
Azure Static Web Apps will serve a static HTML whatever you specify as the app and will spin up and deploy an Azure Function using Node.js to run the back-end using anything you instead specify as the api:
As you can guess from the configuration, my repo contains the front-end in the client folder and the back-end code in the api folder:
Front-End: Vue.js
As I’m still learning also Vue I kept the code very simple and actually started from the TodoMVC Vue sample you can find on the Vue website: TodoMVC Example.
I like this sample a lot as it shows the power of Vue.js using a single file. Very easy to understand if you have just started learning it. If you are already an experienced Vue user, you’ll be happy to know the Azure Static Web Apps has a native support for Vue, so that you can build and deploy Vue CLI. I’m honestly not that expert yet so I really like the super-simple approach that Vue also offers. Plus I also think that the super-simple approach is perfect for learning, which make it just great for this post.
Call a REST API
The original TodoMVC sample uses a local storage to persist To-Do data. Thanks to the Watchers feature that Vue provides, the code JavaScript code you need to write is very simple as any changes to a watched list – todo in this case – is automatically persisted locally via the following snipped of code:
watch: {
    todos: {
        handler: function(todos) {
            todoStorage.save(todos);
        },
        deep: true
    }
},
Of course, to create a real-world full-stack sample, I wanted to send the To-Do list data to a REST API, avoiding the usage of local storage, to enable more interesting scenarios, like collaboration, synchronization on multiple devices and so on.
Instead of relying on a Watcher, which would unfortunately send the entire list to the REST API and not only the changed item, I decided to go for a more manual way and just call the REST API just binding them directly to the declared methods:
methods: {
    addTodo: function () {
        var value = this.newTodo && this.newTodo.trim();
        if (!value) {
            return;
        }
        fetch(API + "/", {headers: HEADERS, method: "POST", body: JSON.stringify({title: value})})
        .then(res => {
            if (res.ok) {
                this.newTodo = ''
                return res.json();
            }
        }).then(res => {
            this.todos.push(res[0]);
        })
    },
Connecting the addTodo method to an HTML object is really simple:
<header class="header">
    <h1>todos</h1>
    <input class="new-todo" autofocus autocomplete="off" placeholder="What needs to be done?" v-model="newTodo"
        @keyup.enter="addTodo" />
</header>
With these changes done, it’s now time to take a look at the back-end.
Back-End: Node
Azure Static Web Apps only support Node.js as a backend language today. No big deal, Node.js is a great, fast and scalable language that works perfectly with Azure Function and Azure SQL so we’re really good here. If you are not familiar on how to run Azure Function with Node.js and Azure SQL make sure to read this article: Serverless REST API with Azure Functions, Node, JSON and Azure SQL. As Azure Static Web Apps uses Azure Functions behind the scenes, everything you learned for Azure Function will be applicable to Azure Static Web Apps back-ends.
The client will send a HTTP request to the back-end REST API passing the To-Do payload as JSON. For example to mark a To-Do as done, this JSON
{"completed":true}
will be send via a PUT request:
https://xyz.azurestaticapps.net/api/todo/29
to set the To-Do with Id 29 as done. If everything is ok the REST API will return the entire object, to make sure the client always have the freshest data:
[{
    "id":29,
    "title":"Write about Vue",
    "completed":1
}]
Thanks to Azure SQL support to JSON, the back-end doesn’t have to do a lot…just turn an HTTP request into a call via the TDS protocol supported by Azure SQL but beside that there isn’t a lot to do. JSON will be passed as is, so what the back-end really has to do is to make sure that depending on the HTTP request method invoked, the correct Azure SQL operation will be executed. For example a PUT request should call and UPDATE statement. Implementation is very easy:
switch(method) {
    case "get":
        payload = req.params.id ? { "id": req.params.id } : null;
        break;
    case "post":
        payload = req.body;
        break;
    case "put":
        payload =  {
            "id": req.params.id,
            "todo": req.body
        };
        break;
    case "delete":
        payload = { "id": req.params.id };
        break;
}
If you have more complex needs you may decide to implement one function per HTTP request method, but it this case would have been an overkill. I really try to follow the KISS principle as much as possible. The simple the better. But not simpler! (Of course if that would be production code I would check and make sure that JSON is actually valid and harmless before passing it to Azure SQL. Never trust user-provided input, you never know!)
Database: Azure SQL
Azure SQL has been created with just one simple table:
create table dbo.todos
(
  id int not null primary key
    default (next value for [global_sequence]),
  todo nvarchar(100) not null,
  completed tinyint not null
    default (0)
)
As a developer I still prefer to use JSON in the backend and to send data back and forth to Azure SQL, so that I can also minimize the roundtrips and thus improve performances, so all the stored procedures I’m using have this very simple signature:
create or alter procedure [web].[get_todo]
@payload nvarchar(max)
Then inside the stored procedure I can then use OPENJSON or any of the JSON functions to manipulate JSON. This way it becomes really easy to accept “n” To-Do as input payload. For example, let’s say I want to delete three To-Dos at once. I can pass something like
[{"id":1}, {"id":2}, {"id":8}]
and then just by writing this
delete t from dbo.todos t
where exists (
   select p.id
   from openjson(@payload) with (id int) as p where p.id = t.id
)
I can operate on all the selected To-Dos at once. Super cool, and super fast! The ability of Azure SQL to operate both with relational and non-relational features is really a killer feat!
Why Azure SQL and not a NoSQL database?
Answering that question could take a book so let me try to summarize. A NoSQL database for a To-Do list app is more than enough. But I always try to think about future improvements, and I want to make sure than anything I’d like to do in future will be reasonably well supported by my database. I might need to have geospatial data, to aggregate data to do some analytics, I may want to use graph or I may need to create a concurrent system to allow more than one person working on he same to-do list and I need a structure without locks. All these things are available inside Azure SQL without requiring me to use anything other than a technology I already know. This means that I’ll be super productive. I won’t even have scalability issues as with Azure SQL I can go up to 100 TB.
A To-Do list has a pretty well-defined schema, and the performance I can get out of a properly designed relational database are exceptional and cover a huge spectrum of use cases. With a NoSQL database I might squeeze a bit more performances when I focus on a very specific use case, but at the expense of all the others. I really want to keep door open to any improvement so, for this time, for my use case and future needs, I think Azure SQL is the best option I have here.
Keep in mind that well-defined schema doesn’t mean carved in stone. I can have all the flexibility I may want as I can easily store To-Do as JSON (or just a part of it) into Azure SQL, mixing relational and non-relational features, allowing end-users to add custom field and properties if the want to. Actually, you know what? That looks like a great idea for a post. I’ll definitely write on on this topic, so stay tuned!
Conclusion
Creating and deploying a full-stack solution is really easy now, thanks to Azure Static Web Apps. Completely serverless, you can just focus on coding and design while enjoying the simplicity – along with scalability and flexibility – that serverless solution offers. Azure SQL will guarantee that your solution is future-prof, providing scalability out and up to 100 TB with all the perks of a modern post-relational database, like multi-model support, security built-in, columnstore, lock-free tables and anything you may need in your wildest dream.
As usual enjoy the full source code here: https://github.com/Azure-Samples/azure-sql-db-todo-mvc

Recent Comments