This article is contributed. See the original author and article here.
When building an application, one of the things we have to work alongside with is business requirements but we mostly forget about the users, “Is this application accessible to the users?”
User’s Interaction and accessibility are many of the factors that needs to be discussed when building an application. It’s important to consider how efficient your application is to your users.
Check out this Podcast Episode on A Girl in Love with Tech Podcast where I and Microsoft Snr Program Manager Ilya Fainberg who role is researching market trends and understanding customer needs to formulate product strategy. Helping customers succeed in their journey to the Microsoft Cloud by advising on best practices and product discussed about the importance of User’s Experience in Microsoft Power Platform
In this article, we would learn about simple user’s needs we can easily work on when building a Power apps application but first, let us understand what Power Apps is
What is Microsoft Power Apps?
Microsoft Power Apps is a low-code or no- code tool in the Microsoft Power Platform ecosystem that is used in building business applications with or without the use of programming languages. Microsoft has been able to bridge that gap, where both developers and non-developers have free rays in building solutions. What this means is that, the platform can be extended by code making it a pro code platform for professional developers.
What to look at for
1. Simple icons: it is advisable to use icons in place to help increase space and avoid distractions. Make use of icons that are understandable on what it does.
2. Consistency: When building an application, especially when you have many screens in the application. It’s important to consider the consistency of the controls in your screen especially the width and height.
3. Colours: How well you use your colours is very important, especially to the users, it has to be accessible, not contrasting the other, the colour should not be too dull. These are the few examples to consider when working with colours
The font colour and background colour of your screen should be accessible. Check the Colour contrast checker to see which colour works best.
When using an image in the screen the colour in the background of the image should not contradict the background colour of your screen.
Use primary colours to point out the main objective. A good example of not working well with colors is using a green colour for the delete icon.
4. Avoiding distractions: Application should always be easy to use. A user should not need a manual to use your application.
5. Performance: Improving how users interact with your applications should be met. A few examples to consider when working in an application:
Application should not take too long to load or respond to an action.
When a user clicks on a button they expect that something will happen. Button controls should not be used as a text control.
6. Size: The font type and size should be readable and accessible. Check here and learn more about accessible fonts.
7.Responsive: Building an application, always think about the use of your application on different devices. When building an application one of the mistakes we make is not having an idea or design of how the application layout will look like on different types of screens.
This article is contributed. See the original author and article here.
With ongoing advancements in technology, there has been a continuous shift in how we learn, network, and interact with each other. Communities in Teams experience enables students and mentors to connect and bring out a true sense of connection among them.
IIT Madras, one of the leading engineering institutions in India, has been using Teams to enable mentorship-led communities along with their Microsoft Learn for Educators (MSLE) effort in their data science program. Mentors connect with the students to help them with course curriculum and technical questions related to various Microsoft certification courses that they are encouraging their students to take up, both asynchronously and with live online office hours, in one place.
In this article, we will explore how IIT Madras created communities for mentorship cohorts and engaged their students to help them easily connect with one another and have a go-to space for upskilling and networking.
Why create mentorship communities on Teams?
Building a strong connection between the mentors and mentees is critical for folks to achieve goals and learn from each other. This is especially true if the students are from diverse geographical locations, ages, roles, and backgrounds. The BS Degree in Data Science and Application Program offered by IIT Madras is born out of the philosophy of democratizing education and has seen wide acceptance both inside and outside the country.
With data science being a buzzword in the industry for quite some time, the BS program aims to provide without compromising the strong academic foundations needed in this arena. Knowledge of cloud computing and use of cloud resources is a significant extracurricular component where IIT Madras is working with Microsoft (through a faculty development program – Microsoft Learn for Educator program) to enable Microsoft Cloud-related certifications, both in Data Science and Application Development, for its students. Communities in Teams provides a single platform for students to connect, engage, and build relationships with their fellow students and mentors before and after their sessions.
This community is the centralized space for students to find information related to their out-of-class mentoring sessions scheduled in the program and address all questions and concerns. Students can
Find the program schedule
Engage with the coordinating team
Track important dates
Help, interact, and collaborate with peers
Resolve queries in real time
One-stop access to all your reading materials
Connect with your trainers/mentors
Follow upcoming events
Additionally, since students could potentially use Teams in their colleges, it serves as an excellent opportunity for them to navigate on a single platform.
How is IIT Madras creating and managing mentorship cohorts in Communities in Teams?
IIT Madras has been using Communities in Teams as a platform for all its students and mentors to build relationships, expand their network, and motivate students in finishing their Microsoft certification programs.
For every mentorship session, they share the QR code/ invite link of the community to all its registered participants. Students join the community before/during the course delivery session to connect asynchronously with their peers and discuss key elements discussed during the session.
The mentors/coordinating team shares all the required details of the cloud certification including meeting details, and prerequisites, and supports students by providing them a platform to ask questions, seek guidance, and share their certificates.
These communities also act as a knowledge resource for all the students aiming to get themselves certified with other certifications as IIT Madras leverages the existing community network they have built to cross-promote the upcoming mentorship sessions and certifications.
Here is what IIT Madras has to say about Teams
In the unique context of IIT Madras BS Degree in Data Science and Programming, the mentorship communities through MS Teams help emulate the informal learning environment that is available in the regular on-campus programs for extra-curricular activities. This is a very significant activity as students aiming to get Cloud Certifications not only get guidance from their peers/seniors who have already completed their journey but also promote a strong sense of belonging. We are really happy to be part of this journey with Microsoft Teams and are looking forward to having a strong community built within this space.
Overall, these communities have been helping the students to engage proactively, find easy resolution of queries, and stay motivated to complete their programs and certifications.
Best practices to keep in mind while creating student-mentor communities on Teams
Set Community Description, Avatar, and Guidelines: Once the community is created, ensure the community description encourages participation and delivers the goal of the community. Additionally, fill out any specific community guidelines you want to communicate to members of the community. Having a community avatar makes the community more real. Learn more about updating the community details.
Restrict Community Join Link Sharing: To ensure the community remains secure and limited to authorized members, disable the option to share the community join link and enable requests for members to join. This step prevents the link from being shared outside the intended audience, maintaining the privacy and exclusivity of the community. Learn more about how to disable the option to share a community link
Create an engagement plan: Plan your engagement for 2 weeks beforehand as starters to kick-start conversations in the community. You can have multiple types of posts planned with details on who will post and when.
Change your profile name so members can uniquely identify you as the mentor. You can use titles such as Your Name – Mentor
Diversify Communities: Consider creating separate communities for every certification/program type. This segmentation allows for more targeted discussions and networking opportunities within specific cohorts.
Empower the community to lead: A community becomes strong and sustainable only when leaders are nurtured within the community and empowered. As part of this, there is a cognitive apprenticeship within the community through which students can move up to become Mentors and Community managers.
By following these steps, you can harness the power of Communities in Teams to create vibrant communities that foster connections, facilitate networking, and enhance the overall mentorship experience.
How to send feedback and suggestions?
We are always happy to receive feedback and suggestions to make our product even better. To participate in our feedback program and help us in our endeavor, please follow the steps below:
This article is contributed. See the original author and article here.
PIM for Groups
Entra ID (formerly Azure AD) offers the Privileged Identity Management (PIM) for Groups feature, enabling users to attain just-in-time membership and ownership of groups, thus governing access to a range of services. This feature allows the implementation of policies similar to those in PIM for Entra ID Roles and PIM for Azure Resources, allowing the configuration of actions like approval enforcement, multi-factor authentication (MFA), justification requirements, and activation time limits. Each PIM for Groups configured group features two distinct policies, catering to membership and ownership activation. This means that if an account is both an eligible owner and an eligible member of a group, each of them have their own activation.
Microsoft 365 Defender RBAC offers centralized permissions management for the following services:
Defender for Endpoint
Defender for Identity
Defender for Cloud Apps
Defender for Office 365
Microsoft Defender Vulnerability Management
Secure score
When a role is created, the services which the role covers can be selected. The advantage of using the new M365 Defender RBAC as opposed to the legacy RBAC for each individual service is that it is possible to grant permissions to multiple services from just a single role assignment. If you have been using legacy RBAC assignments it’s very simple to import those roles into the new M365 Defender unified RBAC. The steps for importing the roles can be found here.
M365 Defender unified RBAC workloads need to be activated before they are applied. Until the workloads are activated Defender will apply the legacy RBAC model for each individual service.
When creating an M365 Defender role you will need to create an assignment for it. Assignments will have a scope (which Defender data sources the assignment will apply to) and Entra ID users or groups (which users or groups the assignment will be applied to).
As group membership can define getting M365 Defender roles, and group membership can be given in a just-in-time manner, it means that indirectly M365 Defender roles can be given in a just-in-time manner.
The steps to set this up would be the following.
Create the Entra ID group and add members
In the Azure portal go to Azure Active Directory and click on Groups and then New group.
Figure 1 Creating new group
Enter the details as required.
Figure 2 Adding details to group being created
Add Eligible Members to the group
Go to the Azure portal and search for Azure AD Privileged Identity Management in the search bar. Once there, select Groups on the left side of the menu. The group needs to be discovered before eligible members can be added. To discover the group, search the group name and select Discover groups.
Figure 3 Discover groups to manage with PIM
Select the group and click Manage groups.
Figure 4 Manage group using PIM
Click on OK.
Figure 5 Onboarding selected groups
Now the group should be visible. Select the group and click Assignments, then Add assignments in the Eligible assignments tab. If it is not added to this tab, the assignment will be active and not eligible.
Figure 6 Adding assignment to PIM managed group
Select the members to be added to the group.
Figure 7 Selecting members
Figure 8 Selecting members
Select Eligible and enter the start and end dates of the eligibility assignment. Once the correct dates are set click Done. Finish the assignment process.
Figure 9 Setting details of eligible membership
Now there should be the account added in the Eligible assignments tab on the groups membership.
Figure 10 Viewing eligible assignment of groups members
Now the group has PIM eligible members.
Create the M365 Defender Role
M365 Defender roles can be created in the M365 Defender portal. If you have the correct permissions you can click on Permissions on the left side in the menu.
Figure 11 Permissions tab in Defender menu
Under Microsoft 365 Defender select Roles.
Figure 12 Microsoft 365 Defender Roles in permissions page
Click on Create custom role. Enter the name of the role and click Next.
Figure 13 Beginning the creation of a custom role
On the Choose permissions tab click on each permission an select the level of access you want the role to have.
Figure 14 Permissions selection screen
Figure 15 Example permissions for Security Operations
Once the permissions you want are selected click on Next.
Figure 16 Permissions selected for each group
On the next screen assignment are created for the role. The assignments created will determine which account are assigned this role. Click on Add assignment.
Figure 17 Adding assignment to role
Enter the assignment name and select the group created in Step 1. Click Add.
Figure 18 Entering assignment details
Move to the next screen by clicking Next. Review the permissions and click Submit.
Figure 19 Reviewing and submitting the roles settings
As mentioned earlier, the M365 Defender RBAC has to be activated for workloads so that it can be applied. If this hasn’t been done already then it will need to be activated. On the main page for M365 Defender Roles there will be a note if any workload has not been activated. If this note is there then you will need to Activate workloads.
Figure 21 Activating workloads
Users perspective
Once a user has been made an eligible member of the group they can activate their membership and get temporarily assigned to the M365 Defender role. The user will have to follow these steps:
Go to Azure AD Privileged Identity Management and to the Groups tab in the menu on the left. The group should be visible. If the group is not visible, verify that the user is an eligible member of the group and that the group was ‘discovered’ by the admins. These steps can be found in the previous sections. Select Activate role.
Figure 22 Activating group membership
On the next screen select Activate on the group you want to activate the membership for.
Figure 23 Activating group membership
Select the duration the membership should last for and add a reason. Select Activate.
Figure 24 Activating group membership
After activating the role, if the membership status of the group is checked, you will see the account there with details about when the membership was activated.
Figure 25 Viewing the activated group membership
The users view in M365 Defender before and after activating the group membership, and therefore getting assigned the M365 Defender role. Notice that after the role is assigned the user can see menus for Defender related activities.
Figure 26 The Defender menu before activating the group membership
Figure 27 The Defender menu after activating the group membership
Wrapping it up
PIM for Groups paired with M365 Defender RBAC offers a solution for those looking for just-in-time Defender access. These can also be used in combinations. For example, if you want a certain sures to always have read access but access to take device actions should be granted just-in-time, then a read-only Defender role can be assigned permanently and the role for taking device actions can be granted to the group via the steps mentioned above.
This article is contributed. See the original author and article here.
Hello everyone,
I’m thrilled to announce that Microsoft Entra API-driven provisioning is now in public preview!
With today’s announcement, we’re expanding our support for HR-driven provisioning to address the most common customer asks, including:
Automatically provisioning cloud-only users and hybrid users (users that require an on-premises Active Directory account) from any trusted source
Importing data from sources like CSV files and SQL staging tables using the automation tool of your choice
Simplifying the integration by using standard SCIM schema attributes to abstract schema differences across systems and provide a consistent mapping experience
Leveraging Lifecycle Workflows to automate joiner-mover-leaver workflows for users sourced from any system of record
In one common customer scenario, organizations use a cloud human capital management (HCM) platform for managing employees and extracting nightly flat files/CSVs to manage vendor and contractor data. Both of these sources can send information to Microsoft Entra API-driven provisioning using your automation tool of choice. Then, the provisioning service will automatically determine the right operation to perform for each user, and Microsoft Entra ID Governance Lifecycle Workflows will automate the joiner-mover-leaver processes configured by your IAM admin.
Figure 1: Microsoft Entra API-driven provisioning data flow
Let’s walk through the steps involved in configuring this integration.
Bring identities into your directory from any source in three easy steps
Step 1 – Configure API-driven provisioning app
In the Microsoft Entra Portal, sign in as a user with Application Administrator and Hybrid Identity Administrator role. You will see two new provisioning applications in the Enterprise App gallery:
API-driven provisioning to Microsoft Entra ID: Configure this app if you’d like to provision cloud-only user accounts from your authoritative source.
API-driven provisioning to on-premises Active Directory: Configure this app if you’d like to provision user accounts first to your on-premises Active Directory and then sync them into Microsoft Entra ID using Microsoft Entra Cloud Sync / Connect Sync.
If your provisioning target is an on-premises Active Directory domain, download and configure the Microsoft Entra provisioning agent. Once configured, you can select the Active Directory domain in the provisioning app.
Figure 2: Connect to your on-premises Active Directory domain
Figure 3: SCIM schema attributes to on-premises Active Directory attribute mapping
The Microsoft Entra provisioning service creates a unique API endpoint for your provisioning app. You can copy this API endpoint from the “Overview” blade. Select “Start provisioning” to accept inbound provisioning requests at this API endpoint.
Figure 4:API endpoint for your provisioning app
The inbound provisioning API endpoint has the format:
where {servicePrincipalId} is the object ID of your provisioning app and {jobId} is the provisioning job id.
Step 2 – Grant permission to your application or service to upload identity data
In this step, you create an entity in Microsoft Entra ID that represents your application or service calling the inbound provisioning API and grant it the necessary permissions. You can use one of the following options:
Grant the following Graph API permissions with admin consent:
SynchronizationData-User.Upload
AuditLog.Read.All
Figure 5: Permissions required to perform API-driven provisioning
Step 3 – Upload identity data using any automation tool of your choice
You can now securely upload identity data to the provisioning /bulkUpload API endpoint. The great thing about API-driven provisioning is that you don’t need to implement custom logic to figure out whether an operation in your system of record requires creating or updating an identity. Just upload the data from your source systems and the Microsoft Entra provisioning service will automatically determine the right operation to perform for each user record based on mapping rules configured by your IAM admin.
Unlock more integration scenarios
In the set of steps above, we showed you how to provision to Microsoft Entra ID in the cloud, and to Active Directory on-premises. You can apply these steps to implement several enterprise HR integration scenarios.
Scenario 1: IT teams can import HR data extracts from any source
Flat files, CSV files and SQL staging tables are commonly used in enterprise integration scenarios. Employee, contractor, and vendor information are periodically exported into one of these formats, and an automation tool is used to sync this data with Microsoft Entra ID. With API-driven provisioning, IT teams can use any automation tool of their choice (example: PowerShell scripts or Azure Logic Apps) to modernize and simplify this integration.
Scenario 2: HR ISVs can build direct inbound sync with Microsoft Entra ID
With API-driven provisioning, HR ISVs can ship native synchronization experiences so that changes in the HR system automatically flow into Microsoft Entra ID and connected on-premises Active Directory domains. For example, an HR app or student information systems app can send data to Microsoft Entra ID as soon as a transaction is complete or as end-of-day bulk update.
Scenario 3: System integrators can build more connectors to systems of record
System integrators can build custom HR connectors to meet different integration requirements around identity data flow from systems of record to Microsoft Entra ID.
What customers and partners are telling us
We got some great feedback from customers and partners like you during the previews.
Microsoft Entra API-driven provisioning will allow us to achieve our cloud-first vision by provisioning identity directly in the cloud and on-premises, integrating with our HR application. We will be able to remove legacy infrastructure and automate many fragmented workflows and reduce dependency on on-premises Active Directory infrastructure. This will enhance our security, efficiency, and user experience.
Sachin Desai, Sr. Director at Avanade Inc.
With API-driven provisioning, HR has better control over the identity lifecycle & data in Active Directory and Microsoft Entra ID. When combined with Lifecycle Workflows, onboarding and offboarding becomes easy and seamless, and with that, no more manual work and always an up-to-date identity!
Pim Jacobs, Principal Consultant at InSpark and Microsoft Most Valuable Professional (MVP)
Microsoft Entra API-driven inbound provisioning is a game changer for customers constrained by existing technologies, opening the possibility for any customer to start the journey for joiner, mover, and leaver automation.
Martyn Gill, Senior Architect and Team Lead at Kocho
With API-driven provisioning, our customers can link employee information in SmartHR with Microsoft Entra ID. This will reduce the time and effort required to manage accounts as employees join, move, or leave the company. SmartHR is excited to partner with Microsoft in building this integration!
Takumi Kanzaki, Product Engineer at SmartHR
Rippling gives businesses one place to run HR, IT, and Finance by automating payroll, expenses, and benefits in one integrated platform. With Microsoft Entra API-driven provisioning, we can now extend this automation to streamline access to more workforce apps, regardless of whether it’s in the cloud or on-premises. We look forward to enabling this seamless experience for our customers by partnering with Microsoft!
Sam Gnesin, Product Lead at Rippling
Give it a try
With this new capability, you now have even more flexibility on how to keep identity data in sync with your authoritative sources, regardless of whether they are hosted in the cloud or on-premises. Working with your HR/IT teams, you can select from a range of automation tools like Azure Logic Apps, PowerAutomate, Azure Functions or Azure Data Factory to retrieve, transform and merge HR data and simply upload the data to the new provisioning API endpoint.
To quickly configure and evaluate API-driven provisioning with your favorite API testing tool, refer to one of these tutorials:
The API-driven provisioning feature is in preview, and you can start using it if you have Microsoft Entra ID P1 (formerly Azure AD Premium P1) license or above. Licensing terms will be released at general availability.
This article is contributed. See the original author and article here.
Leveraging Microsoft Sentinel workbooks for reporting to leadership is a common use case. A common concern is granting recipients access to Microsoft Sentinel or all of the tables within the workspace. Using some different RBAC components, this can be done.
Components:
Table-level RBAC
Resource-level RBAC
How It Works:
Table-level RBAC: Access to the data that is leveraged within the workspace is set at the table level. This prevents the user from being able to read data from the other tables while still being able to see the required data within the workbook.
Resource-level RBAC: Access to just the resource as needed. The resource here is the workbook of interest. Setting access at the resource level prevents the user from being able to see all resources within the resource group.
How to Configure:
Table-level RBAC: Table-level RBAC will leverage a custom role that enables the user to be able to see the workspace and run a query, and a reader role on the table itself. The process is highlighted in the documentation here.
Resource-level RBAC: Resource-level RBAC will limit the scope of visibility to be just to the resource. To set this:
Go to the Azure Portal.
Go to the resource group that has Microsoft Sentinel.
Find the workbook of interest.
Click on access control.
Click on add.
Choose role assignment.
Select the workbook reader role.
Select the user that should be able to see the workbook.
Click review and assign.
Sharing the Workbook
Since the user is unable to see Microsoft Sentinel, the workbook will need to be shared directly with the user. To do so:
Go to the Azure Portal.
Go to Microsoft Sentinel or the resource group.
Find the workbook of interest and open it.
Click on share and copy the link.
Share the link with the user who should have limited access.
Anticipated Questions:
I don’t want the user to see the workspace so that they can’t run a query on the data. Can I do that?
No. The permission to see and query the workspace is required so that the user can view the data in the workbook, which queries the data.
How does the user consistently view the workbook without having to use the link?
The user can configure a dashboard that pins the workbook to the dashboard.
What if the workbook uses several tables?
Table-level RBAC will need to be configured for each one.
What if I have multiple users who need this type of access?
Consider creating an AAD group that contains these users and assign permissions to the group.
And that’s it. This is a fairly straightforward process that leads to good results. Go ahead and give it a shot and leave comments below if there are any issues.
This article is contributed. See the original author and article here.
Today we are excited to announce the general of Azure Spring Apps (ASA) landing zone accelerator. You can start deploying your spring applications to Azure Spring Apps at scale using the built with industry-proven practices.
Customers on their app modernization or migration journey to cloud may encounter challenges to deploy spring applications at enterprise scale and get it right at the first time. Landing zone accelerators help you address this challenge providing guidance to deploy workloads faster with better security, scalability, availability, reduced cost, operating confidently with better performance.
Landing zone accelerators provide architectural guidance, reference architecture, reference implementations and automation packaged to deploy workload platforms on Azure at scale. The goal of landing zone accelerators is to save you having to reinvent the wheel by building on the lessons we learned working with our strategic customers. This accelerator allows you to establish secure, compliant, and scalable development, test, or production environments within 15-30 minutes.
ASA landing zone accelerator comes with two parts,
Design Area Guidance providing recommendations and considerations for critical design pillars: Security, Networking, Identity and Access Management and Monitoring
Reference implementation providing end-to-end guidance for provisioning Azure Spring Apps and deploying workloads to production-grade secure infrastructure.
Build and deploy spring applications at scale
Azure Spring Apps makes it easy to deploy Spring applications to Azure without any code changes. The service manages the infrastructure of Spring applications so developers can focus on their code. Azure Spring Apps provides lifecycle management using comprehensive monitoring and diagnostics, configuration management, service discovery, CI/CD integration, blue-green deployments, and more.
For application teams, the Spring Apps landing zone accelerator offers a significant head start by bundling together the most used backing services, which teams can select as part of their deployment process. This includes Azure Spring Apps Enterprise for Java Spring Boot applications, Azure Application Gateway for efficient web traffic management, Azure Virtual Machines for streamlined management operations, and diverse database services such as Azure MySQL Flexible Server, Azure PostgreSQL Flexible Server, Azure Cosmos Database and Azure SQL Database for adaptable data storage solutions. Teams can further secure and monitor their operations with Azure Key Vault, Azure Monitor Logs, and Azure Application Insights – or using any monitoring tools and platform of their choice. And they can automate from idea to production using any automation tools and platform of their choice.
On the other hand, platform teams benefit from an array of resources designed to maintain security and operational efficiency. The Azure Firewall, Azure Bastion, Azure ExpressRoute, Azure DNS, and Azure VPN Gateway ensure seamless connectivity, secure access management, and effective traffic control across both on-premises and Azure environments. The Landing Zone Accelerator for Spring Apps builds on the Azure Well-Architected Framework, adhering to its five pillars of architectural excellence – reliability, security, cost optimization, operational excellence, and performance efficiency. Furthermore, it integrates seamlessly with Azure landing zones and other accelerators. Rooted in real-world Azure migration projects, this accelerator framework not only ensures consistent governance but also reduces operational overhead, optimizing cost, and establishing a reliable solution for deploying both private and public applications in single or multi cloud environments.
Design Area Guidance
The reference architecture is considered across four key design areas integrated with centralized services.
These design guidelines are based on real-world work with our strategic customers performing large-scale Azure migration and modernization projects, and you can use the architectural guidance to achieve your target technical state with confidence.
The reference implementation demonstrates a secure baseline infrastructure architecture to deploy spring and polyglot apps. It uses a hub and spoke architecture with a single spoke hosting Spring Apps. East/West traffic (traffic between resources in the hub and resources in the spoke) is filtered with Network Security Groups and North/South traffic (traffic between the Internet and resources in the hub or spoke) is routed through and mediated with an instance of Azure Firewall.
Core architecture components are below.
Azure Spring Apps (Enterprise or Standard) is deployed using VNet-injection to allow for mediation inbound and outbound traffic to the Azure Spring Apps Instance and deployed applications.
The Azure Firewall instance has been configured to write its logs to a Log Analytics Workspace.
Azure Private DNS zones for Azure Spring Apps and support services deployed with Private Endpoints
A single Windows Server 2022 Virtual Machine deployed into the spoke Virtual Network for testing access to applications deployed into the Azure Spring Apps instance. This VM is not exposed to the internet and is only accessible via Azure Bastion.
Log Analytics Workspace where Azure Spring Apps and Azure Firewall deliver logs and metrics.
Lets get started by forking the repo to create a dev, test or production environment in 15-30 minutes using the landing zone accelerator. The artifacts in this repository provide groundwork that you can customize for your environment and automated provisioning pipelines. For any feedback, please use the GitHub Issues.
Meet the Experts
This accelerator was created and maintained by Cloud Solution Architects, Software Engineers, and Program Managers at Microsoft. Check them out under the GitHub repo contributors section.
Advanced People Directory: Advanced People Directory is a SharePoint Framework (SPFx) webpart designed to display people information from across your organization. The webpart lets you search by multiple attributes and return basic information, linked documents, and an organization chart.
Agile Retail Analytics Dashboards on Power BI: Agile Analytics Retail dashboards use Microsoft Power BI and Azure services to centralize data from financial, operational, and other business areas and deliver insights into product performance, sales growth, and more.
Commerce 365 for EasyPost: NVision’s Commerce 365 for EasyPost integrates Microsoft Dynamics 365 Business Central with EasyPost, simplifying shipping. The API lets you quickly connect with over 100 carriers, automatically create shipments, and support high volumes through batch processing.
Commerce 365 for EasyPost – Tasklet Mobile WMS Module: NVision’s Commerce 365 for EasyPost – Tasklet Mobile WMS app lets EasyPost users create and request carrier labels using Mobile WMS without needing to switch to Microsoft Dynamics 365 Business Central.
Commerce 365 for Sendcloud – Tasklet Mobile WMS Module: NVision’s Commerce 365 for Sendcloud – Tasklet Mobile WMS app lets Sendcloud users create and request carrier labels using Mobile WMS without needing to switch to Microsoft Dynamics 365 Business Central.
Custom Defined Fields for Purchase Requests: The Custom Defined Fields for Purchase Requests app for Microsoft Dynamics 365 Business Central allows you to add up to 32 custom fields in different cards belonging to purchase requests.
Design Engine App for Dynamics 365 Business Central: Design Engine lets you simplify ERP for employees working in production and logistics environments with Microsoft Dynamics 365 Business Central. Employees can easily access ERP data, simplify goods handling, and more.
Dynasoft Friendly Banking: Automate banking operations, get real-time statement imports, and eliminate manual tasks with the Dynasoft Friendly Banking app for Microsoft Dynamics 365 Business Central. This app is available in English and Spanish.
Easy Item Tracking for Good Looking Documents: Fenwick’s Easy Item Tracking connector extends Microsoft Dynamics 365 Business Central, Good Looking Documents, and Easy Item Tracking to add item tracking information from Good Looking Documents to reports.
Inventory Shelf Life: Available in French and English, the Inventory Shelf Life app by FoodCloudPlus lets you use Microsoft Dynamics 365 Business Central to easily create and assign controls to customers and items. Food manufacturers and distributors can reduce the risk of returned products and unhappy customers.
Item Restriction Management: Available in Traditional Chinese and English, Item Restriction for Microsoft Dynamics 365 Business Central lets you block the sale of certain items to specific customers and regions based on trade agreements, internal rules, and more.
Job Queue Manager: The Job Queue Manager app for Microsoft Dynamics 365 Business Central is designed to run job queue entries in a specific order and email their status. This app is available in English and Dutch.
Kani Payments Reporting and Reconciliation: Kani is a Microsoft Azure-based reporting and reconciliation platform designed to help finance technology and payments companies automate back-office tasks such as reconciliation, reporting, and compliance enforcement.
Meeteo: Improve Your Microsoft Teams Meetings: Available in French, Meeteo is available as software as a service combined with an add-in for Microsoft Teams, delivering advice before, during, and after meetings through the provision of agendas, surveys, participant lists, and more.
Navitec Digitoo Bridge: Available only in Czech, Navitec Digitoo Bridge integrates Microsoft Dynamics 365 Business Central with Digitoo, allowing you to transfer purchase documents and extracted metadata from them into Dynamics 365.
NCVV VAT Registration Number Validation: Available in German and English for Austria, the NCVV VAT Registration No. Validation app helps you maintain master data for customers, debtors, and creditors in Microsoft Dynamics 365 Business Central.
Notify User: The Notify User app for Microsoft Dynamics 365 Business Central allows you to assign a user to notify while saving a note for any record, such as customer cards and sales orders.
Over Shipping: Available in French and English, the Over Shipping app by FoodCloudPlus enhances Microsoft Dynamics 365 Business Central, letting you set and control tolerance percentages for items, customers, and combined levels, allowing for greater customization and control.
Pazo: Pazo is mobile-first operations management platform for retail and frontline workforces. Available as software as a service, Pazo lets you ensure all tasks, audits, and inspections are compliant.
Powerblox Advanced Pricing and Discounts: The Powerblox Advanced Pricing and Discounts app for Microsoft Dynamics 365 Business Central lets you manage prices and reductions, create discount groups for customers, and always have a clear overview of your margins.
Powerblox Inbound Logistics: The Powerblox Inbound Logistics app for Microsoft Dynamics 365 Business Central lets you set advanced warehouse functions. The app lets you manage incoming tracks per gate, manage stock at logistic unit levels, manage outgoing logistics processes, and more.
ProE-SCM 365 Workflow: Available in German and English, YAVEON ProE-SCM 365 Workflow enhances Microsoft Dynamics 365 Business Central to simplify management of customer credit, automate system actions, control processes, and more.
Quality Inspector: Quality Inspector by Insight Works is a comprehensive quality control app for Microsoft Dynamics 365 Business Central. The customizable entry forms and multiple inspection types enhance product quality, reduce costs, and help maintain compliance.
Rillion Connect: Rillion Connect streamlines invoice approval processes for purchase orders (POs) and non-POs by integrating Microsoft Dynamics 365 Business Central with the Rillion invoice automation platform. Reduce invoice processing costs and speed accounts payable approval times.
Safe & Smart Audit Management Software: The Safe & Smart Audit Management System is designed to automate various operations and enhance your audit department. The software as a service solution streamlines processes, facilitates collaboration with external auditors, improves internal controls, and more.
Safe & Smart Core Insurance System: The Safe & Smart Core Insurance System provides integrated functionality for processing and delivering insurance products. The software as a service solution was designed for a range of insurance industry users and addresses the need for a streamlined and efficient insurance management system.
Sales Stage Tracker for Dynamics 365: The Sales Stage Tracker app for Microsoft Dynamics 365 lets you record and analyze time spent in each stage of a sales opportunity. The app helps you identify and optimize slowdowns, shortening time to close, increasing revenue, and enhancing efficiency.
Share-Effect Flow Connector: The Share-Effect Flow Connector lets you manage terms in Microsoft 365 as part of your organization-wide enterprise content management strategy. Sync terms with entities from ERP and CRM systems, tag documents, and automate business processes in SharePoint Online.
TAPP for GoCardless on Dynamics 365 Business Central: Bluefort’s TAPP for GoCardless enhances Microsoft Dynamics 365 Business Central and GoCardless, enabling no-touch direct debit payments and payment automation, increasing the efficiency of your invoicing and payment collection.
Temporary Traffic Management: Road Direct’s eBoard temporary traffic management (TTM) software lets you view all job books from any device and location. The Microsoft Azure-based solution includes team management, time recording, and equipment tracking,
Wise Card: Available in Icelandic and English, Wise Card enables users of Microsoft Dynamics 365 Business Central to fetch credit card entries for corporate purchasing cards from Valitor and Rapyd. This app is available in Iceland.
Workshop Employee Communications Webpart for SharePoint: The Workshop webpart lets you add feeds to your Microsoft SharePoint site from Workshop, an employee communications platform for human resources, public relations, and internal communications professionals.
Go further with workshops, proofs of concept, and implementations
Catalyst Envisioning Workshop for Annata 365: Fellowmind will help you discover the potential gains to be realized by implementing Annata 365, built on Microsoft Dynamics 365 Supply Chain Management. Learn how Microsoft and Annata can accelerate your digital transformation.
Collaboration on Microsoft 365: 6-Week Implementation: Available only in Japanese, Hitachi will deliver information sharing, document management, collaborative content creation, video conference, and real-time communication through cloud services built on Microsoft 365.
Complete MXDR Powered by Microsoft Sentinel: KiZAN will help you rapidly improve your security posture and protect against cybersecurity threats by implementing and continuously monitoring, detecting, and responding to security incidents by using Microsoft Sentinel, Microsoft 365 Defender, and Microsoft Defender for Cloud.
Data & Analytics: Using a mesh concept, Concurrency will help you define a modern data framework, understand priority initiatives, and accelerate data outcomes with an accessible and governed data estate built on Microsoft Power BI.
Databricks on Azure: 1-Week Training: DEX Consulting will show you how to use Microsoft Azure Databricks for data cleaning, processing, and workflows. The session covers how to use Databricks for collaboration on Microsoft 365 and integration with the Microsoft Power Platform.
Databricks on Azure: 4-Week Assessment: DEX Consulting will analyze your current data environment and identify how you can use Microsoft Azure Databricks to improve your data cleaning, processing, and workflows. This session covers options to improve existing Databricks instances or migrate to a new system.
Databricks on Azure: 4-Week Implementation: DEX Consulting will implement Microsoft Azure Databricks according to your needs. This offer includes analysis of current data systems, design and construction of functional workflows, integration, testing, go-live support, and maintenance.
Digital Workspace Provisioning – Setup Consult: Ascend Technologies will help you simplify user setup and onboarding, improve security, and maintain Windows consistency throughout your organization by implementing its Zero-Touch Laptop Provisioning.
DX Human Resources Development: 1-Month Training: Available only in Japanese, Fixer’s DX Small Starter Kit is an intensive training service for human resources developers. Learn how citizen developers can use the Microsoft Power Platform to further human resources strategy.
Dynamics 365 Customer Service: 3-Month Implementation: AW will optimize your business processes by implementing Microsoft Dynamics 365 Customer Service. This offer includes project planning, analysis of your requirements, dedicated training, and more available in Spanish.
GDPR Data Anonymization Function: MS POS Poland will implement its solution, built on the Microsoft Power Platform and Dynamics 365, to ensure that your company is compliant with the GDPR right to be forgotten. The solution enables data obfuscation and anonymization.
Google Workspace to Microsoft 365: Migration: Vistas Cloud will migrate your emails, contacts, calendars, and documents from Google Workspace (formerly G-Suite) to Microsoft 365. This offer includes Microsoft 365 configuration, administrator training, and post-migration support.
Intelligent Migration to Microsoft 365: Innovative Driven’s Intelligent Migration services help you realize a modern, secure, and collaborative solution built on Microsoft 365. Migrate your file share content to Microsoft 365 and gain greater insights into your data while lowering risk.
KPMG Employee Experience Enabled by Microsoft Viva: Drawing on its experience with customer relationship management and consulting, KPMG will design and implement an employee experience solution on Microsoft Viva that incorporates key elements from Microsoft 365 to increase employee productivity.
Live Chat and Bot Services on Dynamics 365: 5-Day Implementation: Adastra will review your current environment including integrations, customizations, and business processes, then configure live chat and bot services on Microsoft Dynamics 365 Customer Service.
Microsoft Viva Connections: 6-Week Implementation: Persistent will build a one-stop employee gateway on Microsoft Viva Connections to enhance your employee engagement, improve communications, foster meaningful relationships, and make accessible relevant communications, communities, and tools.
OpenAI and the Power Platform: 1-Week Training: Designed for people who lack extensive experience with artificial intelligence (AI), DEX Consulting’s training will show you how to use the Microsoft Power Platform, Azure AI services, and OpenAI models together.
OpenAI and the Power Platform: 4-Week Assessment: DEX Consulting will analyze your current environment, design a solution, and deliver an execution plan to enhance your organization’s processes through the addition of artificial intelligence (AI) capabilities combined with the Microsoft Power Platform and OpenAI.
Res@Place: 2-Week Pilot: Neos-SDI will implement Res@Place, its solution built on the Microsoft Power Platform to manage office space reservations and contact tracing. This solution is available only in French.
SSC Endpoint Management with Security Workshop: SCC will help you understand how Microsoft 365 E3, Microsoft Intune, and Microsoft Defender for Endpoint can manage and secure user devices, apps, and identities.
Teams Voice: Implementation: Connection will help you replace your legacy PBX system with Microsoft Teams Voice. This offer includes a network readiness assessment, phone system design, number porting, feature configuration, and more.
UNITE: Secure Core_: Implementation: Infinity Group will implement its UNITE: Secure Core_ to simplify management of your security infrastructure via Microsoft Defender for Business. Get proactive monitoring, updates, and protection for your business identities, applications, devices, and data.
Viva Employee Experience 1-Hour Workshop: NewTech will show you how Microsoft Viva apps can increase employee communication and engagement, align organizational areas, and grow employee skills. You will also learn about what already is included in your current Microsoft 365 license.
AppSource is continually expanding the library of line-of-business apps that work with Microsoft products and technologies. Be sure to check out thefull app libraryto see how Microsoft’s partner ecosystem is working to support businesses across industries and regions.
Agile Marketing Analytics – Power BI Dashboards: Agile Analytics’ marketing dashboards provide an instant solution to your data analysis needs, enabling you to convert mass amounts of data into actionable insights that help you better understand your overall performance and make better-informed business decisions.
Aptean Accelerate Bundle Beverage Drink-IT edition – Manufacturing: Designed to help alcoholic beverage manufacturers streamline business, Drink-IT for Microsoft Dynamics 365 Business Central addresses unique industry challenges, including tax management, sales and purchase conditions, and event management.
Aptean Accelerate Bundle Beverage Drink-IT edition – Wholesale and Distribution: Designed to help alcoholic wholesalers and distributors streamline business, Drink-IT for Microsoft Dynamics 365 Business Central addresses industry challenges, including tax management, sales and purchase conditions, and alcohol balance.
Aptean Advanced Check Management for Food and Beverage: Aptean Advanced Check Management extends the check printing features in Microsoft Dynamics 365 Business Central, increasing the productivity of accounts payable personnel and enabling you to apply brand imagery and signatures.
Aptean Claims for Food and Beverage: Aptean Claims for Food and Beverage helps you manage sales and purchasing processes more efficiently, enabling you to easily create and manage return orders and credit memos for sales and purchasing without leaving Microsoft Dynamics 365 Business Central.
B2F Consignment Management: Available in Turkish and English, B2F Consignment Management for Microsoft Dynamics 365 Business Central helps you manage the sales of products you receive on consignment from suppliers or that you sell on consignment to customers.
bossPayment LSV: The LSV extension for Microsoft Dynamics 365 Business Central enables you to use bossPayment to create a direct debit file in the PAIN.008 format of the ISO20022 standard, automating and simplifying the process of collecting outstanding invoices. This application is available only in German.
CBS SIFO Leasing: Cloud Business Solutions SIFO Leasing automates the routine processes of sending collection notices and mass messaging for marketing, integrates with banks for online payments, and includes virtual office tools for customers. This application is available only in Spanish.
COSMO Process Manufacturing Pack: COSMO Process Manufacturing Pack is an industry software bundle for Microsoft Dynamics 365 Business Central that makes it easier to develop, produce, and track process-manufactured products.
DocSolutions for MES: DocSolutions for MES connects your ERP system to your content management system, enabling you to store, organize, and share your documents and manufacturing execution systems (MES) files in Microsoft Dynamics 365 Business Central.
Easy Item Tracking: Easy Item Tracking lets you edit and view item tracking lot/serial numbers and expiration dates in Microsoft Dynamics 365 Business Central documents, journal lines, and item reclassification journals, allowing you to better manage inventory levels, track stock movement. and reduce errors.
Elfsquad CPQ for Power BI: Elfsquad’s application connects your Elfsquad Management System data to Microsoft Power BI using an OData connection, enabling you to dive into your manufacturing data and extract valuable insights and trends.
eloomi Learning Management System: Anchored in simplicity and continuous innovation, eloomi is a modern learning experience solution designed to help you streamline your onboarding, upskill and reskill your talent pool, manage compliance, and drive true people development.
EV Fashion Intercompany: Tired of complex intercompany setups? EV Fashion Intercompany for Microsoft Dynamics 365 Business Central makes managing activities across interconnected companies easier than ever. This application is available in Danish and English.
Exobe Device Insight: Designed for Microsoft Intune users, Exobe’s report for Microsoft Power BI provides insights into device compliance and encryption across your organization so that you can quickly identify areas of concern and act as needed.
Flex DocFinance Connector: Connect the Flex Finance and Flex Starter apps with DocFinance and Microsoft Dynamics 365 Business Central to allow the exchange of data necessary for the management of treasury and main banking operations. This application is available in Italian.
Flex EI: Flex El from Divimast enables organizations to manage Italian electronic invoicing through Microsoft Dynamics 365 Business Central. This application is available in Italian.
Flex Finance: Ideal for general ledger management, Flex Finance complements the standard functionalities of Microsoft Dynamics 365 Business Central and is integrated with leading treasury software and corporate banking services such as DocFinance. This application is available in Italian.
FLYX Digital Loyalty: FLYX is an API-based solution that empowers businesses with the speed and flexibility needed to increase customer loyalty and drive traffic to stores. Build creative, personalized digital loyalty experiences that meet your customers’ expectations.
Item Import Tool: Apply IT Clad’s template when you create an item in Microsoft Dynamics 365 Business Central to ensure the proper item type, category code, replenishment system, base unit of measure, and other important fields are populated correctly.
ModeXpress Integration: Supported in Belgium and the Netherlands ModeXpress Integration for Microsoft Dynamics 365 Business Central helps you manage shipments and receipts, delivering full control and visibility over your logistics to ensure reliable delivery of products and efficient management of incoming stock.
Mrkt Point of Sale: Whether you’re a mobile or fixed retailer, small business owner, or part of a large corporation, the MRKT point of sale solution provides seamless integration and automation to streamline workflows and boost performance.
Multi-Entity Management: Multi-Entity Management for Microsoft Dynamics 365 Business Central centralizes and automates the processing of purchase orders, receipts, payroll, invoices, and more to maintain data integrity and reduce the potential for human error.
Ongoing WMS Connector: Connect Ongoing WMS to Microsoft Dynamics 365 Business Central via the Golden EDI Integration Platform to increase efficiency in your warehouse or outsource the warehousing to one of the third-party logistics providers using Ongoing WMS.
Packing List: Designed to help you manage packing lists used for shipping and receiving, the Packing List add-on for Microsoft Dynamics 365 Business Central extends item cards with packing list information and enables you to assign lists to customers and vendors.
Powerblox Lifecycle Management: Powerblox Lifecycle Management helps you manage the lifecycle of your items, customers, and vendors in Microsoft Dynamics 365 Business Central. Prevent the production, transfer, and ordering of discontinued items, prevent purchases from certain vendors, and more.
Powerblox Warehouse Scanning: Powerblox Warehouse Scanning for Microsoft Dynamics 365 Business Central enables you to register all your warehouse transactions on a mobile scanner. Automate your warehouse operations, define which users can perform which tasks, and more.
Purchase Requisition: The Purchase Requisition extension helps automate the procurement request process that flows from different functions of an organization to the procurement department by sending all users’ procurement requests through Microsoft Dynamics 365 Business Central.
QE Approval Workflow: QE Approval Workflow facilitates and streamlines the workflow approval process in Microsoft Dynamics 365 Business Central, automating manual processes and reducing the time and errors associated with manual approvals. This application is available in Spanish.
QE Factura E: QE Factura E for Microsoft Dynamics 365 Business Central facilitates issuing, sending, and managing electronic invoices in accordance with the standards and requirements established by local tax authorities. This application is available in Spanish.
Sales Cockpit for Dynamics 365 Business Central: Sales Cockpit is a Microsoft Power BI application that offers a comprehensive view of posted sales transactions, sales orders, and simple receivables transactions in Microsoft Dynamics 365 Business Central.
Simulated GL for Bonus: The EOS Simulated GL for Bonus app enables you to calculate the amounts of bonuses to be paid to your customers or recognized by your vendors, manage a periodic bonus forecast, and more in Microsoft Dynamics 365 Business Central.
VirtlX 360-degree Employee Engagement Platform: Ditch the spreadsheets and gain unique insights into employee engagement, satisfaction, and well-being while transforming your employee value proposition with VirtlX’s all-in-one management platform built for Microsoft Dynamics 365.
Zoho Expense: Zoho Expense automates travel and expense management for your business, enabling you to securely store digital receipts, streamline approvals, accelerate reimbursement, simplify accounting, and more for all aspects of corporate travel.
Zoho Inventory: Zoho Inventory is a powerful, easy-to-use inventory and order management solution that helps businesses of all sizes to meet their end-to-end inventory management needs. Keep track of inventory, manage orders, track shipments, and control warehouses from a single interface.
Zoho Subscriptions: Zoho Subscriptions is cloud-based subscription management solution crafted to help your growing business handle all the busy work that comes with subscription billing so you can focus on growing your business.
Go further with workshops, proofs of concept, and implementations
AddPro SOC with XDR: Gain proactive security with reports and recommendations, customized automation, around-the-clock incident response, and more by adding AddPro SOC to your organization’s Microsoft Sentinel deployment.
Adoption and Change Management: 1-Day Workshop: Tailored to your organization’s needs, Covenant Technology Partners’ workshop focuses on how to successfully deliver business results with Microsoft 365. Deliverables include customized, actionable recommendations you can follow to support your adoption journey.
ApproveIt 365: 2-Hour Implementation: IDYN will quickly implement ApproveIT 365, a cloud-based integration solution that integrates e-signing into Microsoft Dynamics 365 Business Central using DocuSign. Send quotes to customers from Business Central and let them safely e-sign via DocuSign.
Avanade AWS Connect Accelerator: 3-Week Implementation: Avanade’s AWS Connect Accelerator simplifies the integration of Amazon Connect’s contact center suite with the customer service workspace and omnichannel capabilities of Microsoft Dynamics 365 Customer Service.
Better Be Secured by adista: Available only in French, adista’s offering will help secure your Microsoft 365 tenant by implementing a zero-trust strategy using Azure Active Directory conditional access, Microsoft Defender for Office 365, Microsoft Intune, and other Microsoft security tools and services.
Celsior Business Intelligence Fast Start: 1-Hour Workshop: Accelerate data-driven decisions with actionable insights delivered quickly and cost effectively via Celsior’s customizable dashboard templates for Microsoft Power BI. Unleash the power of your data to gain a competitive edge.
ConnectIT 365: 4-Hour Implementation: Learn how you can gain more control over how your data is processed and formatted with IDYN’s ConnectIT 365, a cloud-based integration solution that can be used as a toolkit for imports and exports in Microsoft Dynamics 365 Business Central.
Custom Application with Power Apps and Power Automate: 1-Month Implementation: Prolifics will provide a low-code solution for small businesses seeking to streamline operations and improve efficiency, using Microsoft Power Platform to automate processes and eliminate the complexities of traditional custom development.
Cyber Protection Pack for Microsoft 365: Acquiring the necessary skills, experience, and processes to optimize security services can be a daunting task. Global Micro Solutions aims to enhance your overall Microsoft security score, enabling you to make the most out of your Microsoft 365 investment.
DEX AI Solution for Power Platform and OpenAI: 4-Week Implementation: DEX Consulting will implement its DEX AI solution, integrating Microsoft Power Platform and Azure OpenAI to provide a conversational AI system that can be used with in-house data in as little as 10 minutes.
Direct Banking: 4-Hour Implementation: IDYN’s Direct Banking is designed to optimize your banking processes in Microsoft Dynamics 365 Business Central. Eliminate manual bank reconciliations; import bank accounts, statements, and transactions directly from Ponto or Cobase Bank Connector; and more.
Dynamics 365: 4- to 6-Week Custom Implementation: Definity First’s custom implementation of Microsoft Dynamics 365 provides a personalized solution that includes data migration, contact and opportunity configuration, custom Microsoft Power BI reporting, and technical training.
Dynamics 365 Business Central: 1-Day Implementation: Automate processes and streamline your business with Microsoft Dynamics 365 Business Central implementation services from Goom Spain. This offer is adaptable to companies of all sizes across business sectors.
Dynamics 365 Business Central Admin Training: 1-Day Workshop: Gain comprehensive insight into the administration of Microsoft Dynamics 365 Business Central in this workshop from Business Systemhaus. Topics include roles, rights, profiles, apps, and add-ons. This offer is available in German.
Dynamics 365 Business Central for Distribution: 8-Week Implementation: TEXO’s implementation is designed for customers requiring just the core financial and distribution modules in Microsoft Dynamics 365 Business Central. This service does not include third-party integrations or customizations.
Dynamics 365 Business Central for Distribution: 12-Week Implementation: Ideal for companies with one to two warehouses and 10 or fewer users, TEXO’s 12-week implementation of Microsoft Dynamics 365 Business Central will automate and streamline your processes and help you manage your business.
Dynamics 365 for Sales: 1-Day Workshop: Exigo Tech’s offer includes an assessment of your sales practices, identification of key pain points, and development of a Microsoft Dynamics 365 Sales solution to address them. Help your sales teams achieve growth targets, generate leads, increase account value, and win customers.
Dynamics 365 Quick Startup: 2- to 3-Week Implementation: Definity First’s team of experts will evaluate your business needs and create a lightly customized Microsoft Dynamics 365 solution that addresses your requirements while keeping implementation time and cost to a minimum.
Infosys Modern Identity and Access Solution with Microsoft Entra: Infosys will empower your organization to provide secure access to everything by delivering identity and access management, cloud infrastructure management, and identity verification using Microsoft Entra.
Managed Windows Workstations: 6-Week Implementation: Today’s business challenges need modern solutions. Global Micro Solutions offers a combined hardware and software solution designed to secure your remote workforce and streamline management and device deployment for Microsoft Windows workstations.
Mergers, Acquisitions, and Divestitures: 5-Month Implementation: Integrating IT systems between organizations can incur significant costs and introduce technical challenges. Cyclotron helps organizations overcome these challenges using Microsoft 365, Microsoft Azure, and third-party migration tools.
Microsoft 365 Keep On Track Advisor Services: Available from Advania Finland, Microsoft 365 Keep on Track Advisor Services help you discover and prioritize Microsoft 365 cloud changes, adapt the end-user experience to changes in the technical environment, and more.
Microsoft 365 Managed Service: Advania Finland’s team will manage your Microsoft 365 environment on your behalf, implementing best practices and ensuring the environment is secured and up to date so your teams can stay connected and productive.
Microsoft Defender for Endpoint: 10-Day Implementation: IT Partner’s implementation of Microsoft Defender for Endpoint provides advanced endpoint security and threat protection to help organizations detect, investigate, and respond to attacks and security breaches at their endpoints.
Microsoft Dynamics 365 Migration: 4- to 6-Week Implementation: Definity First will meet with your team to gain insights into your business objectives, analyze your IT landscape, provide insights into the licensing and costs, and migrate your organization to Dynamics 365.
Microsoft Teams: 4-Week Implementation: Offering a range of solution development and integration options to meet your business requirements, Cloud Cover IT’s engagement will guide you through the process of designing, deploying, and developing custom Teams solutions.
Microsoft Teams Envisioning and Design: 4-Day Workshop: Cloud Cover IT’s immersive workshop will equip you with the knowledge and strategies needed to unleash the full potential of Microsoft Teams in your organization and improve collaboration, communication, and productivity.
Microsoft Viva: 8-Hour Workshop: Centric will introduce you to Microsoft Viva, the digital platform that brings employee insights, communications, knowledge and training, goals, and engagement under one roof to help organizations create a thriving culture with engaged employees and inspiring leaders.
Power Platform Admin and Governance CoE Starter Kit: 4-Week Implementation: Designed to elevate your Microsoft Power Platform adoption maturity and ensure efficient and controlled growth, FPT’s CoE Starter Kit will help you develop a strategy for managing, monitoring, and adopting Power Platform at scale.
ShipIT 365: 1-Day Implementation: IDYN’s implementation of ShipIT 365 for Microsoft Dynamics 365 Business Central enables you to book and print shipments with your preferred carrier, track and trace your shipments with real-time updates, and enjoy a low cost of ownership with no vendor lock-in.
ShipIT 365: 4-Hour Consultation: IDYN offers consulting services for ShipIT 365, a cloud-based integration solution that helps businesses ship orders with over 1000 carriers using Microsoft Dynamics 365 Business Central. Save time and money on shipping, get real-time visibility into shipments, and more with ShipIT 365.
Viva Connections Essentials Package: 5-Week Implementation: FRONTIS will work with you to explore use cases that address your business needs, then jump-start Microsoft Viva Connections usage by setting up dashboards, news feeds, and resources to help you transform the employee experience and achieve results.
Viva Connections Starter Package: 2-Week Exploration Workshop: FRONTIS offers an exploration workshop to help you understand the benefits of Microsoft Viva Connections, a personalized destination for employees to discover the relevant news, conversations, and tools needed to excel in their daily work.
Viva Goals: 4-Week Implementation: Elevate your objectives and key results (OKR) writing and achieve business objectives faster with Freedom Systems’ implementation of Microsoft Viva Goals. This offer includes training in effective OKR writing that aligns with your strategic priorities.
Viva Goals Adoption and OKR Writing Service: 2-Week Implementation: Freedom Systems’ engagement will help you communicate the concept and benefits of OKRs to secure buy-in from senior executives, assess your goal-setting practices, design a tailored OKR framework, and deploy Microsoft Viva Goals.
Viva Goals Business Transformation: 3-Month Implementation: Optimize your organization’s goal-setting processes, take your OKR writing to the next level, and achieve success faster with Freedom Systems’ tailored implementation of Microsoft Viva Goals.
AppSource is continually expanding the library of line-of-business apps that work with Microsoft products and technologies. Be sure to check out thefull app libraryto see how Microsoft’s partner ecosystem is working to support businesses across industries and regions.
This article is contributed. See the original author and article here.
Like this blog, the Sync Up Podcast is a one-stop shop for learning all about the latest and greatest features of OneDrive. Hosted by myself (Stephen Rice) and Arvind Mishra, each episode aims to shed light on how OneDrive connects you to your files, helps you share and collaborate anywhere and works seamlessly across your devices. We also strive to give you a behind the scenes look at how we build OneDrive and what might be coming down the path!
Subscribe to Sync Up on Apple, Spotify or your favorite podcast app!
If you haven’t listened or aren’t subscribed, here are a few of the latest episodes!
Behind the Blue – OneDrive’s New Design – August 2, 2023
The new OneDrive Design is on its way! On this episode of Sync Up, Stephen Rice and Arvind Mishra discuss the colors, rounded corners and nuances of OneDrive’s new look with expert designers Christopher Wymer and Lyndsey Gill! They walk through the inspirations, challenges and magic that went into bringing this new, refreshed OneDrive to your screens!
Jason Moore, former host of the Sync Up podcast, is back for a special bonus episode on the past, present and future of OneDrive! Join Stephen Rice and Arvind Mishra as they talk with Jason Moore about OneDrive’s history, as it grew from just an idea to a beta of 5000 users to the massive service that it is today! They talk about the early days of SkyDrive, how the product evolved over time and how it will continue evolve into the future! Stick around to the end for a sneak peak at Jason Moore’s hit song about OneDrive!
OneDrive is getting a new home! Join Stephen Rice and Arvind Mishra as they go behind the scenes of the latest OneDrive features in the Sync Up podcast. They talk with the experts and designers for three great features that are coming in the next two months! First, Lesha Bhansali lifts the veil on the new OneDrive Home, People View and Meeting Views that are designed to get you to your files as fast as possible. Second, Ihcene Cheriet will talk about the new, simplified Share Dialog that makes sharing easier than ever, and the new Manage Access experience which helps you stay in control of your content!
The Sync Up Podcast is back! Stephen Rice and Arvind Mishra have brought the Sync Up podcast back from the brink to give you the best insights into the OneDrive product! This month, we talk about all the amazing features we announced at the Microsoft 365 Collaboration Conference with Product Managers Irfan Shahdad and Miceile Barret! We talk about OneDrive Home, simplified sharing, colored folders (YES!), people and meeting views, new filters, and whether popcorn is better than M&M’s for movie snacks.
About the hosts
Stephen Rice is a Principal Product Manger for the OneDrive team, where he has worked the past 9 years. He focuses on enabling collaboration across Microsoft 365, whether you are working with partners inside or outside of your organization! In his free time, Stephen enjoys playing games such as Magic: The Gathering and enjoying Star Wars, which he reviews on his other podcast, the Ion Cannon Podcast.
Arvind Mishra is a Principal Product Manager on the OneDrive team, where he’s worked for the past 1.75 years. Prior to Microsoft he worked at several consumer subscription startups, and way before that, he worked at Microsoft, as a Product Manager supporting the User Experience scenarios in Windows, including Search and Organization. Now that he’s back at Microsoft, he’s working on, surprise: consumer subscriptions, supporting OneDrive’s efforts to help customers ensure all their important stuff is safely backed up to the cloud. In his spare time, he also enjoys all things Star Wars, and playing not enough video games.
This article is contributed. See the original author and article here.
Manufacturers worldwide are investing heavily in digital transformation, overhauling almost every aspect of their operations and business models. But one key group—frontline workers —are still awaiting their digital renaissance.
Today, many organizations feel their workers are not empowered or digitally well-equipped. Manufacturers struggle with high turnover and the challenge of training and upskilling new workers. Downtime and worker productivity remain nearly universal issues.
To help address these issues, Microsoft is investing in frontline worker enablement across a broad range of technologies. This includes new solutions to help frontline workers deliver exceptional service with next-generation AI, as well as on our ongoing investment in mixed reality hardware and solutions. Microsoft Dynamics 365 Guides cultivates collaborative environments where people put knowledge into action. Here are three ways mixed reality is addressing frontline worker training, support, and knowledge transfer across industries:
1. Resolve issues quickly with remote support and collaboration
Unplanned downtime is costly. The average manufacturer confronts over 800 hours of equipment downtime a year, or 15 hours per week. Industrial manufacturers consequently spend almost USD50 billion on downtime every year.1 In these high-pressure situations, communication across functions can either speed resolution or create blockers to forward progress.
Historically, manufacturing environments fostered knowledge silos with valuable insights confined to individuals, groups, or departments. Mixed reality shifts this dynamic. Workers can share real-time, situational video of their environment, allowing others to experience it firsthand—regardless of location. Expert guidance, troubleshooting, or step-by-step instructions are immediate. This eliminates the need to travel, while minimizing downtime and production disruptions.
Gone are the days where access to experts, communication barriers, or information silos dictate how knowledge is shared or when assets are repaired. Working on assembly or service lines requires specialized skills and expertise. Access to individuals with the relevant, hands-on experience, however, is not always possible. With Dynamics 365 Guides, when specialized skills are required, experts are a Microsoft Teams call away.
Together, Dynamics 365 Guides and Microsoft Dynamics 365 Remote Assist with Teams connect workers beyond their physical limits. A communication hub, Teams enables collaboration across the workforce. Its integration with Dynamics 365 Guides allows workers to extend this to the physical world on any device.
2. Accelerate training with information in context
Frontline workers are the backbone of industry operations. These roles demand technical savvy, quick decision-making, and resiliency. Traditional in-place training and onboarding processes are often ineffective or add to the cognitive burden of overwhelmed frontline workers.
Hands-on training with physical assets is expensive, time-consuming, and at times dangerous. Inconsistent quality or impersonal training is often the result. However, holographic environments can mitigate these on-ramping risks. Embracing mixed reality accelerates learning by introducing relevant, task-specific knowledge in new immersive and data rich environments.
Using 3D models and digital twins, frontline workers receive a better understanding of the machines and processes at hand. Related materials are retrieved or amended instantly, nurturing knowledge exchange, which is further enhanced by AI. Mixed reality is the eyes and ears of AI. Delving into operation nuances for personalized, in-depth learning becomes easier. When integrated, mixed reality and AI accelerate worker training, shortening steps and supplying users with the working knowledge they need for the task at hand.
With Dynamics 365 Guides frontline and service workers can start accelerating their role-based knowledge today. Workers receive purpose-built, interactive guidance on complex machinery, assembly protocols, or maintenance steps when and where they need it.
3. Ensure transfer of information, insights, and skills
As employees near retirement, their wealth of expertise needs to be captured and shared. These experts understand the assets and processes that keep production moving. Retaining and transferring that knowledge is vital. There’s just one problem: Manufacturing is experiencing a talent exodus. Globalization, unemployment, and a rapidly aging workforce together are compounding operational challenges. Organizations are rightfully concerned. One-third of manufacturing executives claim retaining and replacing high-performing employees as a strategic priority in 2023.2 Mixed reality is poised to help solve this by capturing information for informed decision-making and greater productivity.
Mixed reality facilitates knowledge retention and transfer across an organization through the creation of immersive experiences and simulations, regardless of location or device. The versatility of mixed reality makes up-skilling faster and more accessible. Dynamics 365 Guides offers industrial workers the opportunity to document unique situational processes and procedures not included in asset operating manuals. Step-by-step instructions, annotations, and “on the ground” insights are placed in context and immediately accessible throughout the day.
With Dynamics 365 Guides embedded in Microsoft Dynamics 365 Field Service mobile, mixed reality is democratized for every worker. Organizations now have asset, maintenance, and service information at their fingertips. This combination in one app improves worker accuracy, productivity, and efficiency—while offering powerful guidance on the device at hand.
Realize your future manufacturing potential
Mixed reality is a key part of an emerging technology category known as the industrial metaverse. Its foundational cross-platform technologies—including AI, cloud to edge, digital twins, machine learning, and mixed reality—are shifting our relationship with data from stationary to dynamic experiences.
Mixed reality is an essential glue that visualizes the diverse elements of the industrial metaverse. Seamlessly integrating the physical and digital, mixed reality creates immersive experiences that transcend traditional industrial operations. Guides overlays information atop real-world assets and scenarios, making knowledge available in context where it is needed most.
Prepare your workforce for their smart manufacturing future with mixed reality. Learn how Dynamics 365 Guides can help realize tangible business outcomes.
Dynamics 365 Guides
Optimize operations and solve problems in real-time with holographic guidance.

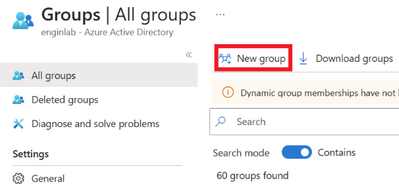


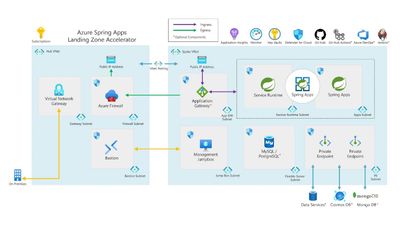


Recent Comments