E-Documents as a Global Solution for Business Central
This article is contributed. See the original author and article here.
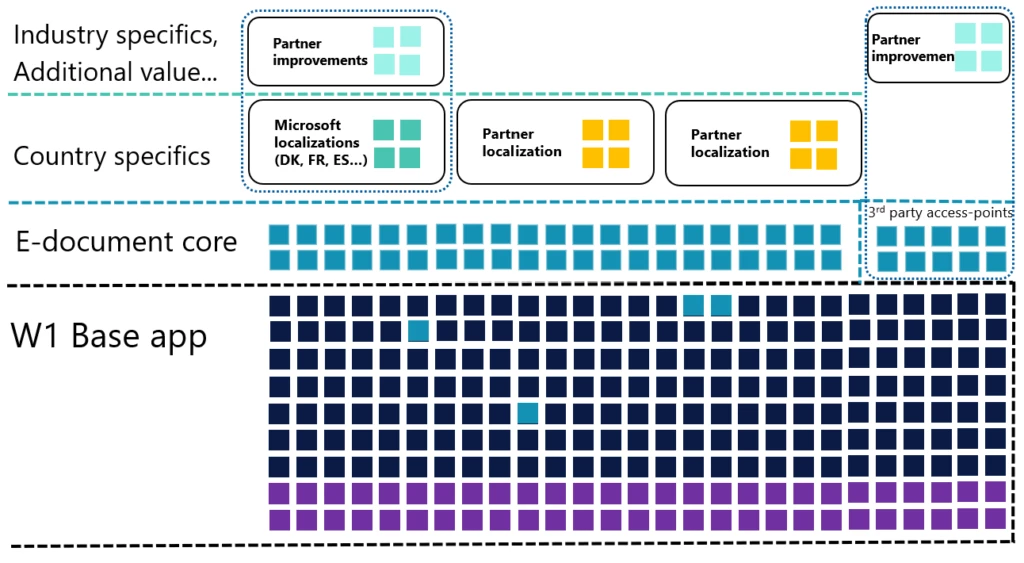
Business Central 2023 release wave 2 introduces a new global feature – Electronic Documents. Microsoft has crafted this as a foundational framework, providing a robust base for catering to localized requirements. This innovative approach allows Microsoft to efficiently deliver tailored localization apps for some countries. Furthermore, partners can leverage this model to craft their custom localizations. Given the unique e-document formats and distinct integration services prevalent in various countries, these localization apps are indispensable.
Why did Microsoft deliver it?
Before we delve into the world of E-Documents within Business Central, let’s acquaint you with an important new acronym – CTC, which stands for Continuous Transaction Control. This term signifies the imperative ‘real-time’ invoicing reporting and validation mandated by authorities. CTC encompasses a suite of digital control mechanisms to enhance tax collection and curb tax fraud. Electronic Invoicing stands as a key component of CTC, a model increasingly embraced by numerous countries.
We can easily conclude – this approach will become mandatory in many countries if it hasn’t already. The prospect of different solutions for each country poses challenges. Hence, we’ve developed one global extendable solution as an app, simplifying support for diverse countries.
Exploring the Scope of E-Invoicing Models
Understanding the landscape of E-invoicing can initially seem straightforward – creating an electronic file and transmitting it. However, the reality is more intricate. E-invoicing encompasses various models, including the 2-corner, 3-corner, and 4-corner frameworks. Each country retains autonomy to determine its preferred approach. Moreover, even in non-mandatory scenarios, businesses often opt for E-invoicing to streamline communication.
Our solution encompasses all the corner models mentioned here and facilitates additional messaging capabilities between access points, providing a comprehensive E-documents framework.

How do E-Documents Operate in Sales and Purchases?
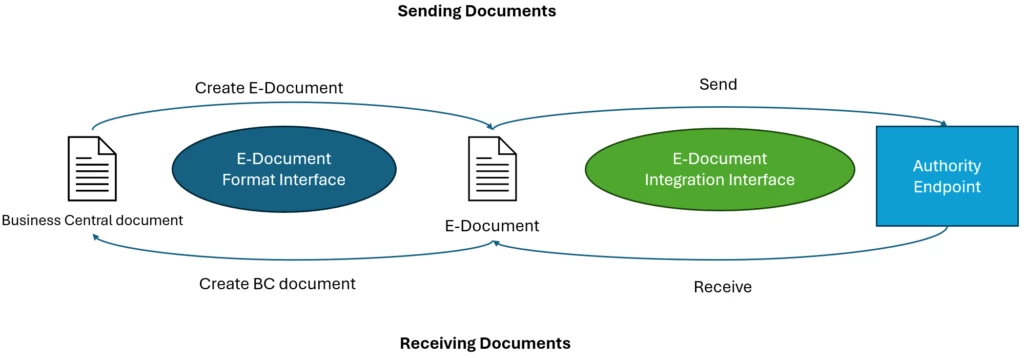
E-Documents in Business Central facilitate seamless interaction in both sales and purchase processes. It’s a two-way system, enabling the transmission of electronic sales documents to customers while also receiving electronic documents from vendors. These electronic documents have their own distinct lifecycles, which may not always align with invoice timelines. To accommodate this, we’ve introduced a new entity, the E-Document, linked with the original document in Business Central. This entity hosts a unique information set, including statuses, logs, and potential error notifications or warnings.
Once the system is configured, posting a sales document triggers the automatic creation of an E-Document. Depending on your setup, it’s promptly dispatched to the designated service. You gain complete visibility into its status and can take additional actions as needed.
In the case of incoming purchase electronic documents, you have the flexibility to upload them to Business Central manually. However, if your access-point provider provides a document delivery service, you can configure a Job Queue for automated downloads and E-Documents creation. Here’s the magic: if you’ve mapped vendors’ items with yours through item-references or G/L accounts and there are no errors, the system will effortlessly generate purchase invoices with all the essential details. Your task? Just review and post them.
How to Expand This Functionality?
This framework has been created to speed up your productivity when building electronic invoicing applications by taking care of all the infrastructure work, like subscribing to different posting routines, writing custom mapping logic, logging, error handling, and running jobs in the background.
The framework is designed to improve your productivity in developing electronic invoicing applications. It handles essential infrastructure tasks such as subscribing to various posting routines, custom mapping logic, managing logs, handling errors, and running background jobs. This empowers you to direct your attention towards the specific electronic invoicing logic, including:
- Exporting/Importing documents from Business Central to the local format mandated by the authority.
- Establishing seamless integration with the authority’s endpoint for sending and receiving electronic documents.
To create your local E-Document:
- Create a new extension adding dependency to the E-Document Core application.
- Implement a document interface based on the specification mandated by the local authority, using designated endpoints for the sales: Check, Create, and CreateBatch, and GetBasicInfo and PrepareDocument when you expect to receive documents.
- Implement an integration interface to send/receive documents to the local authority automatically.
- Enhance user experience by implementing a setup wizard that gathers all necessary configuration details and obtains customer consent for data transmission. This streamlined process ensures a smoother onboarding experience for users.
More details with examples how to extend existing E-Document Core application can be found here.
The post E-Documents as a Global Solution for Business Central appeared first on Microsoft Dynamics 365 Blog.
Brought to you by Dr. Ware, Microsoft Office 365 Silver Partner, Charleston SC.


.png")
.png")
.png")

Recent Comments